Playing Nice with Unity: Editor Customization
Tearing your hair out over that ugly little textfield that refuses to cooperate? This post provides an introductory overview of the options available for Inspector and Editor customization in Unity.

Note: This post was originally published on our studio's development blog. We're a small student team based in Ontario, Canada working on our first commercial project.
Can I please just delete one element in this godforsaken array without having to navigate eight bloody dropdowns, six unnamed text fields, and the 1989 Portuguese Census?
It’s happened to all Unity users at some point. You write a new script, attach it to an object, see it in the Inspector for the very first time, and recoil in disgust. Perhaps it’s the inability to name array elements, or the absence of constraints on one of your variables, a texture preview that’s just a bit too small, or - perish the thought - something’s alignment is off by a few pixels. The ensuing chaos is simply too much to bear. You close the editor, pour yourself a hot cup of chamomile tea, and swear you’ll never have to look at that script ever again. Two fields misaligning by three pixels, is, after all, an offense worthy of litigation in the eyes of your designer, artist, and/or public relations manager. Luckily, in your hour of need, the very editor you’ve cursed as the bane of your existence has had your back the entire time, and in your capable hands, the Unity Editor API shall save your team countless headaches.

Just try and remember to override the GetPropertyHeight function.
A word of caution before we move on - if you’re a pro-tier editor wizard yourself, this article may not be for you. While I’m a decently advanced programmer, I consider myself to be only intermediately experienced with the Editor API - this post is intended to help beginners know why and how they should go about learning the basics and implementing simple editor customizations in their own projects. And so, without further ado, let us delve into the realm of the editor.
What is editor scripting?
Broadly speaking, when I use the term “editor script”, I’m referring to any script that uses the Editor API to explicitly tell the Unity editor what to display, which UI elements to use, and which operations should be performed upon interacting with those UI elements. Examples of editor scripts I will discuss include PropertyAttributes, PropertyDrawers, CustomEditors, and EditorWindows. All of these scripts can be used to customize existing functionality or create new functionality within the Unity Editor at varying levels of scope.
When should I use my own editor scripts?
If you’re relatively new to Unity or working with the Inspector, there are a number of simple customizations for function and form alike that can be accomplished entirely without editor scripting. Unity has a number of built-in Attributes (check the sidebar of the docs for a full list) that function as a tagging system of sorts, allowing you to specify, among other things, script dependencies, Inspector headings, and the use of sliders or input restrictions for variables. Unless you’re looking to impart project-specific or relatively detailed functionality, using these tools can be a great way to tweak the Inspector to your needs without excessive overhead.
Eventually, your requirements will exceed the capabilities of these tweaks, and you'll write your very first custom editor. Then, your pixel-retentive self might realize that just about every script could use a few extra half-millimetres of layout padding, or perhaps your designer will cry for customized transform gizmos for every different type of enemy in the game. Here’s where you need to know when to pump the brakes - as with any programming job, there’s a trade-off of effort in versus increased productivity here, and it can be a challenging one to gauge.
Writing a new editor for every new MonoBehaviour is, generally speaking, a horrible idea - the default Inspector is there for a reason, and irrespective of its occasional quirkiness, it gets the job done efficiently for the vast majority of scripts, particularly simpler ones. My personal advice is to only use a custom script if you need an improvement of function, rather than form, and if you or someone on your team will be actively using that desired functionality on a semi-regular basis. This avoids both bloat in your codebase and wasted time, as not every little tweak will end up being worth it in the long run.
Writing Editor Scripts
Before delving into any editor scripts, you’ll likely want to familiarize yourself with Unity’s SerializedObject and SerializedProperty classes - these represent how the editor sees your objects, and are used for, among other things, identifying data fields, fetching array elements, and sending updated data back to the object. Luckily, apart from the things you’re actively customizing, Unity will automate the majority of tedious tasks like layout spacing and field display for primitive datatypes.
The type of script you’ll need to create depends entirely on the level of functionality you’re trying to implement. Here’s a quick guide to the technique you’ll most likely want to use, based on your needs:
Modifying UI for individual fields: PropertyDrawers
If you want to customize a certain type of datafield, then a PropertyDrawer is probably the way to go. PropertyDrawers are used to define the Inspector GUI for a specific type - commonly a custom data structure class found in multiple MonoBehaviours. Once the PropertyDrawer has been defined, all instances of that data structure will appear with the same customized Inspector layout, unless overridden. Let’s look at this with an example.
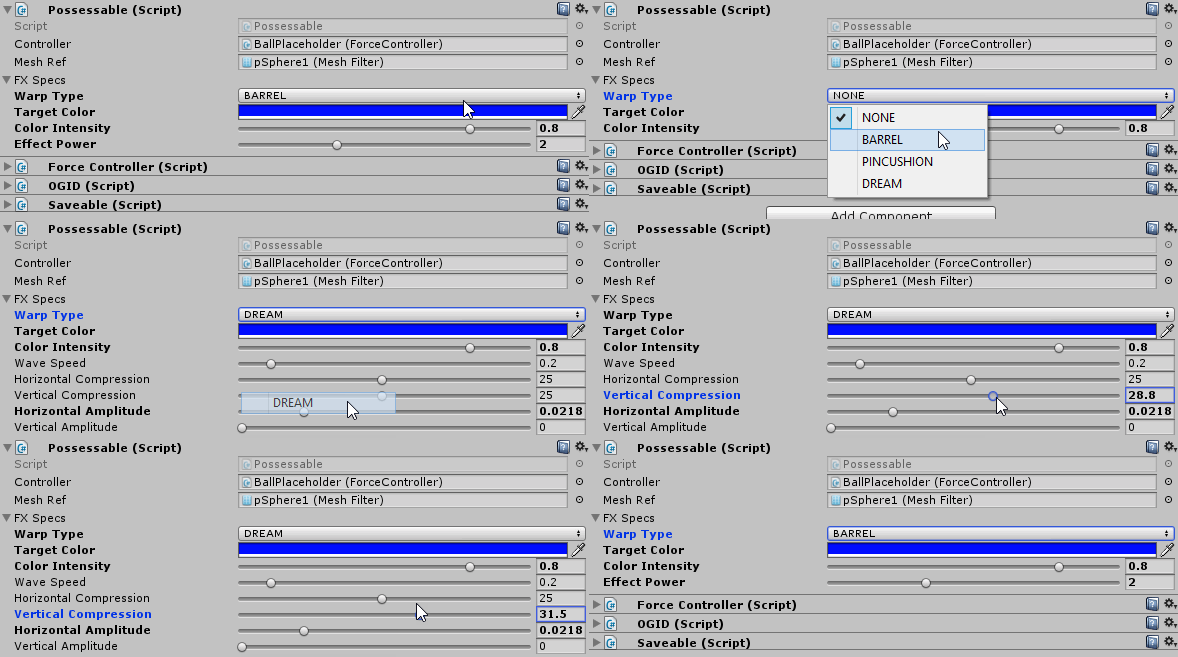
In Spirit, we want to use a few different post-processing effects depending on the object the player is currently controlling. Right now, this includes colourshifting and different types of image warping. I wanted to give our design team a quick way to edit these effects for each object, having context-sensitive fields that would display based on the effect type. Since this functionality was fairly self-contained, I wrapped the necessary fields in a utility data class, FXSpecs, and defined a PropertyDrawer for that data type:
[CustomPropertyDrawer(typeof(PossessionFX.FXSpecs))]
public class FXSpecsPropertyDrawer : PropertyDrawer
{
public override void OnGUI(Rect position, SerializedProperty property, GUIContent label)
{
//Here's where you define your GUI elements:
//Buttons, sliders, textfields, and so on.
}

public override float GetPropertyHeight(SerializedProperty property, GUIContent label)
{
//I keep track of the cumulative height of the panel by modifying a
//variable in OnGUI, which you can then return here.
return currentHeight;
}
}
The result is that any MonoBehaviour with an FXSpecs field will display our custom UI - meaning that we can pop effect data onto other types of behaviours, such as cutscenes or animations, without having to redefine the UI in each instance:

In this way, PropertyDrawers can be thought of as little custom editor modules that can be used to define the UI of individual data structures, rather than modifying the layout for entire script components. (If you do need to redefine the UI for an entire script, you’ll want to create a CustomEditor as outlined below.)
Selectively modifying field display: PropertyAttributes
Consider the following scenario: you have a class with a string field you’d like to mark read-only in the inspector for debugging purposes, while preventing accidental editing. While you’re at it, you’d like to be able to tag any field as read-only for any future applications. The solution - custom PropertyAttributes. In addition to Unity’s built-in attributes (e.g. Range, TextArea, Header), you can create your own. Generally speaking, you’ll need to create two scripts to define a new PropertyAttribute. First, what usually amounts to a shell class declaring your attribute keyword:
public class ReadOnlyPropertyAttribute : PropertyAttribute { }
You’ll define the Inspector behaviour for your attribute in a new PropertyDrawer script:
[CustomPropertyDrawer(typeof(ReadOnlyPropertyAttribute))]
public class ReadOnlyPropertyDrawer : PropertyDrawer
{
public override void OnGUI(Rect pos, SerializedProperty prop, GUIContent label)
{
pos.height = 16;
EditorGUI.LabelField(pos, label, new GUIContent(prop.stringValue));
}
}
Having done this, anything you tag with your attribute will implement the corresponding PropertyDrawer, leaving untagged fields untouched:

I like to think of this as a selective approach to PropertyDrawers - allowing you to choose which fields will implement your custom UI on a case-by-case basis. For certain applications - such as wanting to make some fields readonly, or restricting an input range - this makes much more sense than the broad-brush approach of defining a PropertyDrawer without an accompanying attribute. However, if you want all datafields of a certain type to function the same way in the Inspector, a PropertyDrawer alone is generally sufficient.
Custom Inspectors for certain script types: CustomEditors
A CustomEditor affords the highest level of customization on a per-script basis in the Inspector. This allows you to redefine the display and functionality of all of an object’s fields, as well as imparting any additional behaviours (for example, buttons that execute custom routines on the object). However, it should be noted that creating a CustomEditor is typically much more involved than creating a PropertyDrawer, particularly for scripts with complex datatypes or a large number of data fields. If the functionality you wish to customize can easily be wrapped in a small utility class independent of its parent, a PropertyDrawer may be the wiser choice.
For cases where your desired functionality cannot be accomplished through PropertyDrawers alone, the CustomEditor affords a diverse and powerful toolset for enhancing your script’s Inspector pane.
During the creation of our path animation utility, it quickly became apparent that the default Inspector simply wouldn’t do, for several reasons:
The default layout for arrays would make manually managing a list of waypoints excruciatingly time-consuming.
We wanted to be able to toggle things like curve shape and gizmo drawing from the Inspector with GUI buttons.
We wanted to manage adding and removing waypoints from the Inspector, rather than manually creating and deleting new Transforms and dragging them around into arrays.
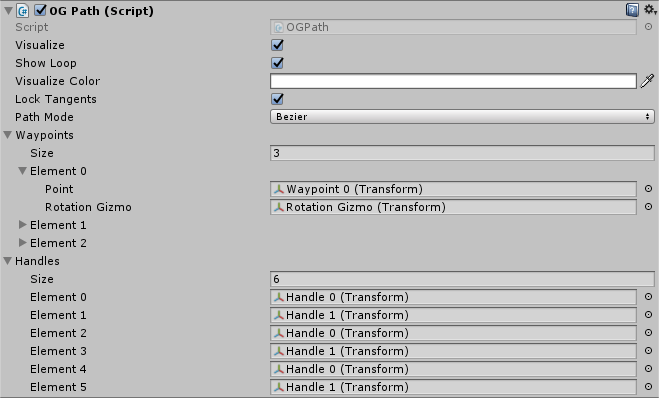
Here's an example of what the default Inspector for our utility would look like:

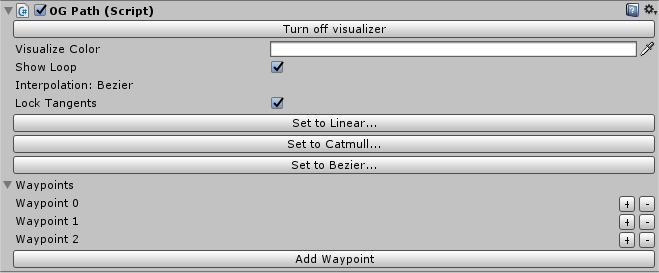
Since the functionality we wanted was fairly specific to our path utility, I opted to create a CustomEditor for the utility, adding new UI elements for the desired functionality, redefining the display of the waypoint list, and letting Unity handle the display of simple field types:
[CustomEditor(typeof(OGPath))]
public class PathEditor : Editor
{
public override void OnInspectorGUI()
{
//...With EditorGUILayout spacing is handled for you.
EditorGUILayout.PropertyField(visualizeColor);
EditorGUILayout.PropertyField(showLoop);
//...
if (GUILayout.Button("Set to Linear..."))
path.SetInterpolationMode(OGPath.PathMode.Linear);
//...Make sure you take care of all the fields you want
//to be exposed in the Inspector!
}
}
(Note: The EditorGUILayout class is invaluable here, as it can quickly automate layout tasks that are otherwise borderline agonizing to perfect.)
The result is something like this:

The beauty of this is that we can easily edit the functionality of the Inspector if our needs change later on, extending or modifying the behaviours we’ve defined to improve our custom UI.
Global functionality: EditorWindows
When you want to automate a task or expose some functionality pertaining to something other than an individual script - whether your whole application, an entire scene, or a collection of assets - you’ll want to look into EditorWindows. These are standalone panels of functionality that, once created, are accessible from Unity’s Window menu and allow you to create a UI for pretty much anything you can imagine - editing assets, performing operations on an entire level full of objects, resetting configuration files, testing procedural generation…
A simple EditorWindow is easy to create and permits the implementation of any global functionality (or local functionality, if you obtain handles through object fields or by searching the active scene). Let’s look at a simple example - an editor window that interfaces with a static file management class to provide a UI for wiping application data and save files (something that proves to be necessary rather frequently when iterating on your game’s file system, and becomes tedious when done manually). The script looks something like this:
public class SpiritAdminPanel : EditorWindow
{
//This tells Unity where to put your window in the menu.
[MenuItem("Window/Spirit Admin", false, 25)]
public static void ShowWindow()
{
SpiritAdminPanel window = GetWindow();
//Set up your window properties (size, title, etc.) here.
}

private void OnGUI()
{
if (GUILayout.Button("Reset all app data", buttonStyle))
//...And so on, define your UI here.
//GUILayout, like EditorGUILayout, allows for easier UI definition.
}
}
The resulting window is a simple panel with two buttons allowing us to wipe out our data as we please:

Any time you’re looking to automate some global process that occurs outside of runtime, an EditorWindow can be a great option that maximizes your ability to customize and perform these processes without needing to hard-code every change.
Moving forward with customization
If you’re relatively new to editor customization in Unity, you’ll probably be doing a lot of reading - much of the functionality of the Editor API, however useful, is not always immediately apparent. While follow-along tutorials on editor scripting do exist all over the web, they will rarely accomplish the exact functionality you’re looking for. The result is a lot of digging through documentation, forums, and experimenting on your own. This can be an arduous process, but ultimately, you’ll find that the process can be well worth the effort, as its workflow benefits are potentially immense.
Plus, you’ll finally be rid of those dastardly few pixels standing between you and perfect Feng Shui in the Inspector.
Read more about:
BlogsAbout the Author
You May Also Like


