

Daily news, dev blogs, and stories from Game Developer straight to your inbox
Sponsored By
Featured Blog | This community-written post highlights the best of what the game industry has to offer. Read more like it on the Game Developer Blogs or learn how to Submit Your Own Blog Post
Building a Scalable Online Game with Azure - Part 1
Getting started with cloud development can be overwhelming at first. In this blog series, I'm walking you through the basics of getting your gaming backend up and running in the cloud and storing your player data in a scalable cloud storage.
10 Min Read

Introduction
Today, almost every single game out there has got an online component: These range from sharing game progress across multiple devices, to tracking achievements and enabling social services, to implementing the whole game logic on the backend side for online multiplayer and cheat protection.
Thus, most games are made up of a frontend and a backend:
The frontend shows all the nice graphics and effects and processes user input. Frontends can be implemented for a variety of platforms, including classic Desktop PCs, mobile devices, web browsers and game consoles.
The backend can be as simple as a standalone executable running on some Linux machine and providing a public communication endpoint (i.e. IP address and port). However, most of today's gaming backends are far more complex (and most of them are just as mysterious and secret). The Steam backend allows to store savegames, unlock achievements and connect with friends. Most shooter games provide a master server, which allows players to run their own local servers and advertise these servers to their friends and other players. And some games even run their whole game logic in the backend. User input is processed on the client, and sent over the network. The backend verifies whether this input is legal, processes its impact on the game world, and sends the results to all connected clients.
All of these backends need to scale with the number of clients they need to serve. The more players are playing our game simultaneously, the more there is to do for the backend machines. Traditionally, backend developers where estimating the maximum amount of load each backend machine can take, i.e. 100 players being logged in simultaneously. Then, they were setting a number of machines matching the estimated number of total players of the game. In order to make sure that players are distributed evenly across all machines, they were setting up either some sort world selection for the players, or setting up an automatic load balancer. The former forces players to decide where to play, with the worst case scenario of them being unable to play with their friends, which in turn might have selected a different world (and thus, backend machine) to play on. In either case, we'd have to provide as much computing power as it takes for handling the maximum amount of simultaneous sessions. This setup leads to two obvious disadvantages:
If there is a peak in players wanting to play, there might not be enough capacity to handle all requests. Most games need to place players in waiting queues until someone signs out again.
If there is a low in players wanting to play, we're wasting capacity. This can happen every single night around 4am, when most players in the region have gone to bed and big parts of the backend are idle.
Recently, people keep telling that most of these problems have been solved: "Easy, just run your backend in the cloud!" Now, it happens that the term cloud is being used to describe a wide range of architectures, for solving various classes of problems. If you're adding some of your files to your Dropbox, you're leveraging "the cloud" as backup store and for sharing data across devices. Big companies use "the cloud" for tapping into seemingly unlimited computing resources and solving large-scale problems.
What is "the cloud", and how can it help us to build a gaming backend that meets all of the above challenges?
There are various definitions out there, so let's give it a try:
The cloud provides the combined computation and storage resources of an undetermined number of machines to other devices at arbitrary locations on demand.
There are many cloud providers out there nowadays, most of which use the internet to provide their resources to consumers around the globe. These cloud providers usually feature very easy setup and provisioning of these resources, and allow their customers to pay for their service according to usage.
Getting started with cloud development can be overwhelming at first: The landing page of Microsoft Azure, for instance, offers more than 80 services. The big companies try to do their best to provide detailed instructions to get started, but with a technology as huge and powerful, comprehensive tutorials are rare.
In this blog series, I'm walking you through the basics of getting your gaming backend up and running in the cloud, connecting your client, and storing your player data in a scalable cloud storage.
Backend Architecture Overview
Let's take a minute and walk through the general idea of how to set up a scalable backend architecture, before we take a look at an actual implementation.
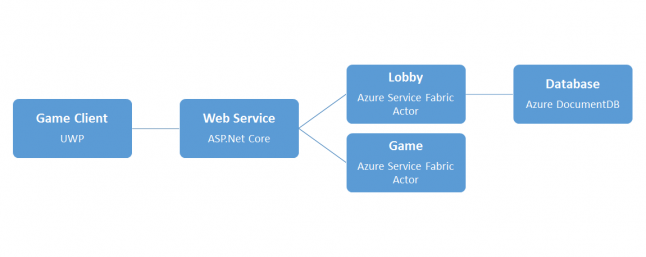
In the proposed architecture, we're using a Universal Windows Platform (UWP) client, but clearly, we can use any kind of client here, including a Unity or Unreal application. The client connects to a web service which acts as interface between the frontend and the actual backend services. We don't want our clients (or any potential attacker) to directly interact with the backend services. The web service itself doesn't do very much, except for relaying any requests to the respective backend services. Thus, it can be stateless, and theoretically be scaled indefinitely, because we can run it on any number of machines.
The heart of our backend is split up into actors. These microservices contain the actual business logic of the backend, such as creating new user profiles, sending chat messages or trading items between players. How much we'd like to split up our actors is up to us, and as the concept of the actor model is still fairly new to commercial game development, there's no golden rule here yet. Just keep in mind that with increasing the number of different actor types, there's the well-known trade-off between separation of concerns and message passing. Adding more different actor types allows us to scale parts of our backend up (and down) with higher granularity: If many players are trading right now, we can create more actors for handling transactions. If there's a huge battle, create more actors for calculating collisions and hit chances. However, with more different types of actors, we might be required to pass more messages around to get the actual job done. Azure will handle the requirement of scale-up, scale-out or handling fail-overs for us, but that means that we won't know for sure whether the actors that are talking to each other are running on the same machine, or not.
Finally, at some point, we're going to have to persist some part of the game state. We're using Azure DocumentDB here, because it's easier to scale document-based databases than traditional relational databases. All of this comes at the cost of data integrity though: There's no such thing a foreign keys in DocumentDB, so we might want to spend some time deciding which things to put into which document.
Now that we've understood the basic idea of our backend architecture, let's get our hands dirty and write some actual code.
Service Fabric Setup
The first step is to properly set up our development environment:
Download and install Visual Studio, including the web tools.
Install the Microsoft Azure Service Fabric SDK.
Enable PowerShell script execution by starting a PowerShell as administrator and entering the following command:
Set-ExecutionPolicy -ExecutionPolicy Unrestricted -Force -Scope CurrentUser
Many of the Azure tools are based on PowerShell scripts. The above line enables the tools to deploy and run a local development cluster on our machine, so we don't have to upload our changes to the cloud every time.
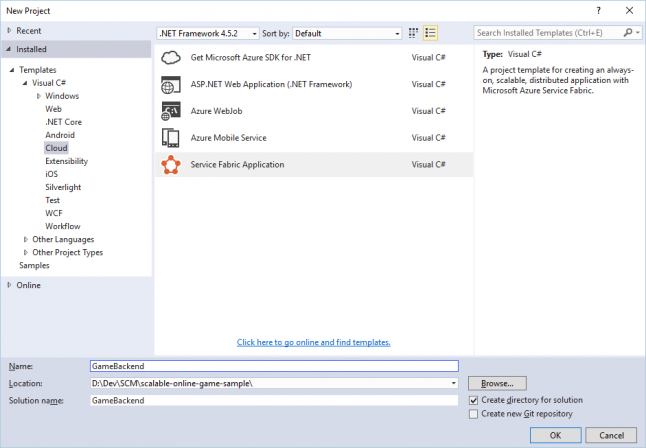
Now, it's time to start Visual Studio and create a new project:
Click File > New > Project.
From the installed templates, select Visual C# > Cloud > Service Fabric Application. If that template is missing, ensure you've properly installed the Service Fabric SDK.
For the initial service fabric service, select the Actor Service template.
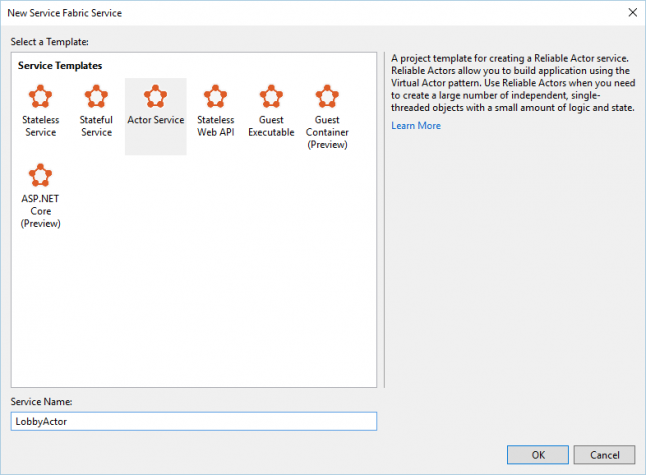
Visual Studio will create three projects for us:
A Service Fabric project named as in step 2 above. This project ties all services together and provides all the configuration data and scripts required for launching our backend in the cloud.
An actor project named as in the last step above. This project contains a first dummy implementation of our game logic, in this case the ability to retrieve and change a variable named count.
An actor interface project. This project contains an interface that allows other services to send messages to our actor.
If we'd hit F5 to compile and run the application now, Visual Studio would deploy the application and the Service Fabric Local Cluster manager would create a local cluster at C:\SfDevCluster on your hard drive. This folder can become somewhat big (around 10 GB), so if you want to save some SSD space here, you can start an administrator PowerShell prompt, navigate to C:\Program Files\Microsoft SDKs\Service Fabric\ClusterSetup and run the following command:
.\DevClusterSetup.ps1 D:\SfDevCluster\Data D:\SfDevCluster\Log
Of course you can pass any other folder if you'd like.
Now, hit F5 and start your cloud application!
Doing so for the first time might take a while, because Azure needs to set up the local cluster for development. Also, you might need to start Visual Studio as administrator for the process to complete without any errors.
Wait for the provisioning to complete. Your Visual Studio log should somehow read as follows:
Started executing script 'Get-ServiceFabricApplicationStatus'.
[void](Connect-ServiceFabricCluster); Import-Module 'C:\Program Files\Microsoft SDKs\Service Fabric\Tools\PSModule\ServiceFabricSDK\ServiceFabricSDK.psm1'; Get-ServiceFabricApplicationStatus -ApplicationName 'fabric:/GameBackend' -ErrorAction Stop
The application has started.
Service Status:
fabric:/GameBackend/LobbyActorService is not ready, 1 partitions remaining.

Service Status:
fabric:/GameBackend/LobbyActorService is not ready, 1 partitions remaining.

[...]

Service Status:
fabric:/GameBackend/LobbyActorService is ready.

The application is ready.
Finished executing script 'Get-ServiceFabricApplicationStatus'.
Time elapsed: 00:00:16.9669169
The application URL is not set or is not an HTTP/HTTPS URL so the browser will not be opened to the application.
Hm. The thing with web services is - there's isn't much to see without having a frontend.
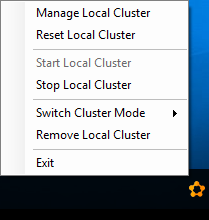
Luckily, there are some tools around that help us manage the local cluster and verify everything's up and running. In your system tray, right-click the Service Fabric Local Cluster Manager and select Manage Local Cluster:
Your default browser will open with a pretty re-assuring dashboard:
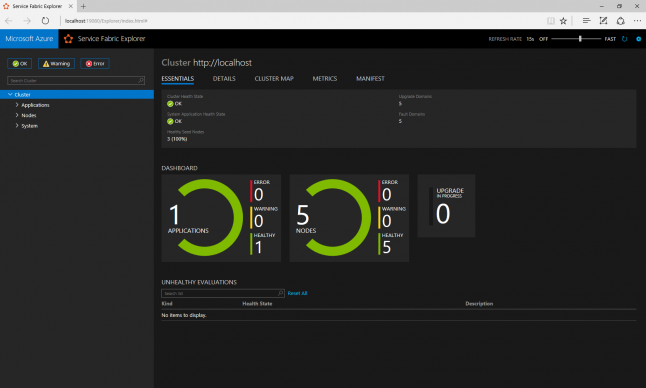
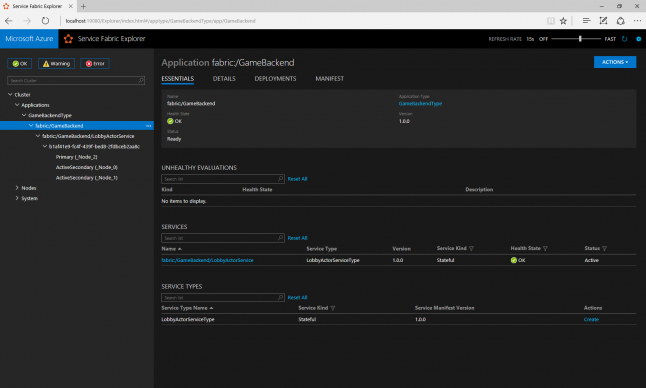
It seems like we've successfully set up an application, running on five nodes on our local system. Let's take a closer look. At the tree view to the left, click on Applications and select your application type. You will see that we've deployed a single service, the actor service we selected when creating the Visual Studio project:
Click on your service, and then on its single partition. We can observe that the service is running on three nodes right now:
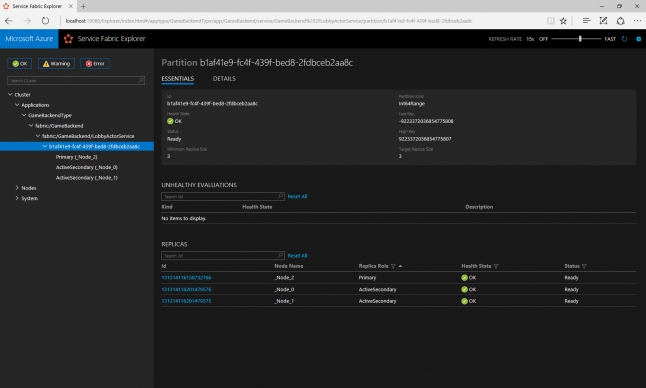
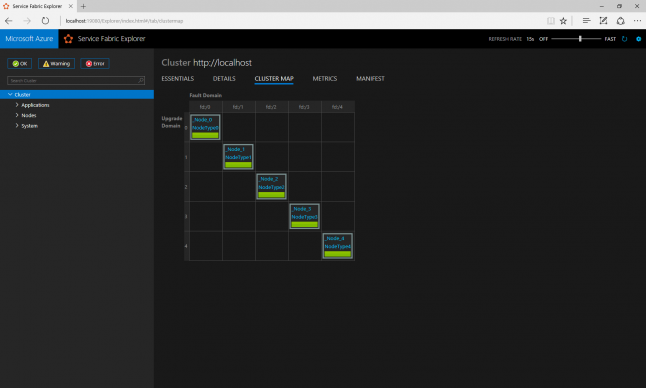
Azure has deployed our service to three different nodes. This way, we ensure 100% uptime, even in the case of a simultaneous update of our application and fail-over of the current node. From your dashboard, you can take a look at how the cluster nodes are organized into fault domains and upgrade domains to achieve exactly this goal.
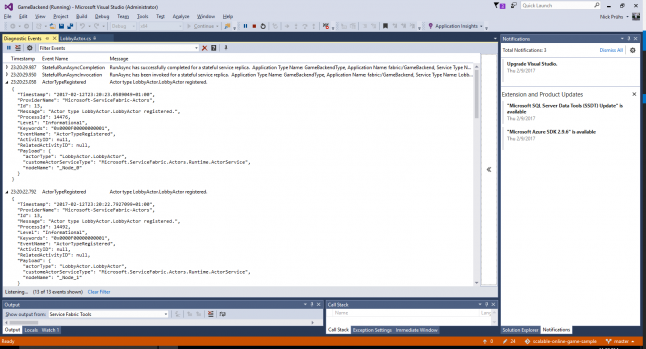
Back in Visual Studio, we can examine the events that were raised by our application in the Diagnostic Events view. Here, we can see as well that our actor service has been registered to the nodes 0, 1 and 2.
Congratulations! You've successfully set up your first cloud-based actor model game backend application!
This concludes the first part of this series. In the second part, we're going to add the web service that acts as interface between the frontend and our actors.
References
Microsoft. Using cloud services for UWP games. February 2017. https://docs.microsoft.com/en-us/windows/uwp/gaming/cloud-for-games
Microsoft. Get started with deploying and upgrading applications on your local cluster. January 2017. https://github.com/Microsoft/azure-docs/blob/master/articles/service-fabric/service-fabric-get-started-with-a-local-cluster.md
Microsoft. Create your first Azure Service Fabric application. December 2016. https://docs.microsoft.com/en-us/azure/service-fabric/service-fabric-create-your-first-application-in-visual-studio
Microsoft. Getting started with Reliable Actors. January 2017. https://docs.microsoft.com/en-us/azure/service-fabric/service-fabric-reliable-actors-get-started
Read more about:
Featured BlogsAbout the Author
You May Also Like


