

Daily news, dev blogs, and stories from Game Developer straight to your inbox
Sponsored By
Featured Blog | This community-written post highlights the best of what the game industry has to offer. Read more like it on the Game Developer Blogs or learn how to Submit Your Own Blog Post
The making of a Hidden Object Game: 2D background art
This article is about the art design and production of a hidden object game, Jane Austen Unbound! A current popular facebook game.
9 Min Read

The facebook hidden object game Jane Austen Unbound is adapted from Jane Austen’s series of fictions. Along the game play, many familiar figures in the books would appear. And the game features many scenarios in the books, around 1800s in England.
The link to the game:
https://apps.facebook.com/janeaustengame/?fb_source=appcenter&fb_appcenter=1
Our team is honored to create scene art for this game. Here I gave walkthrough for making one of the locations. From design to finished.
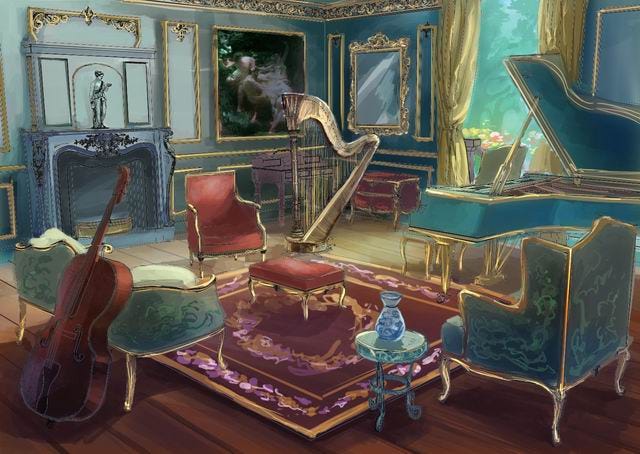
It is called Regent Music Room. It’s located in a noble man’s mansion, where he enjoys music.
Our client desires a room like this, the similar layout, and the composition need to be more tightly packed, to make it a good hidden object scene.
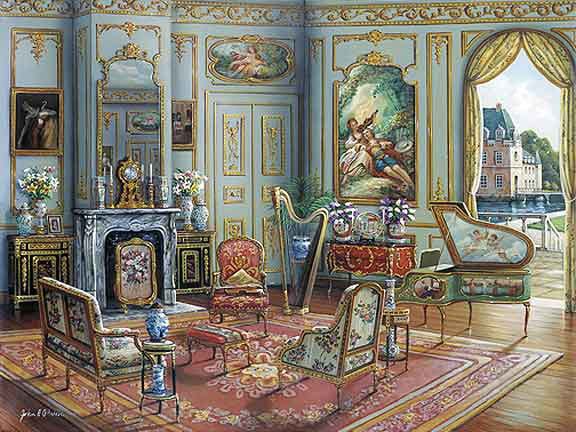
This game features lots of interior scenes, and many of them are aristocratic and royal settings. No doubt that employing 3D rendering in the picture production can make the pictures more accurate, and reduce cost. So at the very beginning of the development, our client decided the art production solution to be 3D render plus 2D overpainting.
1.Design Stage:
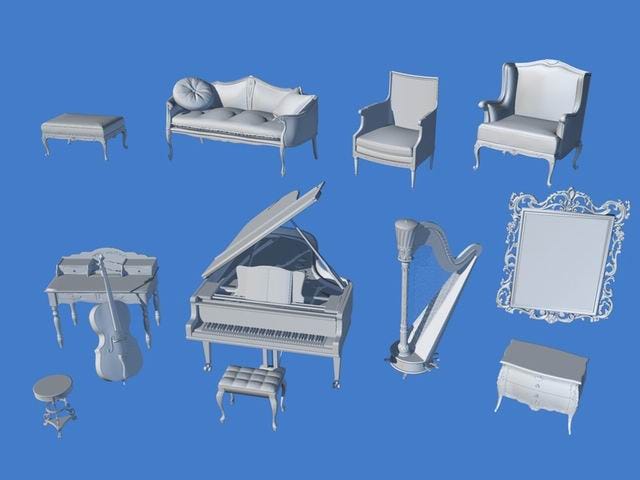
1.1. Gather 3D models
Our first step is to look on Internet, to see what useful 3D models we can find.
We find the below models on these two free 3D model sites:
Of course, we have downloaded many more models, the below models are what we picked from the pile of models.
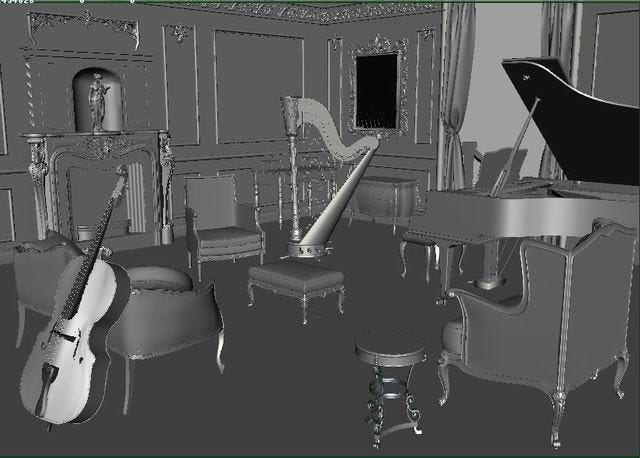
1.2. 3D model placement and design
We think we can make the entire interior by 3D, and out door by photograph.
In addition to the downloaded 3d models, we create the walls, because you can’t find such a wall fit your need on Internet. In fact it is very simple 3D work, a flat wall with a few moldings, basic 3D geometries.
In doing this type of interior scene design, 3D is very labor saving. You can move the furniture around, rotate them easily, change the camera angle with no effort at all. On the contrary, if you do the design by 2D, rotating a furniture or change camera angle means re-draw the picture.
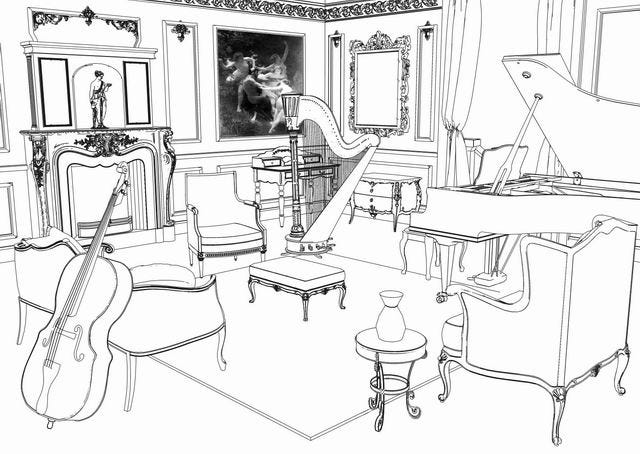
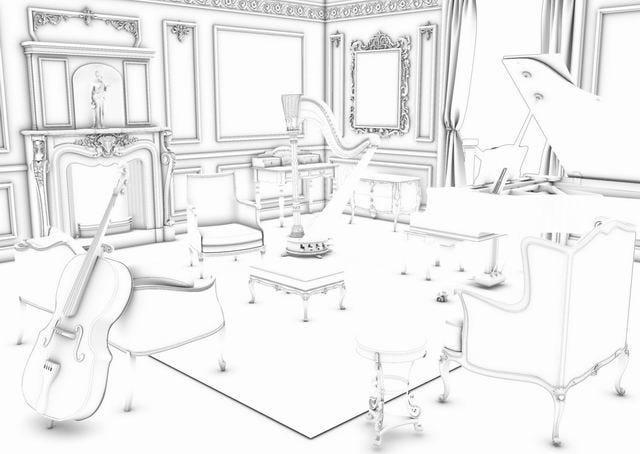
1.3. Render line art
Of course you can’t send the grey 3D screen shot to the client. I think sending neat line art is good courtesy. And make it easier for people to see your design. Believe it or not, with the same design, sending line art would get it easier approved. It can be done with little labor.
We use Maya, the Mental ray renderer is able to render neat lines with simple setup(I’ve mentioned it in another blog post). See the below picture, the lines are all clear cut. We only need to fix a few discontinuous lines in photoshop. If you use other 3D applications, I think they also include contour rendering.
1.4 Color & Lighting Design
After the line art is approved, our artist produces the color&lighting design.
2.Finished Art Stage:
And after the color scheme is approved, we proceed to make the finished quality background. Render 3D image, and then 2D overpaint the picture.
2.1. Texture Mapping
As in the design stage, we have 3D models in place, this makes the next step very straight forward. What we need to do, is to find some 2D textures to map on the furniture, then make simple lighting.
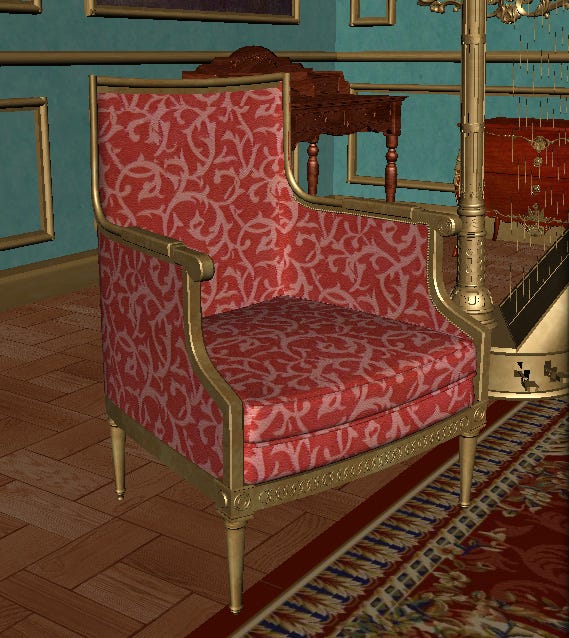
The material setting for the furniture is very simple. Like this chair, it has 2 materials, a gold material for the deco and a fabric material for the cushions. For the cushion part, we need the UVs neatly laid out. You can check if it has good UVs by mapping a checker texture to it. If it doesn’t have good UVs, only use basic projection tools, such as plane projection, cylinder projection, automatic projection. This can save the labor to the minimal shape. Don’t manual tweak individual UV point, and don’t mind the seam of the textures. Keep mind we can address these issues easily in 2D overpainting phase.

Find a good fabric pattern for the cushions. At this point, we only need minor adjustment of the texture scale and placement. Can be easily done in UV editor window.
A few good sites for finding textures:
cgtextures.com
freetextures.3dtotal.com
And for the golden deco, you don’t need to consider their UVs, they have no textures, just a golden color material.
2.2. Shaders
And the shader setting for all the things is very simple, for walls, fabrics, ambient shader with no highlights; For wood,marble, blinn shader with dim highlight; Metal, Phong shader with sharp highlight.
Of course, these simple shaders can’t give the delicate material feeling to everything. In movie industry, people spend lots of efforts and rendering time to get good material feeling. But here, don’t worry, we will have 2D overpainting stage to compensate the inadequate in 3D render.
Assign shaders and textures to everything, then the scene is ready for lighting.
2.3. Lighting
To make the lighting setup fast, and rendering time short, just use simple lighting setup. Keep in mind we will do lots of 2D overpainting afterward. So mind what degree of quality the 3D render image should get to. It need not to be very nice, it need just to reach the mark. There’s a saying in our business, that the picture is done “30% by 3D and another 70% by 2D”.
Place a few point light in the scene to give general illumination, and when some face need light and color, give a spot light. Always use light decay. A light without decay is essentially flat.
The 3D render image should have depth or should be flat, should be with or without much light color, all depend on the preference of the art director. Because different art directors and teams have different production habit: Some prefer to add light and color in 2D overpainting stage, while some prefer to make as much in 3D as possible.
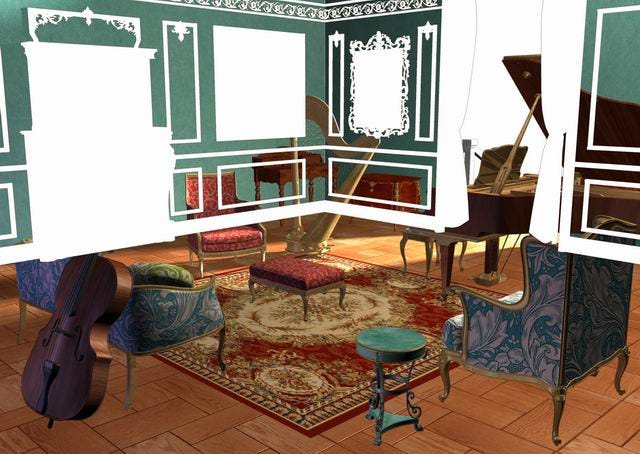
The below is our 3D render image.
This is the color pass:
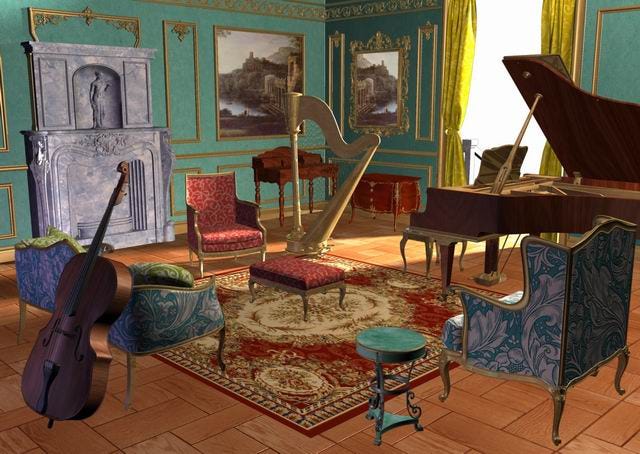
Of course an Ambient Occlusion(AO) pass is often very helpful, it adds to the sense form and detail:
Then we pass the image to the 2D artist to do the final 2D overpaint job.
The image file we pass to the 2D artist, is a PSD, it often has the following layers:
A color image layer;
An AO layer;
A few mask layers.
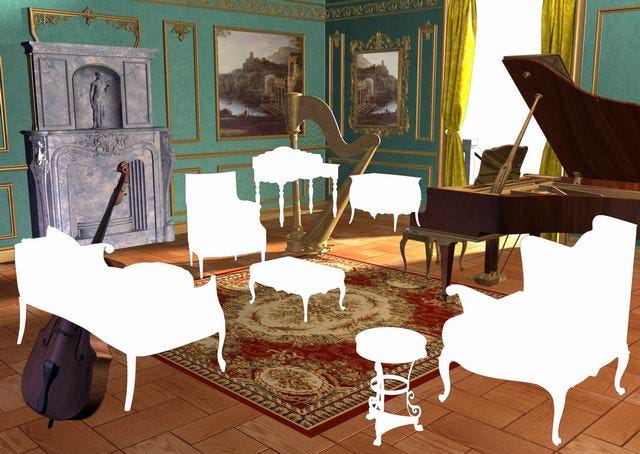
2.4. Layering and Masks
In Maya we have render pass and render layers. In rendering setup, we can separate things in different render layers: furniture, background, items…that would make the life of the 2D artist happy. But I strongly suggest you not to do so. Instead, render a single image, with only one layer, then render the masks you need. Because setting up render layers is complicated and time consuming for producing one single image(while it saves your life in producing sequence of images). And if things interact with each other in lighting process (cast shadow to another object for instance), you would easily make things wrong.
We make a few useful masks for the 2D artist, for example mask to separate furniture from background; And you can make a mask for all the golden parts. It’s lucky that we can make these masks in 3D by a single click. On the contrary, the 2D artist may spend lots of time making them by selection and lasso tool.
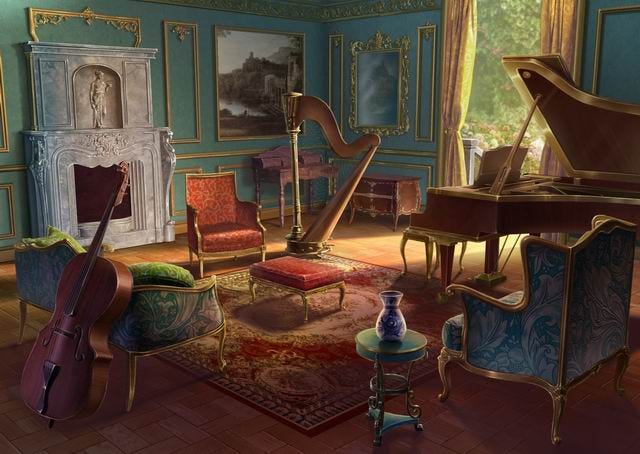
2.5. 2D overpainting
In this stage, our 2D artist do the following major things to get the raw 3D picture to the production quality.
Make the lighting condition believable. As we have made very poor 3D lighting, it need to be improved in the 2D stage. In this stage, we tweak the light and colors of every individual things, to give the sense that the scene have defined, and believable lighting condition, and the transmission of lights should be correct, comfortable.
For example, the locker to the right of the harp, it’s lighting needs more work. To that position, it should receive more sun light bouncing from the floor, and have better contrast between the two vertical faces.
And another important thing we do in this stage, is to give cold/warm contrast to every individual things. That the picture won’t look dull.
And we add some subtle lights which were not there. For example the cold light to the left of the fire place.
Add shadows, self and cast shadows. We add self shadow to enhance volume of the furniture. And in early planning, we have decided to add most of the cast shadows in 2D.
Enhance the feeling of materials. We use different treatment to enhance the feeling of different materials, such as wood, fabric, marble, and metal. For example, metals need more highlights and reflections; Fabrics should be made more soft, adding more folds.
The 3D models are hard and rigid. We overpaint the edges, make the hard edges round feeling. See the fireplace and the golden deco of the chairs.
Fix the glitches of 3D rendering. For example, the couch to the left, its golden deco is very thin, even with very high sample rate in 3D render, the anti-alias is not good.
Add backgrounds, photo objects. We use photograph to make outdoor background. And often we add lots of photo objects to enrich the scenes(Not hidden objects). For example vase, flowers, books. Their texture and materials are complicated, creating them in 3D is time consuming, and often give a faked feeling.
Before Overpainting:
After Overpainting:
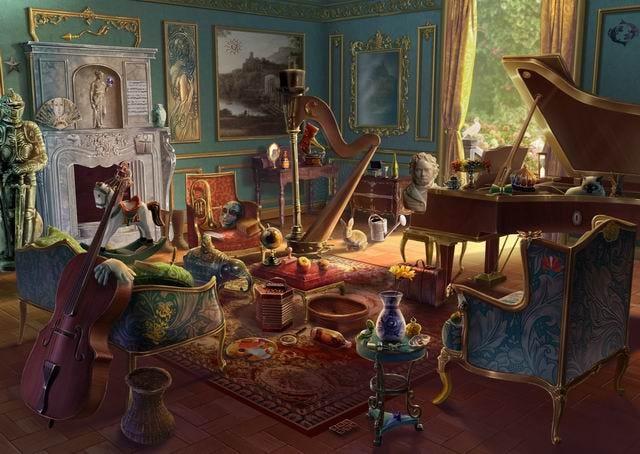
3.Object placement & overpainting.
This is a hidden object game, so the last step is putting in objects and overpaint them.
There’s not much to say for this stage, we only follow some general rules:
Find objects fit the time and story;
We actually “place objects in the scene”, not “hide graphics in a flat picture”. The objects look believable to be placed there;
Mind the sizes of the objects, both the absolute and relative size should be believable.
Fill the space evenly;
Avoid things hated by the publisher, for example:
Trademarked items, Items with logos on them,
Guns and other weapons, Cigarettes or other smoking items,
Drugs, Alcoholic beverages,
Nude or partly nude people, Violent or bloody images
More of my articles about art production:
http://gamasutra.com/blogs/JunxueLi/940564/
Follow me on twitter...
Read more about:
Featured BlogsAbout the Author
You May Also Like


