


Daily news, dev blogs, and stories from Game Developer straight to your inbox
Sponsored By
Featured Blog | This community-written post highlights the best of what the game industry has to offer. Read more like it on the Game Developer Blogs or learn how to Submit Your Own Blog Post
UX Walkthrough: Prototype Testing Do’s & Don'ts Part-1
Step by step approach of how to build and test your game UI prototypes in pre production stage, starting from product brief, game specs. to UX flows for usability testing and iterate on player feedback much ahead of full production!
9 Min Read

Co-authored with Andrea Abney
Andrea is an accomplished User Researcher. She has lead UX Research teams at Disney Interactive in the past and currently spearheads User Research at mobile gaming juggernaut Scopely.
If usability testing lies at the heart of UX validation then building a sound prototype is the key to unlock it’s full potential. - Om
We all know that UX design relies heavily on UX research and usability testing for generating valuable insights which shape the future of products and businesses.

Image above shows various touch points for prototype testing in pre-prod cycle.
Not only will applying UX methodology to generate user behaviour insights before building a feature save multiple iterative efforts post launch but also millions of dollars worth of dev. time. In the previous walkthrough series we covered how usability testing should be set up and conducted in sanitised conditions with a moderator, what aspects to avoid and best practices.
As promised, we will walk you through a hypothetical feature and apply all the UX steps we would in a real world environment.
A typical agile flow process for a feature in pre-production generally looks like this:
High Level Brief
Product managers across organizations create a high level brief of a feature regarding the app or game they are working on. This brief may be targeted at boosting KPI’s like retention, monetisation, engagement or a new USP not seen in competitor products.
Examples #1 Demonstrates what a one-page high level brief may look like for a games' "Inventory" feature:

High level concepts, as above, will translate into a more granular specs fleshing out details and forming an early base for tech dependencies like front end, platform or backend. It could also integrate Game designers/Business Analysts who get involved whilst working closely with other leads to generate a concrete spec.
NOTE: At this stage there is input from UX from a research perspective. Included will be any pre-built target personas, demographic studies or competitor benchmarks to integrate best practices for this specific feature.
Sketches & Low Fidelity Wireframes
Once the brief has been iterated upon by stakeholders, it is handed over to the UX designers to build flows to better understand how player will journey through different scenarios, screens and required actions.

Post blocking the flow, sketch sessions are held to brainstorm with different permutation combinations of content placement and action hierarchy. Wireframe creation stage can involve exploration starting from white-boarding which is then further refined to create digital counterparts.

It’s a good idea to start with some early pencil sketches or white-boarding to create a wide range of options. Sketching gives iteration speed and removes tunnel vision which is often seen while designing a software/game.

Some best practices and pitfalls to avoid when developing wireframes:
Explore a Wide Spectrum: It is good to come up with at least 2-3 variations of a feature, not only in terms of the layout but also functionality and aspirational design. Here is why:
Most features start out as MVPs. What makes it into the game depends on costing in terms of dev. effort, projected timeline and release schedule.
MVP versions may be sufficient enough for launch but it is good to have atleast 1 aspirational version designed as well. For example: use of micro animations, 3D elements for more immersion vs 2D elements, parallax mapping etc. Even if the need of the hour is to launch with low-tech (low dev cost) feature, gradually over time in various updates this feature can be updated to the aspirational one.
It often happens that road maps shuffle as we move along, some features are dropped that could be the breather space to make a push for your aspirational version. If you have it ready.
By future proofing your aspirational design along with the MVP version, you avoid context switching as both versions can be designed at one go, rather than designers having to shuffle back and forth to solve the same problem over and over again.
Resist Temptation to Use UI: UX designers should avoid falling for the lure of designing their initial flows using some hacked up UI or UI widgets available from your existing products library to make flows look prettier or more aspirational.
I have often seen UX designers succumb to the pressure of using UI screens.
Why? There are several reasons for it:
1) Product groups or key stakeholders may not be used to just looking at wireframe flows and make decisions regarding the feature. They may not understand why everything is in B/W or grey scale while the products look and feels different. This could also be because of their past conditioning.

2) Sometimes brief/feature owner’s may directly approach the UI designers to build the flow using UI screens as:
They may not think UX plays a role or is important enough in the feature
They may be pressed for time to get the spec. approved or may not feel confident about people evaluating solely on basis of wireframes
It is merely a matter of educating the product group and establishing a culture of UX, when a flow or design is in approval stage they need to be evaluated based on low-fidelity wireframes and only once the flows along with the spec have been hardened should it move on to UI and it can be presented for final approval.
Question: How do you ask your top leadership to adapt to this change? This is present the arguments below:
Tell them how insisting on UI flows at UX design stage can...
Hampers Iteration speed: Imagine you are dealing with a flow which has multiple screens and it is still in flux receiving comments from various stakeholders and leads, engineering even and a small change in text could have gigantic ramifications.

UI designers make the change in multiple screens (every screen in the flow) which can be seen as wasting valuable production time. If there are 10X changes, which do you think will be easier to quickly iterate on - wireframes or UI visuals?
Higher % margin for error: In any production environment, time is a luxury. By indulging in flow stage with UI, most of the effort and time is directed towards just putting the flow together, making it pixel perfect, rather than spending time thinking about edge and use cases. While UX generally accounts for 95% of all use cases, I have seen this margin for error go up when UX designers indulge in high-fidelity designs early in UX phase.

Example above shows the amount of time a UX designer spends on various processes.
UX & UI stepping on each other’s toes: In many cases, UX designers may not be well versed with visual design, so when UXer is forced to build UI flows, it implies two departments are stepping on each other’s toes. With UI designers solving UX issues, the potential for friction heightens. Not to mention the inefficient utilization of each resource’s strength.

Assembling a Prototype
Once a flow has been iterated upon and signed off, it is good idea to build a prototype for first round of usability testing. This also helps the higher up and dev. teamsunderstand how a feature looks on the device/screen.
Remember: Until this point we have been toying with assumptions & ideas of what users need & how they would like us to design them. In order to validate those assumptions, it is important to test them out!
Tools for Prototyping
Prototypes can vary from simplistic printouts of your wireframes to PowerPoint click throughs to on-device prototypes using a variety of designer friendly softwares available in the market like Invision.

Be it quick printouts, powerpoint click throughs or device ready prototypes, ensure you test your designs. This is the only window early in design phase to get actual user feedback!

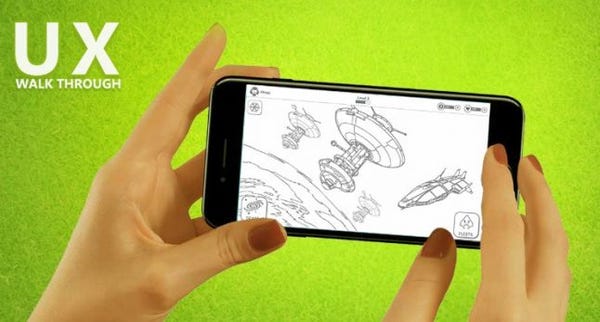
Design friendly softwares like above allow you to bring your wi-fi's to life.
Below is an example of a prototype we have assembled in a designer-friendly software based on brief, spec and wireframes shown above, which allows us to test a device ready version with our TA group to generate qualitative data.
Conducting a Test
For conducting a test it is extremely important to liason with a user researcher who has expertise in conducting these kind of test sessions, like Andrea here who is not invested in the project as much as the product/development team and can perform the same in a remote lab. This helps mitigate biases that result in analysis based on feedback rather than personal opinions (You can read more about biases to avoid here).
Preparation for conducting a test
Recruiting: It's crucial you recruit the right test subjects to get the most valuable feedback.

Facebook, Google analytics and existing online communities are a goldmine for recruiting test subjects!
Know who you are designing for and then recruit similar people.
Recruit the target demo for your product. This means recruiting people who use similar products. For example players who play mid-core games of competitors.
Talk to them on the phone before they come in. Have a conversation about their behaviours and products they use, make sure they are really in your target demo.

4. It's good to have a mix of users/players profiles like beginners, average level users and power users. Based on their experience, their expectations of the product will change. A power user may not need much on-boarding or instructions but a beginner might. It prevents skewing the experience design towards any particular archetypes.
In Part-2 of this series, we will look at results of prototype testing in real time with real players & the process of gathering & sorting inferences for folding feedback into the design. Stay tuned!
If you liked this post, you can check out my other Game UX Deconstructs. Feel free to connect with me for my future article.
Read more about:
Featured BlogsAbout the Author
You May Also Like


