

Daily news, dev blogs, and stories from Game Developer straight to your inbox
Sponsored By
16-step Sequencer in Pure Data
One way of creating and controlling a simple 16-step sequencer in Pure Data. Novation Launch Control, Pure Data, REAPER, MIDI Yoke.
5 Min Read

Pure Data is a popular dataflow programming environment. It is neat, it is pretty widespread, and it is free. Tinker on your laptop without the need for a soldering iron :-). It's a popular choice in the #gameaudio and #sounddesign community to implement interactive soundscapes and generative music. Leonard Paul used Pure Data in his soundtrack of Sim Cell, see https://www.youtube.com/watch?v=SriQg9cp8Tc
One of the presents I received this Christmas was Novation's Launch Control, a USB-MIDI control interface with 16 knobs and 8 buttons. I was always fascinated by sequencers of the modular analog synthesizers and since I had some free time and felt like chilling, I decided to implement an emulation of one and Pure Data seemed like a natural choice for this task.
Basic Structure
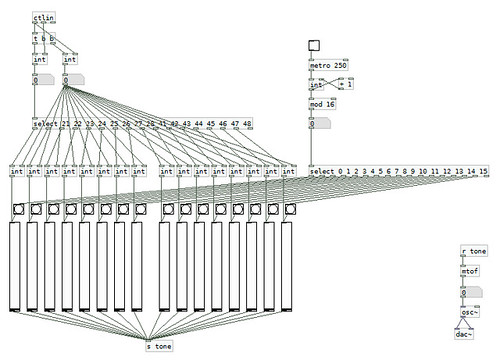
An untangled and simplified version of the patch looks like this:
Receiving Data from Launch Control
The upper row of knobs of Launch Control is mapped to CCs #21 through #28. The lower row is mapped to #41 through #48. Each knob sends a control value whenever its position changes. The value would be between 0 (all the way to the left) and 127 (all the way to the right).
The incoming MIDI control data are represented by the "ctlin" object which has three output pins (outlets): CC#, value, and channel. The two "int" objects are there to hold the values of the latest CC# and the control value.
Pure Data receive MIDI if set up in menu "Media" > "MIDI Settings..."
Note about Pure Data behavior: Each "int" object can receive its new value from either of the two input pins (inlets). When a value is sent via the left pin, it is sent further via the output pin so that it affects the objects further down the line. The left pin is called the hot inlet. When a value is sent via the right pin, it's only stored for further use by that object but it does not propagate. This pin is the cold inlet. The propagation can be however "provoked" by sending a bang to the first pin.
The array of "int" objects below is used to feed the values to the vertical sliders that serve as the repositories of the actual sequencer values and also as their visual representations. The control values are copied to all the the "int" objects via cold inlets so that the values are not propagated right away.
That happens only when the "select" object sends a bang when one of the knobs gets touched by the user. Its outlets are connected to the inlets of the corresponding "int" objects. When a bang arrives, the value gets pushed to the corresponding vertical slider.
The "t" object is there to send the signals in the desired order. The value is copied first and propagated to its destination later.
Timing the Playback
I am using "metro" object which sends periodic bangs at given intervals. I chose 250 ms, ending up in a tempo of 60 BPM. The "int", "+ 1", and "mod 16" objects implement a very simple mod-16 counter. Every 250 ms it outputs a number between 0 and 15. Its output is filtered by another "select" object which sends a bangs to the vertical sliders in order to provoke them to output their current value to the synthesizer.
The "s" and "r" objects represent an invisible link which behaves pretty much like a regular link but makes things less cluttered on the screen.
The control values are interpreted as MIDI notes 0..127. The MIDI number is converted to the frequency using "mtof" object. The "osc~" object is a simple sine wave function generator. Its output is directed to the "dac~" object which represents the audio interface of the operating system. Use "Media" > "Audio Settings..." to specify which audio interface to use. Don't forget to press Ctrl+/ to enable the audio output. And later on Ctrl+. when you or people in your immediate surrounding have had enough sine waves for the day :-).
External MIDI Synthesizer
In my video I used an external MIDI-driven synthesizer to generate the audio. I used MIDI Yoke to connect Pure Data to my digital audio workstation. MIDI Yoke is a virtual MIDI switchboard enabling MIDI links between the applications running on one's PC. I like to use REAPER as my DAW and the sounds used in the video were coming from SuperWave P8 VST synthesizer, my go-to VST for chiptune sounds.
I used this modification of the patch to send MIDI to REAPER:
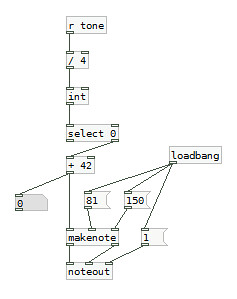
The "/ 4" object reduces the overall resolution of the sliders from 0 to 31.75. The "int" is to round the number to the nearest integer below. The "+ 42" is to shift the pitch so that we start somewhere around G3 note. I included this transformation in order to make the pitch selection slightly more convenient for the user.
The "select 0" object ensures that the only non-zero numbers get sent further. The knobs all the way to the left will be interpreted as pauses.
The "makenote" and "noteout" objects are MIDI note output helpers. I could use a "midiout" object instead, however these two saved me some hassle by taking care of starting and stopping the MIDI notes as needed.
The "loadbang" sends a bang whenever the patch is loaded so that the values of velocity of 81 (the second input pin of "makenote"), the duration of 150 ms (the third input pin of "makenote") and MIDI channel 1 (the third input pin of "noteout") are properly sent to the "midinote" and "noteout" objects upon start-up.
Conclusion
Pure Data is fun and programming the melody using knobs is an interesting experience. I'll do more when I have time :-)
Read more about:
BlogsAbout the Author
You May Also Like


