Daily news, dev blogs, and stories from Game Developer straight to your inbox
Sponsored By
Tutorial: Simple, High-Performance Particles for Mobile
A simple but useful tutorial for creating great-looking particles on smartphones -- that won't eat up all of your performance budget.
May 20, 2013
11 Min Read

Author: by Itay Duvdevani
When it comes to game development, is there really a silver bullet? Perhaps, but from what I've found, you have to shoot a lot of bullets and shoot 'em fast.
We all know that the current mobile casual-gaming world poses many challenges for developers. It's tempting to imagine the game we're working on as the next Angry Birds or Cut the Rope, but that's more like winning to lottery -- we can't really count on it. Managing your investment and risk is distributed among many smaller titles can be a key strategy in determining success. To do that, we need our game development process to be as efficient as possible.
One of the areas where cost can be managed is graphics. There is no arguing that beautiful results can be achieved in 3D, but that doesn't mean "2D sucks." In many aspects, developing 2D is quicker than 3D: Assets and game engines are quicker to develop, while with a good artistic eye we don't have to settle on "coolness" and the value-to-player.
During my experience at Playscape (formerly MoMinis), we've implemented 2D effects with the most basic building blocks that every 2D engine should offer. But before we go into those, some background:
The Playscape Platform started as a rapid game development platform for J2ME, before the "iPhonedroid" revolution. At the time, the engine was limited to MIDP's capabilities, which included simple bitmap sprites and right-angle rotation.
When the platform was ported to Android (and OpenGL) we decided to preserve simplicity for our game developers, and limit the Android renderer by the same constraints imposed by J2ME.
This was a long time ago. Since then, J2ME almost disappeared from Playscape's target markets and OpenGL ES became a standard for mobile games.
But even though we ditched J2ME for some time now, we were still bound by the MIDP limitations. This happened mostly due to more pressing business concerning our game development pipeline (we were releasing a new game every two to three weeks).
Eventually, we came to the conclusion we cannot just stop everything to modernize the platform. Instead, we decided on a very limited set of features that every 2D engine should have:
Free rotation around a pivot point (with angular speed and acceleration)
Free scaling around the same pivot;
And color "tinting" -- application of an RGBA color to a texture with MULTIPLY combiner
For portability reasons, these features are implemented on-top OpenGL ES 1.1. Apparently, this is enough for some nice looking particle effects.
Now, let's take a look at some specifics:
Particle Systems
In 3D and 2D, particle systems are used extensively to simulate a variety of physical phenomena and special effects, such as: Fire, smoke, blood, magic, sparks, rain, water, grass and many more.
A particle system is essentially an emitter object, which has shape and size, which creates particles according to certain rules. Each particle that's created receives a variety of attributes form the emitter and environment, such as speed, color progression, direction, rotation and time-to-live.
The idea is to combine and blend many of these basic particles in a way that create pretty and complex effects:
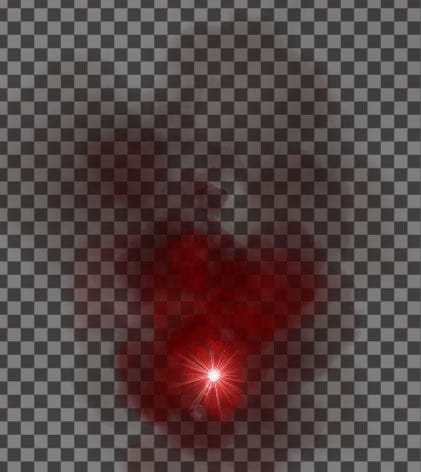
(The above is a single emitter which emits about 40 particles a second, each with a random fade duration, grow, speed and angular speed. Particles fade from opaque-red to transparent-black as their end-of-life approaches. The smoke textures are grayscale, so any smoke color can be generated with the same assets as we MULTIPLY the texture's color).
Illumination and Occlusion
If we keep it simple, a pixel blended to the pixel buffer can either occlude the existing pixel, or illuminate it.
Smoke or blood occludes the scene, while sparks, flames and flares illuminate it. However, a particle system isn't limited to one of these -- consider a torch particle system -- A particle starts as an illuminating particle (flame) but as time progresses it transforms to an occluding particle (smoke). Therefore, we need to support both effects, sometimes in the same particle at the same time.
Blend Modes
For our effects to look right, we need to use the appropriate blend mode. I'll focus on OpenGL, but everything stated here holds for DirectX or any other low-level 3D API.
The last stage of the OpenGL 1 pipeline is to combine the current color at the pixel buffer with the color of the incoming fragment. The examples for glBlendFunc in OpenGL ES 1.1 docs states that:
Transparency is best implemented using glBlendFunc(GL_SRC_ALPHA, GL_ONE_MINUS_SRC_ALPHA) with primitives sorted from farthest to nearest.
This is unfortunate, as compositing images with this blend mode is limited and error prone. (Working naïvely with this blend mode might cause dark halos around objects)
Consider a pixel represented by: (Rs,Gs,Bs,As) which we would like to blend with the existing pixel: (Rd,Gd,Bd,Ad) where each pixel component is in the [0,1] range.
OpenGL suggests the following blending: (using the red channel as an example)
Rout = As*Rs + (1-As)*Rd
Notice that all components are always lower than or equals to one -- We cannot lighten the scene, only darken it. This blending mode is good for occluding (see the world through pink glasses), but cannot be used to lighten a scene.
To illuminate (use a flashlight over something for example), we might have chosen to do:
glBlendFunc(GL_SRC_ALPHA, GL_ONE)
That blends as follows:
Rout = As*Rs + Rd
Where we only add light to scene and control the amount of light added with the source's alpha channel. However, again, as all components are always non-negative we can only lighten the scene, disallowing occlusion.
To accommodate for both needs, Porter & Duff in a 1984 paper (Computer Graphics Volume 18, Number 3 July 1984 pp 253-259) suggest using:
Rout = Rs + (1-As)*Rd
or:
glBlendFunc(GL_ONE, GL_ONE_MINUS_SRC_ALPHA)
That allows us achieve both occlusion and illumination:
Occlusion is achieved by premultiplying the RGB channels with the alpha channel: Rs=Rs*As for every pixel in the original texture. This makes the above method identical to the method suggested in the OpenGL docs, and saves a runtime multiplication.
Illumination is achieved by not premultiplying the texture, and using the alpha channel as the amount of light to add to the scene
A picture is worth a thousand words. In the following example both particles are rendered with the same alpha channel (shown on the right) in the same blend mode (mentioned at the bottom). Notice how we're able to achieve smooth occlusion on the right particle, while being able to lighten the background on the circumference of the left particle:
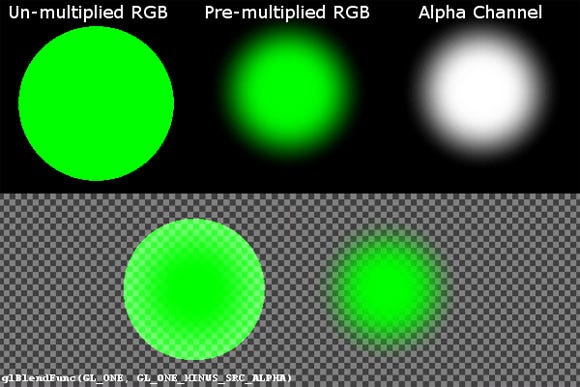
If I would have had to guess why OpenGL authors chose the less useful blending equation as their example, I would guess that it's because most (if not all) graphic editors don't premultiply alpha, and this is the correct way to achieve the expected particle (on the right).
In the popular editing programs premultiplying a texture is not straightforward. For example, this is what you'd have to do to convert a non-multiplied image to premultiplied image in The GIMP:
Open the image you wish to pre-multiply (make sure it is flattened)
Right-click drawing layer -> Add Layer Mask…
Choose: Transfer layer's alpha channel
Click the layer mask
Select all and copy
Choose the drawing layer and paste
Click the New Layer button to make the floating layer a new layer. You should now see the alpha channel on top of the drawing
Change the alpha layer mode to Multiply
Merge the alpha layer into the drawing layer (Right-click -> Merge down)
You now have a pre-multiplied image. Export and use
At this stage, it is important to note two issues we've encountered specifically on Android:
BitmapFactory.decodeBitmap does not handle PNG transparency well enough for our needs. Transparent pixel's RGB is overridden with black, and low alpha values aren't perfectly loaded. To utilize to the full extent the method suggested here, you will have to use a better decoder (a few are available in appropriate licensing and quality)
As I've mentioned before, graphic editing application do not usually premultiply alpha. I assume that for that reason the implementers of GLUtils.texImage2D have chosen to premultiply all textures loaded using this function before passing it to OpenGL. Just remember that if your texture is already premultiplied, you need to use glTexImage2D directly. This is unfortunate, as combining this behavior with the one recommended by the OpenGL docs causes double-alpha multiplication, which is characterized by ugly dark halos around objects.
Let's combine everything for an effect. We will create a very basic, simple and quick fire-burst effect, like the one you'll expect to see in the rocket's exhaust or an oil rig. Our fire will have three stages: Ignition, flame and smoke. The ignition happens at the base of the fire, and it's very bright -- it illuminates its surrounding and it's almost white in color. The flame is the fire after it's detached from the fuel, and is yellow-orange in color. It still provides some illumination, but not like the ignition. The last part is the smoke and soot -- It is grey or black and blocks what's behind it until it disappears.
Here are the three stages in our particle's lifecycle: (zoom set to 300%).
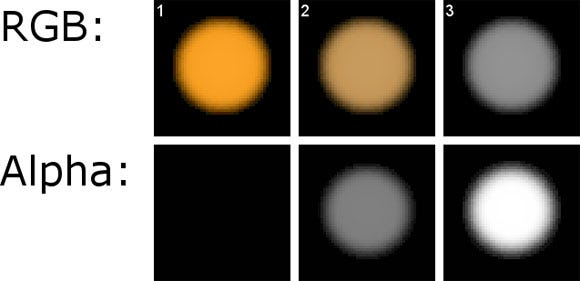
(Please note that for demonstration purpose I only listed the key frames in our particle's animation. These key frames should be interpolated to create smoother particle animation.)
The alpha channel tells the story. The first stage's RGB is not premultiplied, and the alpha channel set to black -- making the particle a complete addition mask. Note that I've chosen the particle's color to be a shade of orange that still has some color in the blue channel -- otherwise adding these particles on top of each other will give pure yellow, instead of the white we're aiming at. The particle's ADD mask is built to soften the edge of the flame in the ignition stage.
The second stage is similar to the first stage, except the add mask is softer -- the color added is darker, and the add factor is lower. This serves as a good transition between the bright ignition and the dark soot. The texture is not premultiplied, although it may seem that way at first glance.
The smoke is very simple -- it is a grey, alpha premultiplied particle, which only occludes the scene. We use a grey that is lighter than the shade of smoke we want, since we'll also be fading the particle to transparent black as its end-of-life approaches.
The emitter is a simple point emitter that emits 40-50 particles per second. It sets the particles lifetime and speed (height of the flame), its speed direction (flame spread), and its grow rate (flame's "body"). In addition, each particle is created with a slightly different semitransparent white "tint" (flame intensity) and finally, as mentioned before, each particle is tinted to transparent black toward the end of its life.
With a little trial-and-error we calibrate the emitter to achieve the final result:
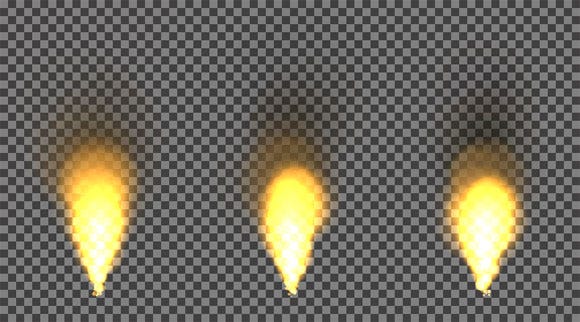
There is plenty of room for modifications -- for example, by changing the time each particle spends in each stage we can get more intense ignition, or a longer smoke trail. We could also apply physical modifiers to each particle, adding wind or gravity for instance.
Conclusion
With the current product proliferation in the casual mobile gaming market, focusing on a single hit is a risk. Instead, publishing many titles quickly provide risk distribution and operational latitude to respond to the market's feedback, and experiment with different types of games and user experiences.
To achieve that, game development cycles need to shorten, in time and in cost. We focused on a factor that can affect both significantly -- graphics. Unless the gameplay explicitly requires 3D environment, I suggested choosing 2D, which is usually lighter on artist and developer resources.
As for user experience, we've seen a basic example that shows that a small amount of work and very basic 2D constructs can be used to generate elaborate graphic presentation.
But 2D effects aren't limited to the method I've presented. Even though it's in use all over the industry, over great range of complexities, this was just an example of what can be done with very basic building blocks. Many other effects can be achieved with the same facilities, giving developers great creative freedom in developing 2D games and users the visual experience they expect, even without impressive 3D environments and characters.
Read more about:
FeaturesYou May Also Like


