Daily news, dev blogs, and stories from Game Developer straight to your inbox
Sponsored By
Featured Blog | This community-written post highlights the best of what the game industry has to offer. Read more like it on the Game Developer Blogs or learn how to Submit Your Own Blog Post
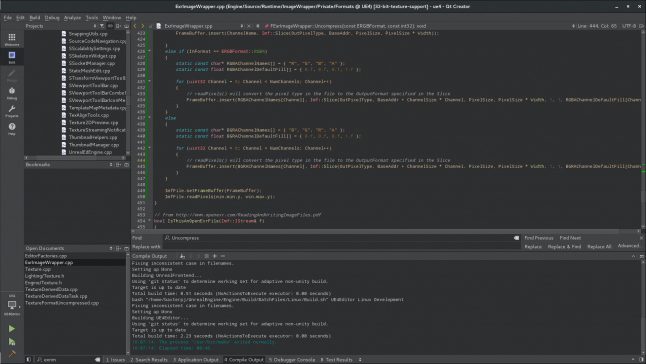
Working with UE4 on Linux using Qt Creator
Covers setting up Unreal to work with Qt Creator. Epic has a helpful guide to this here: https://docs.unrealengine.com/en-us/Platforms/Linux/BeginnerLinuxDeveloper/SettingUpQtCreator but it's a little bit lacking.
8 Min Read

Intro
I'll start by pointing out that Epic already has a guide to using Qt Creator for UE4. However, I found a few things lacking in that guide. This is my attempt to improve upon it.
This guide assumes you're able to build and run UE4 outside of Qt Creator. For this guide, we're going to be using a game project, MyGame, located under UnrealEngine/Projects. If you're looking to just build base Unreal Engine for now, you can check out Epic's guide at the above link for the proper build/run settings.
This guide will not cover things like downloading source or resolving dependency issues specific to your Linux distribution. For that, I recommend looking over Epic's documentation on building and running on Linux.
Qt Creator Overview
There are several IDEs on Linux that work with Unreal Engine 4. These are some of the benefits and drawbacks of Qt Creator:
Pros:
Fast and accurate intellisense.
Especially compared to VS Code's still-early C++ intellisense.
Stores previous searches for quick retrieval, allowing you to get back to a previous search "thread".
Switching between projects via "sessions" is fast and easy, with sessions saving things like currently opened files.
Fully-featured debugger, with quick direct command line access to GDB when needed.
Cons:
For files to be "visible" to the project (e.g. accessible from "open" dialog, scanned for intellisense, navigable from the "project" window, appear in "project" search results), they have to be added to the project file. GenerateProjectFiles.sh will create a UE4.pro file, but it doesn't include things like .ini files and third-party source.
You can work around some of these problems with two features:
Search for "Files in File System" and select the directory you want to search in (e.g. UnrealEngine/).
Use the "File System" view instead of the "Projects" view for navigation.
Have to manually set up build/run options on each machine. These are stored in a per-user settings file, tied to a specific build "Kit", and aren't distributable across a team.
No C# support.
Install
Your Linux distro may come with a version of Qt Creator, and it may be perfectly fine to use that version. If you want to stay up-to-date with the most recent version of Qt Creator, you can download and install it from https://www.qt.io/download. I recommend installing both Qt Creator and the latest Qt. If you use an older version, the UI may be slightly different from the images below.
Setup
GenerateProjectFiles.sh should have created a UE4.pro file in your base UnrealEngine directory. From the main screen of Qt Creator, go to File → Open File or Project and select the UE4.pro file.
The first time you load, it will ask you to choose a kit. The default "Desktop" kit should be fine. Go ahead and click Configure Project.
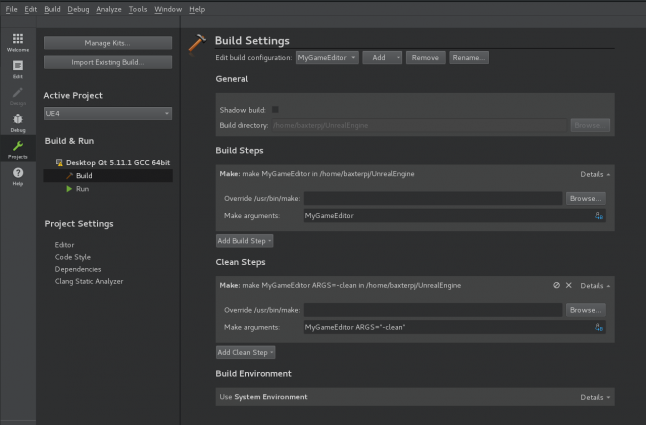
Build Settings
Click on the Projects icon in the left bar.
Under Build & Run, choose the Desktop kit's Build tab.
Remove all but one of the build configurations. We'll set up one configuration and use it as a template for the others.
Rename the remaining configuration MyGameEditor. This will be the main configuration for development.
Change the following settings:
Uncheck Shadow build.
Under Build Steps, delete the qmake step (we'll be using the makefile generated by Unreal).
For the remaining Make step, set Make arguments to: MyGameEditor.
Under Clean Steps, set the Make step's Make arguments to: MyGameEditor ARGS="-clean"
That's all you need to get building! If you want to set up the other build options, you can Add → Clone Selected and create whichever configuration you need:
Config Name | Make/Clean Args | Purpose |
|---|---|---|
MyGameEditor (Debug) | MyGameEditor-Linux-Debug | Build engine/game code in debug |
MyGameEditor (DebugGame) | MyGameEditor-Linux-DebugGame | Build only game code in debug |
MyGame | MyGame | Builds the game as a standalone binary (requires cooked content) |
MyGame (Debug) | MyGame-Linux-Debug | Builds the standalone game in debug mode. |
MyGame (Test) | MyGame-Linux-Test | Builds the standalone game in test mode (shipping mode + dev console and a few dev tools) |
MyGame (Shipping) | MyGame-Linux-Shipping | Builds the standalone game in shipping mode (no cheats/dev tools). |
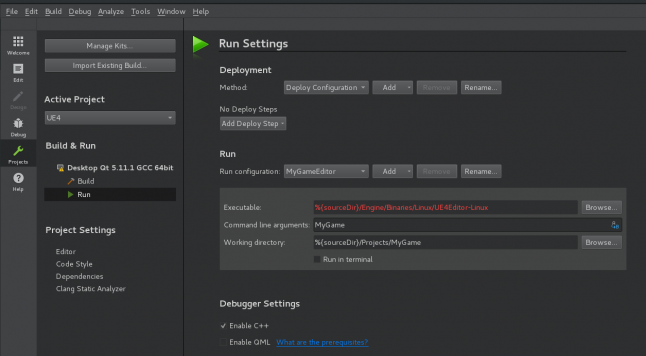
Run Settings
Navigate to the Run settings.
Rename the default Run configuration to MyGameEditor. We'll use it as a template for the other configurations
Change the following settings:
Set the Executable to: %{sourceDir}/Engine/Binaries/Linux/UE4Editor
Set the Command line arguments to: MyGame
Set the Working directory to: %{sourceDir}/Projects/MyGame
That's all you need to get running! If you want to set up the other build options, you can Add → Clone Selected and create whichever configuration you need:
Config Name | Executable | Command line arguments |
|---|---|---|
MyGameEditor (Debug) | %{sourceDir}/Engine/Binaries/Linux/UE4Editor-Linux-Debug | MyGame |
MyGameEditor (DebugGame) | %{sourceDir}/Engine/Binaries/Linux/UE4Editor | MyGame |
MyGame | %{sourceDir}/Projects/MyGame/Binaries/Linux/MyGame | |
MyGame (Debug) | %{sourceDir}/Projects/MyGame/Binaries/Linux/MyGame-Linux-Debug | |
MyGame (Test) | %{sourceDir}/Projects/MyGame/Binaries/Linux/MyGame-Linux-Test |
Debug Settings
Pretty Printers
Epic distributes "pretty printers" for GDB, which provide visualizers for some of their native data types (like the .natvis file does for Visual Studio). For example, with pretty printers enabled, GDB displays the textual content of the FString instead of the underlying memory allocator information.
Unfortunately, these printers don't quite conform to the "official" standard listed in the pretty printer documentation. As such, Qt Creator is unable to parse them and use them internally by default.
I've tweaked the way the printers are generated so that Qt Creator can use them, and for now you can find the change in this pull request. Download the UE4Printers.py file, and place it in ~/.config/Epic/GDBPrinters/, overwriting the existing version of the file. Just be aware that if you ever re-run Setup.sh, it will replace the file with the original version.
Also note that there is a bug with pretty printers in the current version of Qt Creator. The fix should be released soon, but for now, you can replicate the fix info on the fix here.
Finally, to enable pretty printers, go to Tools → Options → Debugger → GDB, and check Load system GDB pretty printers.
General Settings
To use tabs instead of spaces:
In the Options navigate to C++ → Code Style
Copy... the built-in style to a new style so you can Edit... it
And under Tabs And Indentation, set the Tab policy to Tabs Only.
Do the same (Tabs Only; Tab size: 4; Indent size: 4; "With Regular Indent") under Text Editor → Behavior to adjust behavior for non-C++ files.
Under Options, navigate to C++ → File naming and uncheck Lower case file names. Otherwise, when you create a file, it will ignore your casing.
Snippets
I've created some Qt Creator snippets to aid in UE4 development. They can be found here.
Use
The bottom of the left-hand toolbar has the build/run/debug buttons. The icon at the top lets you choose which configuration to build and run (similar to XCode).
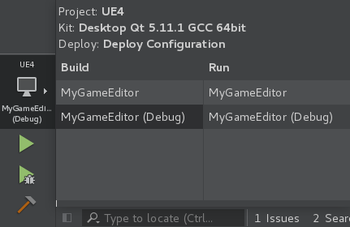
Click the hammer icon to build. Click the green arrow to run, or the green arrow with the bug icon to debug.
Debugging
The visual debugger should be fairly intuitive.
To interact directly with GDB via the command line, go to Window → Views → Debugger Log. The left column allows you to enter commands. The right column shows output.
Pro Tips
The "project" will not save which windows were open last. Every time you reopen the project, you will be starting fresh. To restore opened windows, you need to create a "session", and open that when you restart QtCreator. To create a session:
Go to File → Sessions → Manage...
Create a New session.
Switch to it.
When you cancel a build in Qt Creator, the signal it sends to 'make' causes it to not properly close the mono instance the Unreal Build Tool is running in. This leaves the canceled build still running in the background. To fully kill the build, open the System Monitor (or use top or ps aux and kill) to kill the process called Main. You should see all of the clang and clang++ processes slowly close out.
Some handy shortcuts:
Ctrl+K to search for files in the project.
Ctrl+B to build.
Alt+0 to toggle the sidebar.
Ctrl+[ and Ctrl+] to navigate up or down to the next brace.
Ctrl+/ to toggle commenting-out the selected code.
The Search Results tab keeps a history of previous searches, and for each search, it remembers your last position in the window. This is super-handy for navigating down (and then back up) function calls using searches.
You'll probably want to search using Files in File System, so the search will include things like ini files.
I'd recommend including at least the following extensions: *.ini, *.cpp, *.h, *.inl, *.cs
If you're searching for shader-related code, you'll want to add: *.usf, *.ush
Conclusion
I hope this guide will prove useful to UE4 developers working on Linux. There are several small issues and annoyances I've come across, but having a good IDE and debugger makes life a good bit easier.
If you have any questions or run into any issues, let me know in the comments.
Read more about:
Featured BlogsAbout the Author(s)
You May Also Like


.jpeg?width=700&auto=webp&quality=80&disable=upscale)


