Daily news, dev blogs, and stories from Game Developer straight to your inbox
Sponsored By
Using Google Action Script to create highly collaborative dev tools
Google Apps Script (GAS) provides an incredibly powerful way to create collaborative tools for game development. This post walks you through the implementation of a fully functional localization tool using GAS and a Google Sheet.
17 Min Read

Here at Victory Lap Games we are creating a game called Blast Zone! Tournament (BZT). BZT is going to be shipped in at least 12 languages, we already have a few thousand strings that have been translated, and we will continue to add new strings and edit the existing strings as we continue development on the game. After BZT! launches, we will add more strings for live operations such as tournaments. We need a good way to manage our strings.
At a basic level, a translation sheet provides a place to enter a unique string identifier (StringId) as well as a text string per supported language for all of a game’s text fields. To ensure we only retranslate strings when necessary and to minimize errors, we need an automated way to know if translated strings are up-to-date or not. We also want an easy way to export a JSON data file per supported language with key-value pairs for the text strings; the keys are the StringIds and the values are the text strings in each file’s language.
We ended up using and being pretty happy with our GAS (Google App Script) driven Google Sheet. GAS makes it incredibly easy to create JavaScript add-ons for Google Sheets, Docs, and Forms. After a bit of fiddling around, we created a simple and powerful tool that does all of the above and much more:
Provides a fully collaborative solution that enables people around the globe to work together without copying files around
Automatically translates new English strings into each of the additional languages
Supports both \n and visualized returns (ALT + Enter) in a Google sheet
Handles the export of potentially finicky characters like " in an elegant manner
Warns the user if a duplicate StringId is entered into the sheet
Here's a walkthrough and the source code needed to create an interactive localization sheet; you may find this tool useful for your game or use this walkthrough as a basic introduction to programming add-ons in GAS.
NOTE: This walkthrough assumes you know how to program and are at least vaguely familiar with JavaScript, C, C#, or C++. If you want a primer on JavaScript, check out Codecademy’s awesome tutorial.
Disclaimer
This code is provided for free and distributed with the MIT license. Also, I don’t claim this code is optimal or even pretty yet it should give you some insights in what GAS can do. Also, if you want to skip the step by step tutorial, the source code in its entirety is available right here.
Create a Google Sheet
Create a new Sheet on your Google Drive.
The image below shows the first entries in BZT’s sheet. You can see the list of languages at the top. Then each of the following rows have a StringId followed by the English text and each of the translations:
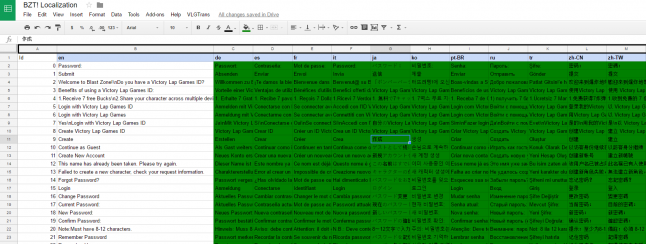
For the list of languages on the top row, we are using Google's language codes as these values can be passed to the GOOGLETRANSLATE() function to translate a string from its source language to each of the translated languages.
In your sheet, add at least 2 languages to the top row. As in the sheet above, B1 can be set to ‘en’ and C1 set to ‘de’. Or, just copy this example sheet.
The StringId’s in this example are the numbers starting at A2 through A23. Feel free to make them anything you see fit. In many games, people use names that give programmers and designers an idea of where the strings are used such as “main_menu.start_game”.
Let’s start scripting!
In your sheet, go to Tools->Script Editor to open up the Script Editor. You will notice that your code file is called code.gs and it contains the function myFunction() {}.
Delete the myFunction(){} text.
The first thing we want to know is when the sheet is being edited so we can do things like ask if newly entered English text invalidates the current translations. Fortunately, Google provides an onEdit(e) callback that is called whenever a sheet is changed. Also, their SpreadSheetApp service provides access to the currently active Google sheet.
The code below uses onEdit(e) as its entry point and does the following tasks:
Gets the active Google sheet
Determines the range of cells that were changed in the sheet - remember that the user may delete a whole block of cells at once!
Checks if the top-left changed cell was DELETED, CHANGED, or INIT'ed - Google only provides the prior-value for the top-left cell
Calls the appropriate function depending on if a StringID, source string, translated string, or the language list was changed
Brace yourself for the first bit of code, copy and paste the code below into the Script Editor:
// Enums
function Enum(constantsList)
{
  for(var i in constantsList)
  {
    this[constantsList[i]] = i;
  }
}

// Delete a prior non-NULL value
// Change a non-NULL value to a different non-NULL value
// Change a NULL value to a non-NULL value
var EditType = new Enum(['DELETE', 'CHANGE', 'INIT']);

// Generic "on edit" by user
// NOTE: Minimize the code here as it will affect overall Sheet performance
function onEdit(e)
{
  'use strict';
  var s = SpreadsheetApp.getActiveSheet();

  // Edits happen on a "grid" of 'x by y' cells
  // So, we will iterate over the changes, one by one
  var active_cells = s.getActiveRange();

  var start_row = active_cells.getRow();
  var start_column = active_cells.getColumn();

  var width = active_cells.getWidth();
  var height = active_cells.getHeight();

  var i;
  var j;

  var edit_type = EditType.DELETE;
  if(width == 1 && height == 1)
  {
    if((e.oldValue == "" || e.oldValue == undefined) && active_cells.getValue() !== "")
    {
      edit_type = EditType.INIT;
    }
    else if((e.oldValue != "" && e.oldValue != undefined) && active_cells.getValue() === "")
    {
      edit_type = EditType.DELETE;
    }
    else
    {
      edit_type = EditType.CHANGE;
    }
  }
  else
  {
    if(active_cells.getValue() === "")
    {
      edit_type = EditType.DELETE;
    }
    else
    {
      edit_type = EditType.CHANGE;
    }
  }

  // Go through each change
  for(i = 0; i < width; i++)
  {
    for(j = 0; j < height; j++)
    {
      var row = start_row + j;
      var column = start_column + i;

      var  current_cell = s.getRange(row, column);

      if(row == 1) // Localization languages
      {
        if(column > 1)
        {
          // Top bar list of languages changing
          changeLanguageList(s, current_cell, edit_type);
        }
      }
      else if(column == 1)
      {
        // StringId changing
        changeStringId(s, current_cell, edit_type);
      }
      else if(column == 2)
      {
        // Primary language text changing
        changeSourceText(s, current_cell, edit_type);
      }
      else
      {
        // Likely translated text changing
        changeTranslatedText(s, current_cell, edit_type);
      }
    }
  }
}
If you made it this far and aren’t totally confused, great! We are almost ready to run the script for the first time. We just need one more code block.
Adding strings – part 1 of 3, Enter the StringId
The most common action users will perform is adding new strings. In general, they will first add the StringId and then enter the English text. At a later date, translator(s) will update the translated text strings.
We definitely want to inform the user if their new StringId is not unique. Please, copy and paste the following code block to the end of your script:
function informDuplicate(x, y)
{
  var ui = SpreadsheetApp.getUi(); // Same variations.

  ui.alert(
    'Warning',
    'Row ' + x + ' and row ' + y + ' both have the same id',
    ui.ButtonSet.OK);
}

// s - SpreadsheetApp
// r - Cell being changed
// EditType.INIT, EditType.DELETE, EditType.CHANGE
function changeStringId(s, r, edit_type)
{
  var value = r.getValue();

  if(value !== "" && (edit_type == EditType.CHANGE || edit_type == EditType.INIT))
  {
    var current_row = r.getRow();

    // Determine size of the sheet
    var start_row = 2;
    var data_range = s.getDataRange();
    var end_row = data_range.getLastRow();

    var values = s.getRange(start_row, 1, end_row - start_row + 1, 1).getValues();
    var new_row = current_row - start_row;

    var row = 0;
    while(row <= end_row - start_row)
    {
      if(row !== new_row)
      {
        if(value === values[row][0])
        {
          informDuplicate(current_row, row + start_row);
        }
      }
      row += 1;
    }
  }
}
Time to test this out!
Your script should have a red asterisk by its name. Save your script by pressing File->Save.
In the Script Editor, go to Publish->Test as Addon. Give your project a name, set INSTALLATION CONFIG to “Installed and Enabled”, select your current sheet from Spreadsheets, then press save. Now your document should be interactive!
Try entering 2 identical StringId’s and you should see a warning dialog box.
The code merely informs the user that there are duplicate StringIds; yet, there is one very important aspect to this code which new programmers might not notice. See the line where var values = s.getRange(…). We are getting a copy all the StringIds for the while loop below. That method of getting the data is much faster than putting a s.getRange(current_row, 1) inside the while loop which would cause separate hits to the database for each iteration of the loop. It is also worth noting that Google will actually stop the processing of your function if you have too many separate hits to the backend database. On a large localization sheet, placing s.getRange(current_row, 1) in the while loop would actually break the functionality of the function as Google will halt the loop’s execution. In general, use as few calls into the Google services as needed and you’ll keep your scripts running quickly.
Adding strings – part 2 of 3, Changing the source text
After entering the StringId, we tend to write our source text in English. We are also assuming that the other languages' strings will always be based on the provided English text.
Our non-English translated text strings have 4 possible background colors:
Green – user-provided text that was changed after the English text was entered (up-to-date)
Orange – the English text was updated more recently than the user-provided translated text (needs new translation)
Red – the translated text was provided by Google Translate
White – The translated text was entered before the StringId was entered
We allow Google translated text to change freely as the English text changes. Yet after a translation is provided, orange text will not automatically change and it will be either have a green (up-to-date) or orange (needs new translation) background. It is worth noting that the cells’ background colors can be manually changed at any time. So, make sure people using your sheet understand the tools they are using.
Please, add the following code to the end of the script and look it over:
// s - SpreadsheetApp
function getLanguageListCount(s)
{
  // Location of the primary language
  var primary_language = s.getRange(1, 1);
  var count = 0;

  var nextCell = primary_language.offset(0, 1);
  while(nextCell.getValue() !== "")
  {
    count += 1;
    nextCell = nextCell.offset(0, 1);
  }

  return count;
}

function askInvalid()
{
  var ui = SpreadsheetApp.getUi(); // Same variations.

  var result = ui.alert(
     'Please confirm',
     'Does the updated text require new translation?',
      ui.ButtonSet.YES_NO);

  // Process the user's response.
  if (result == ui.Button.YES)
  {
    // User clicked "Yes".
    return true;
  }
  else
  {
    // User clicked "No" or X in the title bar.
    return false;
  }
}

// s - SpreadsheetApp
// r - Cell being changed
// EditType.INIT, EditType.DELETE, EditType.CHANGE
function changeSourceText(s, r, edit_type)
{
  //var s = SpreadsheetApp.getActiveSheet();
  var row = r.getRow();

  // Don't process this change if there is no string id
  var string_id = s.getRange(row, 1).getValue();
  if(string_id === "")
  {
    return;
  }

  var lang_count = getLanguageListCount(s);
  //SpeadsheetApp.getUi().alert('lang', lang_count, SpeadsheetApp.ButtonSet.YES_NO);

  var invalidate = true;
  if(edit_type == EditType.CHANGE)
  {
    invalidate = askInvalid();
  }

  if(invalidate)
  {
    lang_count--; // Skip the primary language (English)
    var nextCell = r.offset(0, 1);

    // Constant
    var source_language = s.getRange(1, 2).getValue();
    var source_text = s.getRange(row, 2).getValue();

    while(lang_count > 0)
    {
      // If it is red or doesn't have a value set, then update the Google Translate
      if(nextCell.getBackground() == "#ff0000" || nextCell.getValue() === "")
      {
        var column = nextCell.getColumn();
        var dest_language = s.getRange(1, column).getValue();

        var translatedText = LanguageApp.translate(source_text, source_language, dest_language);
        nextCell.setValue(translatedText);
        nextCell.setBackground("red");
      }
      else
      {
        nextCell.setBackground("orange");
      }

      nextCell = nextCell.offset(0, 1);
      lang_count -= 1;
    };
  }
}
Save your script. Go back to the sheet and enter a few StringIds then the English text. The other languages’ text fields should get automatically translated by Google and have red backgrounds.
Adding strings – part 3 of 3, Changing a translated text string
When a translated string is changed, there is comparatively little to do:
If the string isn't empty, then assume it is newly translated text and therefore make it’s background green
If the string is now empty, set the background color to orange
Add the following code:
// s - SpreadsheetApp
// r - Cell being changed
// EditType.INIT, EditType.DELETE, EditType.CHANGE
function changeTranslatedText(s, r, edit_type)
{
  var lang_count = getLanguageListCount(s);
  var column = r.getColumn();
  var row = r.getRow();
  var string_id = s.getRange(row, 1).getValue();

  if(string_id !== "" && column > 1 && column <= lang_count + 1) // Translated languages
  {
    if(r.getValue() !== "")
    {
      r.setBackground("green");
    }
    else
    {
      r.setBackground("orange");
    }
  }
}
Save your script and go back to your sheet. Changing translated text entries on lines with StringIds should make them update in color. Updating the English text should invalidate existing translations if desired.
Now, let’s add a new language
When a new language is added, the one cool thing to do is ask if the user wants Google to provide an initial set of translations. Although we wouldn't use them in the final product, these auto-translated strings are very useful for testing how well the font handles a new language and, especially for German, how well our game’s UI holds up with longer text strings.
Please, add the following code and look it over:
function askGoogleTranslate()
{
  var ui = SpreadsheetApp.getUi(); // Same variations.

  var result = ui.alert(
     'New Language Added',
     'Do you want to add Google Translated text to the language?',
      ui.ButtonSet.YES_NO);

  // Process the user's response.
  if (result == ui.Button.YES)
  {
    // User clicked "Yes".
    return true;
  }
  else
  {
    // User clicked "No" or X in the title bar.
    return false;
  }
}

// s - SpreadsheetApp
// r - Cell being changed
// EditType.INIT, EditType.DELETE, EditType.CHANGE
function changeLanguageList(s, r, edit_type)
{
  if(edit_type == EditType.INIT)
  {
    if(askGoogleTranslate())
    {
      var data_range = s.getDataRange();
      var start_row = 2;
      var end_row = data_range.getLastRow();

      var row = start_row;
      var column = r.getColumn();

      var source_language = s.getRange(1, 2).getValue();
      var dest_language = s.getRange(1, column).getValue();

      var id = s.getRange(row, 1, end_row - start_row + 1, 1).getValues();
      var text = new Array(end_row - start_row + 1,1);  // must be a 2d array
      text = s.getRange(row, 2, end_row - start_row + 1, 1).getValues();

      var loc_text = s.getRange(start_row, column, end_row - start_row + 1, 1);
      loc_text.setBackground('red');

      // Bake out the values
      // NOTE: Cannot iterate through more than 500 cells as GAS has a limit of 500 calls to LanguageApp.translate()
      if(end_row - start_row + 1 <= 500)
      {
        while(row <= end_row)
        {
          if(id[row - start_row] !== "" && text[row - start_row][0] !== "")
          {
            // Translate only have single element calls
            text[row - start_row][0] = LanguageApp.translate(text[row - start_row][0], source_language, dest_language);
          }
          row += 1;
        }

        // Do a single big set call
        loc_text.setValues(text);
      }
      else
      {
        // I prefer the backed text solution above yet this works
        loc_text.setFormula('=GOOGLETRANSLATE(B2, "' + source_language + '", "' + dest_language + '")');
      }
    }
  }
}
Save your script and go back to your sheet. Add another language to row 1, enter ‘es’ in D1 for example. You should be prompted for if you want to automatically generate Google translations for the new language.
Export the data files
Lastly, we want to be able to export our strings. Yet so far, we have relied on changing the sheet for our code to be run. The code below adds a new menu to the top of our sheet and also implements a basic JSON exporter.
Copy and paste the code below into the Script Editor.
// s - SpreadsheetApp
function getLanguageList()
{
  var s = SpreadsheetApp.getActiveSheet();

  // Location of the primary language
  var primary_language = s.getRange(1, 1);
  var name_array = [];

  var nextCell = primary_language.offset(0, 1);
  while(nextCell.getValue() !== "")
  {
    name_array.push(nextCell.getValue());
    nextCell = nextCell.offset(0, 1);
  }

  return name_array;
}

function onOpen()
{
  var ui = SpreadsheetApp.getUi();
  // Or DocumentApp or FormApp.
  ui.createMenu('VLGTrans')
      .addItem('Export', 'ExportAllLanguages')
      .addToUi();
}

function ExportAllLanguages()
{
  var s = SpreadsheetApp.getActiveSheet();
  var languages = getLanguageList();
  var language_count = languages.length;

  // Determine size of the sheet
  var data_range = s.getDataRange();
  var start_row = 2;
  var end_row = data_range.getLastRow();

  var cur_lang = 0;

  for(cur_lang = 0; cur_lang < language_count; cur_lang++)
  {
    var text_file = "{\n";
    var row = start_row;
    var column = 2 + cur_lang;

    var ids = s.getRange(start_row, 1, end_row - start_row + 1, 1).getValues();
    var lang_strings = s.getRange(start_row, column, end_row - start_row + 1, 1).getValues();

    while(row <= end_row)
    {
      if(ids[row - start_row] !== "")
      {
        // Allow both Alt+Enter and \n in strings
        var res1 = lang_strings[row - start_row].toString().replace(/(?:\r\n|\r|\n)/g, '\\n'); // replace real Alt-Enter with a \n

        // Allow both \" and " without any problems
        var res2 = res1.replace(/\\\"/g, '\"'); // replace \" with a " (so, all are just a ")
        var text = res2.replace(/\"/g, '\\\"'); // make all single " a \"

        text_file += '"' + ids[row - start_row] + '":"' + text + '"';
        if(row < end_row)
        {
          text_file += ",";
        }
        text_file += "\n";
      }

      row += 1;
    }
    text_file += "}";

    DriveApp.createFile(s.getName() + '_' + languages[cur_lang], text_file, MimeType.PLAIN_TEXT);
  }
}
Save your code. You need to close your sheet for the onOpen() function to run and create the new Export menu item. So, CLOSE your sheet and reopen it. You should see the VLGTrans->Export menu item. Press Export and then check your Google Drive for the localization files.
The code above also ensures both \n and Alt+Enter work as a newline as sometimes it is nice to see formatted text in the Google Sheet. We also support both \" and " in text strings as an example of string processing which you can expand on if desired.
That's it for the basic tool.
What more is there to do?
For those that want to learn more via coding, here is a partial list of additional features:
Add a menu item to go to the next out-of-date translated text field for a particular language
Add built-in support for gender-specific strings. What if the hero can be either male or female? In many languages, both the speaker's and listener's genders affect the sentence.
Add validation and logging to the exporter: Do all parameters, say {0} and {1}, exist in all languages? Are all StringIds unique? Are there any blank fields in any languages?
Add an “Export out-of-date strings” feature
Add an import updated strings mean feature
And a whole lot more...
In Conclusion
Having highly collaborative tools allows you to scale your team easier. Maybe this simple tool will help you and your team; and if nothing else, hopefully this post helps prod additional people to write and share GAS-powered game development tools.
Read more about:
BlogsAbout the Author(s)
You May Also Like