

Daily news, dev blogs, and stories from Game Developer straight to your inbox
Sponsored By
Featured Blog | This community-written post highlights the best of what the game industry has to offer. Read more like it on the Game Developer Blogs or learn how to Submit Your Own Blog Post
Turning your Steam Machine into a devkit
Be it SDD attendees' BRIX Pros from Intel or homebrew SteamOS-based boxes, I expect many developers wanting to use one as a devkit. Here's how to easily deploy software to it and debug it remotely.
11 Min Read

I happen to be one of the lucky lessees of the Gigabyte BRIX Pro (Intel Corporation makes no mistake about it making it clear it's their property on lease) thanks to my participation in Steam Dev Days. Even though these days my main development system is a Debian Linux box, the BRIX's somewhat unique hardware - the Intel Iris Pro 5200 GPU - combined with SteamOS, makes it desirable to be able to treat the little Steam Machine in the same way as a console devkit.
In this article I will try to explain how to achieve the following with a SteamOS box:
easy deployment of software,
remote control (starting and killing of processes, grabbing screenshots),
remote debugging.
As you can see, this does not include building, which I think is better to do locally and not remotely, but with a little bit of general Linux knowledge you should be able to set it up without too much effort.
SteamOS is based upon Debian Linux. Having used Debian daily for more than I care to remember made things easier to start with. For all kinds of remote access, including file system access, we will use SSH. Remote debugging over network can be achieved using gdbserver.
SteamOS setup
After installation, SteamOS has two user accounts: steam for the Big Picture mode, which is the one the system boots into by default, and desktop, which has a Gnome-based desktop interface. Both accounts are password-less, which will turn out to be significant in a moment.
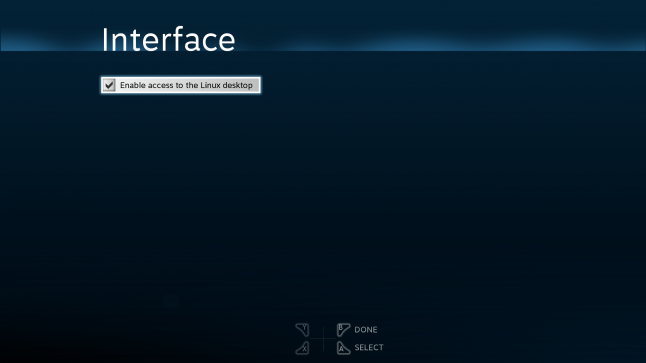
We need to do some setting up on the machine itself first, so go to Settings -> Interface and Enable access to the Linux desktop.
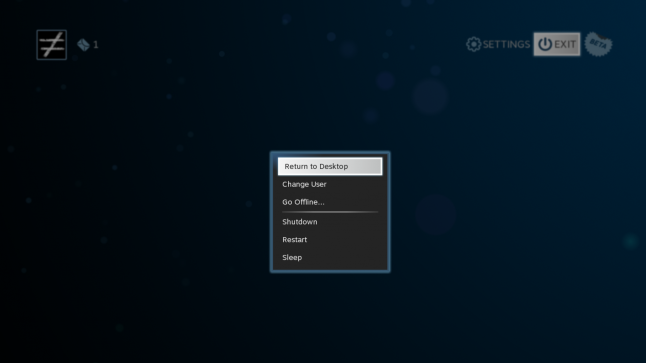
Then we have to actually access the desktop, which we can do by going to the Exit menu and choosing Return to Desktop.
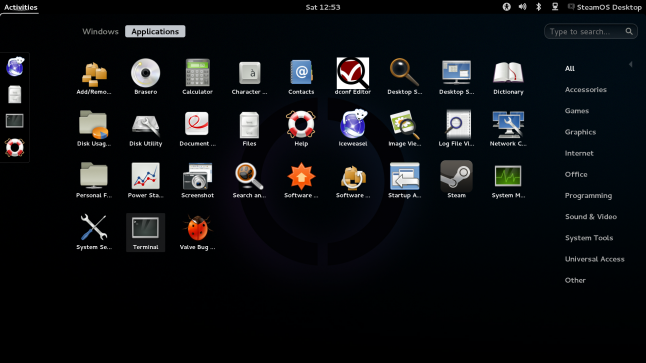
That should switch us to the desktop user and present us with a Gnome user interface. Click Activities in the top-left corner to bring out the menu, then choose Applications, and then Terminal.
The first thing we need to do is to set up a password for this account. This is necessary to be able to acquire system administrator (root) permissions to install software and what not.
From this point on in this article, a line starting with the dollar sign ($) means a shell command to be executed as a regular user, while the pound sign (#) means a shell command executed as root. The command sudo allows a regular user to acquire root rights, for the duration of a single shell command, by typing your regular user's password.
In order to change the password, type:
$ passwd
And type any password you like, twice. Note that the characters you input will not be displayed.
Cool, now we can start installing software. The first, and basically the only thing we need is the OpenSSH server - it will allow us full remote access to the machine. Here's how to install it:
$ sudo apt-get install openssh-server
This should get the SSH server up and running. The last thing we need to know is the IP address of the SteamOS box (note the fragment in bold; if you have more network interfaces, such as wifi, they may be listed as wlan0 or something similar):
$ /sbin/ifconfig
eth0 Link encap:Ethernet HWaddr 74:d4:35:4e:38:2c
inet addr:192.168.0.25 Bcast:192.168.0.255 Mask:255.255.255.0
inet6 addr: fe80::76d4:35ff:fe4e:382c/64 Scope:Link
UP BROADCAST RUNNING MULTICAST MTU:1500 Metric:1
RX packets:82606 errors:0 dropped:0 overruns:0 frame:0
TX packets:36889 errors:0 dropped:0 overruns:0 carrier:0
collisions:0 txqueuelen:1000
RX bytes:95247271 (90.8 MiB) TX bytes:45690367 (43.5 MiB)
lo Link encap:Local Loopback
inet addr:127.0.0.1 Mask:255.0.0.0
inet6 addr: ::1/128 Scope:Host
UP LOOPBACK RUNNING MTU:65536 Metric:1
RX packets:214 errors:0 dropped:0 overruns:0 frame:0
TX packets:214 errors:0 dropped:0 overruns:0 carrier:0
collisions:0 txqueuelen:0
RX bytes:17236 (16.8 KiB) TX bytes:17236 (16.8 KiB)
You can now go back to your main development box, we'll be controlling SteamOS remotely from this point on.
Logging in without a password
I will now assume you are on a Linux box, since SteamOS development requires a Linux development machine anyway; however, all of the required SSH functionality can be achieved on Windows by using PuTTY, and on MacOS as well.
Working with the SteamOS has a catch: the user accounts are by default password-less. This means that you can neither easily acquire root rights, which is necessary to e.g. install software, nor log in via SSH to remotely control the machine. We have fixed that only partially in the previous step - we can now use SSH to get into the desktop account, but we still can't log into the steam account, which is what we should be doing to launch games. Setting up a password for the steam account is not a viable option, though - some things in SteamOS expect it to have no password, and by setting one we may break some stuff. We do not want that.
Fortunately, SSH has a very useful feature called authorized keys, which is a list of public keys (if you don't know what these are, read up on asymmetric cryptography) authorized to log into an account without typing the account's password.
If you are on a Linux box, chances are you already have a public key associated with your development user account (look for a file called ~/.ssh/id_rsa.pub). If not, use the ssh-keygen tool to generate one. The PuTTY suite has a key generator of its own which you can also use.
The desktop account
Once you have your key set, we need to upload the public key (do not confuse with the private one!) to the Steam Machine. This can be done via a single command:
$ ssh-copy-id desktop@[IP address of your SteamOS box]
The ssh-copy-id utility will ask for the password for the user desktop we have set in the previous section. Once you provide it, you will be able to SSH into that account without providing a password.
If for some reason this does not work, all you need to do is to append the contents of your ~/.ssh/id_rsa.pub from the development machine to the /home/desktop/.ssh/authorized_keys file on the SteamOS devkit.
You may want to repeat this step for any user account on any development machine you want to use to connect to the devkit.
The steam account
Unfortunately, we can't just ssh-copy-id into the steam account, since it still has no password. We can, however, just copy the authorized key list into that account, so let's log onto the devkit:
$ ssh desktop@[IP address of your SteamOS box]
Make sure the .ssh directory exists for the steam account and that it's accessible to that account (i.e. it belongs to the steam user and group):
$ sudo mkdir -p ~steam/.ssh && sudo chown steam ~steam/.ssh && sudo chgrp steam ~/steam.ssh
And finally, copy the authorized key list:
$ sudo cp ~/.ssh/authorized_keys ~steam/.ssh/authorized_keys
You will also need to repeat the above steps (ssh-copy-id and authorized key list copying) for new developer accounts wanting to connect to the devkit.
Remote file system access
SSH provides access not only to the command shell on a remote system, but also to its file system. There are many tools for that - the OpenSSH client for Linux includes scp and sftp (on Windows, the PuTTY suite provides PSFTP), but for transparent access I highly recommend using sshfs (should be available in your Linux distro's package manager) - it makes the remote volume accessible just like a locally mounted hard drive partition, for instance.
There are conceptually similar tools for Windows, such as win-sshfs and Dokan, allowing mapping of SSH connections as Windows network drives, but the projects seem dormant - they may or may not work for you.
Remote control
Controlling the devkit remotely boils down to sending commands to it via SSH. A rule of thumb is that for any application which is not just a command line tool, but interacts with X11 (i.e. the graphics layer in Linux), you need to prepend the command with a string like DISPLAY=:0. What it does, is it sets the environment variable DISPLAY for the duration of the shell command that follows to the X11 display used by the steam account (this is basically always :0).
You can also start all your SSH sessions by typing:
$ export DISPLAY=:0
Which will set the variable for the duration of the session, or better yet - add it at the end of the ~/.profile file (it's like the autostart script for the command line shell).
Here are a few examples. You might want to turn those commands into scripts for quick issuing from the developer machine.
Taking screenshots
The easiest way is to use Gnome's screenshot utility:
$ DISPLAY=:0 gnome-screenshot
This will save the frame grabs to the ~/Pictures directory of the steam account in PNG format, complete with a timestamp. An error message could be shown; disregard it, it will still work.
Launching your game
This most essential feature is currently broken, as the game works but does not display. :) Working to fix it. Read on for a temporary workaround.
Simply launch it, making sure your DISPLAY variable is in order.
$ DISPLAY=:0 [path to your game executable]
Since the above currently does not make your game display, you can work around it by using the desktop account and DISPLAY=:1 instead and running the "legacy" non-Big Picture Steam client from there. To do that, we will first need to install the legacy client launcher:
$ sudo apt-get install steam-launcher
Then we can launch Steam (not from the desktop "Return to Steam" icon! you can use the Activities menu instead or type steam into a terminal, or press Alt+F2 for the "Run" dialog) and let it bootstrap itself. Then proceed as above, but staying on the desktop account and DISPLAY=:1.
Killing a process
If your game has crashed and you need to kill it, simply issue the kill or killall command:
$ kill [PID of process to kill]
$ killall [name of process executable]
The subtle difference being that killall will kill all processes of that executable, not just the chosen PID.
The above sends the SIGTERM signal, which is a request for a graceful exit. If the process has crashed so badly it cannot do a graceful termination, you may need to issue a SIGKILL signal instead (forceful termination):
$ kill -9 [PID of process to kill]
$ killall -9 [name of process executable]
System shutdown or reboot
To do this, you need root access, so log into the desktop account and type:
$ sudo poweroff
$ sudo reboot
According to the desired effect.
Setting up the remote debugger
This is a little bit more tricky, since gdb is not present in Valve's SteamOS package repository. However, we can hook up Debian repositories with your SteamOS installation - Steam user Shark has written a really good guide to installing Debian packages on SteamOS. You can skip steps 1-4, log into the desktop account via SSH and pick up at 5.
Once you have done that, simply use APT to install the gdb and gdbserver packages (note the -t option, which makes for a greater chance the install will go smoothly):
$ sudo apt-get -t install gdbserver
And you're all set!
Debugging via SSH
If you're comfortable with the command line, the easiest thing to do is to simply run your game in gdb, just like running it normally.
$ DISPLAY=:0 gdb [path to your game executable]
However, this will not work if you are using a GUI frontend for gdb. If that's the case, read on.
"Real" remote debugging
The gdbserver is exactly what it sounds like: it's the back-end portion of the gdb debugger glued to a simple server accepting connections. Once started, it will wait for a gdb front-end to connect. From the front-end point of view, it makes almost no difference in your mode of operation, which also allows you to use GUI front-ends.
Log back into the steam account for testing and launch your game on the devkit:
devkit$ DISPLAY=:0 gdbserver [devkit hostname]:[port number] [path to your game executable]
Port number is arbitrary, any free TCP port will do.
Then connect to the server from your development machine (note that we're still launching the game executable in gdb - this is to pull in the debug symbols, which will not be loaded otherwise):
developer-machine$ gdb [path to your game executable]
(gdb) target remote [devkit hostname]:[port number]
From this point on, the client gdb has full control of the executable running on the devkit.
Summary
Well, that's it! Now hack away and make that game of yours run smoothly on Linux and SteamOS!
Found any errors? Got questions? Comment away!
Read more about:
Featured BlogsAbout the Author(s)
You May Also Like


.jpeg?width=700&auto=webp&quality=80&disable=upscale)


