Daily news, dev blogs, and stories from Game Developer straight to your inbox
Sponsored By
Featured Blog | This community-written post highlights the best of what the game industry has to offer. Read more like it on the Game Developer Blogs or learn how to Submit Your Own Blog Post
Runtime curve generation with the help of Scriptable Objects
Constructing template-based curved trajectories.
11 Min Read

Abstract
Sooner or later, every game developer faces a problem with implementing a curved movement in his game. For example, you can use this feature to define more sophisticated projectile trajectories or paths of flying monsters. This tutorial will show you the concepts that will help you define a general shape and then construct such paths dynamically from code with the arbitrary origin and target positions.
Special thanks to Sebastian Lague for his brilliant curve solution.
Glossary
Path - a curved trajectory made up of a series of anchor points connected by line segments.
Anchor - a point on the path that marks the end of one curve segment and starting of another
Origin - a starting point of a path
Target - ending point of a path
Shape template - a set of points that define a general shape template based on which we create a real path with the arbitrary origin and target points during runtime.
Prerequisites
The only asset we will need is any bezier asset. You can use any asset you like, but for this guide, let’s choose the free and open source project Path Creator by Sebastian Lague.
You can download it from here: https://github.com/SebLague/Path-Creator
Creating shape template
What can be a template for a curve? A set of control points or anchors. Let’s look at the picture below: we can define a form of our would-be trajectory with a set of points. Origin and target would be the first and the last points in our points array, and all points between them will serve as anchors through which the path will come.

Okay, we have the desired trajectory shape, but we must have scaled between any two points since origin and target could be anywhere in the runtime game environment. That’s because we can't use predefined paths and should use an object where our shape would be stored. A simple ScriptableObject can help with that.
Path Template
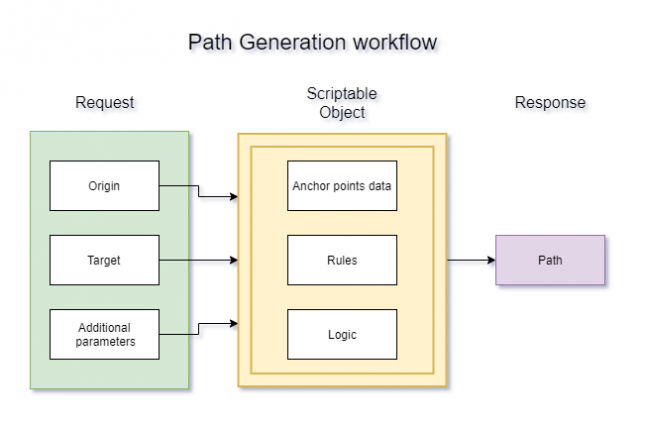
Let’s create a new ScriptableObject class that would encapsulate all necessary data and logic of our path template and provide easy management of various path templates in our project, and name it PathTemplate. This Scriptable should store data about anchor points, any additional parameters that help us build the path we need, and a method that returns a ready path object.
Anchor Data
How can we mathematically describe a set of anchors between an origin and a target? The most straightforward way is to store anchors as offsets from an origin point.
AbsoluteOffsetOfAnchor (From origin of shape template) = Anchor - Origin
But absolute offsets won’t work if the vector between origin and target will vary significantly from the one we set up in our shape template. If you remember, we created shapes when the target is located some distance under the origin, but what if our real target would be located too far or too close or too far in one axis and too close in another? The resulting path will not resemble our shape and can become too stretched or twisted.
To solve this problem, we can use an array of relative anchor offsets as the ratio of the offset of each anchor from origin to the total offset between target and origin in the shape template:
RelativeOffsetOfAnchor(ToTotalOffset of shape template) = (Anchor - Origin)/(Target - Origin)
  //Absolute offsets of an anchor from origin
  public Vector2[] AnchorAbsoluteOffsets;

  //Relative offsets of an anchor from origin
  public Vector2[] AnchorRelativeOffsets;
Now let’s add booleans (separately for x and y-axis ) which defines what logic should we use for path creating in a particular PathTemplate Scriptable.
  //Which set of offsets should be used in our construction path logic separately for x and y
  public bool isXRelative = false;
  public bool isYRelative = false;
Rules for path creating.
What about additional rules with which we can enrich our path template?
We can flip the path in one or both axis:
  //Can be used for rotating constructed path sideways(xDirection) or updown(yDirection)
  // 1 - construct as is, -1 - mirror path along the axis, 0 - strip axis offset from path
  [Range(-1, 1)]
  public int xDirection = 1;
  [Range(-1, 1)]
  public int yDirection = 1;
… and we can randomise anchors of our final path within the specified radius:
//Random radius for anchors between start and end point
//If 0f, then no randomisation applied
public float RandomRadius = 0f;
Path builder method
Let’s conclude this section by describing the method that returns a path.
Note that you can use any bezier creating system you would like, whether it be your own or any 3rd party asset. The only thing that may change if you switch the bezier system will be a type of return value and arguments.
For this tutorial, we will stick to Sebastian Lague’s PathCreator asset, which can build a bezier object (BezierPath) with a set of anchors and then split it into an array of vertices along the path(VertexPath) through which we can move our projectiles and monsters consistently with constant speed.
So let’s continue straight to the method itself:
public VertexPath BuildPath(Transform start, Vector2 end, Bounds bounds)
    {
        var newAnchorsArray = new Vector2[AnchorRelativeOffsets.Length];
        Vector2 totalOffset = end - (Vector2)start.position;

        newAnchorsArray[0] = new Vector2(0,0);

        for (int i = 1; i < AnchorRelativeOffsets.Length; i++)
        {
            float x = xDirection*(IsXRelative ? totalOffset.x * AnchorRelativeOffsets[i].x : AnchorAbsoluteOffsets[i].x);

            float y = yDirection * (IsYRelative ? totalOffset.y * AnchorRelativeOffsets[i].y : AnchorAbsoluteOffsets[i].y);

            newAnchorsArray[i] = new Vector2(x, y);

            if (RandomRadius != 0)
            {
                newAnchorsArray[i] = newAnchorsArray[i] + (Random.insideUnitCircle * RandomRadius);
            }

            if (bounds !=null && !bounds.Contains(newAnchorsArray[i]))
            {
                newAnchorsArray[i].x = Mathf.Clamp(newAnchorsArray[i].x, bounds.min.x, bounds.max.x);
                newAnchorsArray[i].y = Mathf.Clamp(newAnchorsArray[i].y, bounds.min.y, bounds.max.y);
            }
        }

        newAnchorsArray[newAnchorsArray.Length-1] = totalOffset;
        BezierPath bezierPath = new BezierPath(newAnchorsArray, false, PathSpace.xy);
        var vertex = new VertexPath(bezierPath, start);
        return vertex;
We use origin transform, end position, and bounds for parameters since we need to constrain the path in a game zone.
We can start rebuilding anchors from origin to target using arguments into variable newAnchorsArray according to the rules stored in PathTemplate. The first element of newAnchorsArray shall always be equal to the origin position, and the last element shall be equal to the target position.
Then in the for loop, we calculate each anchor between origin and target according to the value booleans IsXRelative and IsYRelative (to choose whether we should use an absolute offset or relative). Multiplication by the variables xDirection and yDirectionis done to reflect the path along the desired axis.
We can add some randomisation with unsophisticated Random.insideUnitCircle multiplied by RandomRadius and constrain the resulting point into bounds.
Don’t forget to set the last point of the array to target position and convert it to the final object (since we use PathCreator in our example, we will use BezierPath for the original curve and then convert it to VertexPath for ensuring a smooth movement with constant velocity if we wish to use this path for movement).
Voila, we did it: Scriptable PathTemplate is ready for use!
I'll show you how to create these templates and use them in our code for moving objects in the next parts.
A simple way to populate PathCreator with shape offsets
It can be useful to initialise PathTemplate automatically according to a set of pre-arranged points.
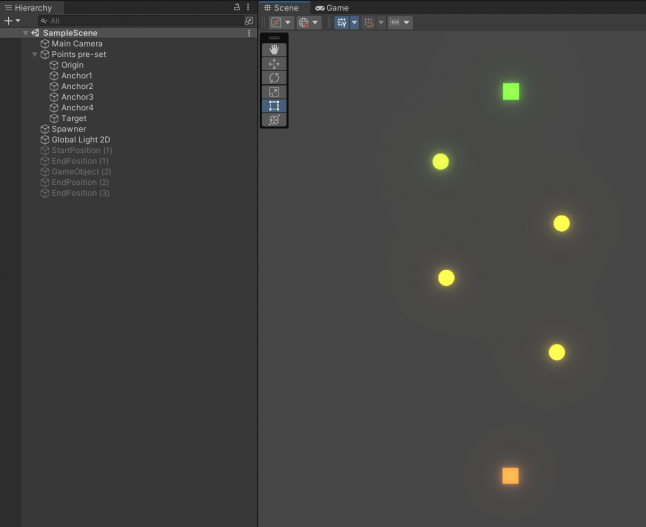
Create an empty scene and arrange gameobjects with the sprite renderer (even empty transform will work) in the desired shape. Look at the picture: I made some gameobjects where Origin is green, anchors are yellow, and the target is orange and placed them under an empty “Points pre-set“ GameObject.
We need a script that calculates offsets for these points and saves them into a supplied PathTemplate object. Create this script and add it on “Points pre-set” GameObject.
using System.Collections;
using System.Collections.Generic;
using UnityEngine;


public class PathTemplateBuilder : MonoBehaviour
{
    //Inititalise this instance of PathTemplate
    public PathTemplate path;

    //Array of points that define a general shape of trajectory
    // First element should be origin, last element should be target
    public GameObject[] Anchors;

    public void Start()
    {
        //Creating arrays to store abslute and relatinve offsets of each point compared to origin
        var absoluteOffsets = new Vector2[Anchors.Length];
        var relativeOffsets = new Vector2[Anchors.Length];

        //Save total offset from Origin to Target to calculate relative offsets
        float dXFromOrigin = Anchors[Anchors.Length - 1].transform.position.x - Anchors[0].transform.position.x;
        float dYFromOrigin = Anchors[Anchors.Length - 1].transform.position.y - Anchors[0].transform.position.y;

        // Calculate offsets for each gameobject in Anchors[]
        for (int i = 0; i < Anchors.Length; i++)
        {
            //Calculate absolute offset
            var dX = Anchors[i].transform.position.x - Anchors[0].transform.position.x;
            var dY = Anchors[i].transform.position.y - Anchors[0].transform.position.y;

            absoluteOffsets[i] = new Vector2(dX, dY);

            //Calculate relative offset
            relativeOffsets[i] = new Vector2(dX / dXFromOrigin, dY / dYFromOrigin);
        }

        //Save offsets to supplied PathTemplate
        path.AnchorAbsoluteOffsets = absoluteOffsets;
        path.AnchorRelativeOffsets = relativeOffsets;
    }
}
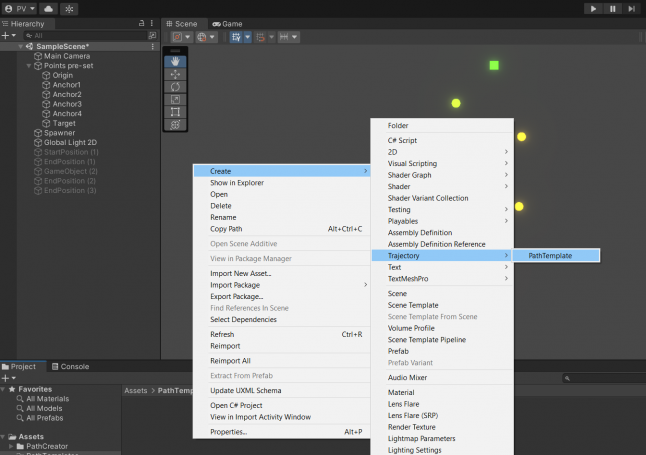
Continue with creating a PathTemplate Scriptable, as shown in the next picture.
Now we need to provide anchors and PathTemplate to our script:
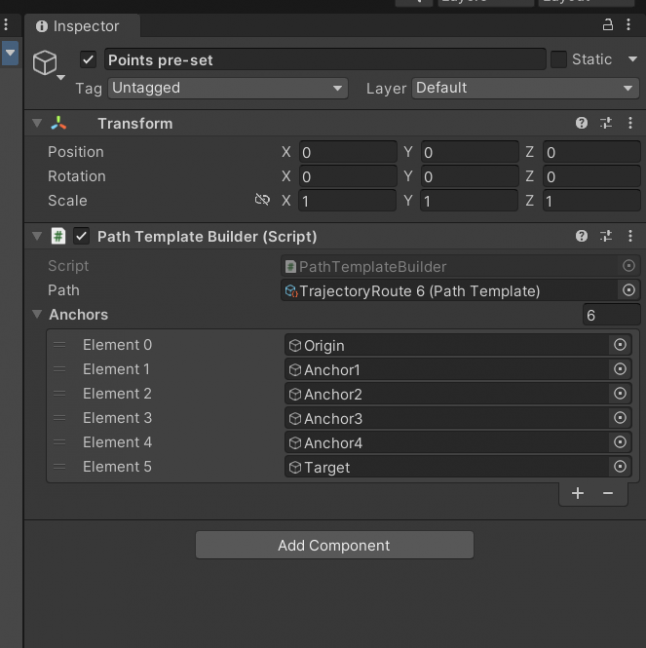
Press Play in the editor to run the script and check what values do we have in our PathTemplate:
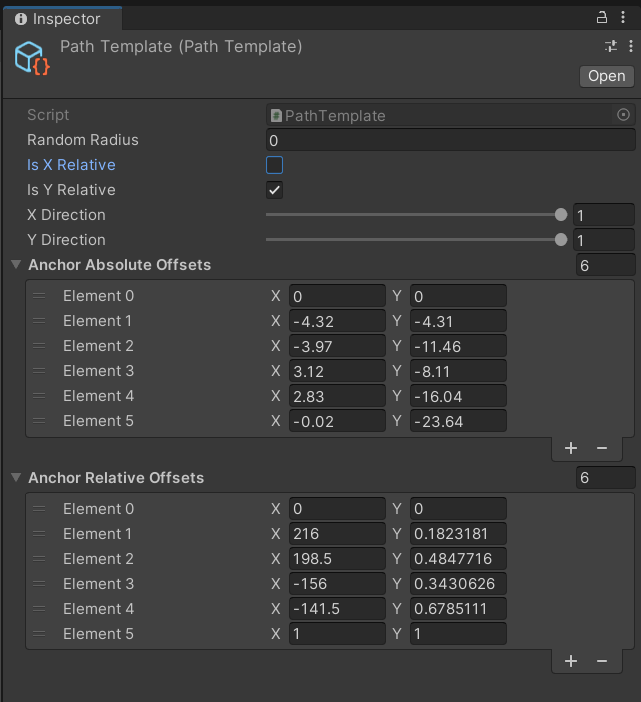
We have been succesfully initialised arrays of offsets and can customise this template to particular needs: let’s set IsYRelative to true because we want this path to be scaled in the up-down direction.
Moving an object along a trajectory
For moving GameObjects along a curved path, we need a script that holds VertexPath and moves GameObject along it. Let’s create a script and name it CurveMover:
using PathCreation;
using UnityEngine;

public class CurveMover : MonoBehaviour
{
    //Current path
    public VertexPath Path;

    //Speed of projectile
    public float Speed;

    //Behaviour type for the VertexPath when object has reached the EndOfPath (for use with PathCreator asset only)
    public EndOfPathInstruction endInstruction = EndOfPathInstruction.Stop;

    //VFX Prefab when object is being destroyed (in real project it should be stored in another class)
    public GameObject VFXOnDestroy;

    //Distance already travelled used for calculating positions in the Update
    private float dstTravelled = 0;


    //Reset and init new path for the object
    public void Init(VertexPath path)
    {
        dstTravelled = 0;
        Path = path;
    }

    public void Update()
    {
        if (Path != null)
        {
            //What should happen when the object have reached the target
            if (dstTravelled >= Path.length)
            {
                GameObject blast = Instantiate(VFXOnDestroy, this.transform.position, Quaternion.identity);
                Destroy(this.gameObject);
                Destroy(blast, 0.5f);
            }
            //Continue to move to the target
            else
            {
                //Increment dstTravelled
                dstTravelled += Speed * Time.deltaTime;
                //Change object's position based on dstTravelled
                transform.position = Path.GetPointAtDistance(dstTravelled, endInstruction);
            }
        }
    }
}
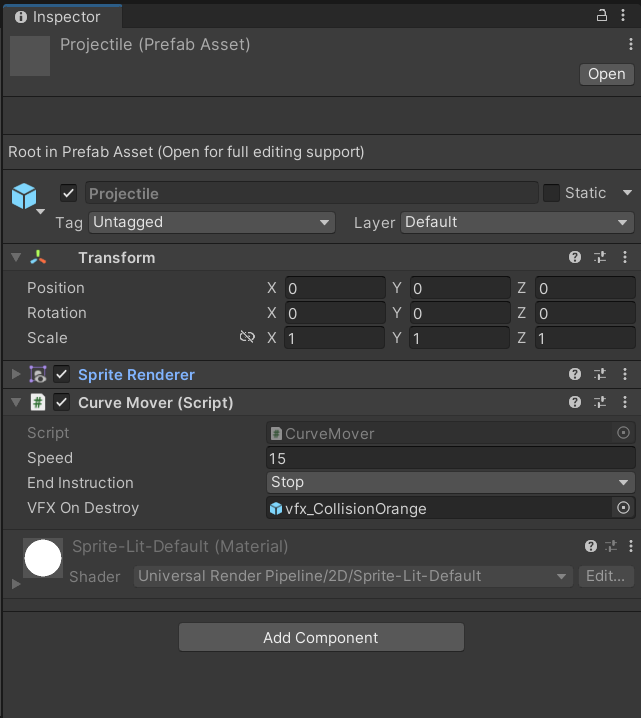
Create a prefab with CurveMover script and initialise it with the following values:
Finally, we have a projectile and a PathTemplate to move it. Let's move on to the most interesting and funny part: shooting!
Spawning and shooting projectiles
It’s easy, and how you can do it depends on your particular project: instantiate (or use existing) GameObject with CurveMover script attached and initialise it with VertexPath from PathTemplate:
//Instantiate a projectile
var obj = Instantiate(myProjectile, StartPosition.position, Quaternion.identity);
//Paste your values here for constraints
var bounds = new Bounds(new Vector2(0, 0), new Vector2(40, 40));
//Get VertexPath from PathTemplate
var path = MyPathTemplate.CalculatePath(gp.transform, EndPositions[Random.Range(0,EndPositions.Length)].position, bounds);
//Initialise projectile it and see how it flies.
obj.GetComponent<CurveMover>().Init(path);
It’s important to note that if you submit a transform of a moving object as the origin of the path, your resulting path will move with it. Because of it, you ought to instantiate empty GameObject to handle such cases and don't forget to destroy it (or return it to the pool if you are using the pooling system) after the path is complete.
Pushing It Further
This guide shows a manageable workflow that helps us create curve-based templates and use them. You can improve this workflow any way you like: for example, build anchors from the ending point or even interpolate your anchor position between start and end positions, put any additional logic into PathTemplate, upgrade CurveMover behaviour or switch to another bezier solution.
Feel free to get in touch with me: https://www.linkedin.com/in/prokhor-vernikovsky-9200b1198/
Read more about:
Featured BlogsAbout the Author(s)
You May Also Like


.jpeg?width=700&auto=webp&quality=80&disable=upscale)


