Featured Blog | This community-written post highlights the best of what the game industry has to offer. Read more like it on the Game Developer Blogs or learn how to Submit Your Own Blog Post
Procedurally Generating Wrapping World Maps in Unity C# – Part 1
In this article series, we will be teaching you how to create procedurally generated world maps, with the help of Unity and C#. This is a four part series.

This article was originally posted on http://www.jgallant.com
Table of Contents
In Part 1 (this article):
Introduction
Noise Generation
Getting Started
Generating the Height Map
In Part 2:
Wrapping the Map on One Axis
Wrapping the Map on Both Axis
Finding Neighbors
Bitmasking
Flood Filling
In Part 3:
Generating the Heat Map
Generating the Moisture Map
Generating Rivers
In Part 4:
Generating Biomes
Generating Spherical Maps
Introduction
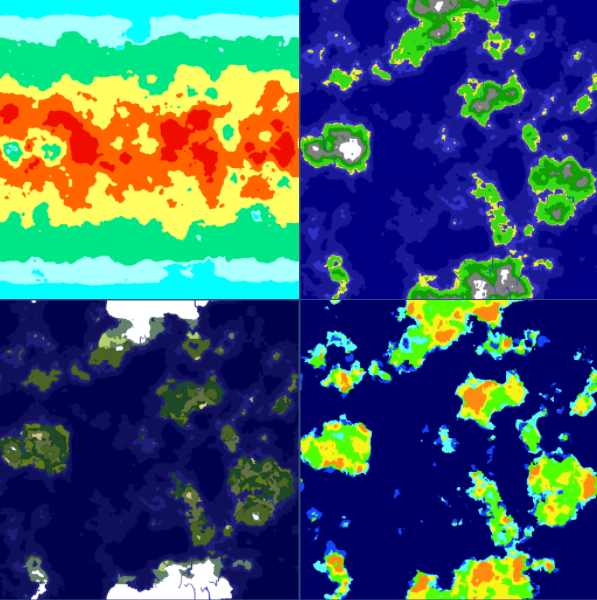
In these tutorials, we are going to create procedurally generated maps that will resemble the following:

The map representations you see above are:
Heat Map (Top Left)
Height Map (Top Right)
Moisture Map (Bottom Right)
Biome Map (Bottom Left)
In the future instalments of this series, we will also cover topics on how to manipulate this map data. We will also look into how to project these maps onto spherical surfaces.
Noise Generation
There are a multitude of different noise generators on the internet, most of which are open sourced. There is no need to re-invent the wheel here, so I opted to use a custom port of the Accidental Noise library.
The C# port was done by Nikolaj Mariager.
Some minor adjustments were made to his port in order to get it to work properly in Unity.
You can use any noise generator you like. The same techniques described in this tutorial can be applied to other sources of noise.
Getting Started
First, we need some kind of container to store the data that we are going to generate.
So, let’s start off by creating a MapData class. The Min and Max variables will serve as a way to keep track of our generated upper and lower limits.
public class MapData {
    public float[,] Data;
    public float Min { get; set; }
    public float Max { get; set; }

    public MapData(int width, int height)
    {
        Data = new float[width, height];
        Min = float.MaxValue;
        Max = float.MinValue;
    }
}
We are also going to create a Tile class, which will be used to eventually create our Unity gameobjects, from our generated data.
public class Tile
{
    public float HeightValue { get; set; }
    public int X, Y;

    public Tile()
    {
    }
}
In order to see what is going on, we will need some sort of visual representation of the data. For this we create a new TextureGenerator class.
For the time being, this class will simply generate a black and white representation of our data.
using UnityEngine;

public static class TextureGenerator {

    public static Texture2D GetTexture(int width, int height, Tile[,] tiles)
    {
        var texture = new Texture2D(width, height);
        var pixels = new Color[width * height];

        for (var x = 0; x < width; x++)
        {
            for (var y = 0; y < height; y++)
            {
                float value = tiles[x, y].HeightValue;

                //Set color range, 0 = black, 1 = white
                pixels[x + y * width] = Color.Lerp (Color.black, Color.white, value);
            }
        }

        texture.SetPixels(pixels);
        texture.wrapMode = TextureWrapMode.Clamp;
        texture.Apply();
        return texture;
    }

}
We will expand on this Texture Generator soon.
Generating the Height Map
Since I decided that the maps are going to be fixed size, we need to set a map Width and Height. We also need a few adjustable parameters for the noise generator.
We are going to expose these variables to the Unity Inspector, as it will make tuning the maps a lot easier.
The Generator class initializes the Noise module, generates height map data, creates an array of tiles, then generates a texture representation of this data.
Have a look at the code, along with the comments:
using UnityEngine;
using AccidentalNoise;

public class Generator : MonoBehaviour {

    // Adjustable variables for Unity Inspector
    [SerializeField]
    int Width = 256;
    [SerializeField]
    int Height = 256;
    [SerializeField]
    int TerrainOctaves = 6;
    [SerializeField]
    double TerrainFrequency = 1.25;

    // Noise generator module
    ImplicitFractal HeightMap;

    // Height map data
    MapData HeightData;

    // Final Objects
    Tile[,] Tiles;

    // Our texture output (unity component)
    MeshRenderer HeightMapRenderer;

    void Start()
    {
        // Get the mesh we are rendering our output to
        HeightMapRenderer = transform.Find ("HeightTexture").GetComponent ();

        // Initialize the generator
        Initialize ();

        // Build the height map
        GetData (HeightMap, ref HeightData);

        // Build our final objects based on our data
        LoadTiles();

        // Render a texture representation of our map
        HeightMapRenderer.materials[0].mainTexture = TextureGenerator.GetTexture (Width, Height, Tiles);
    }

    private void Initialize()
    {
        // Initialize the HeightMap Generator
        HeightMap = new ImplicitFractal (FractalType.MULTI,
                                       BasisType.SIMPLEX,
                                       InterpolationType.QUINTIC,
                                       TerrainOctaves,
                                       TerrainFrequency,
                                       UnityEngine.Random.Range (0, int.MaxValue));
    }

    // Extract data from a noise module
    private void GetData(ImplicitModuleBase module, ref MapData mapData)
    {
        mapData = new MapData (Width, Height);

        // loop through each x,y point - get height value
        for (var x = 0; x < Width; x++)
        {
            for (var y = 0; y < Height; y++)
            {
                //Sample the noise at smaller intervals
                float x1 = x / (float)Width;
                float y1 = y / (float)Height;

                float value = (float)HeightMap.Get (x1, y1);

                //keep track of the max and min values found
                if (value > mapData.Max) mapData.Max = value;
                if (value < mapData.Min) mapData.Min = value;

                mapData.Data[x,y] = value;
            }
        }
    }

    // Build a Tile array from our data
    private void LoadTiles()
    {
        Tiles = new Tile[Width, Height];

        for (var x = 0; x < Width; x++)
        {
            for (var y = 0; y < Height; y++)
            {
                Tile t = new Tile();
                t.X = x;
                t.Y = y;

                float value = HeightData.Data[x, y];

                //normalize our value between 0 and 1
                value = (value - HeightData.Min) / (HeightData.Max - HeightData.Min);

                t.HeightValue = value;

                Tiles[x,y] = t;
            }
        }
    }

}
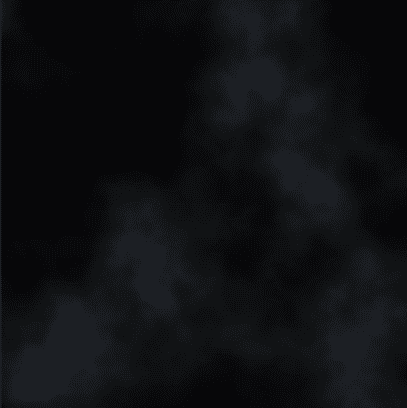
If we run this code, we get the following output texture:

Doesn't look like much yet, however, it is a very good start. We have an array of data, containing values between 0 and 1, with some very interesting patterns.
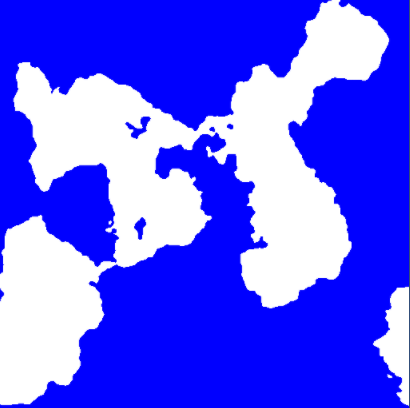
Now, we need to start assigning some meaning to this data. For example, we can say that anything that is less than 0.4 is considered water.
We could change the following in our TextureGenerator, setting everything that is less than 0.4 to blue, and everything else to white:
if (value < 0.4f)
    pixels[x + y * width] = Color.blue;
else
    pixels[x + y * width] = Color.white;
Doing so, we then get the following output:

Now we are getting somewhere. We can start to see some shapes appear with this simple rule. Let's take this a step further.
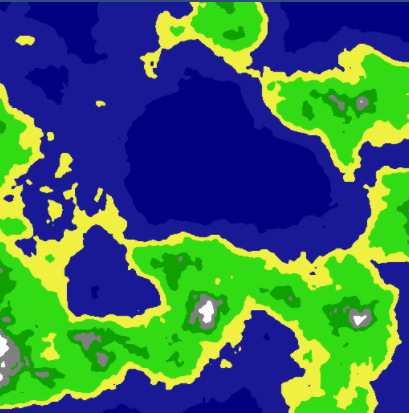
Let's add some more adjustable variables to our Generator class. These will define what our height values will assign with.
float DeepWater = 0.2f;
float ShallowWater = 0.4f;
float Sand = 0.5f;
float Grass = 0.7f;
float Forest = 0.8f;
float Rock = 0.9f;
float Snow = 1;
Let's also add some custom colours to our Texture Generator:
private static Color DeepColor = new Color(0, 0, 0.5f, 1);
private static Color ShallowColor = new Color(25/255f, 25/255f, 150/255f, 1);
private static Color SandColor = new Color(240 / 255f, 240 / 255f, 64 / 255f, 1);
private static Color GrassColor = new Color(50 / 255f, 220 / 255f, 20 / 255f, 1);
private static Color ForestColor = new Color(16 / 255f, 160 / 255f, 0, 1);
private static Color RockColor = new Color(0.5f, 0.5f, 0.5f, 1);
private static Color SnowColor = new Color(1, 1, 1, 1);
Adding in all these rules, in a similar fashion, and we then get the following results:

Now we have a lovely Height Map, with a nice texture representing it.
You may download the source code on github for part 1 here.
Stay tuned for part 2 of this series!
Read more about:
Featured BlogsAbout the Author(s)
You May Also Like


.jpeg?width=700&auto=webp&quality=80&disable=upscale)


