
Featured Blog | This community-written post highlights the best of what the game industry has to offer. Read more like it on the Game Developer Blogs or learn how to Submit Your Own Blog Post
Modelling by numbers: Part One B
An introduction to procedural geometry. Part 1B: Making planes interesting. In the first part of this tutorial we learned to make planes and boxes. Those are basic building blocks. Blocks that can be combined and extended in all kinds of interesting ways.

Modelling by numbers
An introduction to procedural geometry
(This is the second part of a four part tutorial. If you haven't already, you should check out Modelling by numbers: Part One A)

Part One B: Making planes interesting
Unity assets - Unity package file containing scripts and scenes for this tutorial (parts 1A and 1B).
Source files - Just the source files, for those that don’t have Unity.
OK, we’ve learned to make planes and boxes. Those are basic building blocks. Blocks that can be combined and extended in all kinds of interesting ways. Let’s look at a couple of examples...
A house
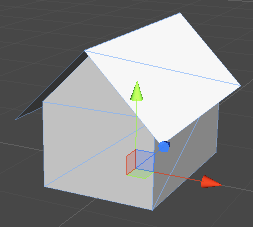
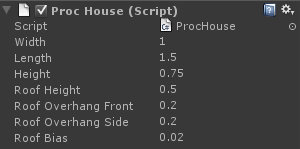
It’s just a box with some extra bits, but it’s a shape that’s both common and easily recognisable, even when very small on the screen. A good mesh to use when populating distant backgrounds.
Let’s start with the box part:
MeshBuilder meshBuilder = new MeshBuilder();

Vector3 upDir = Vector3.up * m_Height;
Vector3 rightDir = Vector3.right * m_Width;
Vector3 forwardDir = Vector3.forward * m_Length;

Vector3 farCorner = upDir + rightDir + forwardDir;
Vector3 nearCorner = Vector3.zero;

//shift pivot to centre-bottom:
Vector3 pivotOffset = (rightDir + forwardDir) * 0.5f;
farCorner -= pivotOffset;
nearCorner -= pivotOffset;

//Directional quad function (takes an offset and 2 directions)
BuildQuad(meshBuilder, nearCorner, rightDir, upDir);
BuildQuad(meshBuilder, nearCorner, upDir, forwardDir);

BuildQuad(meshBuilder, farCorner, -upDir, -rightDir);
BuildQuad(meshBuilder, farCorner, -forwardDir, -upDir);
This is our box code from the previous tutorial, minus the top and bottom quads, and with the near and far corners offset so that the origin (pivot) of the mesh is at centre-bottom.
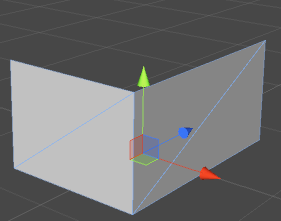
The next step is the triangles under the roof. We’re going to write ourselves a BuildTriangle() function:
void BuildTriangle(MeshBuilder meshBuilder, Vector3 corner0, Vector3 corner1, Vector3 corner2)
{
	Vector3 normal = Vector3.Cross((corner1 - corner0), (corner2 - corner0)).normalized;

	meshBuilder.Vertices.Add(corner0);
	meshBuilder.UVs.Add(new Vector2(0.0f, 0.0f));
	meshBuilder.Normals.Add(normal);

	meshBuilder.Vertices.Add(corner1);
	meshBuilder.UVs.Add(new Vector2(0.0f, 1.0f));
	meshBuilder.Normals.Add(normal);

	meshBuilder.Vertices.Add(corner2);
	meshBuilder.UVs.Add(new Vector2(1.0f, 1.0f));
	meshBuilder.Normals.Add(normal);

	int baseIndex = meshBuilder.Vertices.Count - 3;

	meshBuilder.AddTriangle(baseIndex, baseIndex + 1, baseIndex + 2);
}
We are building half a quad here. This function takes the three corner positions and plugs them straight into the vertex array. The normal is calculated the same way as in our BuildQuad() function: it’s the cross product of the two directional vectors. Only we need need to calculate those directions instead of having them passed in.
Now let’s put triangles at the top of our front and back walls:
MeshBuilder meshBuilder = new MeshBuilder();

Vector3 upDir = Vector3.up * m_Height;
Vector3 rightDir = Vector3.right * m_Width;
Vector3 forwardDir = Vector3.forward * m_Length;

Vector3 farCorner = upDir + rightDir + forwardDir;
Vector3 nearCorner = Vector3.zero;

//shift pivot to centre base:
Vector3 pivotOffset = (rightDir + forwardDir) * 0.5f;
farCorner -= pivotOffset;
nearCorner -= pivotOffset;

BuildQuad(meshBuilder, nearCorner, rightDir, upDir);
BuildQuad(meshBuilder, nearCorner, upDir, forwardDir);

BuildQuad(meshBuilder, farCorner, -upDir, -rightDir);
BuildQuad(meshBuilder, farCorner, -forwardDir, -upDir);

//roof:

Vector3 roofPeak = Vector3.up * (m_Height + m_RoofHeight) + rightDir * 0.5f - pivotOffset;

Vector3 wallTopLeft = upDir - pivotOffset;
Vector3 wallTopRight = upDir + rightDir - pivotOffset;

BuildTriangle(meshBuilder, wallTopLeft, roofPeak, wallTopRight);
BuildTriangle(meshBuilder, wallTopLeft + forwardDir, wallTopRight + forwardDir,
	roofPeak + forwardDir);
We start by calculating the three corners for the front triangle. The tops of the front wall are equal to the up vector, and the up plus the right vector. The top of the triangle is at the roof height, and is halfway between the two corners.
All three of these positions need to have pivotOffset subtracted from them to make them line up with the rest of the mesh.
We can plug these three positions straight into our Buildtriangle() function to form the front triangle. The back triangle needs two changes. First, all three positions need to be offset by the forward vector to put them at the other end of the house.
Secondly, two of the BuildTriangle() arguments need to be swapped. This reverses the winding order of the vertices within the triangle, meaning that the front and back faces of the triangle are now in opposite directions, and thus the second triangle faces in the opposite direction to the first.
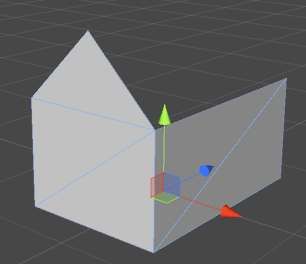
Now for the roof. This is two planes on an angle, lining up with the triangles we just created. However, we want eaves on our house, so these planes need to be pulled out slightly.
Let’s calculate some of the values we’ll need. m_RoofOverhangSide and m_RoofOverhangFront are predefined variables - the distance the eaves are to extend out the sides and ends of the house, respectively.
We’re going to use the roof peak position as the starting point for these quads, so we need to calculate the direction from there to each of the wall corners. This will give us two directions with the correct slope to line up with the tops of the walls:
Vector3 dirFromPeakLeft = wallTopLeft - roofPeak;
Vector3 dirFromPeakRight = wallTopRight - roofPeak;
Then we extend both these directional vectors by the amount defined by m_RoofOverhangSide:
dirFromPeakLeft += dirFromPeakLeft.normalized * m_RoofOverhangSide;
dirFromPeakRight += dirFromPeakRight.normalized * m_RoofOverhangSide;
Next, we take our roofPeak position and shift it out in front of the house. We’ll also extend our forward vector, making it long enough to cover the length of the house plus an overhang at either end:
roofPeak -= Vector3.forward * m_RoofOverhangFront;
forwardDir += Vector3.forward * m_RoofOverhangFront * 2.0f;
Now we have all the information we need to build our roof quads:
BuildQuad(meshBuilder, roofPeak, forwardDir, dirFromPeakLeft);
BuildQuad(meshBuilder, roofPeak, dirFromPeakRight, forwardDir);
Notice that the directions are switched in these two function calls. This has the same effect as switching the arguments when calling BuildTriangle() before. It reverses the winding order of the triangles, making the quad face in the opposite direction. Now both roof quads are facing away from the sides of the house:
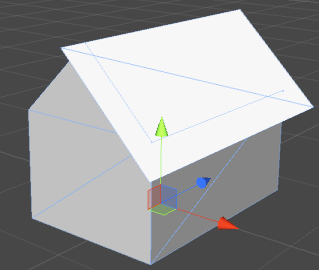
You’ll notice a problem with this. Viewed from this angle, the roof quad that’s facing away from us is invisible. In fact, the only time you’ll be able to see the roof properly is when looking from above. Good enough for a flying game, perhaps, but not for much else.
What we need is a double-sided quad. That is, two quads in the same position but facing the opposite way. Good thing we know how make a quad like that. Use this along with the quads we just built:
BuildQuad(meshBuilder, roofPeak, dirFromPeakLeft, forwardDir);
BuildQuad(meshBuilder, roofPeak, forwardDir, dirFromPeakRight);
The same code as before, but with the direction arguments switched. Our roof quads now each have an opposite side:
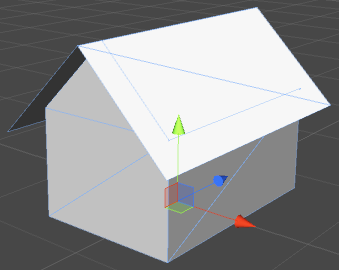
Almost done, just one little thing. Look closely at the wireframe in that last image. Notice how we can see the edge of the walls through the roof? This is due to that part of the wall and that part of the roof being in exactly the same place, which can lead to z-fighting at those pixels, particularly if the precision of the depth buffer is low and/or the mesh is far away (depth precision lessens as an object gets farther from a perspective camera). The fix is simple, we just lift the whole roof up very slightly:
roofPeak += Vector3.up * m_RoofBias;

BuildQuad(meshBuilder, roofPeak, forwardDir, dirFromPeakLeft);
BuildQuad(meshBuilder, roofPeak, dirFromPeakRight, forwardDir);

BuildQuad(meshBuilder, roofPeak, dirFromPeakLeft, forwardDir);
BuildQuad(meshBuilder, roofPeak, forwardDir, dirFromPeakRight);
There, much better:

As a recap, let’s put all that code together:
MeshBuilder meshBuilder = new MeshBuilder();

Vector3 upDir = Vector3.up * m_Height;
Vector3 rightDir = Vector3.right * m_Width;
Vector3 forwardDir = Vector3.forward * m_Length;

Vector3 farCorner = upDir + rightDir + forwardDir;
Vector3 nearCorner = Vector3.zero;

//shift pivot to centre base:
Vector3 pivotOffset = (rightDir + forwardDir) * 0.5f;
farCorner -= pivotOffset;
nearCorner -= pivotOffset;

Vector3 undergroundOffset = Vector3.up * m_UndergroundDepth;
nearCorner -= undergroundOffset;
upDir += undergroundOffset;

BuildQuad(meshBuilder, nearCorner, rightDir, upDir);
BuildQuad(meshBuilder, nearCorner, upDir, forwardDir);

BuildQuad(meshBuilder, farCorner, -upDir, -rightDir);
BuildQuad(meshBuilder, farCorner, -forwardDir, -upDir);

//roof:

Vector3 roofPeak = Vector3.up * (m_Height + m_RoofHeight) + rightDir * 0.5f - pivotOffset;

Vector3 wallTopLeft = upDir - pivotOffset;
Vector3 wallTopRight = upDir + rightDir - pivotOffset;

BuildTriangle(meshBuilder, wallTopLeft, roofPeak, wallTopRight);
BuildTriangle(meshBuilder, wallTopLeft + forwardDir, wallTopRight + forwardDir,
	roofPeak + forwardDir);

Vector3 dirFromPeakLeft = wallTopLeft - roofPeak;
Vector3 dirFromPeakRight = wallTopRight - roofPeak;

dirFromPeakLeft += dirFromPeakLeft.normalized * m_RoofOverhangSide;
dirFromPeakRight += dirFromPeakRight.normalized * m_RoofOverhangSide;

roofPeak -= Vector3.forward * m_RoofOverhangFront;
forwardDir += Vector3.forward * m_RoofOverhangFront * 2.0f;

//shift the roof slightly upward to stop it intersecting the top of the walls:
roofPeak += Vector3.up * m_RoofBias;

BuildQuad(meshBuilder, roofPeak, forwardDir, dirFromPeakLeft);
BuildQuad(meshBuilder, roofPeak, dirFromPeakRight, forwardDir);

BuildQuad(meshBuilder, roofPeak, dirFromPeakLeft, forwardDir);
BuildQuad(meshBuilder, roofPeak, forwardDir, dirFromPeakRight);
A fence

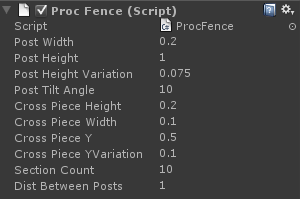
Something common in many kinds of environments, a fence. It’s less complicated to make than it seems - it is just boxes, after all.
Let’s start with the posts.
void BuildPost(MeshBuilder meshBuilder, Vector3 position)
{
	Vector3 upDir = Vector3.up * m_PostHeight;
	Vector3 rightDir = Vector3.right * m_PostWidth;
	Vector3 forwardDir = Vector3.forward * m_PostWidth;

	Vector3 farCorner = upDir + rightDir + forwardDir + position;
	Vector3 nearCorner = position;

	//shift pivot to centre-bottom:
	Vector3 pivotOffset = (rightDir + forwardDir) * 0.5f;
	farCorner -= pivotOffset;
	nearCorner -= pivotOffset;

	BuildQuad(meshBuilder, nearCorner, rightDir, upDir);
	BuildQuad(meshBuilder, nearCorner, upDir, forwardDir);

	BuildQuad(meshBuilder, farCorner, -rightDir, -forwardDir);
	BuildQuad(meshBuilder, farCorner, -upDir, -rightDir);
	BuildQuad(meshBuilder, farCorner, -forwardDir, -upDir);
}
This is basically the same as the box-generating code we wrote in the last tutorial, minus the bottom quad, and with the same centre-bottom position offset we used for our house.
Only now we’re providing a position offset. Our fence is going to have lots of posts, and we don’t want them all sitting on top of one another.
Right, let’s build some posts:
for (int i = 0; i <= m_SectionCount; i++)
{
	Vector3 offset = Vector3.right * m_DistBetweenPosts * i;

	BuildPost(meshBuilder, offset);
}
Very uncomplicated. A loop that calls BuildPost() with an ever-increasing offset. Our fence is now looking something like this:

Now for the crosspieces.
void BuildCrossPiece(MeshBuilder meshBuilder, Vector3 start)
{
	Vector3 upDir = Vector3.up * m_CrossPieceHeight;
	Vector3 rightDir = Vector3.right * m_CrossPieceWidth;
	Vector3 forwardDir = Vector3.forward * m_DistBetweenPosts;

	Vector3 farCorner = upDir + rightDir + forwardDir + start;
	Vector3 nearCorner = start;

	BuildQuad(meshBuilder, nearCorner, forwardDir, rightDir);
	BuildQuad(meshBuilder, nearCorner, rightDir, upDir);
	BuildQuad(meshBuilder, nearCorner, upDir, forwardDir);

	BuildQuad(meshBuilder, farCorner, -rightDir, -forwardDir);
	BuildQuad(meshBuilder, farCorner, -upDir, -rightDir);
	BuildQuad(meshBuilder, farCorner, -forwardDir, -upDir);
}
Also very similar to the basic box code. Note that we use the distance between posts as the length of the piece. This way we can make sure that it always reaches the next post.
Going back to the loop that builds the posts:
Vector3 prevCrossPosition = Vector3.zero;

for (int i = 0; i <= m_SectionCount; i++)
{
	Vector3 offset = Vector3.right * m_DistBetweenPosts * i;

	BuildPost(meshBuilder, offset);

	//crosspiece:

	Vector3 crossPosition = offset;

	//offset to the back of the post:
	crossPosition += Vector3.back * m_PostWidth * 0.5f;

	//offset the height:
	crossPosition += Vector3.up * m_CrossPieceY;

	if (i != 0)
		BuildCrossPiece(meshBuilder, prevCrossPosition);

	prevCrossPosition = crossPosition;
}
Note that the starting position for the crosspiece is the post position, offset by half the width of the post (we want the crosspiece on the back of the post, not sticking through the middle), and by a predefined height value (otherwise the crosspiece would sit on the ground).
We’re also starting from the position generated by the previous post and having the crosspiece join that to the current one. This means that we need to skip the generation of the mesh the first time the loop runs.
Let’s run this and see how our fence is looking now:

Not bad, and fine if you want a pristine, well-made fence. But let’s add a little more visual interest. We want a slightly badly-made, wonky fence. There are a few things we can do to get this effect.
The simplest one is to add some random variation to the height of the posts. We can do this inside the BuildPost() function, by adding a random offset to the up directional vector:
float postHeight = m_PostHeight + Random.Range(-m_PostHeightVariation, m_PostHeightVariation);

Vector3 upDir = Vector3.up * postHeight);
Now our posts look like they were hammered into the ground with much less precision:

Another thing to do is to tilt the crosspiece slightly, as if they aren’t nailed to the posts at exactly the same height all the way along.
Instead of providing just a start position to our BuildCrossPiece() function, we’re going to want to provide a start position and an end position, each with a random height offset:
Vector3 prevCrossPosition = Vector3.zero;

for (int i = 0; i <= m_SectionCount; i++)
{
	Vector3 offset = Vector3.right * m_DistBetweenPosts * i;

	BuildPost(meshBuilder, offset);

	//crosspiece:

	Vector3 crossPosition = offset;

	//offset to the back of the post:
	crossPosition += Vector3.back * m_PostWidth * 0.5f;

	float randomYStart = Random.Range(-m_CrossPieceYVariation, m_CrossPieceYVariation);
	float randomYEnd = Random.Range(-m_CrossPieceYVariation, m_CrossPieceYVariation);

	Vector3 crossYOffsetStart = Vector3.up * (m_CrossPieceY + randomYStart);
	Vector3 crossYOffsetEnd = Vector3.up * (m_CrossPieceY + randomYEnd);

	if (i != 0)
		BuildCrossPiece(meshBuilder, prevCrossPosition + crossYOffsetStart,
			crossPosition + crossYOffsetEnd);

	prevCrossPosition = crossPosition;
}
Our function now passes two positions, from the previous post and the current one, each with its own height offset.
Now we need to update the BuildCrossPiece() function:
void BuildCrossPiece(MeshBuilder meshBuilder, Vector3 start, Vector3 end)
{
	Vector3 dir = end - start;

	Quaternion rotation = Quaternion.LookRotation(dir);

	Vector3 upDir = rotation * Vector3.up * m_CrossPieceHeight;
	Vector3 rightDir = rotation * Vector3.right * m_CrossPieceWidth;
	Vector3 forwardDir = rotation * Vector3.forward * dir.magnitude;

	Vector3 farCorner = upDir + rightDir + forwardDir + start;
	Vector3 nearCorner = start;

	BuildQuad(meshBuilder, nearCorner, forwardDir, rightDir);
	BuildQuad(meshBuilder, nearCorner, rightDir, upDir);
	BuildQuad(meshBuilder, nearCorner, upDir, forwardDir);

	BuildQuad(meshBuilder, farCorner, -rightDir, -forwardDir);
	BuildQuad(meshBuilder, farCorner, -upDir, -rightDir);
	BuildQuad(meshBuilder, farCorner, -forwardDir, -upDir);
}
What we are doing here is calculating a rotation based on our start and end positions, and using that rotation to tilt the crosspiece. To apply the rotation to the entire crosspiece, we simply multiply all of our directional vectors.
The length of the crosspiece is the distance between the two points.

Looking better, but we’re not done yet. Let’s look at our posts again. They’ve got a height variation, but they’re all pointing straight upward. We’ll apply a slight lean to each one, as if it’s shifted in the ground. We’re going to do this to the posts by generating a random rotation in the x and z axis and then using that to rotate the directional vectors inside BuildPost().
We’ll generate the rotation inside the loop and then pass it to the BuildPosts function (the reason we need it in the loop will be seen at the next step):
Vector3 offset = Vector3.right * m_DistBetweenPosts * i;

float xAngle = Random.Range(-m_PostTiltAngle, m_PostTiltAngle);
float zAngle = Random.Range(-m_PostTiltAngle, m_PostTiltAngle);
Quaternion rotation = Quaternion.Euler(xAngle, 0.0f, zAngle);

BuildPost(meshBuilder, offset, rotation);
And we need to update our BuildPost() function:
void BuildPost(MeshBuilder meshBuilder, Vector3 position, Quaternion rotation)
{
	float postHeight = m_PostHeight +
		Random.Range(-m_PostHeightVariation, m_PostHeightVariation);

	Vector3 upDir = rotation * Vector3.up * postHeight;
	Vector3 rightDir = rotation * Vector3.right * m_PostWidth;
	Vector3 forwardDir = rotation * Vector3.forward * m_PostWidth;
Here we apply the rotation to all of the directional vectors, just the way we did when rotating the crosspieces.
Now, why do we need the rotation value in the loop, rather than calculating it inside BuildPost()? It’s because we want the crosspieces to stay attached to the posts, instead of sitting still in mid-air as the posts shift away. Therefore that code also needs to know what the rotation is. Let’s revisit the loop:
Vector3 prevCrossPosition = Vector3.zero;
Quaternion prevRotation = Quaternion.identity;

for (int i = 0; i <= m_SectionCount; i++)
{
	Vector3 offset = Vector3.right * m_DistBetweenPosts * i;

	float xAngle = Random.Range(-m_PostTiltAngle, m_PostTiltAngle);
	float zAngle = Random.Range(-m_PostTiltAngle, m_PostTiltAngle);
	Quaternion rotation = Quaternion.Euler(xAngle, 0.0f, zAngle);

	BuildPost(meshBuilder, offset, rotation);

	//crosspiece:

	Vector3 crossPosition = offset;

	//offset to the back of the post:
	crossPosition += rotation * (Vector3.back * m_PostWidth * 0.5f);

	float randomYStart = Random.Range(-m_CrossPieceYVariation, m_CrossPieceYVariation);
	float randomYEnd = Random.Range(-m_CrossPieceYVariation, m_CrossPieceYVariation);

	Vector3 crossYOffsetStart = prevRotation * Vector3.up * (m_CrossPieceY + randomYStart);
	Vector3 crossYOffsetEnd = rotation * Vector3.up * (m_CrossPieceY + randomYEnd);

	if (i != 0)
		BuildCrossPiece(meshBuilder, prevCrossPosition + crossYOffsetStart,
			crossPosition + crossYOffsetEnd);

	prevCrossPosition = crossPosition;
	prevRotation = rotation;
}
We need to store the previous post’s rotation as well as its offset now, so that our randomised up vector can be rotated properly. We rotate both the up vectors and the back-of-post offset to get our start and end vectors in the correct place up against the post.
And there we have it:

Something extra: per-post position offsets
Sometimes, it’s not enough for the fence run along a completely flat terrain. We will want our fence to follow the height of the ground it sits on. The good news is that all of our offsets are based on the post position. Therefore, we only need to change this, and the rest of the fence will still line itself up properly. To apply a height offset to a post, simply adjust the y value of the post position:
Vector3 offset = Vector3.right * m_DistBetweenPosts * i;

offset.y += Mathf.Sin(offset.x) * 0.5f;

float xAngle = Random.Range(-m_PostTiltAngle, m_PostTiltAngle);
float zAngle = Random.Range(-m_PostTiltAngle, m_PostTiltAngle);
Quaternion rotation = Quaternion.Euler(xAngle, 0.0f, zAngle);

BuildPost(meshBuilder, offset, rotation);
For simplicity, I’ve used a sine wave as the Y offset, just to show the effect. For an actual fence, you’ll want to get the height of your terrain at that position. This could be done using Terrain.SampleHeight() (if you’re using Unity terrain), with a raycast, by sampling a height map, by referencing the data that generates your terrain, or something else. It will depend on the setup of your scene.

And that’s it for part one. Next will be part two, all about cylinders, spheres and other round things.

Read more about:
Featured BlogsAbout the Author(s)
You May Also Like


.jpeg?width=700&auto=webp&quality=80&disable=upscale)


