


Daily news, dev blogs, and stories from Game Developer straight to your inbox
Sponsored By
Learning Twine: Part 2
In Part 2 of the Learning Twine series, I cover Choices, CSS, and introduce using variables to make stories dynamic.
8 Min Read

[Before proceeding too far into this post, I recommend checking out Part 1 first. In it, I cover introducing Twine, creating Links, and changing Story Formats. I also start the story I will be working with for this post.]
Previously, connecting one passage to another was shown using Links. These were created by adding two opening and then closing brackets around some text. In a published story, that Link would then tell Twine to load the corresponding passage of the same name.
However, there are other ways to create connections between passage. Using Choices prompts the reader to choose between the Links available to them on any one passage while removing the other options afterward. Instead of multiple Links, only one is valid per session.
Choices, like other keywords I will also cover, start with two less-than and end with two greater-than signs. These set off the selection as programming for the story and not part of its text. The Links for each choice are enclosed in quotations marks.
After a reader picks on the choices, the others are grayed-out. In the Jonah Story Format, this means the reader cannot pick another from within that passage without restarting the story or refreshing the whole page.
Note: The difference between using a Choice or Link is often a decision between letting the player rewind to a previous point in the story or merely making them consider their current position. Care should be taken, because Choices and Links look the same, as to which would make the most sense in the story at that moment.
Editing each passage individually shows three different text areas: one for the title of the passage, another for its tags, and a third for the actual content. Before now, only the first and third areas were being used. This is because the tags area expects very specific words.
Note: Using "stylesheet" signals that the content of the passage will be CSS. "script" indicates that JavaScript will be present. Without any tags, Twine assumes the content will be primarily story text.
The Twine Documentation lists several of the default elements used by Twine and their CSS selectors. Because of the nature of CSS, all major changes to the default styling should happen to the body element first, so that the styles can cascade down to its children elements. However, because the passage element, by default, has its own separate styles, changes may need to be made to how it appears as well in order to unify the styles of the entire page.
Note: Because passages with the “stylesheet” tag are not normally connected to any others, their execution often happens during the loading of the page itself. This means that, between when the page first loads up to when the browser encounters the passage, the page will be following the default CSS. This can often result, depending on the speed of the reader’s connection to the page, in a switch between them as they are watching.
Once any styles have been changed, it is a good idea to verify the results in a browser. This can be done by Story->Build Story to save the results to a separate file, or Story->Rebuild Story to save the current progress to a previously defined file and then opening the page in a browser.
Note: It is often worthwhile to keep the built page open in a browser while working on it concurrently in Twine. This allows for quick checking, after saving and rebuilding the story, to see the latest text or layout change each time.
After changing the styles of the body and passage elements, the style of Links and Choices often need to be changed as well. To do this, refer to the Twine Documentation on all of the variations of CSS selectors possible in the particular Story Format in use. For the Jonah Story Format, this is “a.internalLink”, “a.externalLink”, “a.back”, and “a.return”.
The power of using CSS is not solely in changing the visual characteristics of elements. It can also be used to remove one from the view of the reader completely. By applying certain styles to an element, it can be obfuscated, hidden, or even not displayed at all.
Note: Care should be taken when using “display:none” or “visibility:hidden” on any element in Twine. While disturbing the expectations of a reader can often create an interesting experience, it can also lead to confusion too.
Because Twine stories rely most often on text to convey meaning, how that text appears and the layout of the words on the page become important. It’s size, spacing, and positioning all contribute to this. By leveraging aspects of typography, a carefully designed layout can often evoke more powerful emotions than the words themselves.
Beyond the set of fonts available to most modern web browsers, Google maintains a collection that they allow others to freely use. These can be easily imported into most non-commercial works as a way to create a different experience for a reader.
To use a Google Web Font in Twine, merely find the font wanted and go to its Quick Use page. This will give details on how to use the font, what extra loading times might be necessary, and any variations that font might have.
From the Quick Use page, clicking on the Import tab shows the CSS code for using that font in another page. By selecting the whole line, and then copying it, it can later be pasted into a passage with the “stylesheet” tag in Twine.
Note: Some Google Web Fonts can add a considerable amount of extra loading time for a project. The gauge on the right-hand side of the Quick Use page shows an approximation of how long it will take before the font can be loaded and then used on any given page.
Pasting the “@import” line at the top of the content area of a passage tagged with “stylesheet” allows it to be referenced by the CSS selectors underneath it. To change the font of an element to the new, imported one, the bottom of the Quick Use page shows the correct code to paste into a CSS selector for that element.
Note: In the latest versions of the Chrome, Firefox, Opera, and Safari web browsers, using an imported font via this method will display text correctly. In different versions of Internet Explorer, however, the results are often mixed.
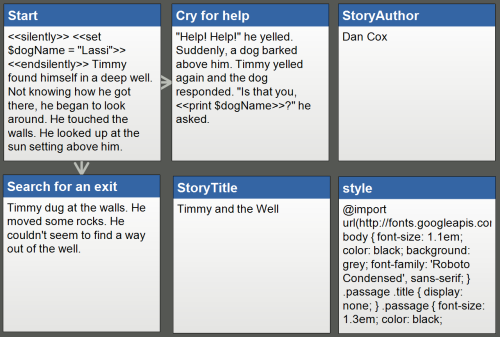
While it is often enough to have a story with connections between passages to create the effect of something dynamically changing, JavaScript can be used to make this a reality. In Twine, this is achieved through using variables, all of which start with ‘$’ but otherwise follow the same regulations of standard JavaScript variables: they can start with an underscore, a letter, or number, but should not contain punctuation or spacing.
To set a variables to an initial value in Twine, the keyword “set” is used. Like other keywords and commands, it too is set off by two less-than and greater-than signs. Unlike normal JavaScript, however, the keyword “var” is not needed. It enough to write the variable name and then set it equal to some value.
Once a variable has been “set”, its value can be shown via the “print” command in another passage. This command can be used within story text as a way to dynamically display a value to a reader during a story.
Finally, because commands and keywords take up space within passages when they are displayed, the “silently” keyword can be used to hide this and collapse the space. Between “silently” and “endsilently”, no commands will take up space on the page between the story text.
By combining JavaScript and CSS within Twine, a story can often be transformed from simple text to a dynamic and interactive adventure. Using Google Web Fonts allows a designer to craft not only the words, but how they appear on the screen as well. Knowing and using the correct tools at the right time can often make the difference between just another story and something unique for readers.
In my next and final part, I will cover using conditional statements and macros within Twine as a way to leverage JavaScript to change the content of passages, make additional interactive pieces, and allow a reader to not only read a story, but help write it in the process too.
Read more about:
BlogsAbout the Author(s)
You May Also Like


.jpeg?width=700&auto=webp&quality=80&disable=upscale)


