Trending
Opinion: How will Project 2025 impact game developers?
The Heritage Foundation's manifesto for the possible next administration could do great harm to many, including large portions of the game development community.
A practical guide to making a simple adventure game in the Unity game engine.
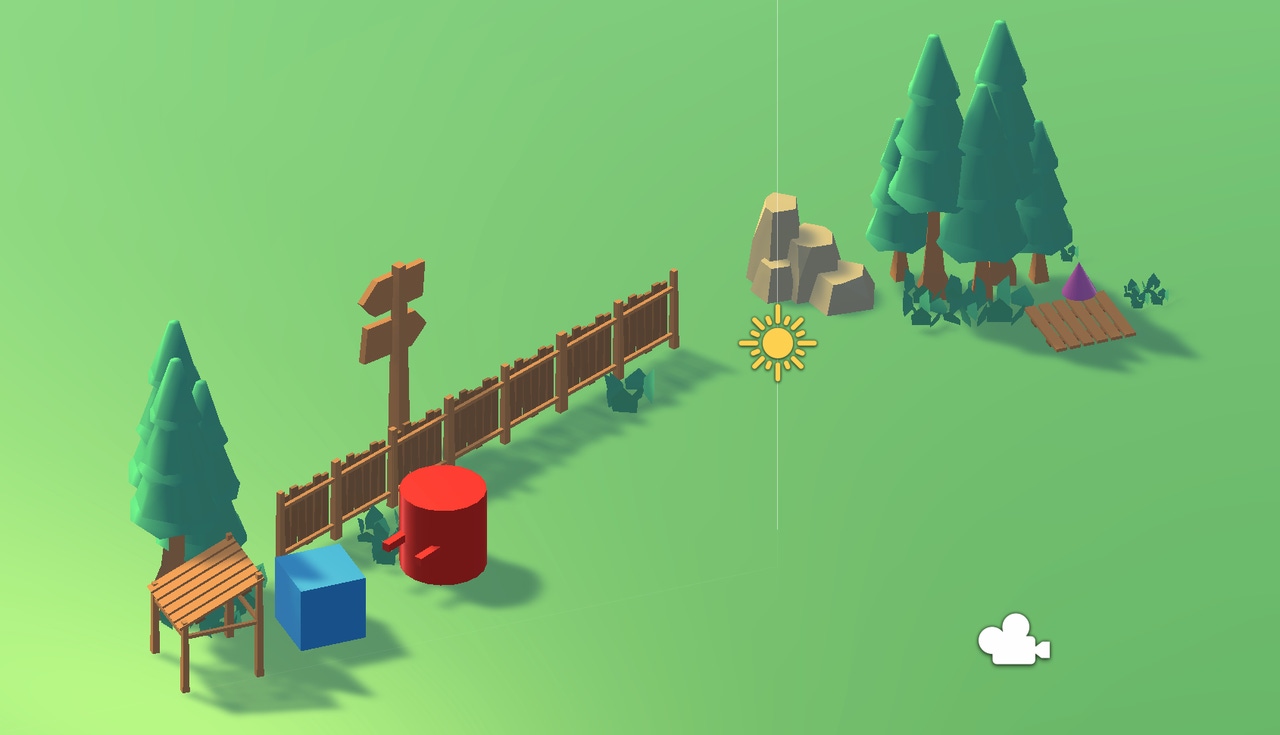
Unity is a powerful game engine that lets you build games for every modern platform. It has been used for hundreds of thousands of released games, and is popular for both 2D and 3D titles across all modern gaming platforms. Despite the company's recent behavior, it's still a great technical platform for building games.
A modern game is fundamentally a simulation environment with a physics, animation, and rendering engine attached—all wrapped up in a neat application with great support for integrating external tools. You can make a game without a game engine, it's just way more work, and you can also make things that are not games with a game engine, it just might not be a good fit.
In this article, we're going to make a simple game in Unity. The fact that even the basics can fit in a single article should indicate how much of the low-level utilities are handled by Unity straight out of the box; it's super fast to get something working in Unity!
We're going to be making a minimal example of a "little guy game"—an adventure game in which you play a little guy and you go around talking to people and finding objects and doing stuff. In doing this, we will:
Make a little scene—involving the basic shape models (or "primitives") available in Unity, imported pre-made models such as you'd find in the Unity Asset Store or online, and entirely custom models imported into Unity.
Make a player character—just a cylinder with arms, really.
Make the character able to move—involving C# scripting for basic input-based movement.
Make the character able to pick up and deliver objects—involving scripting logic for keeping track of target objects, and making them visible in different ways to represent different states.
Make the character able to speak—involving basic prompt-driven dialogue from a pre-written script.
The premise of the game? Well, I'm glad you asked. Once upon a time there was a Player (that's you!) who was friends with a guy called Cube (who was definitely a very well-thought-out NPC character with lots of depth, and not just a cube with a name). It's Cube's birthday, but Cube has lost his party hat and can not celebrate without it. Player must find his party hat and save the day.
A gripping tale of trials and triumphs, for sure…
Let's begin!
(Note that this guide assumes some knowledge about the Unity interface and key concepts. You can read about these in previous guides.)
The first step is of course to install Unity. Downloads for macOS, Windows, and Linux can be found on Unity's website, and this will install an application called Unity Hub.
Unity Hub is an application that manages Unity-related components on your computer, including any versions of the editor you have installed—so you can have old and new versions of Unity installed at once—and all Unity projects you have created.
Before you can install a version of the Unity editor, the Hub may ask you to register for a Unity license. Even if you only want the free version, you will need to follow the steps to make an account and provision a license for this machine before proceeding. Once that is done, you can install an editor. When selecting a version, a good rule of thumb is to go with the most recent LTS option, as this indicates the version will receive Long Term Support: bug fixes and updates.
Once this has downloaded, select “New project” to create a project. In our case, we want a 3D project. I've named mine “CubeWantsAPartyHat”, but you can name yours whatever you like.
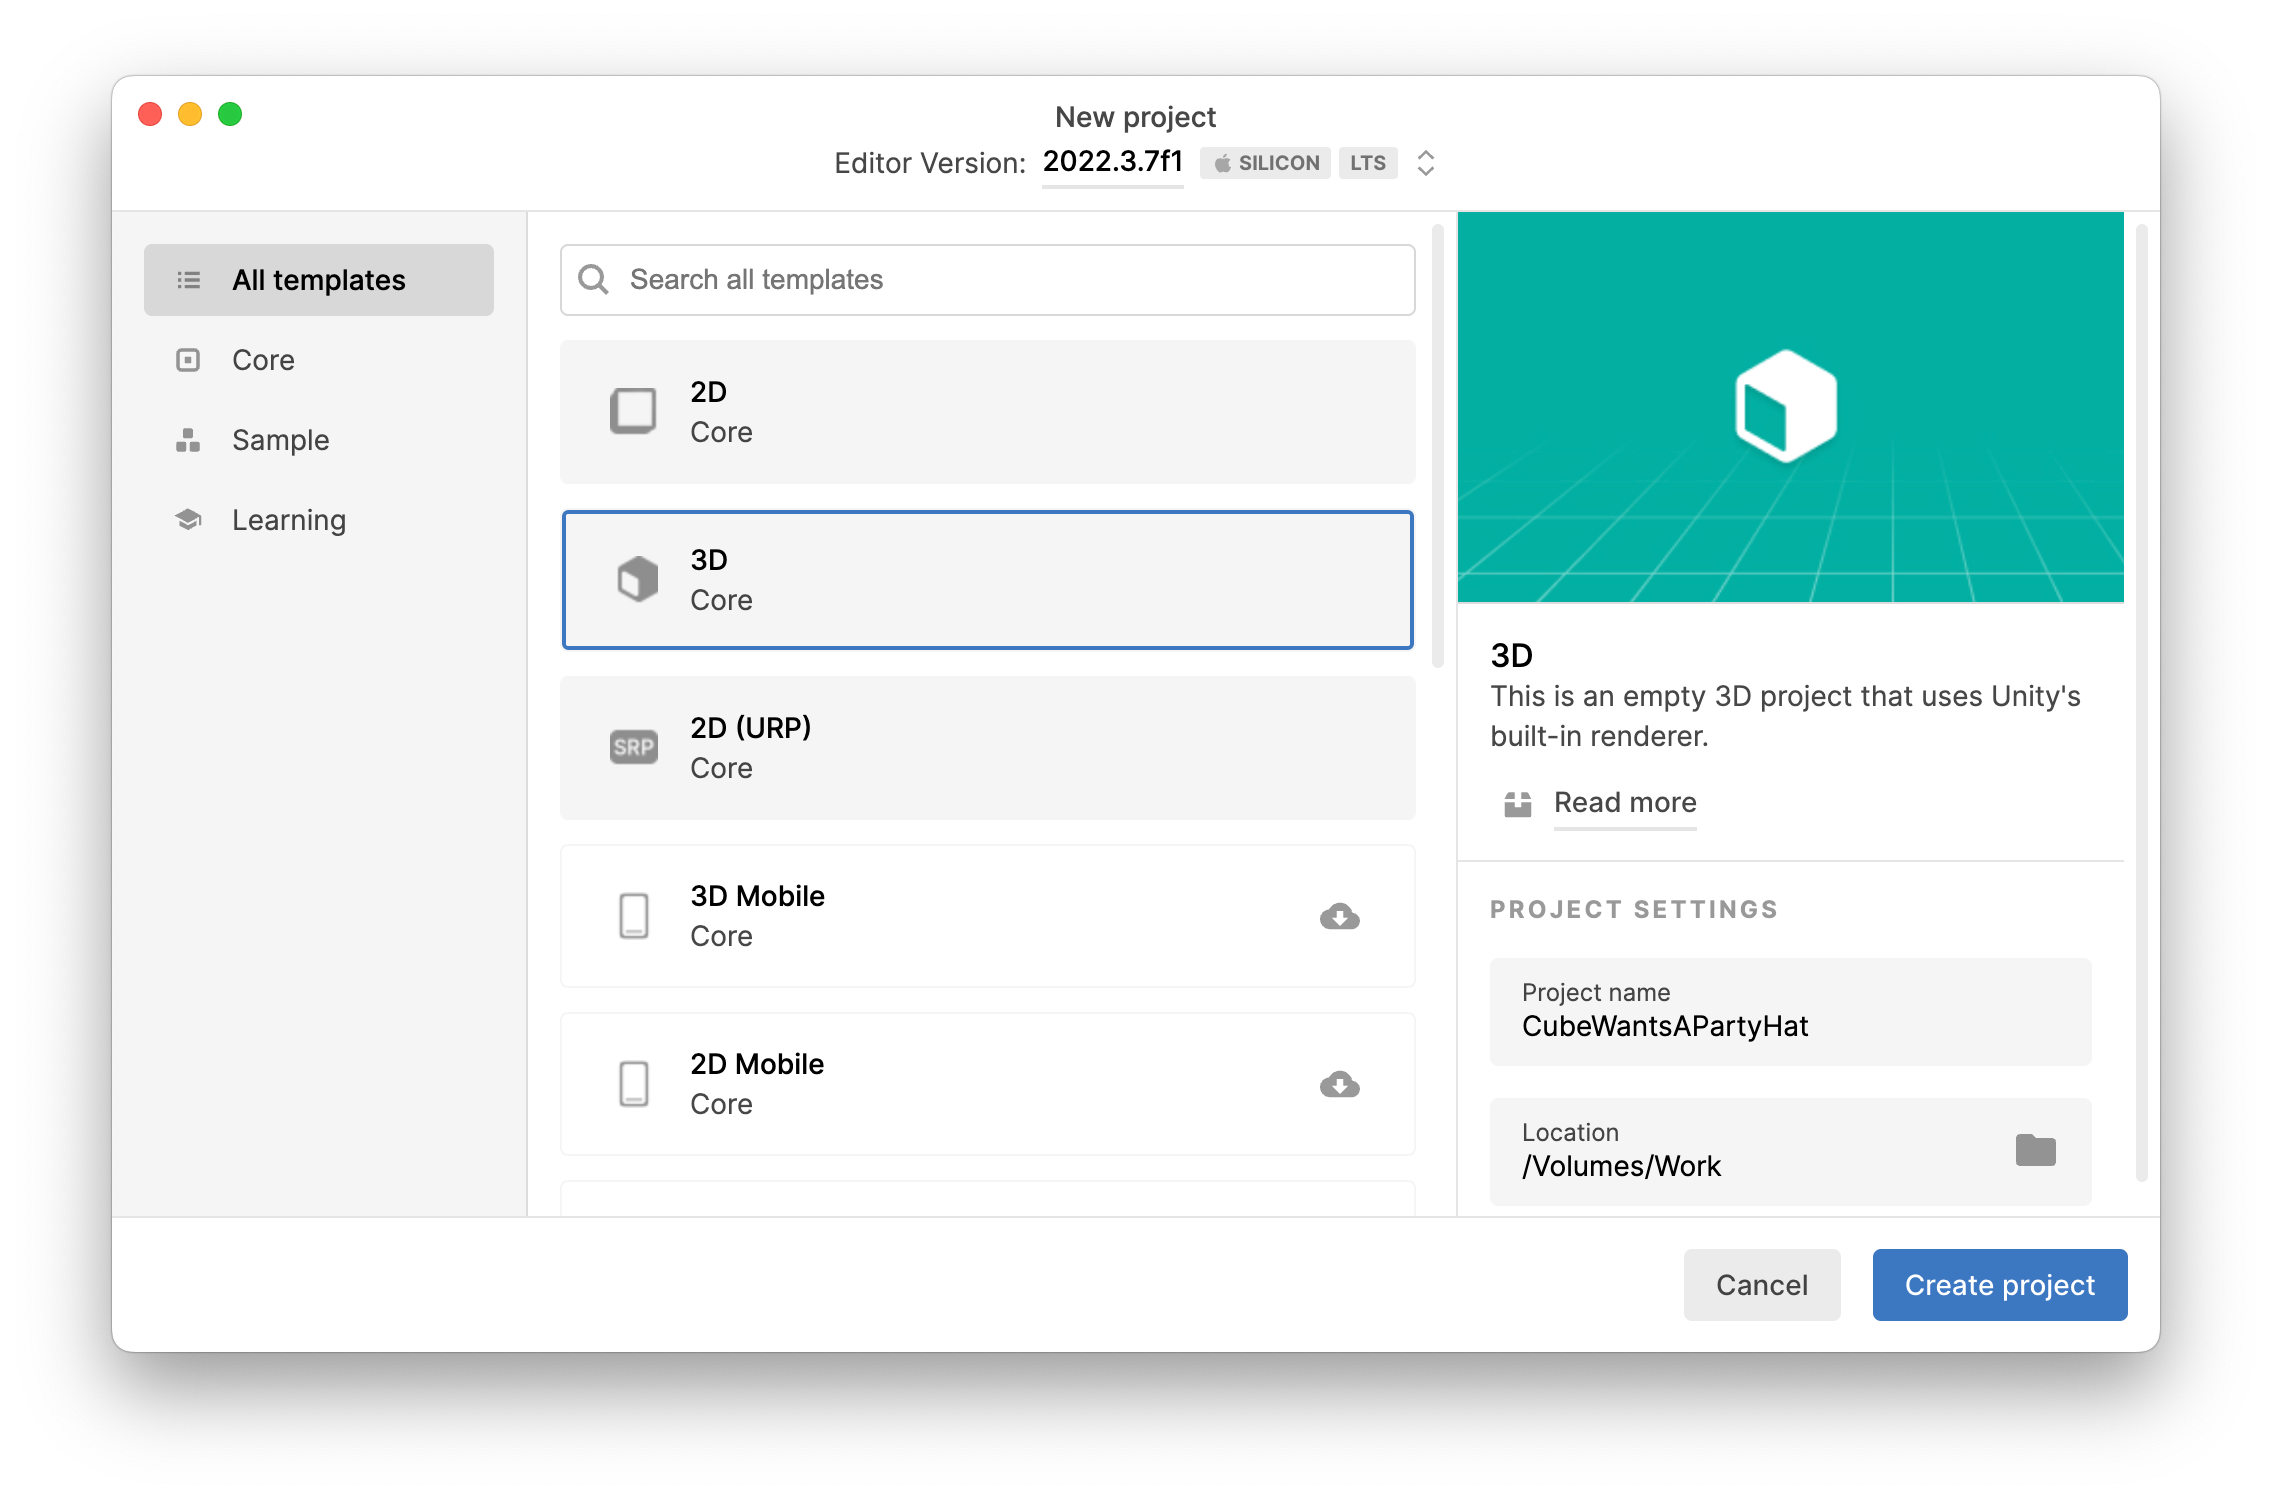
Figure 1. Creating a new Project in Unity Hub.
Now we're looking at an empty project, with an empty scene. To set the scene for our little game, we're going to use a mix of inbuilt Unity primitives, imported pre-made models, and imported custom models.
First, we'll need some ground to put all this on. Physics is easier with objects that exist in all three dimensions, so even though planes exist in Unity we're going to use a solid object for the ground. Unity has inbuilt "primitive" models for basic shapes like cubes, spheres, cylinders, and capsules. So I usually begin with a simple cube, stretched along both horizontal axes, to create a foundation to build from.
Our game is only going to be simple today, so let's just stick with flat ground as the primary surface. If we color it green, it will look like grass. To color a model, we first have to make a Material: a defined re-usable texture or color that can be applied to any number of models, which includes intrinsic information like how shiny or metallic it should appear when lit. By selecting Create > Material in the project pane, we see a huge number of options appear in the Inspector.
To just make a simple color Material, simply select the Albedo field and pick the RGB value you want.
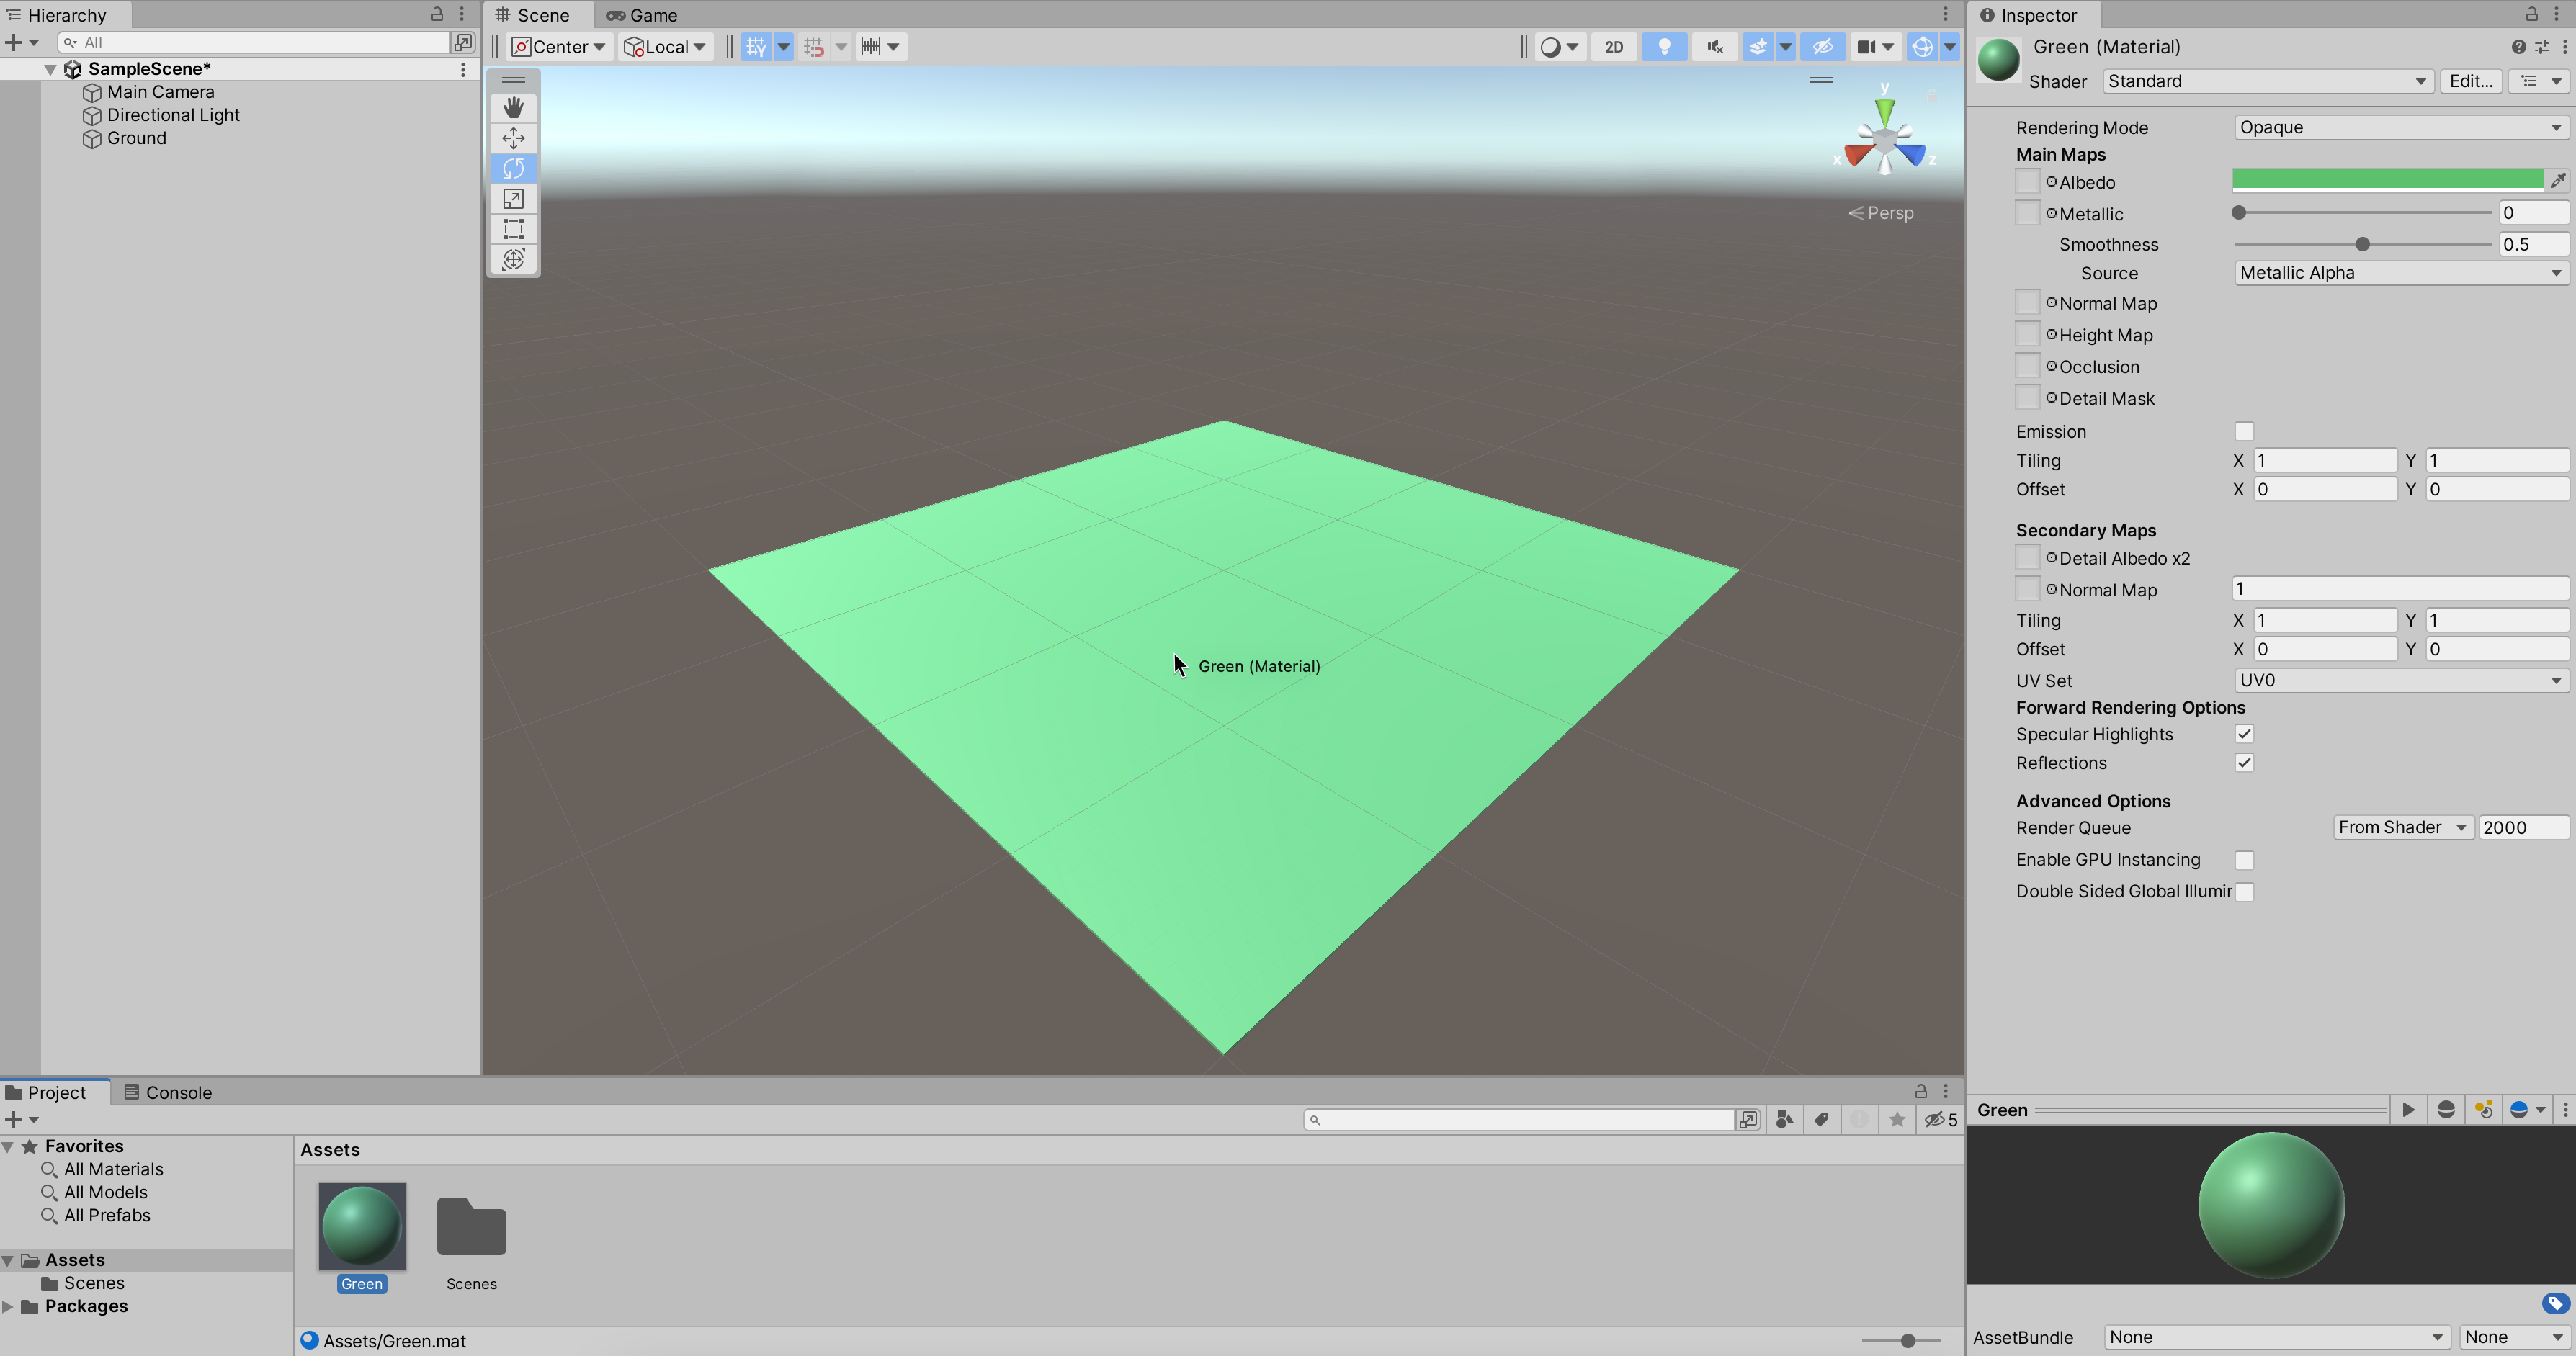
Figure 2. A cube that has been scaled on the X and Z axes, renamed to “Ground”, and colored with a green material.
Adding anything to the scene that can be composed of these basic shapes is as easy as that. You can add a primitive model, scale or rotate it along any axis, position it, and color it with a Material.
But what about if you want to use custom models of more complex objects? To show this part off, we need some Assets. There are lots of stylish and generously-licensed options online for anyone looking for freely available or temp assets. Today, I'm going to use the Survival Kit by Kenney.
By downloading the pack as a zip, unzipping it, and adding it to my Project's assets, I'll now have access to the whole set of models. These can be added to the Scene by simply dragging into the Scene View, and then scaled, moved or rotated as before. At this point, you can just have a play around with different models and composition until you have some clutter you like.
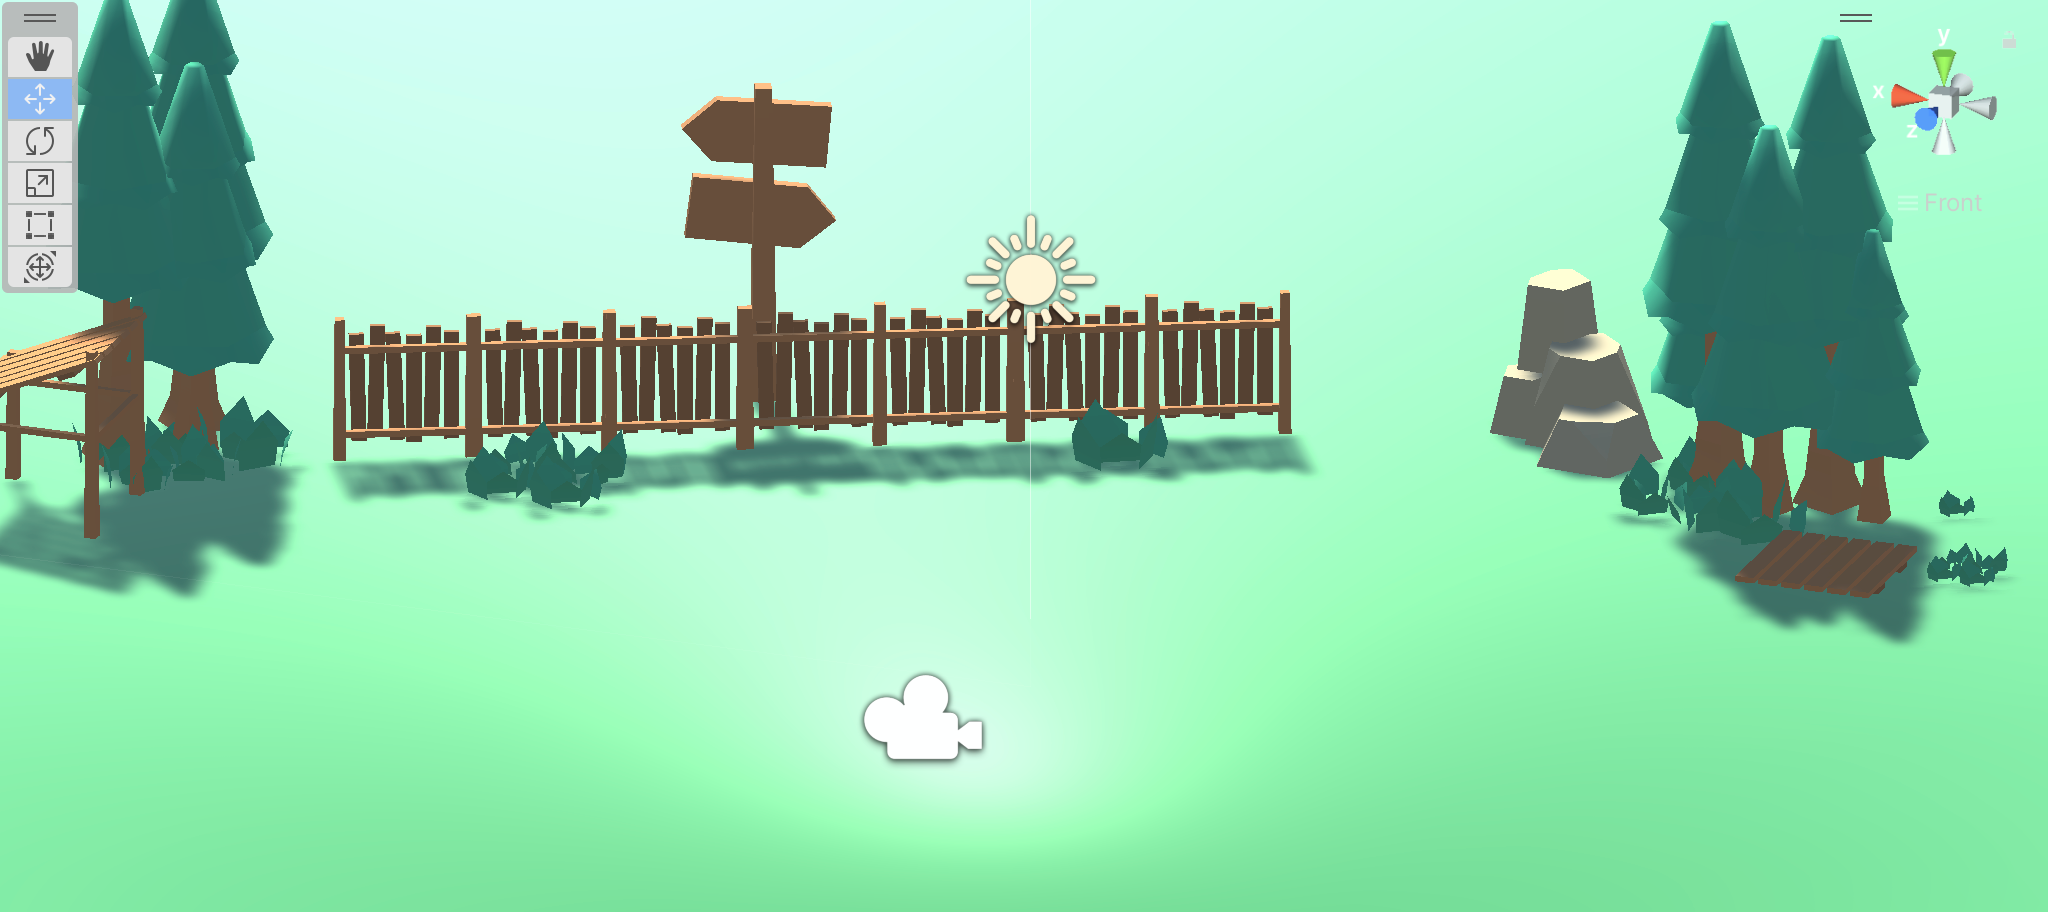
Figure 3. A simple Scene, composed using the methods described. It includes a shelter on the left for character to stand under/near and a platform on the right for the party hat to sit upon.
Using these simple pieces, you can assemble scenes both basic and complex. But keep in mind that just because a scene looks right, does not mean it will behave correctly. For props and parts of the landscape to act the way you want to once the simulation runs and time begins to pass, we need to consider the physical aspects of different objects. Some we will want to always remain static, others we will want to subject to physics that will make them roll or fall due to gravity; some we will want to remain incorporeal like a beam of light, others we will want to be solid and impermeable.
When you want an object to be subject to physics, you give it a RigidBody component. This part represents the physicality of the object beyond just the visuals you can see. This is critical to knowing how it will behave when it is subject to certain forces—its weight will determine how it acts if thrown, its friction will determine how it acts if dragged, its center of mass will determine how it will tip if pushed, and so on. This part can get tricky but the defaults work pretty well for most things (though note they do assume that your Scene is scaled to 1 "unit" = 1 meter for gravitational effects).
When you want an object to respond to something touching it, you give it a Collider component. If you want the response to be "act like a solid object", i.e. don't let the intruding object move any further, or make it bounce back, then you want just a Collider. If you want the response to be "act like a detection volume", i.e. just tell some game system that the collision occurred, then you want a Trigger Collider. The former type is responsible for making sure players can't walk through walls, while the latter is responsible for telling when the player is hit by a projectile or enters a room which should trigger a cutscene.
The Scene hierarchy also comes into play here: objects whose parent moves, scales, or rotates will do so also. This is where the term "parenting" comes from, as a child object will follow its parent. In a typical game, the player model will be a child of a container object that also holds the main camera (so it moves relative to the player) and any accessories the player model is wearing (so they don't stay behind when it moves). So have a think if there are any objects you want to stick together!
For my Scene, the only structural changes I made was to give every object but the grass Colliders so that they would behave as if they were solid, but remain immovable. But we'll need to use these concepts with a bit more nuance as we move onto moving or intractable objects a little later in this tutorial.
At this point, our scene is missing just one important object: the party hat! You'd think that a cone would be the kind of simple shape that Unity would make available as a primitive, but apparently not. So here I've made one in Blender, to export and use in Unity the same way we used pre-made models before. It's as simple as exporting the model to a .fbx file, and importing it like any other assets into your project. I chose to export an untextured model, and apply a simple color material to it once it's in the Scene.
If you have Blender installed on the same machine, you can even drag a .blend file in directly!
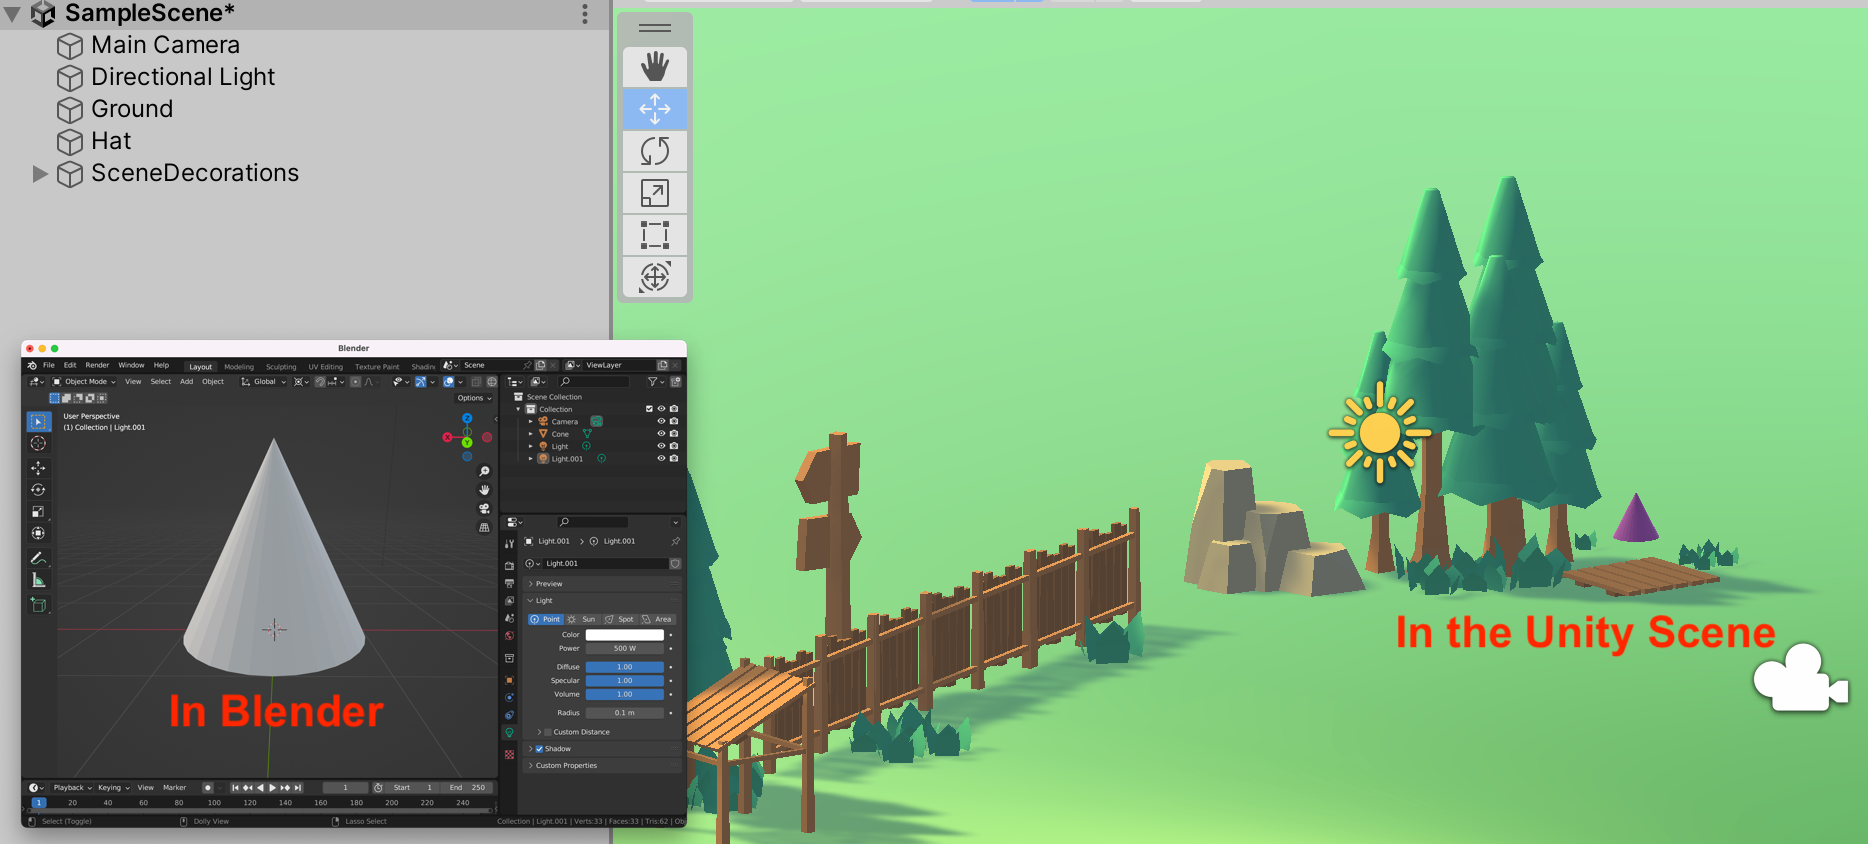
Figure 4. A custom cone model made in Blender, imported into the Unity Scene.
This is a very simple scene, but these same principles apply for making much larger or more complicated scenes—even the most complex Unity scene is just a hierarchy of GameObjects and Prefabs with different physical and material properties, like this one.
If you don’t want to have to tab out to Blender to make custom models, remember you can create and modify custom meshes right inside Unity by installing ProBuilder.
A huge amount of customization and polish not included here will come from playing around with Material settings, wherein you can apply either mappable textures (flat images applied as a texture) or shaders (dynamic textures which are generated programmatically) rather than the flat colors shown here.
Further aesthetic control can be gained through custom lighting, and a skybox texture to match. No matter your setting, shipping a game with the Unity default skybox texture is seen as a major faux pas.
There are just two characters in this little guy game: the Player and Cube. Cube is exactly what he sounds like, a cube primitive with a simple color material. I've made him blue.
Player is only a little more complex. Because he will need to hold things later on, he'll at least need arms. So I've made him a cylinder with some little elongated cubes sticking out the front. By using the same GameObject hierarchy trick, his arms will be sure to move and rotate with his body. With another simple color material, I've made him red.
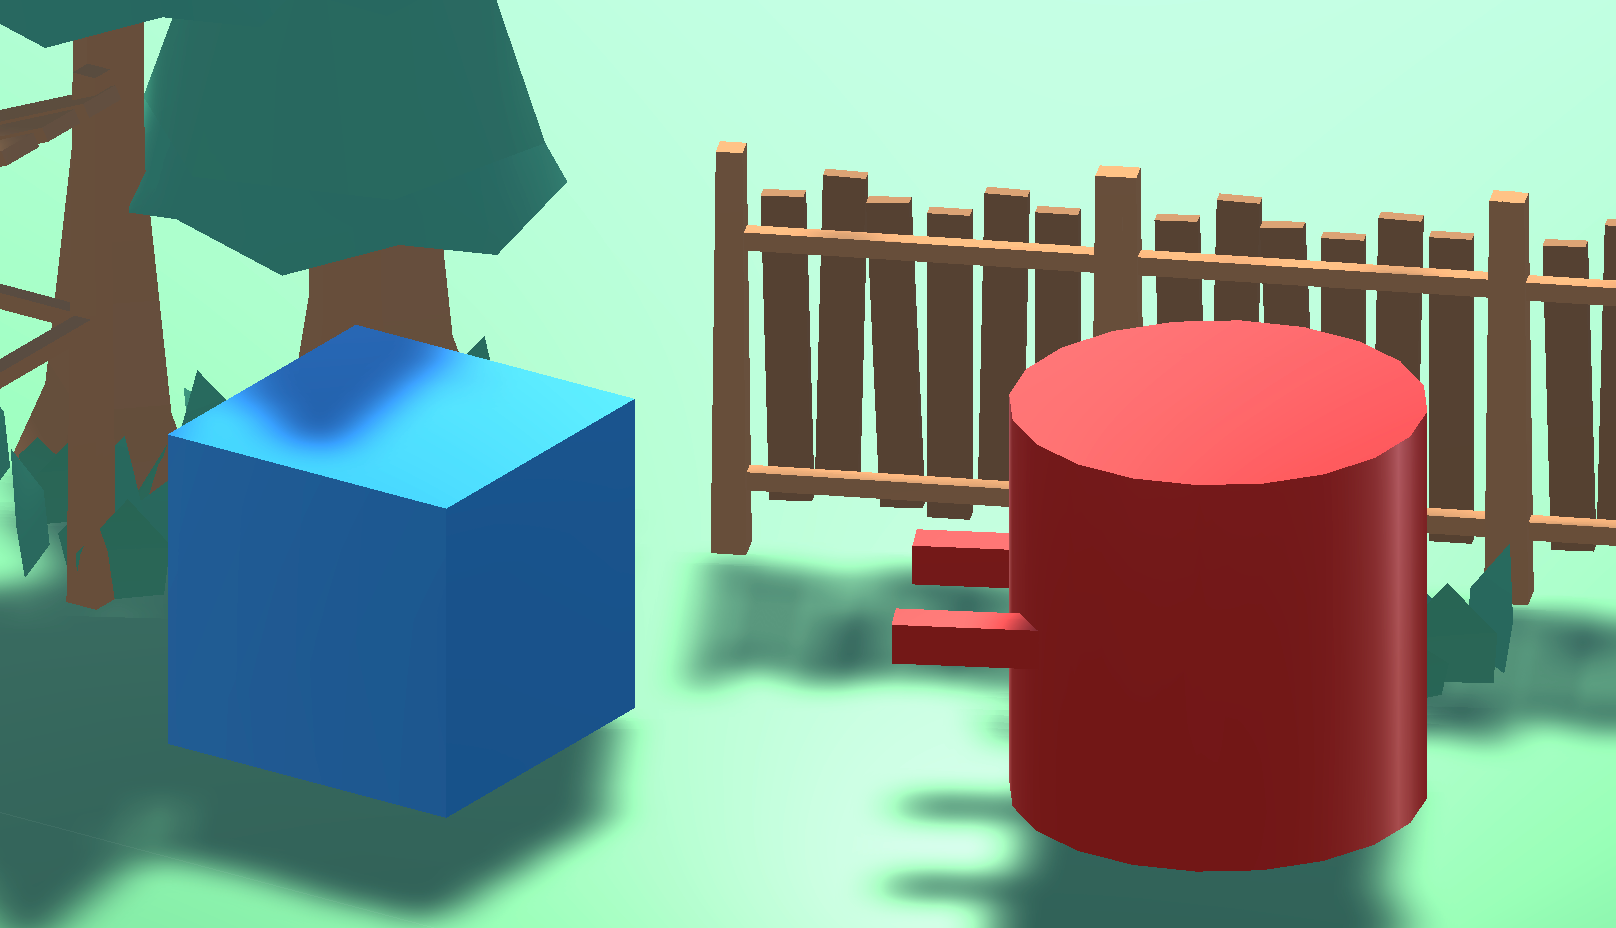
Figure 5. The NPC Character "Cube" and the player character "Player."
Now that they have a physical form, these characters need a few more things to make them functional later. The first is the ability to detect when they collide with or approach objects. (That latter one is just done by colliding with a large, invisible box around the object that you want to be able to respond to being approached. Yes, all of game dev is trickery like this.)
Since we want the player to both be able to move around atop the ground and also detect collision events, it will require both a Trigger Collider (a Collider component with IsTrigger turned on) and a RigidBody (but because he's not going to jump, this can have UseGravity turned off).
Colliders in games with complex characters will often be Mesh Colliders, where the custom shape somewhat mirrors the visible model. But here, we're going to keep it simple with a Box Collider. Because player is a bit of a weird shape, you may want to edit the shape of its Box Collider using the "Edit Collider" functionality. Usually something slightly larger than the physical model will feel most right to the player.
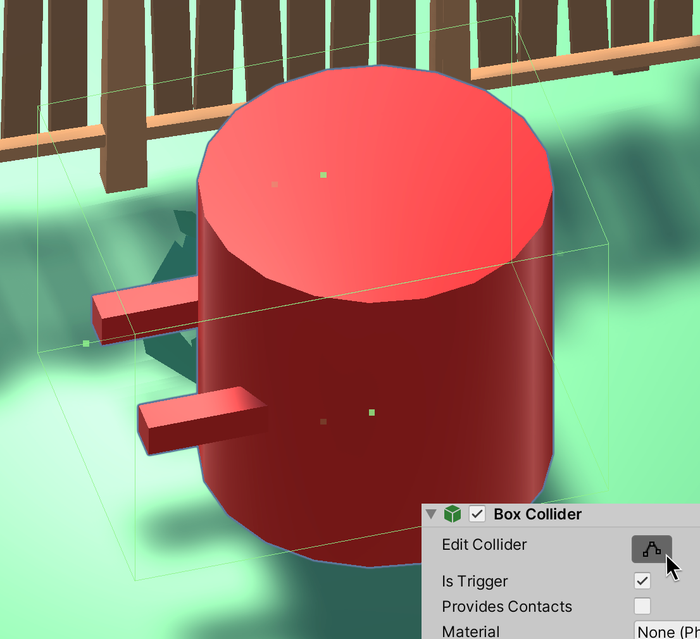
6. The Player model’s Box Collider in Edit Mode.
Next, we need to prepare for each character to be able to use the party hat. Both Cube and Player may be required to wear the hat, and Player will also need to be able to visibly hold the hat.
The easiest way to do this is to just have a point marked on the player where the hat can snap to for each of these actions. By placing an empty transform with an appropriate name where the hat will need to go, we can move the hat to there in code later.
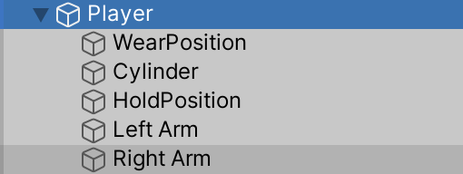
Figure 7. The final hierarchy of objects, contained in an empty Parent GameObject called "Player."
Our two characters are now ready for some logic, so let's move on to the scripting part!
At this point, most games would factor in not just the character models, but also the character animations. We're not going to animate our player here, but there are a wide range of paths you can take for animation in Unity. Most likely, when working with a 3D model, you'll use an Animator Component. Animator Components allow you to reference animation clips, and define how different animations blend together as needed, and which parts of the model that's being animated are deformed and effected by the animation.
Our Player isn't going to be very good at searching for party hats if he can't move around, so let's hook him up to some form of input. We'll do this by selecting Create > C# Script in the project area and creating a script with a sensible name for the Player. Once created, this will be selectable in the Add Component menu in the inspector. Adding the script as a component on the Player object ensures association between the two, and will allow access in the script to any other components or properties of the Player object hierarchy.
Figure 8. An aptly-named script for Player behavior.
If you open this script in your preferred editor, you will see it has defined a class with the same name as the file, and it inherits from the Unity object superclass MonoBehaviour. It will have defined functions for Start, which is called once when the object is created, and Update, which is called every frame (usually 30-120 times per second). Let's populate these with some input-driven movement code!
For complex or configurable inputs, Unity has the Unity Input System. But in our case, we can use the legacy Input Manager that comes with support for WASD/arrows and some generic action keys already built-in.

These functions get the user input as XYZ vectors which can then be used to apply or scale forces or transformations as needed. In our case, we want the forward/back movement to make the player move forward or back—as opposed to accelerate/decelerate or look up/look down, as these keys might do in other games. And we want the left/right movement to rotate the player left or right—as opposed to strafe left/strafe right or tilt left/tilt right.
Here is where an easy trap comes in: inputs should consider the time between updates in their multiplications, and scale accordingly. Otherwise, a system which can run with more frequent update ticks would allow the player to move faster—because they would get the same amount of movement per update, but update more often. In this case, we are going to combine the player's forward/back input, the update time, and some arbitrary scaling factor, to get the appropriate forward (or backwards) force to apply in each update.
Once calculated, the appropriate force amount and directions can be applied to the RigidBody component that controls the Player's movement. By adding some configurable multipliers (to allow fiddling until the movement feels "right"), the final movement code would be something like this:
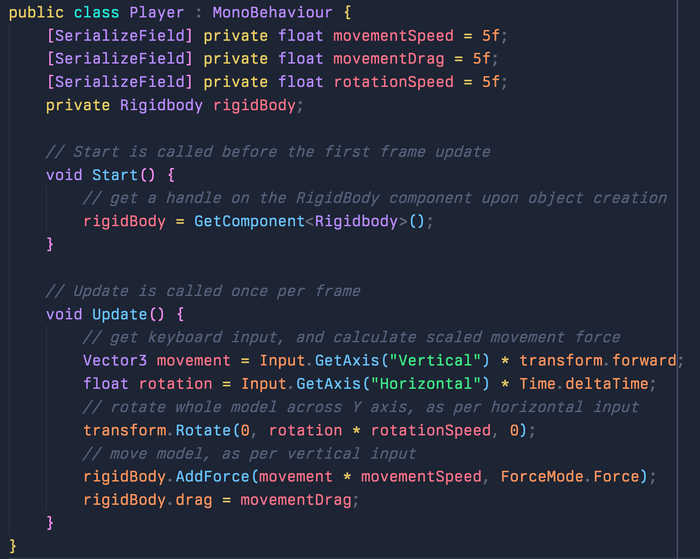
Note that by adding [SerializeField], the movementSpeed, movementDrag and rotationSpeed variables will show up in the Unity Inspector and allow live tweaking of these values in-engine.
At this point, if you save the script, return to Unity, save the scene, and run the game using the play button, and you should be able to rotate and move the Player object around the scene! But he won't be able to do anything more useful than just bump into stuff just yet, so let's make him a little more functional…
Most games will support some form of re-mapping of controls, whether for personal preferences or accessibility reasons. To support this, a layer of abstraction would be necessary between the input and the resulting action, that checks what this input is currently set to. Player-determined key bindings can be saved to PlayerPrefs between sessions (by casting the KeyCode values to/from integer or string representations), and used in-game by making input logic check against the currently-set bindings rather than hardcoded values as we have here.
This is a very simple little snapshot of a game, but it still has some objectives and motivations that must be communicated to the player. I'm a bit biased, but I think the easiest way to do this is by adding some simple dialogue using a framework like Yarn Spinner.
The easiest way to install a third-party package like Yarn Spinner is to use a package manager for Unity, like OpenUPM. You can register this by adding the package registry via Edit > Project Settings > Package Manager > Scoped Registries. Here, you can tell OpenUPM that it is responsible for managing packages from dev.yarnspinner.

Once this is registered, the package listing at Window > Package Manager should list Yarn Spinner under "My Registries." From here, you can click install. For future projects, only this second step will be needed.
Once the Yarn Spinner package files appear in the Project explorer, we can drag the default dialogue system into the Scene to create all the views and logic necessary for managing dialogue. The prefab is available at Packages/Yarn Spinner/Prefabs.
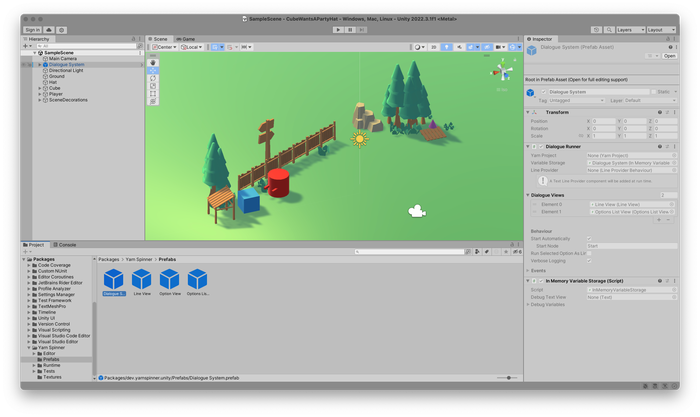
To begin writing dialogue, we need two things: a Yarn project, and a Yarn script. Each can be made via the Create > Yarn Spinner menu from the Project pane. The Yarn Script added to the Source Scripts list of the Yarn Project, then the Project should be dragged into the corresponding inspector slot on the Dialogue System. Now it's time to write some dialogue!
Yarn Spinner is pretty simple: dialogue is mostly just lines of text. Minimal syntax provides functionality for dividing conversations up into sections called Nodes which can be jumped between, and for basic command flow such as via if statements. Using this, we're going to make a simple conversation to introduce and respond to the scenario happening in the game.
By default, conversation begins when the game does, starting from the first node called Start. Here, some simple lines said by Cube will be interspersed by selectable responses for Player, indicated by the preceding "- >." By providing only one option for response each time, the Player will have no choice but to comply.
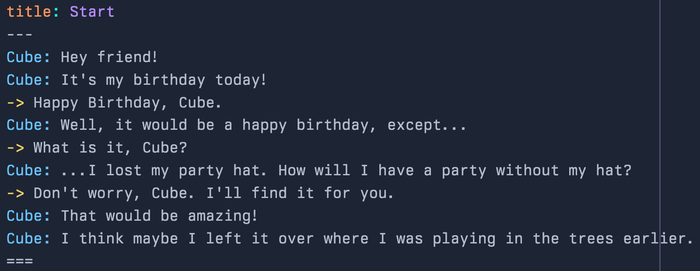
By ending the node (delineated by "===") without jumping to another, this conversation will end once all lines have run. At this point, the player will be expected to go and find the hat. When they return, we'll want the next conversation to be more dynamic, depending on what the player has done since.
If the player has returned without finding the hat, Cube should remind them what they are looking for. If the player has returned with the hat, Cube should ask them for it. If the player has already returned the hat, Cube should thank them again.
First, we'll declare some simple variables, designated by the "$" syntax…

…then we’ll use them in an if-else block to jump to the right conversation nodes…
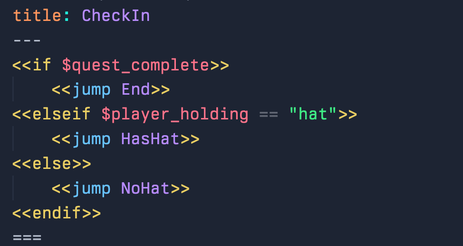
…in which we will respond appropriately to the situation, and update the variables where relevant.

To trigger this second conversation upon the player's return, we can make a Trigger Collider around Cube tell the Player to begin the follow-up conversation. This will require a new script for the NPC Cube.
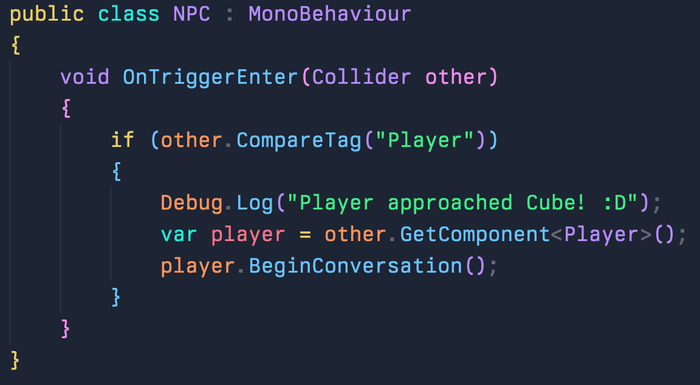
The corresponding BeginConversation function should then tell Yarn Spinner which node to continue running from. To do this, we just need to get a handle on the DialogueRunner in the scene.

And we're done! Playing the game should now show a little conversation at the start, and trigger the follow-up whenever the Player approaches Cube again.
You might notice at this point that the $player_holding variable is never updated from within the Yarn script, as it is related to a state change that happens in game rather than in conversation. More on that coming up next!
Yarn Spinner supports loads of things beyond just lines and options. You can do all sorts of complex logic, and even call into C# functions from Yarn scripts. Using C# to change Yarn variables and call into the required Yarn nodes is just one way of using Yarn Spinner; for the myriad other ways, check out the Yarn Spinner documentation.
It would also be typical at this point to give the player a way to remind themselves what they were doing. This usually takes the form of a dedicated quest list view and/or current quest overlay. In this case, a UI element could be added to the upper corner of the view that says "Find Cube's party hat;" this would be made visible once the initial conversation is complete, and disappear once the matter has been resolved. This would likely be done with Unity's UI Toolkit.
When our dear friend Cube asks us to find his party hat, the implication is that he would also like us to bring it to him. This requires game logic to support various states:
The hat is not yet found, and thus is just out in the world not associated with any character.
The hat has been found, and is now being carried around by the Player.
The hat has been delivered, and is now being worn by Cube.
To add a bit of player agency, we can make it possible to decide to keep the hat for yourself. Not a very nice thing for you to do, keeping your buddy's party hat on his birthday… but some people just want to be all renegade all the time, and who are we to stop them?
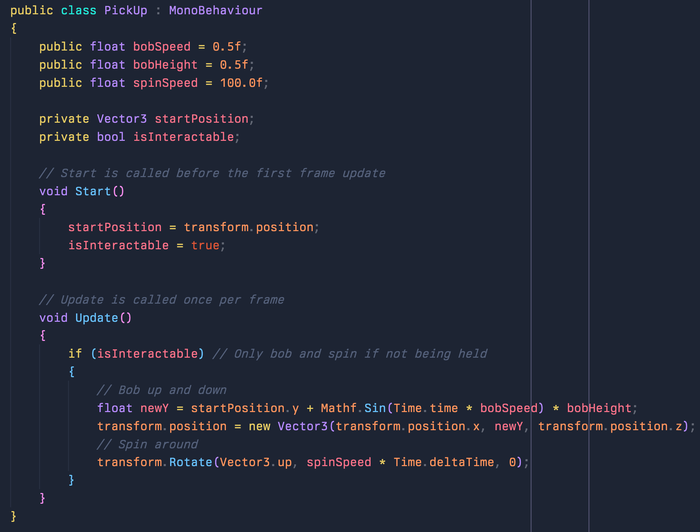
Because the hat is a pickup, let’s make a new script called PickUp that will be designed such that it could be attached to any object which the Player might like to pick up. This script will be responsible for:
Animating the PickUp-able object while it is on the ground—a simple spinning and bobbing motion like an old-fashioned FPS pickup.
Responding to touch (collision with the PickUp-able object's collider), and detecting if it’s come from the Player.
Triggering the player picking the object up, when 2. happens.
This script will then be attached to the hat in the Scene. It will need to interact with other scripts to trigger actions or query components belonging to the Player or Cube, depending on interactions in the Scene. The series of events would go as follows:
The hat is on the ground, so it should be bobbing up and down.
We'll just add some code to the Update function that moves the model up and down. Multiplying some movement by a sine wave ensures it will smoothly move back and forth over time.
2. The hat has been collided with, so it should get picked up.
We'll add some code to the PickUp script that detect whether the colliding object is the Player as expected, very similar to how we detected the Player approaching Cube. If it is, tell the Player to hold this object.
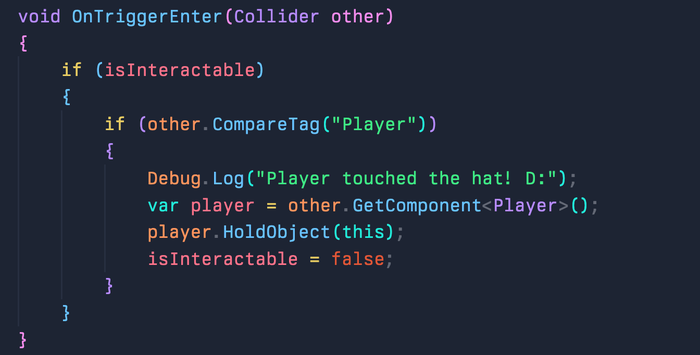
In the Player script, we'll define the corresponding function that moves the PickUp into the Player's arms visually, parents the object appropriately so it will move when the Player does, and stores a handle to the held object for later. One important part is still missing here though…
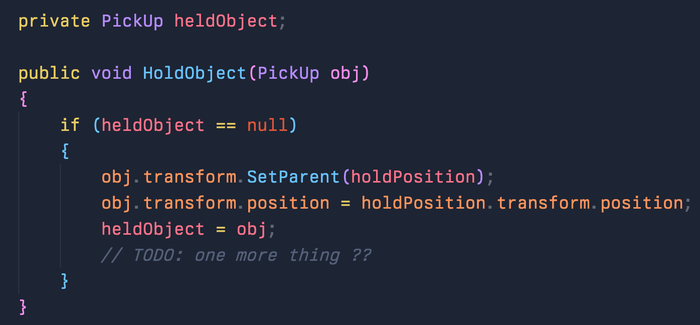
For the dialogue to respond appropriately to the Player visually holding the hat, we must change the state of the Yarn variable $player_holding to "hat." To change a Yarn variable outside of the Yarn script, we can get a handle on the DialogueRunner and set a variable's value by name via the its VariableStorage component.

3a. The hat is kept by the Player to wear, OR
3b. The hat is handed to Cube to wear.
This requires two very similar snippets to the Player class' HoldObject function, but sometimes in reverse. In the first case, the Player just needs to stop holding the hat and put it on his head.

In the second case, the Player needs to stop holding the object…

…and put it on Cube, by giving the NPC script a very similar WearObject function.

These wearPosition and holdPosition fields, once visible in the Inspector, should be assigned the empty transform objects we created earlier during character modeling.
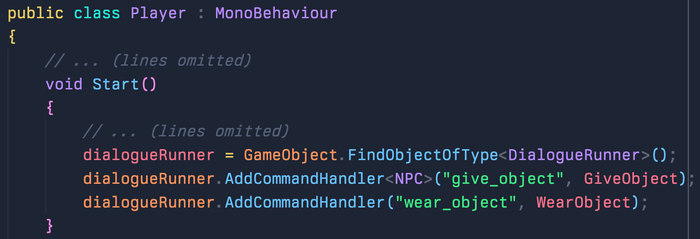
Finally, we need to make the correct player put on the hat in response to selections the player makes in dialogue. This means declaring some custom commands that can be called from Yarn to trigger the appropriate function in C#. We do this with Yarn Command Handlers, by simply telling the Dialogue Runner which function to run for which command, and the class to expect for any parameters it should accept.
So by registering like this in C#:
We can use commands like this in Yarn:
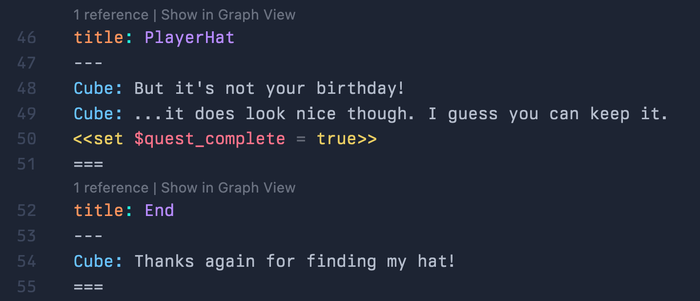
So that when Player decides who gets to wear the hat, they will immediately put it on. And just like that, we have represented all possible states of the hat!
If you play the game now, the hat should move around as suggested by player dialogue and movement. You should be able to kindly return the hat to Cube, or diabolically keep it for yourself.
Because we've made the PickUp class generic, it can be applied to objects other than just the party hat. But to do so would require custom dialogue for requesting the object, and custom functions for delivering it once it was found, for each additional object we wanted to be able to interact with.
In cases where more than one or two types of objects will be handled throughout the game, it would be typical to instead make an entire class of systems for the management of a player inventory. This would become responsible for telling other game systems—and also the players themselves, usually via UI elements—about which objects they possess at any given moment.
So just like that, we've made a little game! There are loads of Unity systems we did not get a chance to play with, including audio, animation, networking, cutscenes (called "timelines" in Unity), custom UI, and more. But using what you have here, you're well on your way to being able to make little guy games of your own.
Go forth and make them!
You May Also Like