Daily news, dev blogs, and stories from Game Developer straight to your inbox
Sponsored By
Day 24 of 100 Days of VR: Creating Waves for Spawning System in Unity
Today in Day 24, we’re going to resume working on our EnemySpawner. Yesterday, we laid the groundwork that allows us to spawn enemies, however, we haven’t implemented finishing a wave yet. Today we're going to fix that!
2 Min Read

Today in Day 24, we’re going to resume working on our EnemySpawner.
Yesterday, we laid the groundwork that allows us to spawn enemies, however, we haven’t implemented finishing a wave yet.
As a result, we only spawn our 5 enemies and then nothing happens after we defeat them.
Today, we’re going to make some changes so that we can move on to the next wave and then win the game.
On a different note, after reading some other articles, I decided that I like their formatting, so I’m going to organize my articles the same way.
Step 1: Create a SpawnManager Tag for our SpawnManager
The first thing that we need to do is to set a Tag for our SpawnManager.
We need to do this, because later in EnemyHealth, when our enemy dies, we want to be able to reference our SpawnManager.

Select our SpawnManager game object and then under tag, select Add Tag… and create a new Tag called SpawnManager. Then go back to our game object and attach the tag like above.
Step 2: Change EnemyHealth.cs to use our SpawnManager
For our EnemyHealth script, we need access to our SpawnManager script so we can call EnemyDefeated(), which we implemented yesterday.
Here’s our change:
using UnityEngine;
public class EnemyHealth : MonoBehaviour
{
    public float Health = 100;
    public AudioClip[] HitSfxClips;
    public float HitSoundDelay = 0.5f;
    private SpawnManager _spawnManager;
    private Animator _animator;
    private AudioSource _audioSource;
    private float _hitTime;
    void Start()
    {
        _spawnManager = GameObject.FindGameObjectWithTag("SpawnManager").GetComponent<SpawnManager>();
        _animator = GetComponent<Animator>();
        _hitTime = 0f;
        SetupSound();
    }
    void Update()
    {
        _hitTime += Time.deltaTime;
    }

    public void TakeDamage(float damage)
    {
        if (Health <= 0) { return; } Health -= damage; if (_hitTime > HitSoundDelay)
        {
            PlayRandomHit();
            _hitTime = 0;
        }
        if (Health <= 0)
        {
            Death();
        }
    }
    private void SetupSound()
    {
        _audioSource = gameObject.AddComponent<AudioSource>();
        _audioSource.volume = 0.2f;
    }
    private void PlayRandomHit()
    {
        int index = Random.Range(0, HitSfxClips.Length);
        _audioSource.clip = HitSfxClips[index];
        _audioSource.Play();
    }
    private void Death()
    {
        _animator.SetTrigger("Death");
        _spawnManager.EnemyDefeated();
    }
}
Here are the changes we made:
We get access to our SpawnManager: _spawnManager, which we’ll notify when an enemy die
In Start() we get _spawnManager by finding our SpawnManager game object from its tag and then getting the SpawnManager script attached to it
In Death() when the knight is defeated, we’ll call EnemyDefeated(), which will decrement our enemy count and call the next wave if all enemies are defeated.
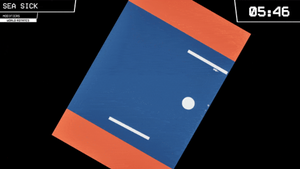
Now when we play the game, after we defeat our first 5 enemies, our next 10 will show up.

Look at the fate of all those who opposed us!
Conclusion
Today has been a relatively busy day, so today’s progress has been relatively short. However, we’re almost done with our Spawning System.
Tomorrow, we’re going to create a player victory state and then fully complete our player spawning feature to our simple FPS!
I’ll see you all tomorrow!
Source: Day 24
Visit the 100 Days of Unity VR Development main page.
Visit our Homepage
Read more about:
BlogsAbout the Author(s)
You May Also Like