

Daily news, dev blogs, and stories from Game Developer straight to your inbox
Sponsored By
Featured Blog | This community-written post highlights the best of what the game industry has to offer. Read more like it on the Game Developer Blogs or learn how to Submit Your Own Blog Post
Building a Scalable Online Game with Azure - Part 5
In the previous part of this series, we created the frontend, a small Universal Windows Platform game that accesses our backend. Finally, we'll be deploying the whole application to the cloud.
5 Min Read

Welcome to the final part of the series Building a Scalable Online Game with Azure! Now that we know about the general architectural design of online games in the cloud, adding a web service that acts as interface between the frontend and the actual backend services, how to persist state to a scalable database, and how to create a small Universal Windows Platform game that accesses our backend, there's only one last thing do to: Deploying the application to the cloud.
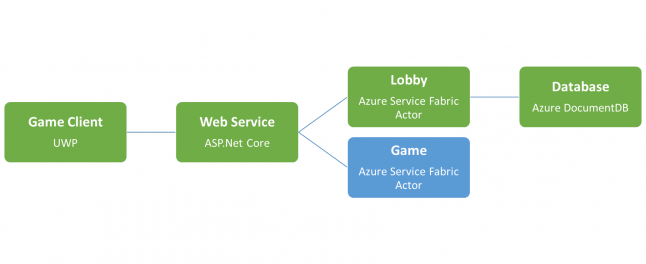
Then, adding more services such as the Game service in the diagram above, is straight-forward and works exactly the same as adding the Lobby service in the second part of this series, and communication between these services is implemented the same way as communication between the Web Service and the Lobby service.
As always, if you've missed any or all of the previous parts, you can catch up by grabbing the source code that we've written so far from GitHub.
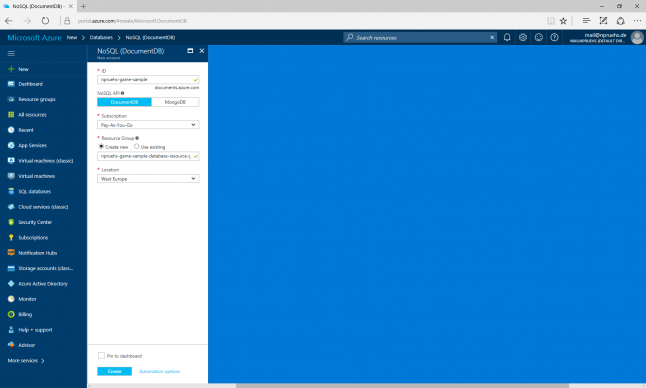
Setting up the Database
First, we need to setup a few things in Azure:
Create a free account at portal.azure.com.
In the navigation pane to the left, click New > Databases > NoSQL (DocumentDB).
Enter an ID for the new database resource.
Ensure that the DocumentDB API is selected.
Select the subscription you acquired when creating your Azure account.
Create a new resource group for the database.
Confirm all settings by pressing Create.
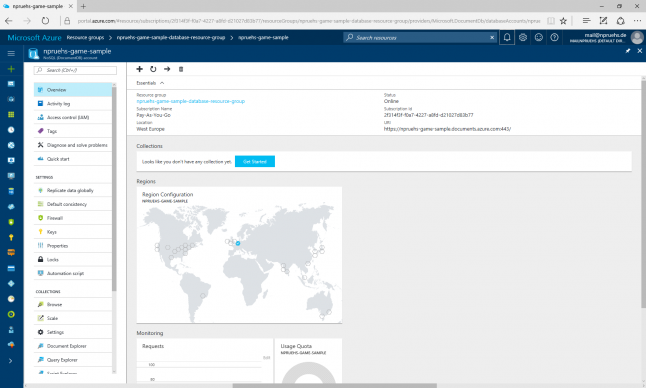
After a few minutes, our new database should be up and running.
In the navigation pane of the database, click on Keys to retrieve our new connection URI and primary key.
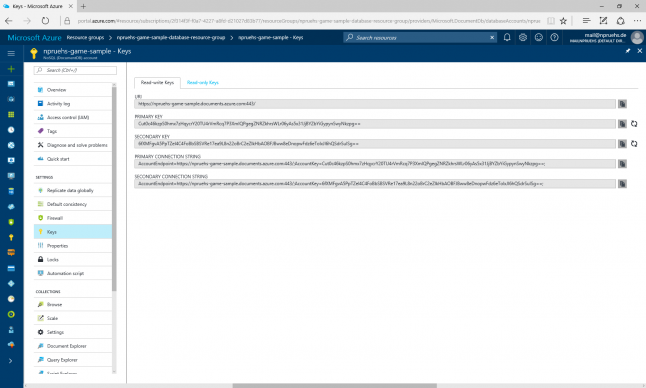
Now, in our LobbyActor, in OnActivateAsync, change the client parameters accordingly.
// Create the client.
this.client = new Microsoft.Azure.Documents.Client.DocumentClient(
    new Uri("https://npruehs-game-sample.documents.azure.com:443/"),
    "Cut0c46kzpS0hmx7zHqycrY20TU4rVmRcq7P3XmIQPgegZNRZkhrsWLr06yAs5x31JjBYZbYiGypynSwyNkzpg==");
We can verify that our new database is working as expected by hitting F5 in Visual Studio and visiting our local endpoint again (e.g. http://localhost:8557/api/login/npruehs). The login counter should be visible from the Document Explorer of our Azure portal afterwards.

Setting up Service Fabric
Time to create the actual service fabric cluster.
In the navigation pane to the left, click New > Compute > Service Fabric Cluster.
Enter cluster name, user name and password as desired.
Select the subscription you acquired when creating your Azure account.
Specify a name for a new resource group.
Confirm all data by pressing OK.

Then, we specify the configuration of our new cluster. Set up a new node type by choosing durability and reliability tiers, as well as virtual machine size. Confirm all settings by pressing OK.
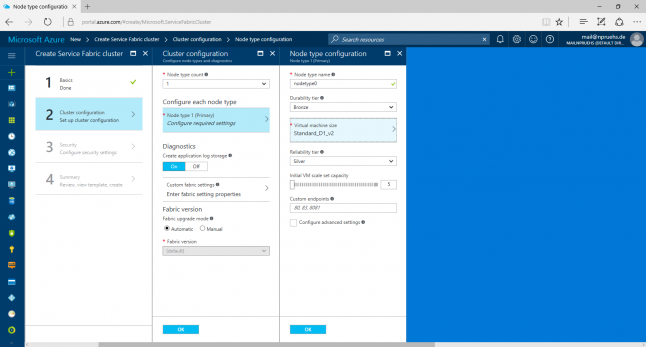
Finish the cluster creation by specifying security settings, reviewing the summary and pressing Create.

Azure will create the service fabric cluster and notify us as soon as it's ready. Make sure to wait until the Service Fabric Cluster is fully deployed.
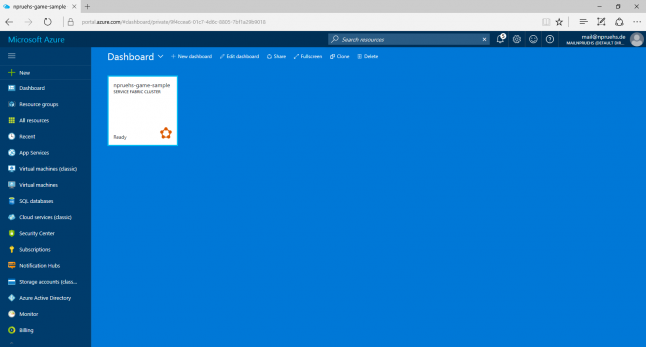
Note that depending on the type of virtual machine you've selected, this can take up to several hours.

Done. Back to Visual Studio.
Deploying the Application
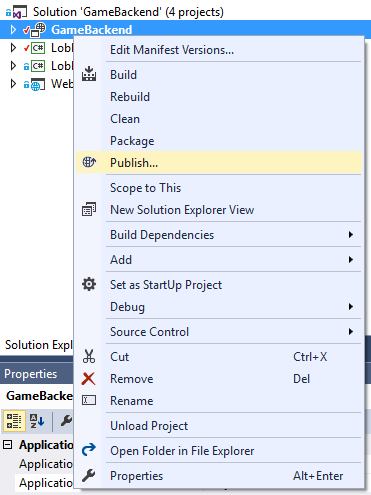
After opening our backend solution, we can right-click the service fabric project (i.e. GameBackend) and select Publish...
Our application has already several target profiles in place: These profiles allow to properly test the application locally, while not wasting any resources when deployed to the cloud.
Select the cloud publish profile.
Sign in to the Microsoft account that you used for accessing the Azure portal.
Select the connection endpoint we've just set up in the Azure portal.
Click Publish.
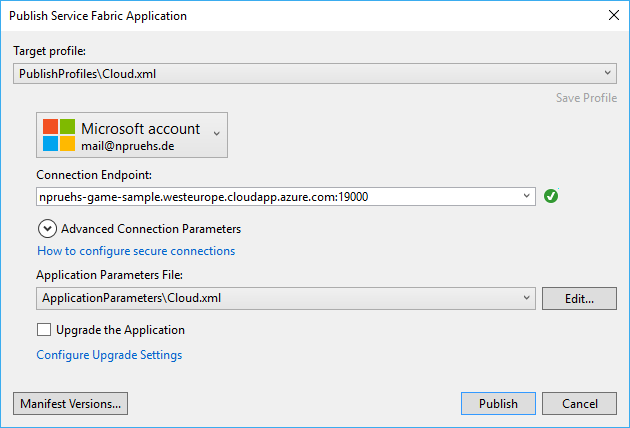
Wait for Visual Studio to publish our application to the cloud.
As soon as the publishing process has finished, we can see our application in the Service Fabric Explorer of the Azure portal!

Setting up the Load Balancer
(Un-)fortunately, our application isn't publicly available yet. Let's change that.
First, we need to add a health probe that will monitor the availability of our service.
In the navigation pane to the left, click All Resources.
Select the load balancer resource (e.g. LB-npruehs-game-sample-nodetype0).
Select Health probes and press the + button (Add).
Specify a name for the health probe, and the correct protocol and port for our application.
Confirm all settings by pressing OK.

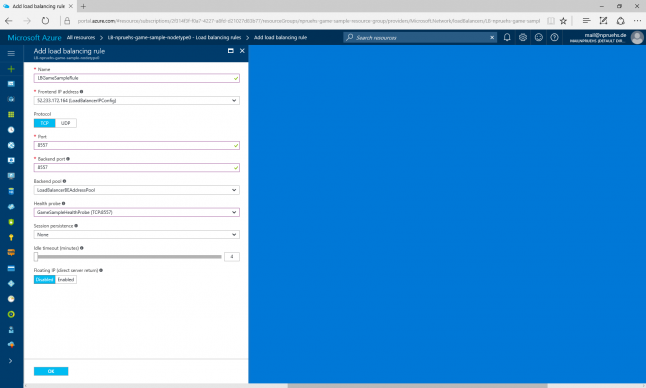
Next, we open the actual port for our game client.
In the navigation pane of the load balancer resource, select Load balancing rules.
Press the + button (Add).
Specify a name for the rule, as well as the correct protocol and port for our application.
Select the health probe we've just created.
Confirm all settings by pressing OK.
Finally, our service running in the cloud is available to be consumed by clients - visit the application URL (e.g. http://npruehs-game-sample.westeurope.cloudapp.azure.com:8557/api/login/npruehs) in the browser and verify the results!
Adjusting the Client
One last tiny step remains: We need to change the connection settings in our client.
Open the frontend solution in Visual Studio.
In SampleFpsTextRenderer.cpp, update the connection settings.
// Send request.
httpClient =
	ref new Windows::Web::Http::HttpClient();
Windows::Foundation::Uri^ uri =
	ref new Windows::Foundation::Uri("http://npruehs-game-sample.westeurope.cloudapp.azure.com:8557/api/login/" + clientId);
Build and run the game. It should properly connect to our Azure backend.
Conclusion
We have learned about the general architectural design of online games in the cloud, adding a web service that acts as interface between the frontend and the actual backend services, how to persist state to a scalable database, how to create a small Universal Windows Platform game that accesses our backend, and how to finally deploy the whole application to the cloud.
Both our game logic services and our data storage are scalable to meet varying resource demands. The backend application is extensible, allowing to add more services at any time.
Congratulations! You've successfully created a scalable online game running in the cloud!
References
Microsoft. NoSQL tutorial: Build a DocumentDB C# console application. March 2017. https://docs.microsoft.com/en-us/azure/documentdb/documentdb-get-started
Xue. Developing and Deploying a Service Fabric Voting App to Azure. February 2017. https://blogs.msdn.microsoft.com/zxue/2017/02/25/developing-and-deploying-a-service-fabric-voting-app-to-azure/
Read more about:
Featured BlogsAbout the Author(s)
You May Also Like


.jpeg?width=700&auto=webp&quality=80&disable=upscale)


