

Daily news, dev blogs, and stories from Game Developer straight to your inbox
Sponsored By
Featured Blog | This community-written post highlights the best of what the game industry has to offer. Read more like it on the Game Developer Blogs or learn how to Submit Your Own Blog Post
Building a Scalable Online Game with Azure - Part 2
In the previous part of this series, we've started to create a small cloud backend with a single actor. In this post, we are adding the web service that is acts as interface between the frontend and the actual backend services.
9 Min Read

In the previous part of this series, we've learned about the general architectural design of online games in the cloud. We created a new project with a single actor and deployed it to a local cluster for testing.
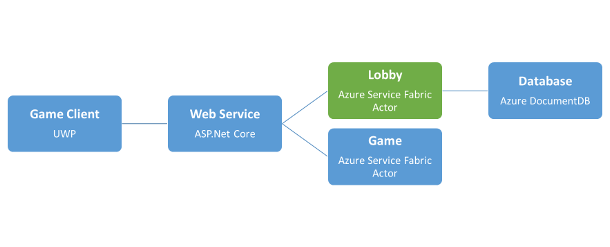
In this post, we are going to add the web service that acts as interface between the frontend and the actual backend services. Remember that we don't want our clients (or any potential attacker) to directly interact with the backend services. As the web service itself doesn't do very much, except for relaying any requests to the respective backend services, it can be stateless. The upside is that it can theoretically be scaled indefinitely, because we can run it on any number of machines.
Adding the Web Service
The web service we are going to build will be based on .NET Core. .NET Core is a lightweight and modular platform for creating web applications and services. It has been designed with portability and performance in mind. The price is a slightly smaller feature set than the .NET Framework. The full source code is available on GitHub.
First, install .NET Core if you haven't done so yet. Make sure you install Visual Studio with web development tools before installing .NET Core.
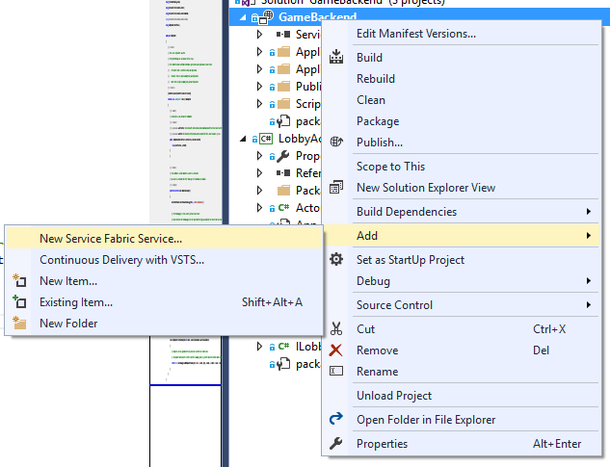
Back in Visual Studio, in the Solution Explorer, right-click the backend Service Fabric project, and select Add > New Service Fabric Service...
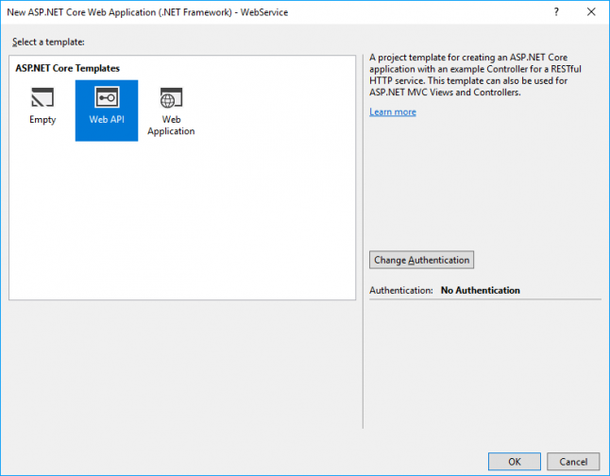
In the New Service Fabric Service dialog, select ASP.NET Core. If that option is not available to you, make sure you have installed Visual Studio with web development tools before installing .NET Core.

In the next dialog, select the Web API template. We don't need a full-blown web application here, because we won't access our services from the browser.
Visual Studio will add a new web service project to our solution. If you press F5 now, two services will be deployed to our local cluster: The web service we've created just now, and the actor service we've created previously. The web service will listen for HTTP requests on a specific port, which is told you in the output window:
Launching the browser with URL http://localhost:8557/ to open the application.
The port may vary from project to project. We can change it in the PackageRoot/ServiceManifest.xml file. If we wait for about 30 seconds, our browser will open indeed - with a HTTP 404 error.
How disappointing.
But don't worry. This doesn't mean we've done anything wrong!
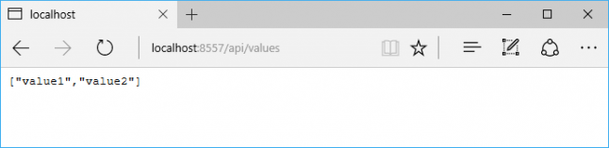
The root URL of the web service is just not routed to any code in our application. If we append /api/values to our URL, we should indeed get a response from our local web service.
Understanding ASP.NET Core Routes
Let's take a closer look at what's happening here. When we visit a URL in our browser, say http://localhost:8557/api/values, an HTTP request is sent to the specified IP address and port. In this case, our web service picks up the request, because it is running on our local machine and listening on port 8557. Then, it inspects the request header, and parses the request URL.
How does the web service decide which code to execute now?
The answer is routes. In web development, we define routes that decide which code to execute based on an HTTP verb (such as GET or POST) and an URL.

In ASP.NET Core, we can define routes by applying C# attributes to methods that are defined in a class derived from Microsoft.AspNetCore.Mvc.Controller. Let's take a quick look at the source file ValuesController.cs in the Controllers folder:
namespace WebService.Controllers
{
    [Route("api/[controller]")]
    public class ValuesController : Controller
    {
        // GET api/values
        [HttpGet]
        public IEnumerable<string> Get()
        {
            return new string[] { "value1", "value2" };
        }

        // ...
    }
}
Whenever we visit /api/values, our web service decides to route the request to our ValuesController, because there is a Route attribute applied to that controller. In that controller class, the Get method is called, because we've sent an HTTP GET request, and there's a HttpGet attribute applied to that method. In our case, that method returns an array of strings. ASP.NET Core automatically converts that array of strings to JSON, which is exactly what we can see in the browser window.
Connecting The Services
Now to the fun part: Let's connect our web service to our lobby actor.
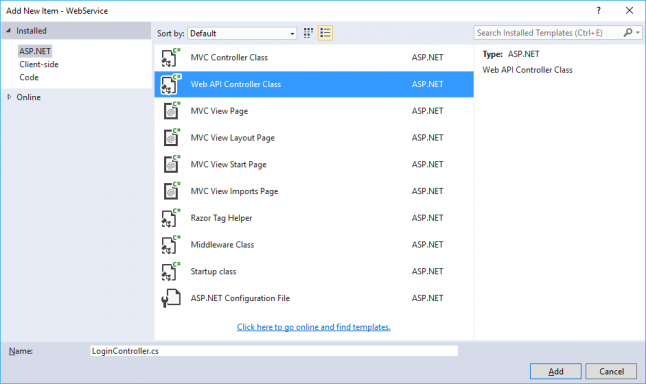
First, let's add a new controller called LoginController.
Right-click the Controllers folder of the web service project in the Solution Explorer and select Add > New Item...
From the ASP.NET section, select the template for Web API Controller Class, and change the name to LoginController.cs.
Remove all methods except for the Get method that takes an id parameter. Change the type of that parameter to string. You might want to update the auto-generated comment as well. The resulting code should look as follows:
namespace WebService.Controllers
{
    [Route("api/[controller]")]
    public class LoginController : Controller
    {
        // GET api/login/5
        [HttpGet("{id}")]
        public string Get(string id)
        {
            return "value";
        }
    }
}
If we deploy our web service now, we should be able to visit /api/login with any id in our browser (e.g. http://localhost:8557/api/login/3).
Our design says we just want our web service to relay any requests to the respective backend services. The big advantage of Azure Service Fabric is:
We don't need to locate these services explicitly.
Instead, we can ask Azure to locate these services for us. Azure will automatically send our messages to the appropriate node in the cluster, and return the response. In order to do so, our web service needs to know a little bit more about Azure functionality.
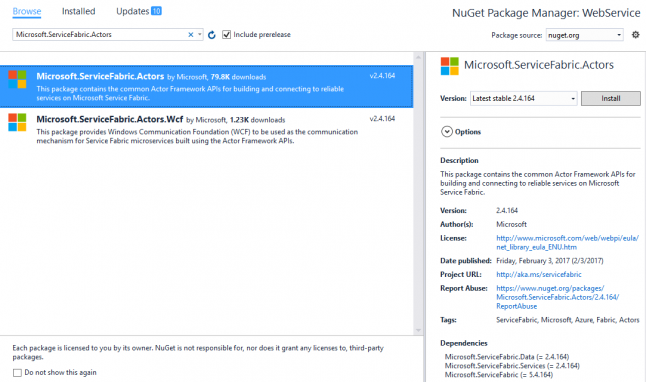
Right-click the web service project in the Solution Explorer and select Manage NuGet Packages...
NuGet is the package manager for Microsoft and .NET applications. Switch from Installed to Browse, and enter Microsoft.ServiceFabric.Actors. Installing this package into our web service will allow it to properly communicate with the actor we created in the previous part of this blog series.
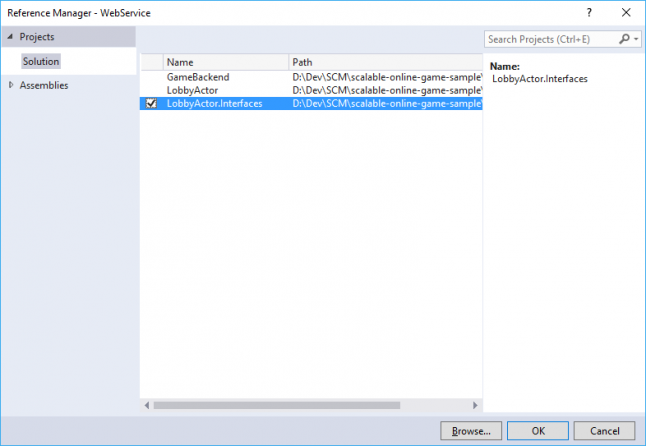
Also, our web service needs to know about how to communicate with our respective actors. Remember? That's what the LobbyActor.Interfaces project was created for. These interface projects provide an API for other services to use, without exposing any of the actual service implementation details. Right-click the web service project in the Solution Explorer, and select Add > Reference... Tick the LobbyActor.Interfaces project and confirm the selection by pressing OK.
Now, add the following using directives to the LoginController:
using Microsoft.ServiceFabric.Actors;
using Microsoft.ServiceFabric.Actors.Client;
using LobbyActor.Interfaces;
Network communication will always take a small while. The time it takes to send a request over the network and wait for its response is called round-trip time. Whenever we send a request to one of our services, we don't want our application to block and wait for the whole round-trip time, which can be tens of milliseconds. Sounds short? Imagine thousands of players accessing our services at the same time. In a best-case scenario, we could serve a lot of them during this time. Let's not waste it!
In C#, method calls can be turned into asynchronous operations by adding the async keyword to their method declaration. However, calls to async methods still expect a result to be returned immediately. Because that result might not be available yet (e.g. because we're still waiting for a network response), we return a Task object instead. The caller may then decide to block or not to block, waiting for the Task to finish.
Change the declaration of our Get method as follows:
public async Task<string> Get(string id)
Now, let's change the contents of that method to an implementation that is actually useful. We need to create an actor proxy for accessing our actor service. In a simplified world, you can think of an actor proxy as a reference to a remote actor: We don't own that actor locally, but we can call methods on the proxy, which will automatically be relayed to the remote actor, wherever it is located. For creating such a proxy, we need to specify the type, which is ILobbyActor in this case. Also, we need to say which actor we want to locate. This is done by specifying the id of that actor. For sake of simplicity, we always refer to the actor with the id 0 here. Later, when we've added another actor for handling games (e.g. IGameActor), we might want to locate a specific game actor by id.
var lobbyActor = ActorProxy.Create<ILobbyActor>(new ActorId(0));
Now that we've got a proxy to the actor we want to talk to, we can call any methods as exposed by the interface of that actor. Note that the method GetCountAsync from the ILobbyActor returns a Task as well. We are using the await keyword here to tell the runtime to wait (without blocking) for the Task to complete before continuing execution with the next line of code.
var count = await lobbyActor.GetCountAsync(new System.Threading.CancellationToken());
Then, we can just return the result. The resulting method implementation should look as follows:
// GET api/login/5
[HttpGet("{id}")]
public async Task<string> Get(string id)
{
    var lobbyActor = ActorProxy.Create<ILobbyActor>(new ActorId(0));
    var count = await lobbyActor.GetCountAsync(new System.Threading.CancellationToken());
    return count.ToString();
}
If we try to build and deploy our application now, we might experience the following error:
C:\Program Files (x86)\MSBuild\14.0\bin\Microsoft.Common.CurrentVersion.targets(724,5): error : The OutputPath property is not set for project 'LobbyActor.Interfaces.csproj'. Please check to make sure that you have specified a valid combination of Configuration and Platform for this project. Configuration='Debug' Platform='AnyCPU'. This error may also appear if some other project is trying to follow a project-to-project reference to this project, this project has been unloaded or is not included in the solution, and the referencing project does not build using the same or an equivalent Configuration or Platform.
We can add an AnyCPU configuration for the LobbyActor.Interfaces project from the Configuration Manager window. That should resolve this issue.
After having deployed the application, accessing our web service (e.g. at http://localhost:8557/api/login/3) should show a 0 instead of the string "value", which is exactly what the GetCountAsync method in our LobbyActor implementation returns.
Congratulations! You've successfully hooked up a stateless and scalable web service to a cloud-based actor-model game service!
The full source code of this part is available at GitHub.
Clearly, we want to do something useful with these services, such as granting our players a daily bonus for logging in. In the next part of this series, we are going to learn how to persist state to a scalable database.
References
Microsoft. Using cloud services for UWP games. February 2017. https://docs.microsoft.com/en-us/windows/uwp/gaming/cloud-for-games
Microsoft. Build a web service front end for your application using ASP.NET Core. October 2016. https://docs.microsoft.com/en-us/azure/service-fabric/service-fabric-add-a-web-frontend
Read more about:
Featured BlogsAbout the Author(s)
You May Also Like


.jpeg?width=700&auto=webp&quality=80&disable=upscale)


