

Daily news, dev blogs, and stories from Game Developer straight to your inbox
Sponsored By
Featured Blog | This community-written post highlights the best of what the game industry has to offer. Read more like it on the Game Developer Blogs or learn how to Submit Your Own Blog Post
An Unholy Alliance: Unreal Engine, GitHub & Perforce
Explains how to setup your UE4 code project to use P4 as your main source depot and how to integrate latest releases of the engine from Epic's GitHub source depot.
10 Min Read

This post was originally published on @Ryan_Darcey's blog, Making Moves.
Let's start off by assuming you're like me, otherwise this blog post might not be for you. And when I say you're like me, I mean:
You love Unreal Engine (UE4).
You love Perforce (P4).
You DON'T love GitHub.
I know, there are millions (thousands?) of engineers crying out in horror right now. GitHub is SO POWERFUL! SUCH SPEED! MUCH ADVANCED BRANCHING! Welp, as someone with 12 years of game development experience using exclusively Perforce or Perforce-like source control solutions, I'm hard pressed to make the leap for such a drastic reduction in ease of use on my very simple project. So, when I setup my UE4 code project, the first thing I did after successfully building the solution was download Perforce (it's free for up to 5 users) and get myself a more familiar/friendly source control.
But...what happens when you need to update engine source code to latest release version of UE4 via GitHub? How do you reconcile such an incompatible P4 alliance? Hopefully I can shed some light on that. It ain't the prettiest, but it ain't so bad, either. Additionally, since I haven't found any write ups on how to sort all this out in one place, I'll aggregate basic info for getting UE4 up and running w/ P4 in this post, as well.
AN ARGUMENT FOR SOURCE CONTROL
First things first: YES, you need source control. Now. Not later. Doesn't matter if you're just a one man team. If you think dragging copies of your project onto an external hard drive is really going to help you when shit hits the fan, you're playing with fire. Or, maybe shit doesn't hit the fan and you just need a quick diff to remind yourself what you've changed to help track down a new bug you just created. Either way, I promise you'll be bigger, faster & stronger with source control behind you. It's worth the initial investment of time to setup.
For a much more exhaustive argument and breakdown of how important source control is, check out this amazing article written by Ash Davis. No stone left unturned there.
INITIAL SETUP
Epic does a pretty great job of helping you get your first build of UE4 running with source code from GitHub. If you haven't gotten that far yet, follow this link and then come back once you've figured it out. NOTE: I highly suggest using Atlassian's SourceTree app for your visual GitHub client.
In addition, I'm assuming you have some basic familiarity with P4. At the very least, you need to setup a server depot & client on your machine. Follow this link to do that in about 5 mins.
SETTING UP YOUR WORKSPACE
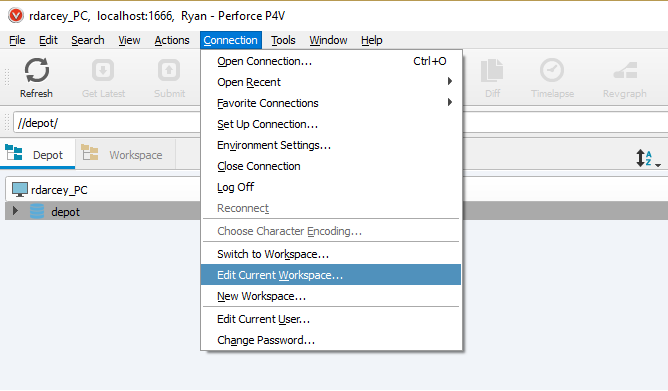
Now that you've got a working UE4 code build, a local P4 server running and you've setup a P4 client, it's time to add files to the P4 depot...BUT WAIT! You should update your workspace with some exclusions first so you don't add any files to the depot that should only be on your local machine. To do that, edit your workspace by choosing the option here.
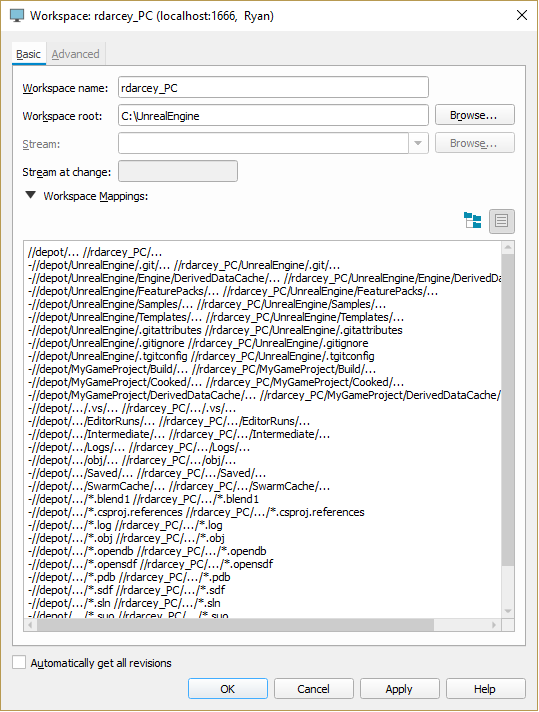
Then, you're going to want your P4 workspace to look kinda like mine below. Maybe not exactly, but it's a start. To consider excluding additional files, check this list here. If you just wanna roll with my list, I uploaded a file here where you can snag the text in the image below and paste it into your workspace mapping. Just a couple notes:
Replace "rdarcey_PC" with whatever your workspace name is.
Replace "MyGameProject" text with whatever the location of your project is.
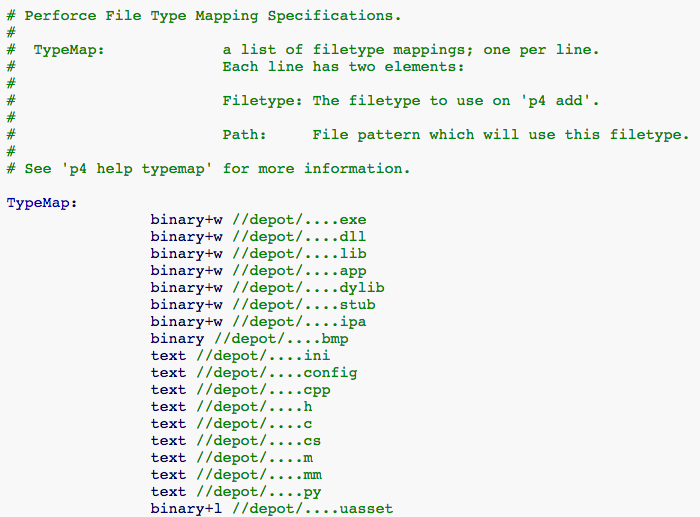
DEFINING YOUR TYPEMAP
In addition, you're going to want to edit your P4 typemap before going any further, which will markup certain filetypes as exclusive check out only (e.g. binary files). Epic explains how to do that here. Super quick and easy. After that, you're safe to drop all your UE4 engine & project files into the depot. Basic P4 setup is now up and running!
MAKING CONNECTIONS
Make sure you also download the P4 Visual Studio Plugin and connect your UE4 editor to P4 to make best use of your new source control setup.
BUILDING BINARIES
Now that you've got all your files checked into the depot, they're all gonna be read only. In order to build your project again, you'll need to check out the required files. Here's what my batch file to do that looks like (again, replace "rdarcey_PC" w/ the name of your workspace).
ECHO Check out all files required to create fresh binaries?
pause
p4 -c rdarcey_PC edit //depot/.../*.dll
p4 -c rdarcey_PC edit //depot/.../*.dll.config
p4 -c rdarcey_PC edit //depot/.../*.exe
p4 -c rdarcey_PC edit //depot/.../*.exe.config
p4 -c rdarcey_PC edit //depot/.../*.exp
p4 -c rdarcey_PC edit //depot/.../*.lib
p4 -c rdarcey_PC edit //depot/.../*.pdb
p4 -c rdarcey_PC edit //depot/.../*.target
p4 -c rdarcey_PC edit //depot/.../*.modules
pause
I highly recommend throwing all these files into a named changelist immediately after checking them out. Keep these files separated from non-binary files.
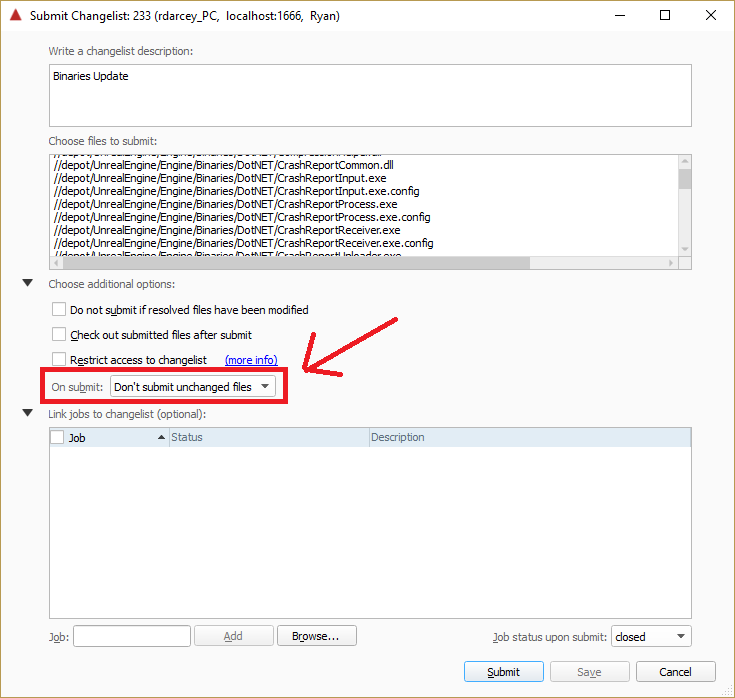
SUBMITTING NEW BINARIES
Once you're ready to update the P4 depot with new binaries, submit the changelist from above, but make sure you select this option so you don't bloat the source depot database:
REMOTE ACCESS
It's beyond the scope of this post, but opening up your P4 server to remote machines isn't that difficult, either. It's just a little bit of IT work. Or, maybe you can afford hosting your server in the Helix cloud (or one of the various other options for hosting in the cloud). Not a bad option, considering it doubles as a way to protect your data. I feel like it's easy to justify skimping on stuff like this when you're an indie dev, but be mindful about how vulnerable data is on your local PC and don't underestimate time you might save down the line by utilizing industry standard software/pipelines.
UPGRADING TO LATEST RELEASE OF UE4
So, you've spent some time happily chugging along on your project using P4 as your main solution for source control. However, now you need some new feature/bug fix in the latest UE4 release. What's the best way to go about that? I'll try to break it down step-by-step.
1) SYNC & SUBMIT LATEST CHANGES TO P4

2) COMMIT LATEST CHANGES TO GITHUB

Unfortunately, the whole reason I'm writing this blog post is cause I'm not very familiar w/ GitHub, so I won't be walking you through this step (or any other GitHub related step) in too much detail. However, this tutorial does a decent job of explaining the basic flow and actions you'll need to take in GitHub. Hope that helps!
3) CHECK OUT ALL UE4 ENGINE FILES IN P4
p4 -c rdarcey_PC edit //depot/UnrealEngine/...
In order to keep things separated/clean, I usually then throw these files in a new, named changelist so I can track what non-engine files get edited during the rest of the process.
4) FETCH & MERGE (OR PULL) LATEST CODE FROM EPIC'S GITHUB DEPOT
5) RESOLVE BUILD INCOMPATIBILITY ISSUES

Run the Setup.bat file in your Engine root folder to make sure you've got all necessary dependencies.
Run the GenerateProjectFiles.bat file in your Engine root folder.
Right click the .uproject file in your project root folder and select "Generate Visual Studio project files..."
Rebuild your solution and resolve any errors.
Make sure you do some minimal testing once you get the editor launched again. You probably broke some blueprints, among other things.
6) RECONCILE UE4 ENGINE FILES WITH P4 DEPOT
p4 -c rdarcey_PC reconcile -f //depot/UnrealEngine/...
NOTE: After this step, make sure all engine files reside in the same P4 changelist. P4 may have determined a file "moved", which will create two entries; an addition and a removal of a file. If these two aren't in the same changelist, P4 will throw errors when trying to submit.
7) SUBMIT LATEST TO P4
UE4 <3 P4 <3 GITHUB
At this point, I'm sure some of y'all are thinking, "Dude, this sounds like a giant pain in the ass. I'm just using GitHub." I totally get it. It is a pain in the ass. However, since I don't see myself needing to update the engine more than a few times a year, it's worth it for me to suffer through those 2 days in order to make the remaining days that much more efficient/comfortable.
If you do decide to roll w/ P4 on your UE4 project, I hope you find this helpful!
 @Ryan_Darcey
Read more about:
Featured BlogsAbout the Author(s)
You May Also Like


.jpeg?width=700&auto=webp&quality=80&disable=upscale)


