

Daily news, dev blogs, and stories from Game Developer straight to your inbox
Sponsored By
A Simple Localization System
A simple localization system for Unity projects
12 Min Read

This blog was originally posted to my personal website.
If you are developing a commercial game, most likely then not you will need to localize it. It certainly was the case with Arranged, our upcoming visual novel about arranged marriages in Turkey. As a happy coincidence, at the same time, I was tasked with creating a localization system for a project at my daily job. It was a UI-heavy non-game application. I’ve been using this simple system for a few months in both projects, and so far it seems to work pretty well.
That being said, I’m sure it might not be a good solution for bigger projects, like RPGs for example. But if your project is not as text-heavy as Planescape: Torment, then keep reading!
Or just download the project from Github if you don’t care about the particulars.
Requirements
First things first, let’s figure out our requirements. The most obvious one is that we would need to get a translated string from anywhere in the code with a simple call. Most likely then not, our project will have some static text in the UI. We don’t want to write a dedicated class for each piece of text in the UI. I would consider these two basic requirements.
Let’s not forget that we will be working with translators, who don’t know anything about coding. For them, downloading the project and try to code the translation in the game is not an option. So we need a way to store the translations somewhere accessible from outside the project. Similarly, translators should be able to test the translations inside the game. So we need to store the translations somewhere outside of the game, in a translator-friendly format.
To summarize:
Translate all strings from the code
Translate UI elements
A translator – friendly format
Accessible from outside of the project
Testable without the need of building or recompiling the project
Design
Now let’s try to come up with the overall design. The answer for a translator-friendly format is quite simple: spreadsheets. I find CSV easier to deal with so I will use it. Alternatively, Excel or Google Sheets could be used for the same purpose.
If you are using Unity, then I suggest storing this file in the Resources or StreamingAssets folder. A persistent data path could be used as well, of course, but the contents won’t be included in a build automatically. You will have to do some extra work. Not sure how those folders work on a mobile device though, you will have to do your research.
So far we have solved the last three points. A translator will receive the build of the game, open the CSV file in his favorite tool, and will be able to see his work in the game without extra work.
The first two requirements are much more straightforward for a programmer. Read the CSV file, store the data, and write a generic and easily accessible method to get the string. The UI localization script will ask for a translated string in a certain method, like OnEnable or Start, and replace the text.
Get To Work
Let’s begin by defining the format of the CSV file. We will have two columns, string id, and the translated string. The ID can be whatever you want, but make sure to talk to your team and agree on a sensible structure. Here is what the first row will look like:
id;English
ui_hello;Hello World
And in a spreadsheet editor it will look similar to this:

Now, if you (or a translator) want to add another language, all you have to do is to add another column:
id;English;Türkçe
ui_hello;Hello World;Merhaba Dünya

Code
Now for the code. I will create a struct to hold all of the translations for each string. It will have a language-translated string dictionary, and a method to get the translation for a certain string.
public struct TranslationString
{
    public Dictionary<string, string> translationDict; //A Language - Translation dictioary

    public TranslationString(int languageCount) //Constructor
    {
        translationDict = new Dictionary<string, string>(languageCount);
    }

    /// <summary>
    /// Returns the translation of the string in a given language
    /// </summary>
    /// <param name="language">Language to translate the string to</param>
    public string Get(in string language)
    {
        if (translationDict.ContainsKey(language)) //Check if we have a translation for the requested language
        {
            return translationDict[language];
        }
        else //Return a default string if the requested translation is not present
        {
            Debug.LogErrorFormat("Translation does not contain language '<color=red>{0}</color>'!", language);
            return string.Format("N/A language '{0}'", language);
        }
    }
}
Now we need a class that will read the CSV file, store the translations in id – TranslationString dictionary and provide a convenient way to retrieve them. For both of my use cases, a static class worked pretty well. Since it is not a Monobehaviour, we will need a way to initialize this class or to make it read the CSV file. While we can write a Monobehaviour class which will call the ReadLocalizationFile() method, I prefer to call it when we try to get the translation dictionary for the first time.
using System.Collections.Generic;
using UnityEngine;

public static class Localizer
{
    private static Dictionary<string, TranslationString> translations;
    private static Dictionary<string, TranslationString> Translations
    {
        get
        {
            if (translations == null) //Fill the dictionary from a CSV file
                ReadLocalizationFile(Application.streamingAssetsPath + "/Localization.csv"); //I named my CSV file Localization.csv, and saved it to the streaming assets folder

            return translations;
        }
    }

    /// <summary>
    /// Reads a localization file at a given path
    /// </summary>
    /// <param name="path">Path of the csv file, including the file name</param>
    public static void ReadLocalizationFile(in string path)
    {}
}
Before we proceed with the ReadLocalizationFile() method, let’s add a couple more things to the Localization class. Most likely we will need to know the current language somewhere in the code. Also, we need to let everyone know when the current language is changed. So let’s add an action and a currentLanguage variable:
/// <summary>
/// Invoked when the language is changed
/// </summary>
public static System.Action languageChanged;

private static string currentLanguage = "English";

public static string CurrentLanguage
{
    get => currentLanguage;
    set
    {
        if (value != currentLanguage) //if the language is changed, assign the new value, and invoke the action
        {
            currentLanguage = value;
            languageChanged?.Invoke();
        }
    }
}
Finally, knowing all available languages might be useful:
/// <summary>
/// Currently loaded languages
/// </summary>
public static string[] Languages { get; private set; }
Now we may proceed to write the ReadLocalizationFile method.
/// <summary>
/// Reads a localization file at a given path
/// </summary>
/// <param name="path">Path of the csv file, including the file name</param>
public static void ReadLocalizationFile(in string path)
{
    if (File.Exists(path))// Check if the file exists
    {
        string[] lines = File.ReadAllLines(path, System.Text.Encoding.UTF8);//Read lines
        int stringCount = lines.Length;//Cache translation string count
        translations = new Dictionary<string, TranslationString>(stringCount - 1);//Initialize translation dictionary

        string[] tempLanguages = lines[0].Split(';');//Setup Languages
        Languages = new string[tempLanguages.Length - 1];
        for (int i = 0; i < tempLanguages.Length - 1; i++)
            Languages[i] = tempLanguages[i + 1];

        CurrentLanguage = Languages[0];

        int langCount = Languages.Length;
        string[] stringTranslations = new string[langCount]; //Temporary array to store translations for initalization
        TranslationString temp;

        for (int i = 1; i < stringCount; i++)
        {
            stringTranslations = lines[i].Split(';');//Split the line to individual translated strings
            temp = new TranslationString(langCount);
            for (int j = 0; j < langCount; j++)
            {
                if(stringTranslations.Length > j + 1)//Add the translated string only if it exists
                    temp.translationDict.Add(Languages[j], stringTranslations[j + 1].Trim('"'));
                else//add the ID (or any other default string) otherwise
                    temp.translationDict.Add(Languages[j], stringTranslations[0]);
            }

            translations.Add(stringTranslations[0], temp);
        }
    }
}
Almost there. Now, all we need is a convenient way to retrieve a translated string according to an ID. It will be a fairly straightforward method:
/// <summary>
/// Returns localized string in a requested language
/// </summary>
/// <param name="language">Requested language</param>
/// <param name="id">Requested string</param>
public static string Get(in string language, in string id)
{
    if (Translations.ContainsKey(id))
        return Translations[id].Get(language);
    else
    {
        Debug.LogErrorFormat("Translations does not contain a string with id '<color=red>{0}</color>'!", id);
        return string.Format("{0} ({1})", id, language);
    }
}
As an extra, I would like to add another Get() method, which will take only the string id as an argument, and return the translation according to CurrentLanguage variable:
/// <summary>
/// Returns a localized string in current language
/// </summary>
/// <param name="id">String id</param>
/// <returns></returns>
public static string Get(in string id)
{
    return Get(CurrentLanguage, id);
}
And that is pretty much it for this class. Here is what the final version looks like:
using System.Collections.Generic;
using UnityEngine;
using System.IO;
using System;

public static class Localizer
{
    /// <summary>
    /// Invoked when the language is changed
    /// </summary>
    public static Action languageChanged;

    private static Dictionary<string, TranslationString> translations;
    private static Dictionary<string, TranslationString> Translations
    {
        get
        {
            if (translations == null)
                ReadLocalizationFile(Application.streamingAssetsPath + "/Localization.csv");

            return translations;
        }
    }

    /// <summary>
    /// Currently loaded languages
    /// </summary>
    public static string[] Languages { get; private set; }

    private static string currentLanguage = "English";

    public static string CurrentLanguage
    {
        get => currentLanguage;
        set
        {
            if (value != currentLanguage)
            {
                currentLanguage = value;
                languageChanged?.Invoke();
            }
        }
    }

/// <summary>
/// Reads a localization file at a given path
/// </summary>
/// <param name="path">Path of the csv file, including the file name</param>
public static void ReadLocalizationFile(in string path)
{
    if (File.Exists(path))// Check if the file exists
    {
        string[] lines = File.ReadAllLines(path, System.Text.Encoding.UTF8);//Read lines
        int stringCount = lines.Length;//Cache translation string count
        translations = new Dictionary<string, TranslationString>(stringCount - 1);//Initialize translation dictionary

        string[] tempLanguages = lines[0].Split(';');//Setup Languages
        Languages = new string[tempLanguages.Length - 1];
        for (int i = 0; i < tempLanguages.Length - 1; i++)
            Languages[i] = tempLanguages[i + 1];

        CurrentLanguage = Languages[0];

        int langCount = Languages.Length;
        string[] stringTranslations = new string[langCount]; //Temporary array to store translations for initalization
        TranslationString temp;

        for (int i = 1; i < stringCount; i++)
        {
            stringTranslations = lines[i].Split(';');//Split the line to individual translated strings
            temp = new TranslationString(langCount);
            for (int j = 0; j < langCount; j++)
            {
                if(stringTranslations.Length > j + 1)//Add the translated string only if it exists
                    temp.translationDict.Add(Languages[j], stringTranslations[j + 1].Trim('"'));
                else//add the ID (or any other default string) otherwise
                    temp.translationDict.Add(Languages[j], stringTranslations[0]);
            }

            translations.Add(stringTranslations[0], temp);
        }
    }
}

    /// <summary>
    /// Returns a localized string in current language
    /// </summary>
    /// <param name="id">String id</param>
    /// <returns></returns>
    public static string Get(in string id)
    {
        return Get(CurrentLanguage, id);
    }

    /// <summary>
    /// Returns localized string in a requested language
    /// </summary>
    /// <param name="language">Requested language</param>
    /// <param name="id">Requested string</param>
    public static string Get(in string language, in string id)
    {
        if (Translations.ContainsKey(id))
            return Translations[id].Get(language);
        else
        {
            Debug.LogErrorFormat("Translations does not contain a string with id '<color=red>{0}</color>'!", id);
            return string.Format("{0} ({1})", id, language);
        }
    }
}
UI
Now, translators can easily translate our game, and we can use the translations in code with the Get() methods. The only thing left is to take care of the static UI translations. For this purpose, we will write a small Monobehaviour class and will add it as a component next to the text we want to translate.
I will make use of the TextMesh Pro instead of the default Unity Text class since it is superior in every way. This class will have a reference to the TextMeshProUGUI component, the id of the string, and will listen to the languageChanged event from the Localizer class.
using UnityEngine;
using TMPro;

[RequireComponent(typeof(TextMeshProUGUI))]
public class StringLocalizer : MonoBehaviour
{
    [SerializeField]
    private TextMeshProUGUI textField;
    [SerializeField]
    private string defaultString = "";

    private void OnEnable()
    {
        Localizer.languageChanged += UpdateLanguage;//Register to the languageChanged event
        UpdateLanguage();//Update the current string
    }

    private void OnDisable()
    {
        Localizer.languageChanged -= UpdateLanguage;//Unregister from the languageChanged event
    }

    private void UpdateLanguage()
    {
        if (!string.IsNullOrEmpty(defaultString))
            textField.text = Localizer.Get(defaultString);//Replace the text with the translated one
        else
            Debug.LogErrorFormat("The string of text object '{0}' is empty. Cannot set the language!", this);
    }
}
This component will update the string using the defaultString as an ID, whenever the component is enabled or the language is changed.
And this is pretty much it. To get a translated string from a code just call Localizer.Get(language, id) or Localizer.Get(id) method. To translate a static UI element add the StringLocalizer component next to the text component, set the defaultString, and everything will work like a charm. However, I would like to improve the StringLocalizer component a little.
I will add a Reset() method. This method is invoked as soon as you add the component to a game object. It will automatically search for the text component and set its contents to the defaultString, to use as an ID in the future.
private void Reset()
{
    textField = GetComponent<TextMeshProUGUI>();
    defaultString = textField.text;
}
Next, I will make use of MyBox. It is an awesome set of helpful editor functions. Definitely check it out if you haven’t already. I will use the [ButtonMethod] attribute to make a button in the inspector for a certain straightforward method. It will update the defaultString.
[MyBox.ButtonMethod]
private void GetDefaultString()
{
    defaultString = textField.text;
}
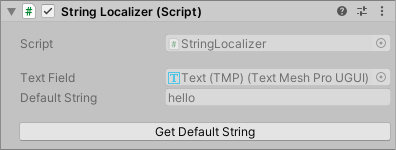
Now, if you add a StringLocalizer component to a game object, you will see a button in the inspector window. Like this:
Finally, we don’t want to accidentally change the defaultString. Again, I will make use of the [ReadOnly] attribute from MyBox.
[SerializeField, MyBox.ReadOnly]
private TextMeshProUGUI textField;
[SerializeField, MyBox.ReadOnly]
private string defaultString = "";
And here is what we got in the end:
using UnityEngine;
using TMPro;
using MyBox;

[RequireComponent(typeof(TextMeshProUGUI))]
public class StringLocalizer : MonoBehaviour
{
    [SerializeField, ReadOnly]
    private TextMeshProUGUI textField;
    [SerializeField, ReadOnly]
    private string defaultString = "";

    private void OnEnable()
    {
        Localizer.languageChanged += UpdateLanguage;
        UpdateLanguage();
    }

    private void OnDisable()
    {
        Localizer.languageChanged -= UpdateLanguage;
    }

    private void UpdateLanguage()
    {
        if (!string.IsNullOrEmpty(defaultString))
            textField.text = Localizer.Get(defaultString);
        else
            Debug.LogErrorFormat("The string of text object '{0}' is empty. Cannot set the language!", this);
    }

    [ButtonMethod]
    private void GetDefaultString()
    {
        defaultString = textField.text;
    }

    private void Reset()
    {
        textField = GetComponent<TextMeshProUGUI>();
        defaultString = textField.text;
    }
}
And that will be all! If you want to see this magnificent piece of code in action check out Arranged, a visual novel about arranged marriages in Turkey. Or go ahead and download the localizer from Github.
Let me know if you think that this is the worst idea ever and how your cat can write a better code just by sleeping on the keyboard for a while. I would love to have some feedback!
Read more about:
BlogsAbout the Author(s)
You May Also Like


.jpeg?width=700&auto=webp&quality=80&disable=upscale)


