

Daily news, dev blogs, and stories from Game Developer straight to your inbox
Sponsored By
100 Days of VR: Day 4 Going through the Unity Space Shooter Tutorial III
Back on Day 4, we’re going to finish the Unity Space Shooter by adding the remaining UI, enemy spawning system, and then creating an end game state.
13 Min Read

Here we are back on Day 4, today, we’re going to finish the Unity Space Shooter by adding the remaining UI, enemy spawning system, and then creating an end game state.
So without anymore delays, let’s get started!
Audio
To create audio for the game we need to add an Audio Source component to our GameObject.
Inside the Audio Source component, we add our music file to the AudioClip slot.
A quick and easy way to add the Audio Source component is to just drag your music file to your GameObject that you wish to add.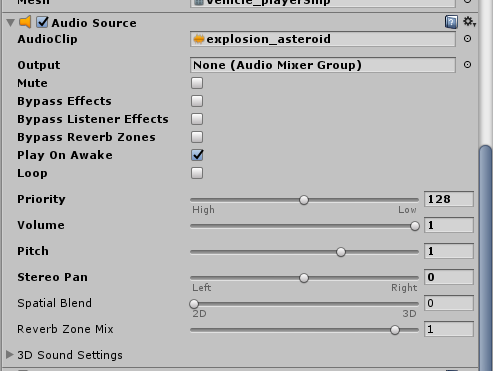
There are a lot of controls that we can use. The most important in this case being:
Play On Awake — play the sound when the GameObject that this AudioSource is connected to is created
Loop — repeats playing the music when it finishes
Volume — Self-explanatory
Adding Explosion Sounds to Asteroids
The audio samples are already all provided for us in the tutorial, so all we had to do was follow along and attach the explosion sound effects to the Explosion GameObject.
Afterwards, whenever an asteroid is destroyed the explosion sound effect gets played.
On a side note, I want to mention that I really enjoy using Unity’s Component system.
Normally you have to manually code everything, but in Unity, it’s as easy as drag and drop!
Adding Shooting Sounds to the Bullets
For the bullet’s sound effects, the video had us use an existing script to play the sound of our bullets being fired.
However I believe we could have just as easily attached a AudioSource to our bullet prefab like we did with the explosion and achieve the same thing when we instantiate the bullet.
However, this is something good to know, so let’s see the code:
using UnityEngine;
using System.Collections;
[System.Serializable]
public class Boundary
{
    public float xMin, xMax, zMin, zMax;
}
public class PlayerController : MonoBehaviour
{
    public float speed;
    public float tilt;
    public Boundary boundary;
    public GameObject shot;
    public Transform shotSpawn;
    public float fireRate;
private float nextFire;
    void Update ()
    {
        if (Input.GetButton("Fire1") && Time.time > nextFire)
        {
            nextFire = Time.time + fireRate;
            Instantiate(shot, shotSpawn.position, shotSpawn.rotation);
            GetComponent<AudioSource>().Play ();
        }
    }
    void FixedUpdate ()
    {
        float moveHorizontal = Input.GetAxis ("Horizontal");
        float moveVertical = Input.GetAxis ("Vertical");
        Vector3 movement = new Vector3 (moveHorizontal, 0.0f, moveVertical);
        rigidbody.velocity = movement * speed;
        rigidbody.position = new Vector3
        (
            Mathf.Clamp (rigidbody.position.x, boundary.xMin, boundary.xMax),
            0.0f,
            Mathf.Clamp (rigidbody.position.z, boundary.zMin, boundary.zMax)
        );
        rigidbody.rotation = Quaternion.Euler (0.0f, 0.0f, rigidbody.velocity.x * -tilt);
    }
}
The only addition is the highlighted part:
GetComponent<AudioSource>().Play ();
We use GetComponent, to search for our AudioSource component through all components attached to the game object. If it finds it we get an instance of it, which we call Play(), to play the sound attached to it.
Adding Background Music
Adding the background music is straightforward.
We just attach Background music as an AudioSource component to the game controller game object and set the Audio Source component to loop.
Counting Points and Displaying the Score
GuiText vs UI
In the next section, we create a UI to show the score on the game.
The video had us create an empty game object and then attach a GUIText component to it.
As you might have recalled, back in the Roll-A-Ball tutorial, we used UI Gameobjects that created a canvas. So what’s the correct thing to do?
From my own research, GUIText is the old way Unity used to show Text, the Canvas system is the new way to implement UI’s.
One of the many benefits of using the Canvas system is so that we can anchor ourselves to specific corners as we have seen in the roll-a-ball tutorial. If we were to use GUIText, we have to manually move them ourselves.
Creating Our Score and Calling other Scripts… In Scripts!
Now that we have our GUI available, the next thing that needs to be done is to figure out how to get the Component and edit it. Luckily, if you’ve been following along, we should have an idea on how to do it!
We use GetComponent and grab the component that we attached to our GameObject!
The next question then is: which script should we attach the GameObject to? Well technically speaking, the easiest thing might be the Asteroids: DestroyByContact script, because that’s when we know we scored.
However this brings up multiple complications:
We would generate multiple asteroids all of which would have the same code. If were to keep track of a total score, each asteroid object would start at 0 and then when it gets destroyed, we would change our text to be 1. Every. Single. Time.
From my instincts of a programmer, the DestroyByContact script shouldn’t be the one in charge of keeping our scores, we need a manager of some sort that keeps track of the overall state of the game, or maybe…a controller!
And as we’ll soon see in the video, we’re right. All of the logic is added into the GameController script as you can see here:
using UnityEngine;
using System.Collections;
public class GameController : MonoBehaviour
{
    public GameObject hazard;
    public Vector3 spawnValues;
    public int hazardCount;
    public float spawnWait;
    public float startWait;
    public float waveWait;
    public GUIText scoreText;
    private int score;
    void Start ()
    {
        score = 0;
        UpdateScore ();
        StartCoroutine (SpawnWaves ());
    }
    IEnumerator SpawnWaves ()
    {
        yield return new WaitForSeconds (startWait);
        while (true)
        {
            for (int i = 0; i < hazardCount; i++)
            {
                Vector3 spawnPosition = new Vector3 (Random.Range (-spawnValues.x, spawnValues.x), spawnValues.y, spawnValues.z);
                Quaternion spawnRotation = Quaternion.identity;
                Instantiate (hazard, spawnPosition, spawnRotation);
                yield return new WaitForSeconds (spawnWait);
            }
            yield return new WaitForSeconds (waveWait);
        }
    }
    public void AddScore (int newScoreValue)
    {
        score += newScoreValue;
        UpdateScore ();
    }
    void UpdateScore ()
    {
        scoreText.text = "Score: " + score;
    }
}
What do we have here? Our GameController script keeps track of our score and we only have one instant of it so we don’t have to worry about the problem discussed above with multiple instances.
We’ll see that we attach our GUIText to the script.
We added UpdateScore() to initialize our text starting state.
But wait!
How do we update our score whenever we destroy an asteroid? We’ll soon see.
Note that we have a public void addScore()
What does it mean for a function to be public? It means that if someone has access to our Script component, they can use the function.
Looking at the DestroyByContact code, that’s exactly what’s being done!
using UnityEngine;
using System.Collections;
public class DestroyByContact : MonoBehaviour
{
    public GameObject explosion;
    public GameObject playerExplosion;
    public int scoreValue;
    private GameController gameController;
    void Start ()
    {
        GameObject gameControllerObject = GameObject.FindWithTag ("GameController");
        if (gameControllerObject != null)
        {
            gameController = gameControllerObject.GetComponent<GameController>();
        }
        if (gameController == null)
        {
            Debug.Log ("Cannot find 'GameController' script");
        }
    }
    void OnTriggerEnter(Collider other)
    {
        if (other.tag == "Boundary")
        {
            return;
        }
        Instantiate(explosion, transform.position, transform.rotation);
        if (other.tag == "Player")
        {
            Instantiate(playerExplosion, other.transform.position, other.transform.rotation);
        }
        gameController.AddScore (scoreValue);
        Destroy(other.gameObject);
        Destroy(gameObject);
    }
}
Looking back at our DestroyByContact code, we used Start() to grab the first instance of our GameController object that exists.
We can do this by first setting the Tag: “GameController” on our GameController object.
The GameObject class that we use, just like the Math library, contain static functions that are available to it, meaning we can use them anytime we want.
In this case: FindWithTag() is a static function avialble to use that helps us search for the GameObject with the tag “GameController”
FindWithTag() returns the GameObject if it finds it, otherwise it returns a null object. That’s why we have to first check if the object we get back is null or not, because if we try to do anything with a null object, our game will crash.
Once we’re sure that our GameObject isn’t null, we do the next thing: grabbing the Script Component attached to it.
Once we initialized our gameController variable, we can directly call our public function AddScore() updating our total score for destroying the enemy ship. Fantastic!
Now whenever a ship blows up, we update our points!
Ending the Game
We made it to the end! We have:
Our player ship
Enemy asteroids being spawned
Destruction effects
Sound effects
UI
There’s only 1 thing left before this tutorial is finished and that’s making the game finish state.
To do this, we created:
Two more GUIText labels: the game over message and the restart instructions
A Boolean to tell us if the game is over or not
First looking at the GameController script:
using UnityEngine;
using System.Collections;
public class GameController : MonoBehaviour
{
    public GameObject hazard;
    public Vector3 spawnValues;
    public int hazardCount;
    public float spawnWait;
    public float startWait;
    public float waveWait;
    public GUIText scoreText;
    public GUIText restartText;
    public GUIText gameOverText;
    private bool gameOver;
    private bool restart;
    private int score;
    void Start ()
    {
        gameOver = false;
        restart = false;
        restartText.text = "";
        gameOverText.text = "";
        score = 0;
        UpdateScore ();
        StartCoroutine (SpawnWaves ());
    }
    void Update ()
    {
        if (restart)
        {
            if (Input.GetKeyDown (KeyCode.R))
            {
                SceneManager.LoadScene(SceneManager.GetActiveScene().buildIndex);
            }
        }
    }
    IEnumerator SpawnWaves ()
    {
        yield return new WaitForSeconds (startWait);
        while (true)
        {
            for (int i = 0; i < hazardCount; i++)
            {
                Vector3 spawnPosition = new Vector3 (Random.Range (-spawnValues.x, spawnValues.x), spawnValues.y, spawnValues.z);
                Quaternion spawnRotation = Quaternion.identity;
                Instantiate (hazard, spawnPosition, spawnRotation);
                yield return new WaitForSeconds (spawnWait);
            }
            yield return new WaitForSeconds (waveWait);
            if (gameOver)
            {
                restartText.text = "Press 'R' for Restart";
                restart = true;
                break;
            }
        }
    }
    public void AddScore (int newScoreValue)
    {
        score += newScoreValue;
        UpdateScore ();
    }
    void UpdateScore ()
    {
        scoreText.text = "Score: " + score;
    }
     public void GameOver ()
    {
        gameOverText.text = "Game Over!";
        gameOver = true;
    }
}
Creating our new variables
The first thing you can see is that we created our GUIText objects and Booleans to allow us to check if the game is over or not.
We initialize these new variables in Start().
Creating the restart options
To restart a game, we have to capture a button press input. To do this, we have to put all of our user input code inside the Update function. That’s the only function that runs continuously allowing us to make these checks.
In our Update() function, we check to see if we can reset and if we are, if the user presses R, we would reload the whole application.
I’m sure we’ll see more about the SceneManager in the future, but as you recall, we work in scenes for our games in Unity. What this means is that in the future we might have games with multiple scenes that we can switch between.
In the tutorial, we use Application, but that’s the depreciated version. We now use the SceneManager.
Creating the Game Over state
Just like when we created AddScore(). Our GameController doesn’t know when the game is over. We have to have an external source tell this to us. That’s why we made our GameOver() public.
Inside the function, we set the GameOver text to say game over and set our gameOver flag to be true. But that doesn’t immediately end our game yet!
If you notice in the spawn enemy code, we don’t ever stop creating new enemies, even when it’s game over! We fix that with this:
if (gameOver)
            {
                restartText.text = "Press 'R' for Restart";
                restart = true;
                break;
            }
What this does is that we add our restart instruction and enter into the restart state, which means we can start detecting when the user presses R in Update()
We also break out of while loop so we won’t continue spawning asteroids forever.
The next part…
So great, we added GameOver to our GameController script, but where do we call it?
Inside the DestroyByContact script! Specifically when our ship blows up.
using UnityEngine;
using System.Collections;
public class DestroyByContact : MonoBehaviour
{
    public GameObject explosion;
    public GameObject playerExplosion;
    public int scoreValue;
    private GameController gameController;
    void Start ()
    {
        GameObject gameControllerObject = GameObject.FindWithTag ("GameController");
        if (gameControllerObject != null)
        {
            gameController = gameControllerObject.GetComponent<GameController>();
        }
        if (gameController == null)
        {
            Debug.Log ("Cannot find 'GameController' script");
        }
    }
    void OnTriggerEnter(Collider other)
    {
        if (other.tag == "Boundary")
        {
            return;
        }
        Instantiate(explosion, transform.position, transform.rotation);
        if (other.tag == "Player")
        {
            Instantiate(playerExplosion, other.transform.position, other.transform.rotation);
            gameController.GameOver ();
        }
        gameController.AddScore (scoreValue);
        Destroy(other.gameObject);
        Destroy(gameObject);
    }
}
We already have the gameController script component so all we need to do is call GameOver!
And there we go! Now we can have a game over state and restart to the beginning!
Conclusion
Phew, this was a long post for the day! I’m seriously re-considering writing everything. It’s starting to take longer than the actual learning, re-watching, and then implementing!
On the brightside however, I have definelty learned more than I normally would since I have to understand what I’m blogging about!
Also, I think things will be a lot easier once I start working on my own projects and deviate from these long “what I learned from these tutorials posts”.
Anyways, we started 3 days ago with close to nothing in knowledge and we’re now one step closer to making a VR game:
Setting up an environment
Creating the player
Spawning enemies
Destroying/Creating objects
Creating UI
Detecting user button presses
Accessing other objects from your script
And I’m sure many more!
I’m going to skip the last few modules and enhancing the game and go straight to the next tutorial.
I think this will be the last tutorial before I start messing around with creating a simple game. Until then!
Find the original Day 4 here.
Or visit the 100 days of VR main page.
Read more about:
BlogsAbout the Author(s)
You May Also Like


