

Daily news, dev blogs, and stories from Game Developer straight to your inbox
Sponsored By
Featured Blog | This community-written post highlights the best of what the game industry has to offer. Read more like it on the Game Developer Blogs or learn how to Submit Your Own Blog Post
Unity Set Up - Pixel Perfect
This post is about setting up unity for pixel art sprites and/or games that require pixel perfect precision. It dives into several unity's 2D features.
4 Min Read


This post is based on the post-development of my Global Game Jam submission "Weekend at Burney's" found here
Intro
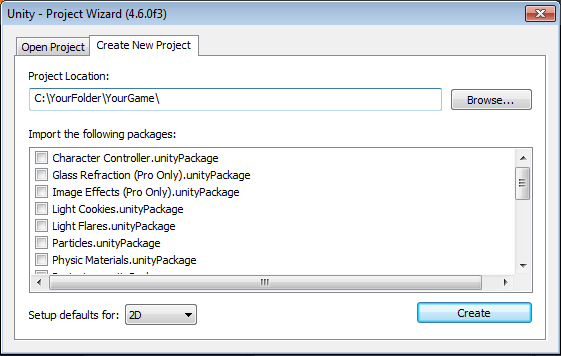
First step is to create the new project by going to File > New Project... If you already have a project, feel free to jump around the post using the titles as guidance for your specific needs. Remember to set the "Setup defaults for: 2D" at the bottom of the dialogue box. After you hit "Create" you'll be thrown into Unity with a lot of the settings for 2D development already in place.
Camera
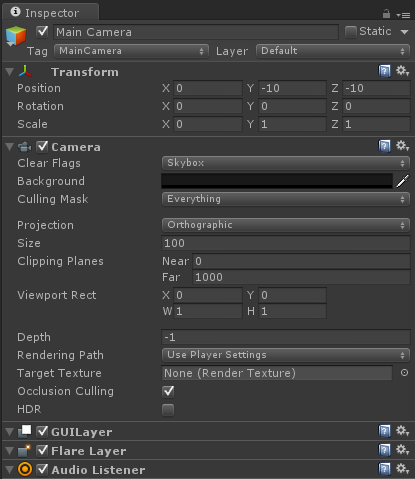
For the camera it's very dependent on the game as the size of sprites desired is up to the developer. These are the options I have set for my game specifically. The camera Projection has to be set to Orthographic otherwise it kind of defeats the purpose of having a pixel art/pixel perfect game (unless you somehow innovated and created a way to make it look amazing). The second property to keep an eye for is the Size. This is going to determine how big your sprites get scaled.
Assets
Single Sprite
For your assets you should set the Sprite Mode to Single, only if it's not a sprite sheet, If you are using a sprite sheet, set the Sprite Mode to Multiple. The next thing to do when adding assets into the project is to set "Pixels per Unit = 1" and the "Filter Mode = Point" as shown below
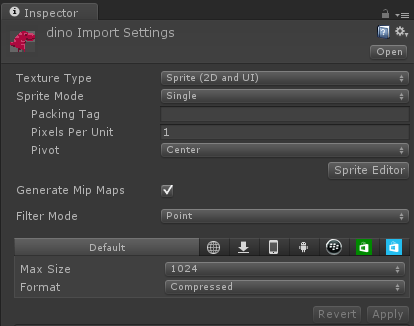
The Pixels Per Unit property will make it so that each pixel is treated as a unit. This will ensure that our sprites can align perfectly by avoiding float values. This does not mean that it will do it automatically; it just means that for sprite positions to align, the values will always be integers as opposed to floats which require estimating positions and zooming in really close.
The second property, Filter Mode, will make sure that our sprites are not blurred when scaled up. This will give it that pixel art feel to the game.
Sprite Sheet
To set up sprite sheets for use, click Sprite Editor (shown in the picture, above the "Generate Mip Maps" checkbox). The following screen will come up with some settings and your sprite sheet.

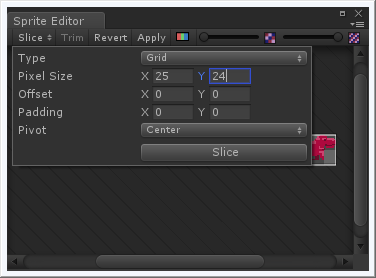
Click the Slice dropdown on the top left and set the Type property (shown below) to Grid. Set your Pixel Size to the size of your frame size in pixels. After you're done click Slice and if the results match what you were expecting, click Apply on the top menu bar (next to the slice dropdown). Otherwise make sure the offsets in your sprite sheet are correct.
After this step if you drag the frames, created from slicing the sprite, into the scene it will prompt you to create an animation file, name it and save it. Even if you delete the object from the scene your animation file will still be in your project folder. This file can later be put into an animator where you can build your animation dependencies and transitions.
Physics
Everything having to do with physics(functions and objects) must be using the 2D version. For example BoxCollider vs Box Collider 2D or Physics.Linecast() vs Physics2D.Linecast(). This is so that the 2D physics engine does most of the work for you. If you are using the physics engine keep in mind objects will have to be moved and handled via functions. If you try to manually set the position of objects thinks MAY get quirky.
if( Input.GetKey(KeyCode.Space) && isOnGround )
{
    this.rigidbody2D.AddForce(Vector2.up * 150);
}
The example above shows the jump check using the rigid body. Vertical force is added to essentially throw the player up in the air and then let gravity do its work.
*Exceptions to this rule include snapping movement, meaning if you want your character to stop as soon as the key is released then you might want to set the velocity manually.
Function Use
This section is short but deserves mention as the struggles with using the right functions is very real. For a while my collision wasn't working and it was entirely due to the fact that the two physics portions of the engine are separated. The problem I was having was very simple. I was using void OnTriggerEnter(Collider2D other) as opposed OnTriggerEnter2D(Collider2D other). Even though the case I want to make is particular to my project it's a reminder to anyone who's going to script their own features using collision for example.
Read more about:
Featured BlogsAbout the Author(s)
You May Also Like


.jpeg?width=700&auto=webp&quality=80&disable=upscale)


