

Daily news, dev blogs, and stories from Game Developer straight to your inbox
Sponsored By
Featured Blog | This community-written post highlights the best of what the game industry has to offer. Read more like it on the Game Developer Blogs or learn how to Submit Your Own Blog Post
The Use of Spawn Animations to Make AI Look Smarter
As a level designer I can feel when spawn animations in a combat encounter are an afterthought or have been rushed. Here is a process for creating a set of quality AI spawns that make the AI look smart before they interact with the player.
12 Min Read

As a gamer and a level designer I can feel when spawn animations in a combat encounter are an afterthought or have been rushed. Having shipped three AAA titles, I know there are many reasons for the lack of interesting AI spawns in a combat encounter, but neglecting to create a varied, quality AI spawn set early in development is a mistake. By having the AI enter the level space in a unique, thrilling way, the AI look lifelike before they even interact with the player. Combining that with a quality AI system and solid level design execution brings together the base ingredients for a 90+ rating combat encounter.
I am going to walk you through a process for creating a set of quality and varied AI spawns. Ideally, creating a set of spawns occurs in pre-production on a strike team. That way, when production hits, all level designers have the spawn set as a tool for them to quickly implement and iterate thrilling combat encounters. If production has hit, its still a solid workflow practice at the start of a new level and all your work can still be shared with other level teams.
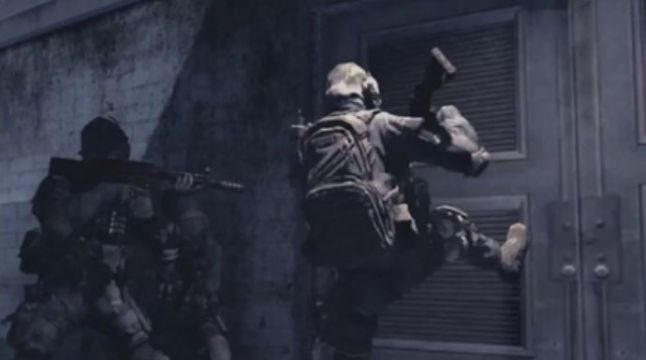
Fig 1. The door kick has become a common AI entrance
Types of AI Spawns
There are only so many different ways AI may enter a level space. The five major types include:
AI non-interactive environment spawn: Run of the mill spawns where AI spawn and enter the scene without interacting with their environment. Examples include: AI run from around a corner, drop through a hole in the ceiling or depending on the AI type, pop into the world shrouded by some type of cool FX.
AI interactive environment spawn: Spawns where the AI interacts with the environment as they enter the screen space. Examples include: AI kick open a door, slide down a pole, crash through a window, or rise up out of a newly formed hole in the ground.
AI object interactive spawn: AI enters the space on an animated or physics driven object. Examples include: a drop ship flies over and AI repel down, a truck pulls up and the AI jumps out, a boat pulls up alongside and the AI rain bullets on the player.
Multiple AI environment interactive spawn: AI enters the space working together in the environment. The cool factor of the multiple AI spawn is interrupting the AI action. One AI helps another down from a high ledge, but the player can shoot them while they help each other causing one to fall and die. Interrupting the whole process and inflicting more damage on the AI while they are in a vulnerable state adds a fun layer of complexity to the encounter.
Multiple AI object interactive spawn: AI enters the space working together using an object. Two AI open a large garage door together, if you shoot one of the AI in the process, the door drops, crushing them both. The cool factor comes from the interactive possibilities the player has with the AI. The AI just do not run around the corner anymore, now the designer has created a mini game out of the spawn where the player may avoid the encounter altogether by using their brain.
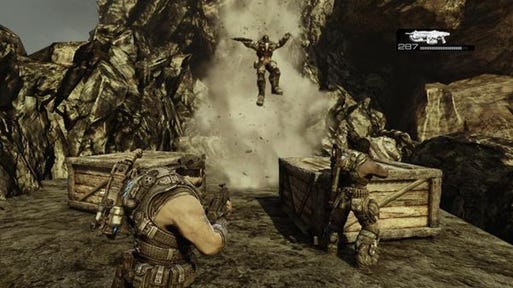
Fig 2. Enemies erupting from the ground in Gears of war are a unique exciting spawn
Take it to the Limit
Multiple Interactive AI Spawns are the cutting edge of AI spawns. They are difficult to animate and not all games have the tech in place for AI to animate in sync with each other or objects and still play all the appropriate hit reacts upon interruption.
If your AI cannot animate in sync with in game objects or each other, talk to your AI programmer and designer as such spawn plans may not have been done on the project yet. They will be EXCITED by your questions and want to help. Remember, anything you do to make the AI look cool reflects positively on them.
Identifying Spawn Locations
Now that the types of spawns to create have been identified, the next step is to develop a language for communicating where on screen the spawns take place. Communicating where AI spawn may seem obvious, but some developers think of spawn locations from the perspective of the AI while others from the perspective of the players. For instance, an animator may say a jump out of closet spawn is a left spawn if the AI moves to their left as they jump out of the closet. However, a designer would think of that same spawn as coming from the right, because it comes from the right side of the screen. Common language identifying vertical and horizontal screen space helps eliminate any communication confusion from different perspectives and helps ensure you have created a balanced set of spawns for designers to use.
The first part of our language is the vertical location that enemy AI can spawn in, top, middle and bottom. An example of each would be an enemy repelling down from overhead, a zombie jumping out of a closet or a locust springing up from a newly formed hole in the ground.

Fig 3: Top, Middle, Bottom subdivision of the screen space
At times you may have a spawn animation where the animation looks better with delineation towards a specific side than as a modular element. For example, consider a zombie jumping out of a closet on the left side of the screen. If one modular spawn animation is used for left, right and center spawns, when he spawns on the left, he jumps straight out, lands and then his mover adjusts his orientation to the player, making him look robotic.
In real life (wink) the zombie jumps out of the closet and orients to the human as he lands. By using a specific jump out of left closet animation that orients the zombie towards the player during the jump, the zombie looks aware of the player and not robotic. The same theory can be applied to most spawn animations, think of a guy repelling down, kicking down a door or coming up from a trap door. When the AI orients to the player as he or she comes on screen, the AI look smart. That being said, lets add the second part of our language, the horizontal space the AI enters from, left, right and center.
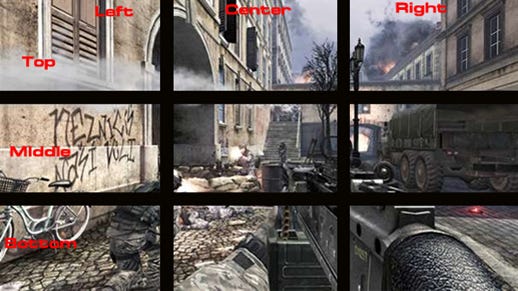
Fig 4: Left, Center, Right screen space subdivision added
Our language for where an AI spawns onscreen is now simply the vertical location followed by the horizontal location. For example, the zombie jumping out of the left closet is a middle left spawn. A repel from a building on the right is a top right spawn and so on. If a spawn does not need a horizontal delineation, name it by the vertical space it enters from. For example, a drop ship in Halo would be a vertical spawn. The assassin appearing in a mist in Dishonored would be a middle spawn.
Make your team familiar with this language as a way of identifying spawn locations. The language not only helps to communicate more efficiently, but also helps with naming conventions, brainstorming, critiquing sequencing of AI spawns and more effectively written bugs.
Research Existing Spawn Types
Now that we know the types of spawns to create and a language to identify where, it is time to research how the five major spawn types may be implemented in your game. Collecting reference is key for communicating spawn ideas to the team that will be creating the spawn sets with you. Start looking at other games that are similar to the game you are working on, and then branch out to other games that use spawns you like. Video capture or grab a you tube video when you see a spawn you like or want to expand upon.
Inspiration for cool AI spawns can come from anywhere, but the most common source besides other games is movies. Watch some of your favorite action movies and pay attention to how the bad guys enter during a combat scene. Once again, when you find an entrance you like, find a you tube� video or note where it is in the movie so you can reference it for later.
Vertical space is a key part of our language and also of sequencing AI spawns. Make sure you are researching a balanced amount of vertical spawns. If you only find middle spawns, you have failed because the player will not be looking around the entire screen space when the AI comes on screen. Make the player look up, down and middle when the AI enters. You need a variety of spawns to accomplish that eye movement, make sure you have lots of ideas for that balance of spawns.
Realizing the Spawn Types
Start building the spawn types the old fashioned way. Book a meeting room and pull in an animator, AI programmer, AI designer and another designer whose ideas you respect. Make a column on the whiteboard for each type of spawn and start off a brainstorming session. Come up with at least ten ideas for each type and then narrow it down to a realistic number to execute upon given your time and resource constraints.
Keep track of the vertical space where your spawn ideas enter from. Make sure you maintain a balance of top, middle and bottom spawns. It is okay to have more of one than another, just make sure level designers have variety when they go to create their combat encounters.
Lastly, prioritize the creation of the spawns in order of which ones have the most impact. If your team falls behind, know which ones you will cut. Less is more in video game design, its always better to have fewer high quality spawns than a bunch of low quality spawns.
Creating a Naming Convention
We can use our language to generate a naming convention for our spawns. Place a screen location in front of each spawn animation name so the designers, animators and programmers all know where the animation is supposed to be implemented. For example, the zombie spawn closet from the left would be ML_Closet_Scare. The ML stands for the middle left of the screen space. A Repel animation that comes down a building on the right would be TR_Repel to indicate the spawn starts in the top right and comes down. Having the screen location as a prefix allows designers the added benefit of easily sorting through a list when they are looking for spawns.
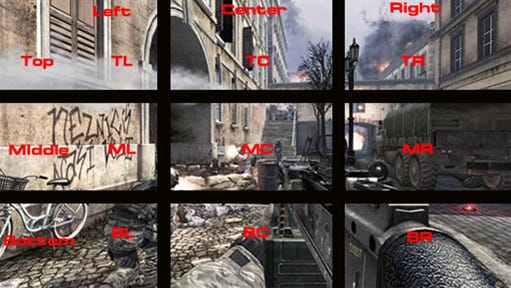
Fig 5. Spawn Location Matrix
If a spawn does not need horizontal designation, like a drop ship or a FX shrouded spawn, add an _mod after the vertical screen space designation instead of the horizontal screen space. Of course designers are tricky and in certain layouts a middle spawn may be used in the top, but we are implementing the Miyamoto rule, designing for the 80% case. Every system you develop will have edge cases and that is okay.
Creating the Spawn Types
With the brainstorming session over, the time comes to create the spawns. First, make a white box for everyone to test the spawns in to act as the hub for all the spawn animation work to be tested and approved in. Label each area in the white box so everyone, including producers, can go in and watch the spawn occur. Make sure there is block mesh geometry to simulate the correct metrics needed for each spawn. Finally, meet several times a week and make sure everyone refers to the reference videos as they create animations or programming additions for desired behaviors.
As the leader of the group you are responsible for setting the quality bar for the spawns. Issues like animation pops and level geometry clipping need to be called out and addressed. If object animations do not sync up with AI animations or animators need more code support, talk to your programmer.
Creating Metrics for the Spawns Types
With each new spawn created, a list of metrics for their implementation needs to be identified so level designers know how to setup their geometry and layout for the spawn to work and look good. For example, how much vertical and horizontal clearance does the drop ship need to fly in? How far must the hole in the ceiling be from the floor for the animation to look seamless as the AI lands? Does the spawn point need to be on or off-screen? Essentially, every detail about the implementation of the spawn needs to be recorded in an easy to read document and placed in your game wiki or other info dump source.
Make sure your white box level showcases all these metrics and everything is labeled and commented nicely. If the spawn requires an animated object or specific geometry, its always a good idea to group those into a prefab, collection or other game object grouping tool your engine possesses. Once all the metrics and spawn animations are complete, setup a meeting with the design team to demonstrate the spawns and inform them of the metrics.
Making the Spawn Types Systematic
If a spawn stands out to be super useful or requests for different variations of the animation come in to support different level layouts, it may be time to make that spawn systematic. For example, lets say you have a spawn where an AI slides down a pole 500 units off the ground. Level designers find the spawn useful in sequencing, but need the AI to slide down poles of varying height for different layouts. The time has come to get a programmer to setup the animation to play along a spline or other tech solution. That way, animators don't waste time making unnecessary animations and the spawn becomes more versatile, saving lots of production time.
Conclusion
Often interesting spawn animations are neglected in preproduction and level designers shoulder the responsibility of requesting different spawn animations during production where resources are tight. Starting work on spawn animations early provides a tool set all level designers can use to quickly iterate through exciting ways to initiate combat encounters and ultimately saves production time. If designers start placing an emphasis early on interesting spawns, we can all start raising the bar of quality AI spawns in games today.
Read more about:
Featured BlogsAbout the Author(s)
You May Also Like


.jpeg?width=700&auto=webp&quality=80&disable=upscale)


