

Daily news, dev blogs, and stories from Game Developer straight to your inbox
Sponsored By
Featured Blog | This community-written post highlights the best of what the game industry has to offer. Read more like it on the Game Developer Blogs or learn how to Submit Your Own Blog Post
The Art of War: Gears of War - Knock Knock
A combat analysis of one of the standout levels in Gears of War, looking at how successful design principles are used to create an entertaining combat experience.
26 Min Read

Introduction
Crafting satisfying combat encounters is by no means a simple feat. Few titles are renowned for successfully delivering gratifying combat scenarios for players to experience. Much can be learnt through analysing some of the best examples that are on offer, and extracting the key principles and they way they have been implemented to gain a better understanding of what makes them so rewarding. This is an analysis of the Knock Knock level in Gears of War, taking into account some of Epic's publicised design principles as well as more general understanding of cover based shooter combat and level design.
Hourglass
One of the much lauded aspects of Gears of War's level design was its "hourglass" sequence structure. More open arenas, referred to by Epic developers as "combat bowls" are linked together by confined corridors. This creates an expanding and contracting volume of space as you move through the environment, which is where the hourglass dubbing comes from.

An abstract diagram depicting the "hourglass" structure.
Combat isn't exclusive to the areas considered the combat bowls. Gears of War will frequently pit the the player against enemies in corridor sections, but these tend to be light and fast skirmishes that provide little resistance. It's in the combat bowls that encounters truly flourish though.
Combat Bowls
The very nature of the combat bowls elevates the potential of any conflict that takes place within them. The larger space promotes more movement from the player (most importantly, rotational and lateral movement) and allows for more interesting variation of geometry for the player and AI to interact with. This creates more tactical options for the player and allows for more surprises to come from the AI.
Corridors
Although combat in corridors lacks the thrill of that in combat bowls, they still serve an important purpose. Continuous combat bowl after combat bowl would be a very intense experience, but it would be flat. There would be no juxtaposition to be able to truly appreciate the thrills of the high intensity. Besides, pleasure can also be experienced from the low intensity offered by the gameplay in corridor sections.They are great for building atmosphere and creating context for the whole experience. These sections are also an opportune moment for delivering narrative and gameplay objective information, where the player is likely to be less distracted through curiosity that often comes with more open spaces and their multiple points of interest.
Knock Knock
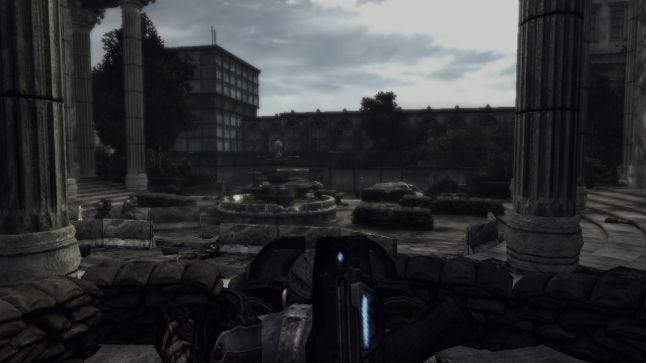
One of the finest examples of Gear's of War's combat encounter design is experienced in the chapter "Knock Knock" in Act 1. Delta Squad are on a mission to try and locate Alpha Squad and secure a sonic mapping device known as the resonator, who they were last known to be in possession of. Their search has lead them to the plaza of the House of Sovereigns.
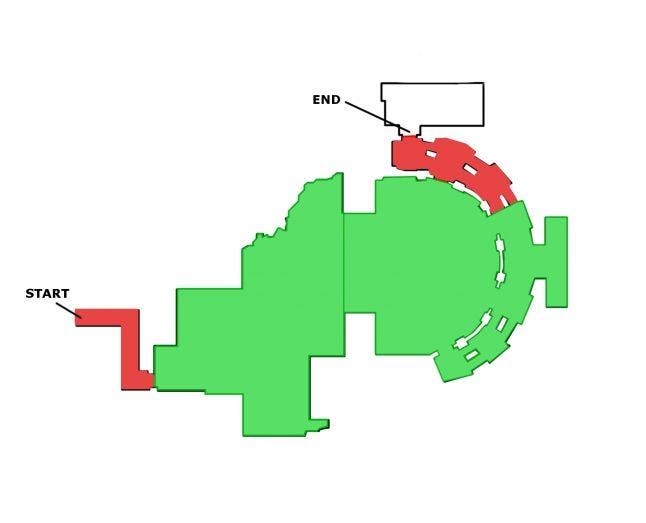
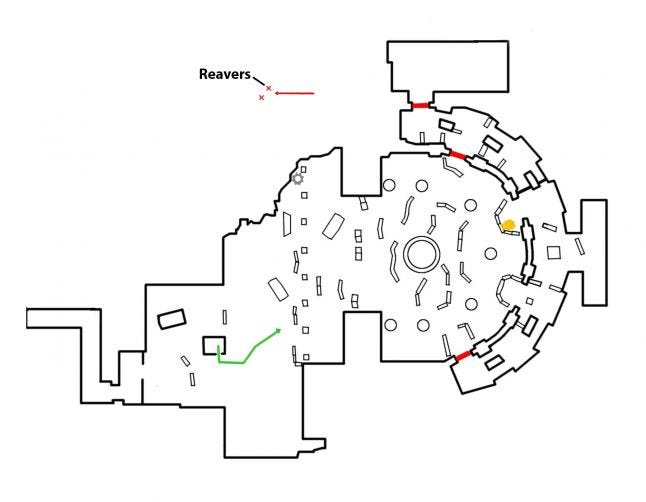
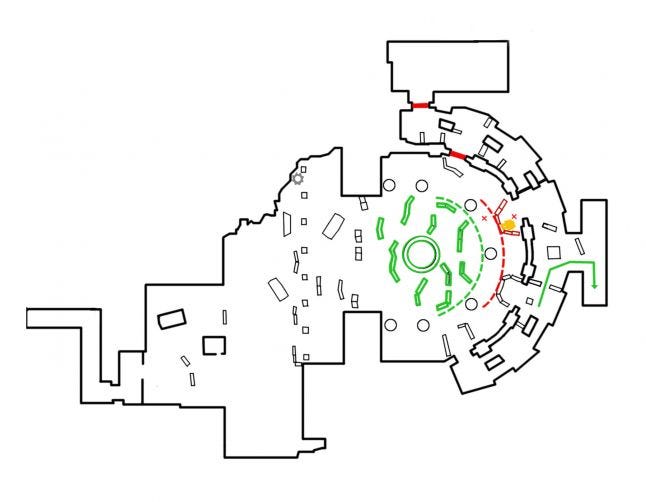
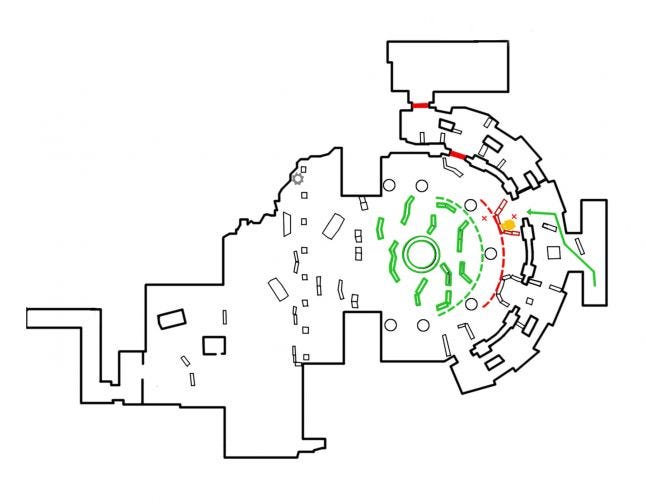
This is the footprint of the Knock Knock level visualised from a high level hourglass colour coded perspective. The red corridors bookend the green combat bowl. I've divided the combat bowl in half as the left half isn't really utilised for combat. An important note is the asymmetry of the combat bowl, as it helps the player distinguish end side from another.
Opening Corridor
The entrance into the corridor where the level begins is hard gated, so the player cannot travel back to the previous area. The rest of the members of Delta Squad are all positioned in front of the player and walk along a path just short of the end, encouraging the player to follow. At this point the player is in a forced walk, ensuring that they can't just run through to the exit of the corridor into the combat bowl ahead. This dictates a minimum amount of time that the player will be in this corridor, and it used to play dialogue that briefs the player on their current objective and the plan of action to achieve it.
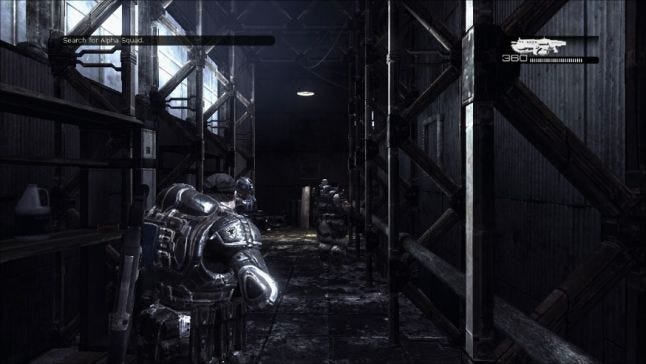
The only way here is forwards. The lighting at the end of the dark corridor also serves to draw the player through the space, not forgetting to mention the lines and repetition of the architectural supports along the walls and edge lines of the floor tiles.
This serves the pacing well, as it begins to provide some light relief for the player from the action of the previous combat encounter. There is also little in the way of any distractions, which helps to more effectively communicate the player's current objective. The tremor simulated through the use of camera shake, falling physics objects and dust particle emitters, starts to build tension and create an atmosphere of dread.

Notice that the structure of this corridor takes the form of a dog leg, where it consists of two 90 degree corners in opposite directions. It keeps the player's line of sight short, and adds variation in the player's trajectory to the exit. The exit is also aligned to provide good composition of the player's goal.
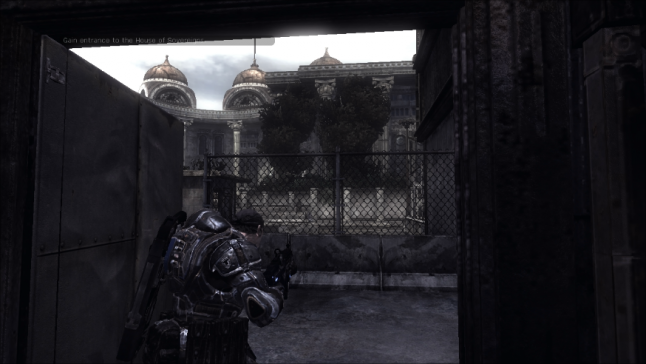
The composition of the exit doorway nicely frames the domes of the House of Sovereigns against the skyline, for easy identification of the player's destination.
Combat Bowl
The player doesn't immediately engage in combat when they enter the combat bowl, it grants a moment to take in that this location was the scene of a prior battle as evidenced from the destruction surrounding them. Then it rewards some light exploration through a small outbuilding immediately in front, containing ammo and grenades to replenish the player's stocks from the last encounter and prepare them for what's to come.
The player can't miss the outbuilding staright in fron of them, plus two roadblocks are positioned that help funnel them towards the door.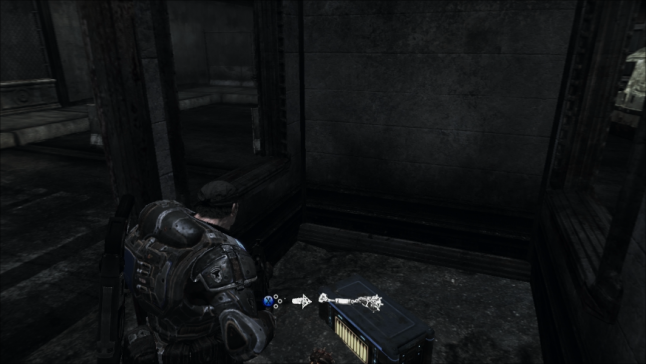
You can't be too sure that the player has restocked on ammo at the end of a previous encounter in another level, so it is good practise to provide players with an early opportunity to do so.
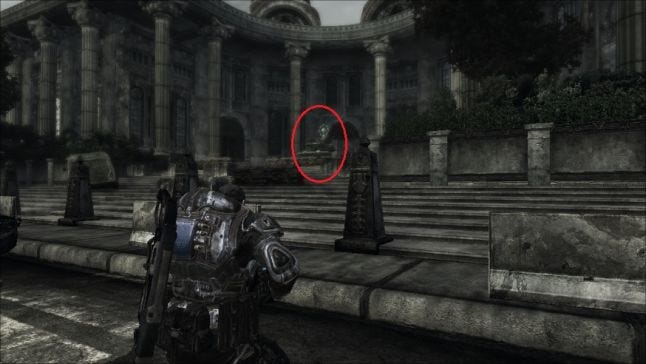
The player is pulled towards the direction of the House of Sovereigns by a central fountain, that serves as visual lure and landmark. The tension continues to build through the use of hushed voice chatter and furthermore with a scripted event of two Reavers triggered just before reaching the steps. They briefly come in and out of view as they scour the adjacent street, just beyond the level boundary to the left. Proceeding to explore this direction will uncover a COG tag, one of the game's collectables.
The visibility of the fountain is established just before you get to the outbuilding and is maintained to lead the player to front of the building. It also proves useful as landmark from which the player can easily reorientate themselves from.
As you can see from the player path in green, that they are purposefully lured towards the most important locations in the first half of the combat bowl. However there is room for exploration, which is rewarded towards the end where the Reavers appear with a COG tag.
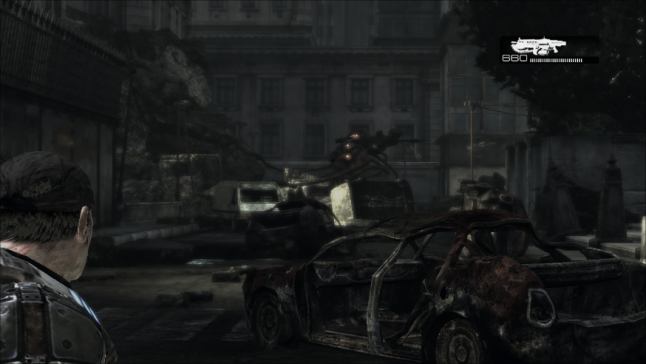
The view across the boundary really makes the level feel larger, and the fact that there is activity happening beyond the boundary gives the impression of a living world that doesn't just centre on the player character.
As the player ascends the plaza steps, they begin to see various sandbag emplacements and roadblocks positioned around the area, in addition to structural objects such as pillars and cement blocks. This is the opportunity for the player to get a lay of the land and pre-emptively assess their surroundings, taking mental notes of where they can take cover and how they can navigate the space safely by using cover-to-cover movement.
The player is afforded a short up close look at the facade of the building, where they can see four large arched doorways. The two centre ones are open and the two outer ones are closed. The open doorways provide a strong combat focus for the player of where the threat will originate from.
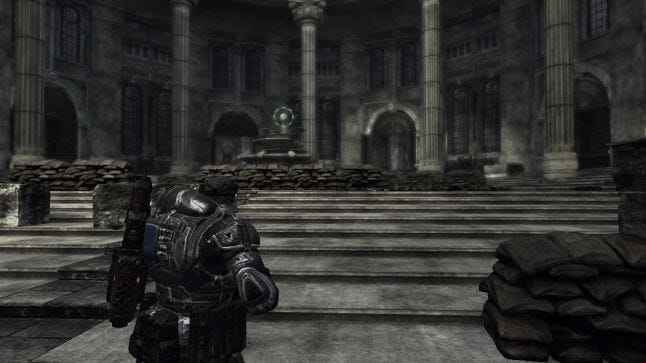
This area is very grand looking, with its large arched doorways, tall imposing pillars and central focal fountain.
Structurally the concave facade allows for a front of greater width to fit within the player's field of view, as opposed to if it was flat, providing more for the player to visually monitor within those limits. It also naturally places the player as the focus at the centre of the circular negative space, whilst also making it easier for the player to survey enemy targets.
Introduction
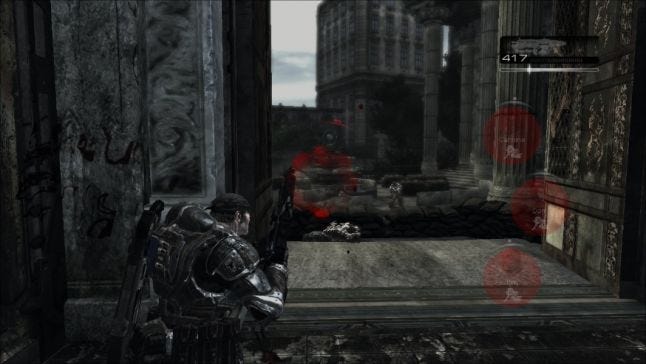
The player triggers the appearance of Locust Drones, when they get into close proximity of the fountain. The Gunner class Drone takes up a position in the left open doorway to operate the Troika (a mounted heavy machine gun), and another Drone known as a Spotter takes cover in the sandbag emplacement in the right open doorway. These two Drones hold their fortified positions, whilst a third free roaming drone vaults over the sanbags in the left open doorway and skirts around the edge of the killzone.
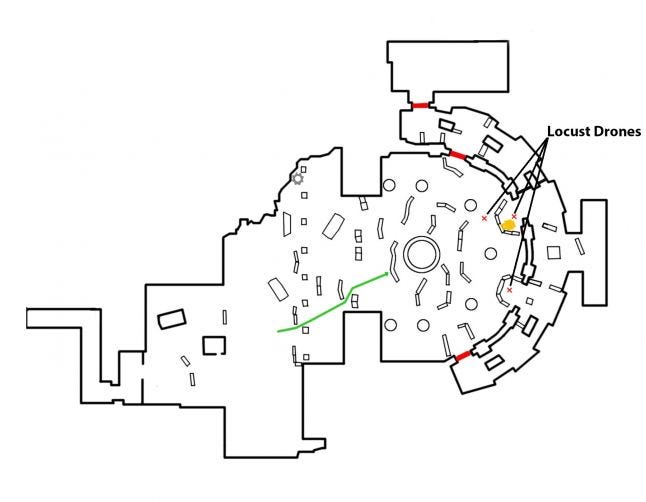
The Locusts are spawned from out of view inside the House of Sovereigns, before emerging through the doorways.
The setup keeps the enemy targets close enough to be visible all at once, so the player can easily monitor.
They immediately open fire on the player and their ally squad members, putting pressure on them to now instinctively anchor themselves into cover. The Troika is a formidable weapon and puts the player at quite a disadvantage. This is the moment where the player has a brief moment to assess the situation.
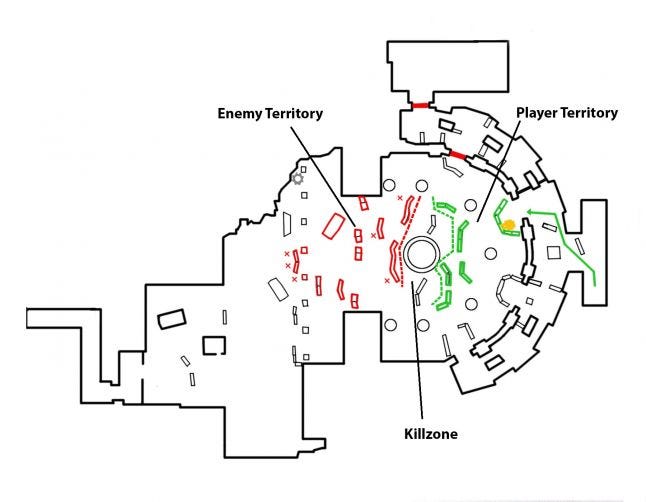
Establishing the Combat Zone
The player's territory and the enemy territory are clearly defined with the corresponding fronts, by the timing of the introduction of the Locusts with the player's position. The player doesn't get to advance any further than the cover surrounding the fountain, before the Locusts make their presence known. The suppressive fire they lay down also stops the player from advancing any further forward. The ally squad members also take cover within this area, adding more proof that it is the player's territory. Two Locusts hold positons within the two sandbag emplacements, conveying the Locust's territory. The one roaming Locust Drone helps to make the standoff not feel too static, and provides some light harassment for the ally NPCs to make them feel involved in the engagement and not come across as sitting idly by.
There are a few fundamental components to a combat arena for shooters with a cover system:
Player Territory (aka Friendly Territory, Allied Territory or Safe Zone) - This is the space that the player occupies when combat is initiated. It contains a generous amount of cover, making it relatively safe to move within. This is where the player formulates their plan to counterattack.
Enemy Territory (aka Hostile Territory/Zone) - The equivalent for the enemy side, being where they launch their attack from. It may also contain obscured areas from which to spawn more enemies from out of the player's view. It will generally have less cover options than that of the Player Territory.
Player Front (aka Friendly/Allied Frontline/Border) - The furthest point forward of the Player Territory, an edge that when crossed means the player has exposed themself to increase risk of danger.
Enemy Front (aka Enemy Frontline/Border) - The equivalent for the enemy territory in the player's direction.
Killzone (aka No Man's Land, Killing Ground or Dead Zone) - The space between the two Fronts defining the two seperate territories, by consisting of little to no cover. As its namesake suggests, it will almost certainly mean the end of whoever is caught in here. This is the hurdle that the player must overcome to win the battle.
Flank Route - This is the answer to the challenge presented by the Killzone. A path that circumvents the danger of the Killzone through use of cover that links the Player and Enemy Territories together. It then provides an advantageous point of attack, either to the side of or from behind the enemy targets.
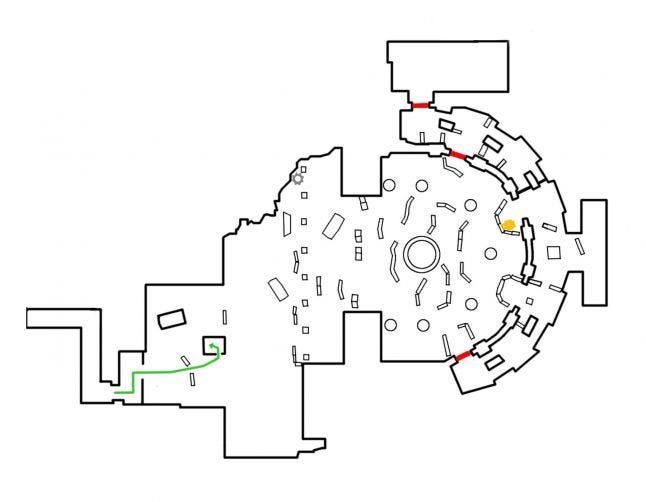
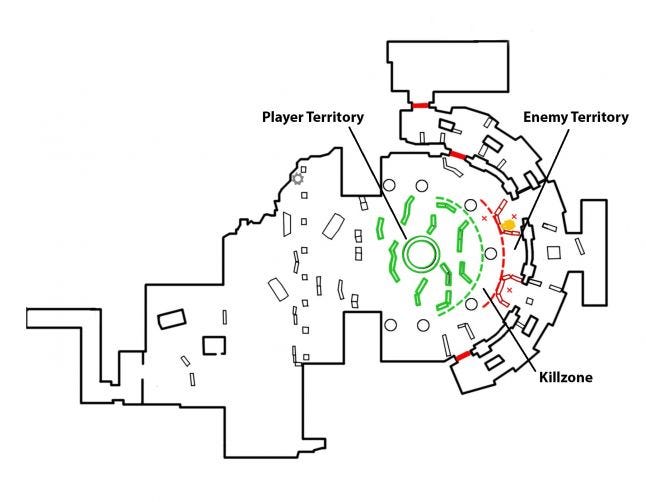 Here we can see the foundation of a solid combat encounter setup. Cover outlined in green represents cover in the player's territory, with cover outlined in red denoting the enemy's territory. The dashed lines depict the respective fronts, the furthest forward point of the territory controlled by that side. This leaves the space in between as the killzone
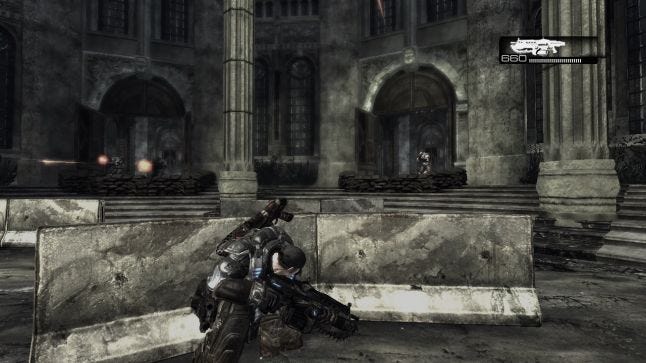
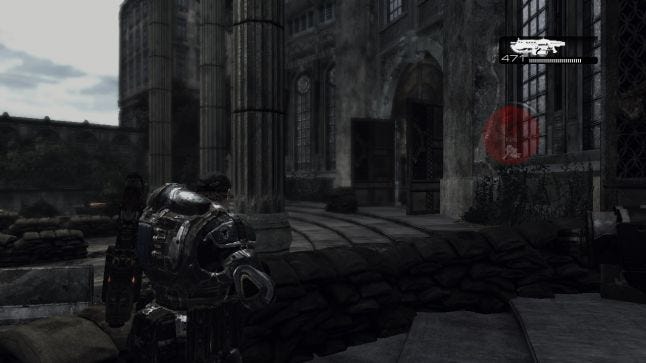
The Gunner on the Troika is too lethal to take on directly, and he'll easily kill the player if they attempt to take him out with pop and shoot tactics. The player can take out the Spotter in the other doorway, but doing so will causes a replacement to be spawned from inside the building to come and take its place.
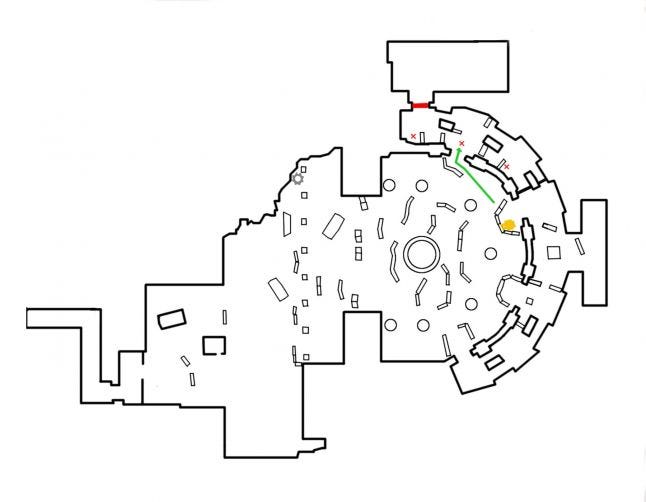
The Flank Route
The situation is escalated slightly by the appearance of a Grenadier (a Locust Drone class type that wields a shotgun) bursting from the closed locked door on the right. The animation helps to bring attention to his presence, but it is also called out to the player by an ally NPC and is marked as a point of interest. Further encouraging the player to confront the Grenadier and take this newly accessible route, is the amount of concentrated cover that bridges the player enemy territory to this doorway.
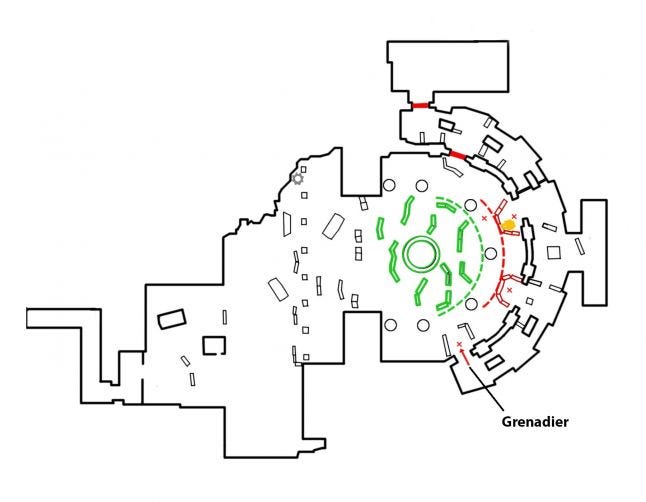
The ability to flank the enemy in this instance is governed by this evennt being triggered.
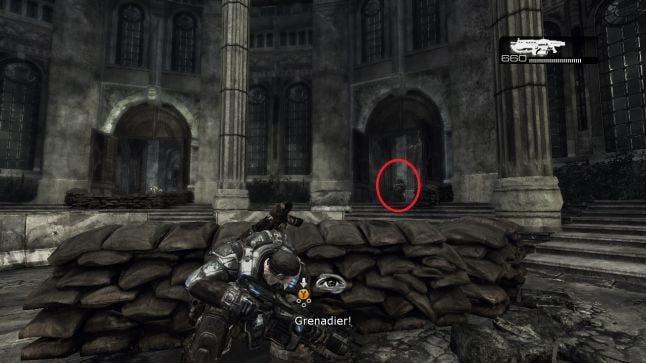
The Grenadier appears just on the fringe of the player's view to the right, requiring them to rotate the camera a little to get a good view. It makes for a standout introduction for this new enemy type.
The player finds themself in a long corridor when entering the doorway, and it isn't long before it turns into a corridor combat section. An Emergence Hole appears around a corner part way down the corridor, spawning three Locust Drones. The Emergence Hole will respawn a replacement if any of these Drones are killed (up to a limit), so destroying the Emergence Hole becomes a priority. The narrow space results in movement and cover options being very limited, however some variety is provided through the types of cover. There's full height cover, low cover plus destructible cover. The player can peer around a pillar to take aim, fire over the top of a roadblock or take a risk to advance forward by vaulting the roadblock to hide behind a destructible crate.
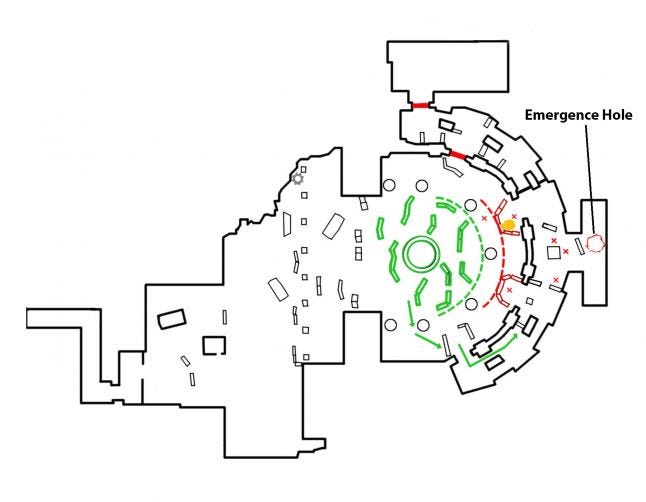
The Emergence Hole appears obscured in this offshoot T-junction, that calls into question the player's Bolo grenade throwing skills.
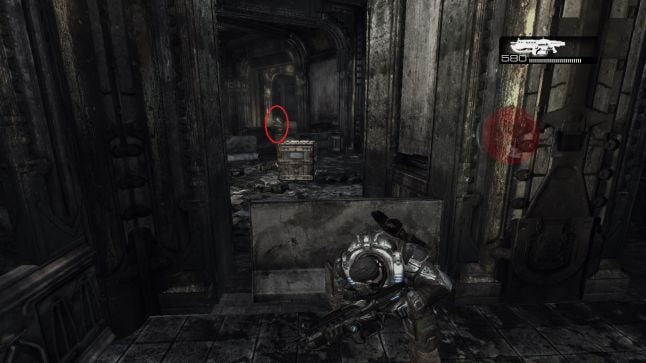
The destructible crate ahead is a risky option, as it will only provide temporary salvation from gunfire and no protection at all from grenades.
There is a strong sense of purpose and drive as the player is funnelled through this path. Reaching the first central doorway allows the player to take out the Spotter quite easily from behind. The view from this positon provides a strong sense of location as the player can see back out to the fountain from where they started the encounter. Their squad mates remain in the ally territory and can be seen still in danger from the gunfire of the Troika that now lies just ahead.
This view of the fountain, the central landmark, restablishes the player's location.
Recuperate
The player is given a short break from the action, once they complete the flank and elimiate the Gunner on the Troika. There is no possible route to progress within the corridor, as the path just beyond the positon of the Troika is blocked. An order to regroup outside at the top of the plaza steps is given by Kim, the Delat Squad leader. With all possible threats eliminated, the player has an opportunity to resupply thmselves with ammo from fallen enemies or from the helpfully placed ammo and grenade pickup opposite where the Emergence Hole was.
The flank has almost been completed, but keep in mind that the player has already had to kill at least four enemies by this point.
The placement of the ammo and grenade pickup requires the player to have eliminated any nearby threat first. They are now in no danger from collecting these items.
A cutscene is triggered when the player goes back outside. This is a moment of complete inactivity for the player, further cementing that this is a rest period. It also sets up the climax to the encounter with a narrative beat. The cutscene results in the death of Carmine, one of your fellow squad members, from a Locust Sniper in the distance. This brings about an abrupt end to the player's feeling of triumph, signalling that the fight is not yet over and fuelling their last efforts in another shootout.
The flank route allows the player to blindside the primary threat of the Gunner, making it easy to take him out. The free roaming Drone is now caught sandwiched firmly in the killzone, making him extremely vulnerable and also quick to dispatch.
Climax
This setup efficiently reuses the same exterior combat area for the final face off, yet at the same time makes it feel different by reversing the situation. This is a sommon occurrence of the Gears of War combat encounter design, where a player is tasked with launching an assault on a location and then defending it once that has been achieved. The fronts have been redirected now that the Gears soldiers and the Locust enemy are on opposite sides from the previous engagement. The gameplay is significantly different, although the same space is being used. It is no longer about advancing on a position and gaining ground, but now about staying in a confined portion of the combat bowl and holding ground. Locust Drones are spawned from the bootom end of the plaza steps and try to advance up towards the player's position. The player now has the advantage of the high ground and the option to put the Troika to devastating use, despite the increased number of Drones. Plus the combat range is far greater from the positon of the Troika to the enemy front.
As you can see, the new positions of the player and the enemies brings new meaning to the same space.
This empowering position feels quite different from the beginning of the first half of the battle.
An important observation here is that although there are six Drones spawned, only three will advance up to the enemy frontline to attack. Combat layers are employed to create a feeling of having to deal with a larger force without actually overwhelming the player with large amounts of enemies all at the same time. While half the enemies are up at the frontline, the other half remain in the background and will move between the cover there every now and again. Members of the second layer will join the frontline whenever a member of the first layer is killed.
Closing Corridor
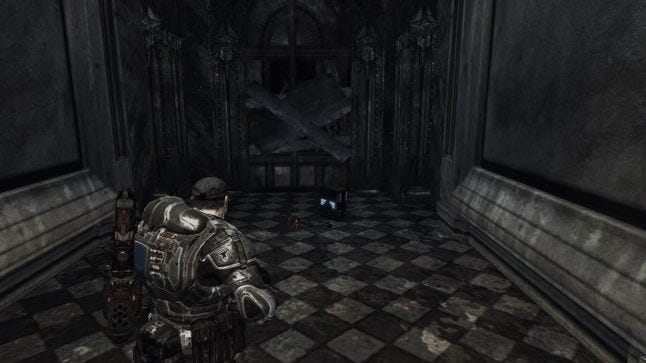
The last remaining closed door at the front of the House of Sovereigns is unlocked once all the last remaining Locust forces have been depleted.
The final door is now open.
 Three last Locust reside inside, before the player can complete their objective. The engagement range has been brought back in considerably.
This leads to one last short corridor section, where the player faces three Locust Drones in close quarters. marcus and Dom breifly reflect on the death of Carmine once the final group of Locusts are dead, before Kim unlocks another door into the main area of the House of Sovereigns to complete the objective.
.jpg/?width=700&auto=webp&quality=80&disable=upscale)
With that the resolution has been brought to a close, and the hourglass sequence can then be repeated in a different way.
Recap
I'll just recap the points that have been discussed above, now that it has been covered in detail.
Playthrough
Here's my playthrough of the level on the PC version of the game on hardcore difficulty, so you can see everything discussed in action.
Lessons
There's a lot to takeaway from this encounter, so I'll try to summarise everything:
Layout - The combat bowl is clearly laid out, so that player can easily detemine Delta Squad's front, the enemy Locust front, the killzone separating the two and the flank route that links them. There's ample cover to provide options for both the player and other members of their squad, and it is clustered in a way that provides and promotes movement. There also needs to be space between the clusters of cover to provide some risk in the player's movement where they expose themselves to danger. Plus there is a flank route that allows the player to bypass the killzone to get to the enemy targets and take up an advantageous positon to attack.
Orientation and Navigation - The asymmetry of the combat bowl is important to make one end distinguishable from the other, so the player knows where they need to be going if they get turned around. When promoting movement around a combat arena, it is also helpful to use a distinct landmark so that the player can easily get their bearings. The use of cover also instinctively highlights useful paths through the environment.
Enemy Composition and Sequencing - The types of enemies the player is faced with and the order they are thrown into the mix and the conditions in which that is done is of note. A Gunner on a Troika, a Spotter and a regular Drone + A Grenadier > An Emergence Hole and three Drones > Six Drones (seperated into two layers) > Three Drones. The player never has to concern themselves with more than 3-4 enemies at a single time. High numbers of enemies isn't always the best option to challenge the player.
Challenge - There is a clear threat priority set at the beginning of the encounter with the Troika, and the goal to eliminate the Gunner operating it. The challenge is increased with the introduction of the Grenadier, a shotgun wielding Drone, in close proximity to the player's position, who will advance. This is further escalated by the Emergence Hole in the confined corridor of the flank route. The player must now face multiple Drones in a tight space, plus seal the Emergence Hole or else have to dispose of Locust reinforcements every time they kill one (up to a limit). The player doesn't have the luxury of being able to flank these enemies, they must instead rely more on pop and shoot tactics and take advantage of their grenades on the tightly grouped formation of the Drones. This is where the combat difficulty feels like it peaks. The challenge isn't created just by throwing more enemies at the player, or continuously introducing new enemy class types. Challenge can be created by the circumstances of the type of situation the player is in with those enemies. The Troika at the beginning is by far the most dangerous threat, but the player never faces too much trouble from it due to it becoming active when the player has lots of nearby cover options. The Grenadier is armed with a lethal shotgun, but doesn't have many options for safe movement to avoid attack. However the fight through the flank corridor has the player more or less pinned down with very limited options.
Reward - Once the flanking corridor is clear of enemy reinforcements, it is then fairly simple to eliminate the Spotter and the Gunner on the Troika plus the remaining free roaming Drone in the combat bowl. Lastly although the player is faced by an attack by many Drones, it isn't difficult to overcome them now that player has access to the Troika, and the fact that they are presented in two layers. The group at the back are non-threatening, so the player can easily focus on the group at the front until they are replaced by the second group. The player is rewarded for completing the flank by being able to just wreak havoc with this weapon.
Pacing - There's a momentum to the combat pace, where it continuously increases in intensity. The player is immediately faced with the significant threat of a manned Troika accompanied by a couple of Drones. This is shortly followed up by the introduction of a Grenadier as well as a new passage through the space of the arena. Entering this passage puts the player in a confined combat space where the player must deal with an Emergence Hole that spawns a squad of Locust Drones, and replenishes their numbers if not destroyed. Once the player takes out the Drone on the Troika, they are then able to operate it themselves against multiple Locusts in the opposite direction the Gears soldiers attacked the position from. Turning the gameplay from assault to defend. That's fours times new elements are introduced to the combat encounter that causes the player to assess or reassess the situation and act accordingly.
Recuperation - Just as important are the times the player is allowed a moment to compose themselves, to have time to restore their health and restock their ammo. There are two points for this, at the beginning before any action takes place and also again when the flank is completed.
Atmosphere and Context - There's a gradual buildup of tension before the first enemy threat appears. The tremor in the corridor, the hushed squad chatter once Delta Squad are out in the open, the moment of quiet and stillness as you take in the destruction of the city around you and the stalking movement of the Reavers on the periphery. This excellently creates that calm before the storm feeling, whereby although there is no actual danger to the player there is a perceived sense of looming threat that adds greater emotional weight to the combat. Also the death of Carmine, is also tied in at an appropiate time, with the player as Marcus Fenix being able to unleash their anguish through the use of the Troika.
Economical - There is well considered reuse of the main plaza space. The flank route provides a brief change of scenery with its interior before the player completes a loop back out into the open exterior for the climax of the battle. This is very efficient use of the space, which allows artists to focus their efforts on a particular part of the level that the player is going to get to see the most.
Conclusion
Knock Knock isn't the only level in Gears of War that puts many of these points into practice, nor is it the first to start doing a lot of them. However the way in which it ties them altogether is what I think makes it stand out. Most importantly the encounter is built on a solid foundation of core proven principles. However there is a considerable amount of work done to give the action context, and to building tension up to that point that makes the action feel very fulfilling and memorable.
References
I highly recommend the following GDC presentations by Mike Zak and Joel Goodsell on the core principles of good combat encounter design. It is with much of the knowledge that I learnt from these that helped me to gain a better understanding of combat in typical FPS and TPS games:
Read more about:
Featured BlogsAbout the Author(s)
You May Also Like


.jpeg?width=700&auto=webp&quality=80&disable=upscale)


