

Daily news, dev blogs, and stories from Game Developer straight to your inbox
Sponsored By
Some Technical & Design Challenges of VR
A collection of design and technical considerations I have come across during my time developing for virtual reality.
7 Min Read

Technical & Design Challenges of Virtual Reality
This post is meant to serve as an overview of some of the core technical and design considerations I’ve come across during my time with VR development. My experience with VR has mostly been with small personal projects in both Unity, and my own engine along with what I have observed from other developers. If you're starting out with VR development these are some key things to keep in mind that might save you some trouble.
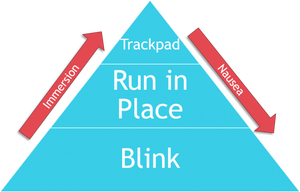
Locomotion Options
Locomotion is the most important design decision I have come across during my time with VR development. How your player moves can influence the entire design and interaction system for your game. The battle between locomotion options tends to come down between trackpad locomotion and teleportation. With teleportation, players point to the ground to select where they would like to move and blink there in an instant. In contrast, trackpad locomotion is closer to how a player would move in a traditional console FPS, players move a joystick or trackpad on their controller and move smoothly in that direction. The consensus so far is that teleportation is a far more restrictive means of locomotion, but is the least likely to make the player nauseous. While trackpad locomotion (similar to what can be seen in console FPS’s) is more immersive and translatable from non-VR designs, but is much more likely to cause motion sickness. My favorite locomotion implementation falls somewhere between these two. “Run in Place” or “Head Bob” locomotion asks the player to run on the spot and uses the movement of their head to determine the pace and speed of movement. This technique retains the flexibility and immersion of trackpad locomotion, while being far less nausea inducing.
Designing for Presence
When designing for VR presence I have found it is far more important to design for consistency rather than visual fidelity. Objects in your world should behave the way a player would expect them to. This makes solid and consistent physics interactions a must. Having a large number of intractable objects is also key in building immersion in VR. Even interactions that don’t influence gameplay can help players feel agency over the world.
One trick I have found for emulating the weight of heavy objects is to have a slight delay on the object following a tracked controller proportional to the simulated weight of the object. This slight delay tends to make players overcompensate and over extend their arm. This makes it seem as though an object is heavier or lighter.
Directing Attention
Directing the player’s attention can be surprisingly challenging in VR. First, because you can’t move the player’s head. Forcibly directing the view of the player is a recipe for instant nausea. Second, if the player gets confused or bored they may be less inclined to give your game the benefit of the doubt. It’s one thing to be confused when they are sitting on a comfy couch with a controller, it’s entirely different when they are standing with a brick strapped to their head.
To get around this problem, you are going to have to rely heavily on lighting cues, sound cues, and your overall level design. Some would argue that we should be doing that anyway, but it is extra important in VR.
The Cost of Rendering
Now that we have dealt with some major design choices, we have to figure out why our performance is so dang bad. Performance in VR is critical; dropping frames will result in disorientation and nausea for the user. Even dropping a single frame is extremely noticeable in VR. To compound the issue, we have to render two spate eyes with a resolution of 1080x1200 for current headsets. That is a lot of pixels to push though even without anti-aliasing, which you are going to need because aliasing is distracting in VR. And all of this needs to be done to hit a framerate of 90FPS.
Speaking of anti-aliasing, you’re likely going to have to ditch whatever technique you’re currently using in favor of either MSAA (Multi Sample Anti-Aliasing) or SSAA (Super Sample Anti-Aliasing). This is because the blurring effect you often see with other (cheaper) forms of anti-aliasing is extremely noticeable in VR. This also has implications over the kinds of renderers you have access to. Use of MSAA means you will most likely have to use a forward renderer, which then in turn restricts the number of dynamic lights you can reasonably use.
As you can see, deciding to use VR has far-reaching technical implications on the rendering techniques you use in your game.
Getting Your Performance Back
You may feel a bit discouraged after reading the previous paragraph. It can be stressful knowing that missing your performance target can cause real world discomfort to a user. But have no fear, there are some tricks we can use to buy back some of that performance. I’m going to outline two different techniques I’m implementing in my engine. I won’t go into the gritty details in this blog but Valve’s Alex Vlachos gives an awesome talk about these exact solutions in more detail.
The first technique I use is Adaptive Quality Scaling. In essence, we scale the resolution of the screen based on the GPU utilization instead of dropping frames. When see high GPU utilization, we drop the resolution of the scene, wait a few frames, and profile again. When we see a low GPU utilization, we increase the resolution, wait a few frames, and profile again. It’s really that simple, and is a great alternative to missing frames in VR.
Theoretically you could scale the quality of anything in your scene (lighting, shadows etc.), but we usually stick to resolution and AA levels because it is a less noticeable change.
The Second Technique I recommend using to gain performance is called Foveated Rendering. This technique helps cut down on some expensive fragment processing. When your rendered scene is submitted to a VR system, the image is distorted slightly to compensate for natural lens distortion. This compresses the edges slightly. This is compounded with the fact that on current headsets, the edge of Fresnel lenses have a blurring effect around their edges. This means that we are doing a lot of unnecessary pixel rendering near the edge of the screen.
To compensate for this we can render parts of the screen at different resolutions. By rendering the center of the screen at our target resolution, and the edges at some fraction of that, we can cut down on the work that needs to be done without a noticeable drop in quality. This isn’t very noticeable because of the natural lens blurring mentioned earlier. Once we have our two rendering regions, we combine and blend them to prevent a noticeable seem where the two connect. By using Foveated rendering, we have cut down significantly on the amount of work for the fragment shader and bought back some much-needed performance.
These certainly aren’t the only cool trick you can use to buy back performance, but they are two of the coolest I’ve seen so far. This was a super simplified overview of these two optimizations, and I urge you to look into more detailed descriptions of these techniques if they sound at all interesting.
Conclusion
VR is the Wild West right now when it comes to design. That means we can’t take any pre-existing designs for granted. This eats up a lot of time as a developer, but it’s also what makes VR development so much fun. This has been a small overview of some of the more interesting problems and solutions I’ve come across, but it only scratches the surface of the problems we’ll all face with VR development.
And I for one can’t wait…
Read more about:
BlogsAbout the Author(s)
You May Also Like


.jpeg?width=700&auto=webp&quality=80&disable=upscale)


