

Daily news, dev blogs, and stories from Game Developer straight to your inbox
Sponsored By
Runick - Level Design
A look into the designing process of an indie game called Runick. This blog post will be divided into three parts, each of them tackling one part of the process I went through while designing the levels in Runick (Experimentation, Progression and Fillers)
11 Min Read

Level design at last!
Before we jump right into action go check out my blog post about forming the idea for Runick. It’s been a while since my last post so you might have to refresh your memory. This blog post is a successor to the Runick - From Idea to Prototype blog post. The previous post can be found here: Runick - From Idea to Prototype
I originally didn’t intend for this one to be so long. The words and ideas just kept coming and I swear it feels like the laptop wrote this one on its own. So if you’re only interested in the conclusion of the whole post skip to the end where you’ll find the conclusion and a TLDR.
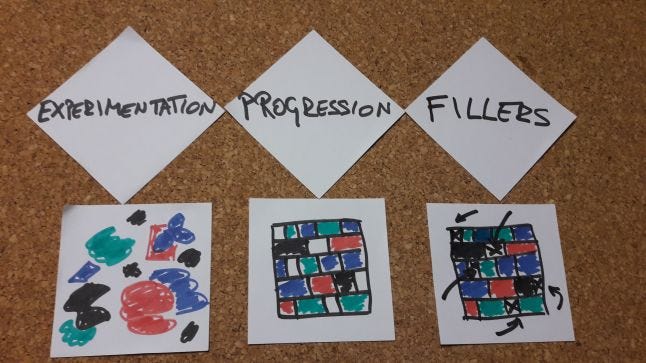
This blog post will be divided into three parts, each of them tackling one part of the process I went through while designing the levels in Runick. The parts are as follows:
Experimentation
Progression
Fillers
Experimentation
"Side effects may include: dry mouth, nausea, vomiting, water retention, painful rectal itch, hallucination, dementia, psychosis, coma, death, and halitosis. Experimentation is not for everyone. Consult your doctor before use." - Warcraft 3 Priest
This is definitely the most fun part and comes right after forming the idea and the mechanics of the game. After all the rules (or a satisfying amount of them) are defined, it’s time to experiment and create levels.
Imagine this part as an artist throwing paint at a blank canvas and wondering how it would turn out. I was the artist, the board size was my canvas and the various shapes with various runes were my colors.
There were two different approaches to this methodology.
The first one was creating a blank board and then placing different shapes on interesting positions. After the setup was made, I played out the board state until I colored it in a way it looked cool and interesting. Like the painter that was throwing paint in the previous analogy this was my very own rune infused sandbox. After I achieved a board state I was satisfied with, I remade the board with that state and tried to play it out optimally. If it was fun and challenging that meant I got myself a new level.
The second approach was the complete opposite, sometimes I got ideas for different board states with a problem (e.g. a predefined state that yet has no shapes in it) that needed to be solved. Then I’d make that board state and throw in a various combination of shapes and try to solve it. If it was solvable, fun and challenging, I would make it my new level.
During this part of the process I wasn't concerned about the difficulty of the discovered levels nor their order or anything in particular. I wanted to create levels and worry about the rest later through playtesting and feedback.
Most of the created levels in this part actually were, and still are, the hardest ones in the game.
Progression
“This would be a good time for a master plan…” - Dr. Boom, Mad Genius
Once there is a pile of levels it’s time to organize and sort all the creative work that was created during the previous phase. This phase has had a couple of iterations, meaning I wasn't sure how to approach it at first.
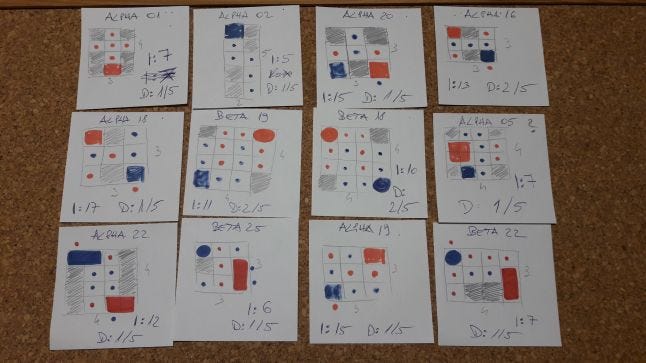
To organize levels I defined a rating system for each level which consisted of the board size, shape types included, minimum number of interaction required to solve a level and my perceived difficulty of the level from 1 to 5. The perceived word in the difficulty assessment is extremely important since I was proven wrong on almost all of the levels (I was and I am biased :D). In the end the difficulty jumped for almost +2 on each level.
.jpg/?width=646&auto=webp&quality=80&disable=upscale)
Attempt Number 1
The first idea was inspired by Nintendos philosophy of level design in 4 steps per a mechanic (intro, development, twist and a conclusion). Each mechanic from Runick would be introduced in a level, further developed in the next, displayed with a twist in the third successive level and then finished off with a conclusion level. Since this sounded a bit overwhelming for the player, I made an addition to it. After a specific mechanic was introduced the game did not follow up with another, yet it stayed with the same for the next 4 levels to keep the player interested and in the comfort zone a little bit longer. Basically, I extended the conclusion segment for 4 more levels (you could say I added a twist to the design principle xD).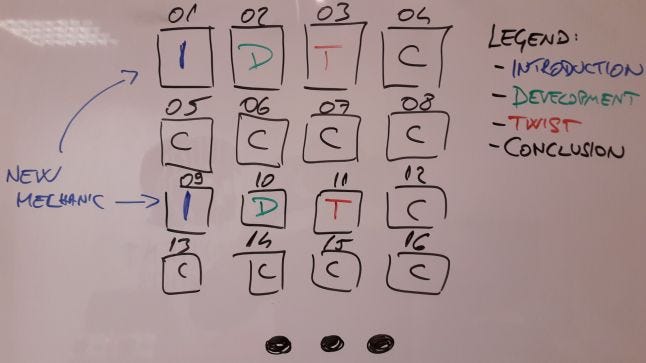
Once I dissected all the mechanics I actually have and use, the game turned into a segmented experience which didn't create an immersive enough flow for the player. And after all the mechanics were displayed with the defined formula all that was left were harder levels which also had to be sorted. The player felt overwhelmed at first and then lost in the sea of leftover levels while his interest was decreasing.
If you are interested in learning more about that design principle check out this great video:
Attempt Number 2
Don’t you just love when a game has worlds, ooh a world here, ooh a world there and all of the sudden you find yourself in Hellheim and wonder if you’ve missed any side quests in all of the previous ones. I mean, who shows you green glowing orbs and a puzzle which you can’t solve?!
I digressed, as you have guessed attempt number 2 were worlds, or more precisely defined, large segments of the game which are thematized. In Runick, this would translate to a cuboid world, sphere world, pyramid world and so on. Since Nintendo's philosophy couldn't work I assumed this idea would make perfect sense. So Runick was divided in the mentioned worlds of 16 levels (the 4 levels in a row rule just furtively transferred to this design idea). Each of the worlds still used the 4 levels of the previous design method since it turned out they were perfect as tutorial levels for each world.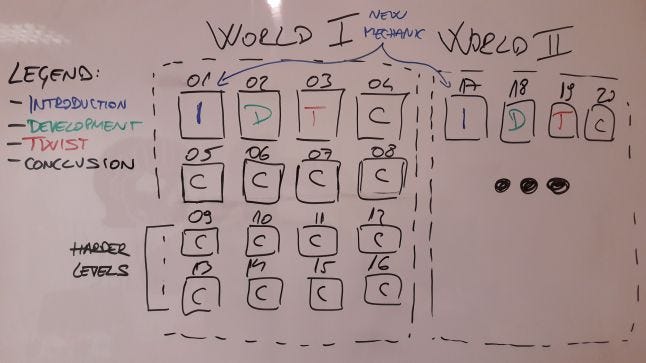
This seemed to work great for the first world BUT (yeah you knew there was a butt) people didn’t know that there were actually worlds. Other worlds were offscreen and you had to swipe or press a button to see their levels and they just assumed that after the first few levels (around 6 - 10) the game will just throw more of the same, but different, in the future. They thought the game is all about 2 1x1 cuboids and different board states. That meant people gave up after the mentioned number of levels unless I peaked their curiosity by manually showing them the intro level for the sphere world. The same problem appeared in the sphere world, again I had to manually show them the way to enlightenment towards the pyramid world (why they used the same logic as before although I showed them a different pattern, I still don’t know today). As you’ve guessed they assumed there’s nothing after the pyramid world aaand boy were they right there wasn't!
So that meant this was not it, attempt number 2 did not flourish. Somehow what attempt number 1 lacked attempt number 2 had and vice versa. If there were only a way to solve that by somehow using the good of both worlds. If only there was a way….
WAAAAAAAAAIT A MINUTE, you do figure out how to solve the glowing orb puzzles in Hellheim so you can actually backtrack and get that gnawing thought of your head. Yeah, finally…
Attempt Number 3
Third one’s the charm, right?
So as you may have concluded in the third attempt to create a progression in Runick I combined the previous approaches. Each mechanic was introduced based on the modified Nintendo's philosophy with 4 levels, then the player was given 4 more levels to master it and feel at home with the introduced mechanic. Cuboids of size 1 were first introduced, then spheres of size 1 and the third introduction was the known shapes in different sizes (the pyramid shape was removed altogether, it was a hard decision to make and one to discuss in a future blog). The world part in this attempt was segmented into an introduction, an easy, a medium and hard difficulty world. Worlds are no longer thematic (except you could say the introduction world has the theme of introduction) and are used as a difficulty curve keeping new players interested and curious while veterans felt engaged in later segments of the game.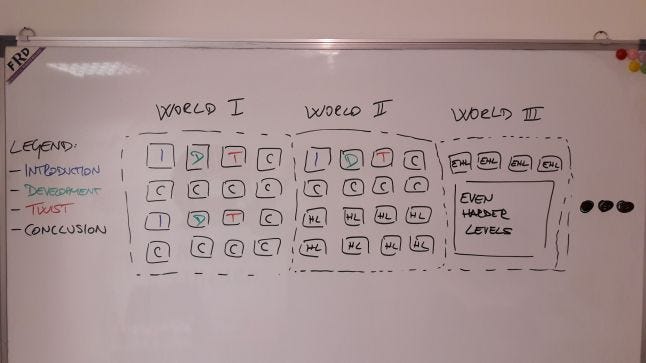
So far, this approach works wonders, keeps the player occupied enough to the point where he finds himself confronted with a new problem, a new mechanic. And later on when he finds out that he learned all that the master can teach him, he seeks harder challenges to prove himself within the new worlds that are provided.
Fillers
"Yeah, I got all five fingers! Three on this hand, two on the other one!" - SC2 Marauder
Or so called filling in the gaps. After I went through all the previous phases there were still some gaps in the flow of the game. Since all of that worked towards creating content and structuring it there no was glue to hold it tightly together. What I mean by that is that some worlds were missing levels of certain difficulties, number of interactions and/or tutorial levels. As was mentioned before the first phase mostly created really hard levels, meaning there were lacking medium difficulty levels and the easiest ones were a rare commodity. In this phase that's exactly the problem I was solving. If I needed a level with a difficulty rating of â…– which is solvable under 20 interactions that's precisely what I tried to create. Another good example would be tutorial levels, the levels that teach you how to play or how to use a certain shape.
Now I didn't have a step by step guide that was used to create all the fillers, but let’s say there was a rule of thumb. The boards for those levels had to be smaller and simpler, I avoided using cuboids bigger than the basic 1x1 size (2x1 cuboids in a level resulted in harder levels by default) and in the end the number of interactions to optimally solve a filler had to be low (lower than 20ish).
Conclusion
“I fear not the man who has practiced 10,000 kicks once, but I fear the man who has practiced one kick 10,000 times.” - Bruce Lee
There is certainly more than one way to do a thing. Although each of those phases occurred naturally to me and I learned through trial and error I believe this experience will help me in future projects. Along with designing the small parts of your game there still is the broader picture that needs your attention. If you managed to come to this part of the blog I’d like to thank you for your time and I hope this blog was interesting and will help you in any of your future game development endeavours.
You can try out the current state of the game on the link below:
https://gamejolt.com/games/runick/332653
TLDR
Runicks level design went through 3 phases:
Experimentation (create a bunch of levels you like, don’t worry about anything)
Progression (define level difficulties of created levels and organize them in a meaningful way)
Fillers (fill in the gaps between levels with new levels that are specifically designed for that purpose, such as tutorials, introductory levels to new mechanics and of certain difficulties)
Sell game, get rich, easy.
Read more about:
BlogsAbout the Author(s)
You May Also Like


.jpeg?width=700&auto=webp&quality=80&disable=upscale)


