Featured Blog | This community-written post highlights the best of what the game industry has to offer. Read more like it on the Game Developer Blogs or learn how to Submit Your Own Blog Post
Procedural Level Generation in Unity for M.E.R.C. (part 1 of 2)
For M.E.R.C. we relied on procedural level generation to add more content and randomness to our game. This article details how we built our procedural level system in Unity and overcame various problems to meet our design goals (part 1 of 2).

Procedural level generation is a great way to create more content and unexpected scenarios within a game. For M.E.R.C. we wanted to create a large set of hand crafted experiences for our story missions but, being a small indie team, we knew we wouldn't have the time or resources to create enough content for such a big game. We also wanted to add randomness and a lot of replayability to the game. Procedural level generation allows us to have a big and endlessly changing world, something that would have been impossible if our small team tried to make it all with individually crafted levels. Using procedural generation allows us to add more content and construct a better user experience for the game. M.E.R.C. is on Steam in Early Access right now so check it out!
What is M.E.R.C.? M.E.R.C. is a real-time squad tactics game. Set in the dystopian future of Neotopia, you control a squad of four mercenaries simultaneously, issuing commands and activating special abilities from a top down view. Each mercenary in your squad has special skills for combat, engineering, and hacking that you’ll need to use in missions. The visuals in M.E.R.C. are reminiscent of Blade Runner with dark rainy slums and city rooftops containing lots of winding streets and neon lights.The story has you entangled between powerful corporations that are warring against each other for control of Neotopia. As mercenaries you are hired to complete various missions for these corporations such as kidnapping competitor scientists or assassinating defecting employees. Every mission you take affects your standing with different corporations and as a result modifies the game world. With all of this in mind, let's take a look at the requirements for our procedural level generation.

Level Requirements
Our levels are set within a maze of city slums and rooftops, but they need specific structure to be enjoyable and interesting to play. We decided to assemble multiple smaller level chunks together to create larger levels for our missions. By doing this we could handcraft interesting and reusable smaller chunks, layer in some procedural randomness and give each level the feel of being handcrafted. To do this, we determined that our procedural levels must:
contain 1 main path
contain 1-3 dead end paths for objectives and loot drops
contain 1-3 shortcuts that act as alternative routes
generate random props and cover objects within each level chunk
spawn enemies based on a "tempo chart"
spawn different types and ranks of enemies based on the mission difficulty
work with Unity's NavMesh system
be deterministic and generate exactly the same across the network for COOP
The above requirements are specific to our gameplay, world, and desired mission lengths. Every game will have its own requirements for a procedural level system. We wanted missions that could be completed in as quickly as ten minutes but could take up to double that time depending on how thoroughly you explore. That meant a bit of variety in the length of the path was also an important consideration.
The biggest challenge for us was how to put all of our requirements together in a way that results in coherent and interesting levels. So how did we do it? If you think of a finished level in your head, with its layout, secrets, tempo, and mission objectives, it can be hard to figure out how to build all of that procedurally. I find it easier if you break it up into layers. Think of a procedural level as something that is built up over multiple passes, with each pass adding a new layer of complexity to the level. Logically, you would start the process with the base layer. In our case this was the layout or path of the level.
Generating the Level Path
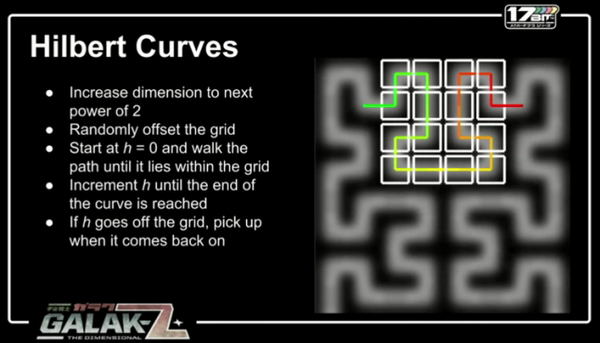
The first problem to solve for our procedural level system was how to generate an interesting main path that includes dead ends and shortcuts. We found our answer in a Unite 2014 talk about Galak-Z level generation from Zach Aikman at 17-BIT (you can watch the full talk here).
Zach’s talk is really interesting and you should watch it, but to summarize: we used a modified Hilbert Curve algorithm to generate our main 2D path. This provides an interesting and unique winding path that is perfect as a starting point for our levels. While the developers for Galak-Z used this to create a 2D side view path for their game, we use it to create a 2D top-down view for ours. Imagine the following image is a top-down view of streets in our game.

(image courtesy of the Galak-Z talk mentioned above)
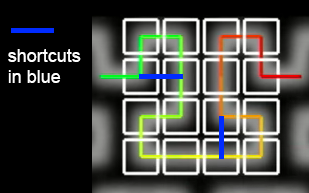
After we generate the main path, we then evaluate all of the valid shortcut map cells and randomly choose to use some. A shortcut won't let you cut across the whole map, but it will let you cut a small distance off the main path and potentially avoid some enemies. We coded in restraints to ensure the shortcuts were not too long or too frequent. When building these shortcuts into our level chunks, we often chose to make them blocked behind a hackable door or requiring some other kind of player action in order to access them. This adds more variety to the level's main path and also provides another way to test the player’s skills.

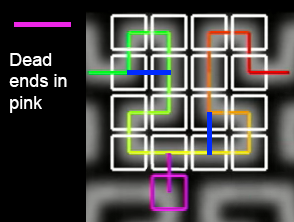
Next, we randomly add side paths with dead ends where no map cells exist. These provide alternate paths that break up the gameplay and offer ideal spots to put loot drops, hidden secrets, and special mission objectives such as Non-Player Characters (NPCs) to find and assassinate. Depending on the mission objectives, we randomly generate one to three dead end paths for each level. Each special mission objective is placed at the end of a dead end.

The idea is that you arrive in the level via a transport ship at the starting map cell where the main path begins. You then navigate your mercenaries through the level and complete your objectives before reaching the end of the main path where you are evacuated and the mission ends. In each level, completion of the mission objectives is required. Mission objectives exist off the main path which forces you to explore the level. Other dead ends are optional and offer secrets and extra loot. This provides a good mix so that our levels can be blasted through if players just want to complete the mission, or can take more time to explore if players want.
Once we have generated the full path with shortcuts and dead ends, we convert it into a list of level chunks to load. Each level chunk is a scene in Unity, so we named each scene with a specific pattern that indicates its configuration. From our generated path, we convert each map cell into a scene name that follows the pattern. This pattern contains the chunk's theme, its connections, and a variation. So following the pattern of <theme>_<main path connections>_<shortcut connection>_<dead end connection>_<variation> a level chunk might have the scene name of: "slums_03_-1_-1_A".
The theme is the visual style for level chunks. All level chunks within a theme must be able to connect seamlessly with any other level chunk in that same theme. For instance, all level chunks marked with the theme "slums" must be able to logically and graphically join to each other via their connections. We also developed a theme called "rooftops" where instead of streets connected together, the tops of buildings are connected by ramps and walkways. Typically all the level chunks within a theme will be the same size. Our chunks are usually around 40x40 units in size.
Based on the structure of Hilbert Curves and our generated paths, each level chunk will have two main path connections, between zero or one shortcut connection, and zero or one dead end connection. A level chunk cannot have both a shortcut and dead end connection as they are never used. Each connection corresponds to an edge of the level chunk and each edge is labelled with a number between zero and three as described in the image below (to label a non-existent connection, like when there is no shortcut, we use "-1").

For instance, a level chunk marked with a main path connection of "03" has a connection opening at the bottom (0) and right (3). The main path connection label is always ordered from smallest to largest (e.g. "03" instead of “30”). It is important to note that, when placing level chunks side by side, the connections do not necessarily have to line up 100% evenly. Adding "jagginess" to some connections adds variety and makes things look less smooth where chunks connect. However, connections must always be lined up in some way to ensure the path connects.
Variations offer the level designer a way to make different versions for the same level chunk. For instance, look at the two variations below labeled "A" and "B" for a "01" main path connection with no shortcut. When generating the level our system randomly chooses one of the available variations for each level chunk, which creates more visual variety.

As we load each level chunk, we move it to its correct offset in the world based on where it belongs in the path. This means chunks cannot have meshes marked for static batching in Unity (because when you try to move them things will break). However, Unity's dynamic batching still works with this system. Below are some example images of randomly generated level layouts (the red areas are shortcuts through buildings, the blue areas are variations of buildings). These are proof of concept layouts without finished art.

I’m happy to discuss any of these subjects in more detail, and would love any suggestions and feedback you might have to offer. You can contact me on Twitter at @velvetycouch
In Part 2 of the Procedural Level Generation in Unity for M.E.R.C. article we will discuss the lighting and NavMesh problems we overcame, and how we spawn NPCs based on a tempo. Part 2 is live now!
Read more about:
Featured BlogsAbout the Author(s)
You May Also Like


.jpeg?width=700&auto=webp&quality=80&disable=upscale)


