

Daily news, dev blogs, and stories from Game Developer straight to your inbox
Sponsored By
Featured Blog | This community-written post highlights the best of what the game industry has to offer. Read more like it on the Game Developer Blogs or learn how to Submit Your Own Blog Post
Optimization tips & tricks for ShiVa
Some of techniques used to develop a high quality game for low spec devices, such as Android: OUYA & GameStick,etc., using ShiVa 3D Engine.
17 Min Read

It's my honor to be here again to talk about the technology I have used in a game, this time it is a 3d platformer game called Kuzu, this time I'm using the engine ShiVa 1.9.2.
Introduction
The first analysis of the Android consoles before we start.
While I was researching for advanced techniques to apply in a game and boost up the efficience (I started some months ago when I just bought the OUYA console), I found some tests already done:
![]()
Our friend Zach from the Shiva community, had made some testing tasks, he had written some efficience tests and benchmarks [github] ; well, he talks about making a game in OUYA running at 60PFS!, in this post.

He also wrote about post-rendering effects, and how there is an easy way to add them but you need to use the off-screen rendering technique (thanks Shaderman).
The results:

After the study of efficience and limitations of the hardware I started to design my game, did some tests by my own
[video 1: stress test with OUYA] [video 2 : testing Shiva engine in OUYA ]
and, full of motivation I started the project "The Legend of Kuzu", my first game for a console. You can see the first 4 levels gameplay of the beta version here,or here:
and get the current version of the game in the OUYA store.
Now, let's go on and start with the howto.
STEPS
The organization of this post follow 3 simple steps:
Optimize models and scenes:
Geometry and skeletons
Materials and Textures
Lighting and Baking
Minimize and optimize draw calls number:
Game Objects
HUD (head ups display)
Effects
A better Game Loop:
AI (scripts)
Levels data: batching, sound and music
Events, animations and cinematics
STEP 1: Optimize models and scenes
Let's take this limitation: a total MAX of 30,000 polys rendering in a frame to have a good framerate. If you are using a single object, it is a nice number, but if you have more than 20 then you are in trouble, so, let's go ahead and reduce the polycount drastically, down to 15k polys.
This measure tell us that we want models very lowpoly, like <1k polys each one for creatures,players and things that moves, so, for the geometry of the level, we have 7-9k polys left. That's our limit. But we want this geometry to live in just ONE object. We can weld the level geometry by two types, colliders and decorations. Other geometry will be in another group, things such as parts of the puzzles: boxes, planes, special objects, etc. or objects for static batching.
It is well know that other engines like Unity can optimized and make the batching process for you just clicking the proper options, but if you don't know how those things works here you have the process.
1.1.1 Geometry
When you have the final model for example in DAE (Collada) or FBX, you can use a software like Ultimate Unwrap 3D - UV Mapping Software ,to reduce the poly count, this software need to first triangulate the mesh you want to reduce and then it shows you a dialog window with the parameters to do the process.
In this sample:

you have 9.9k polys and triangles, that means that the mesh (only one in this model) is already triangulated, so you can skip this step and just go to 3d Tools menu -> poly reduce model, check "Reduce by triangles" and Preserve both vertex and uv borders. Then you can slide the percentage until get a version of the model with much less polys and then weld the model so it will reduce the number of vertices automatically. Remove the bones, lights or cameras, and export the model as Collada DAE, checking the full path for textures,replace special characters, and full ambient options, that will be better for your engine to import and load in runtime.
Here you are an example of the reduction
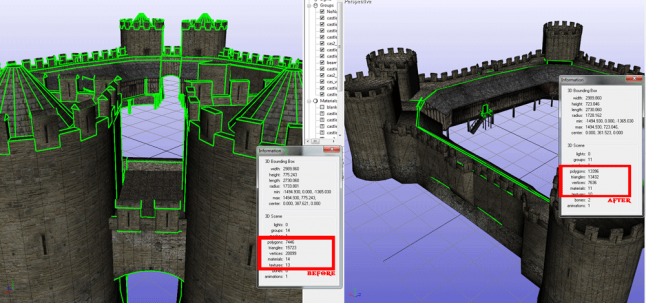
So ,now you have just one optimized mesh (and an optimal number of vertices and triangles) for your level geometry model, and this will consume only one draw call for each material,if you use a normal map for bump or other complex effect it will consumes more drawcalls not just the one of the material, maybe 2-3 more.
1.1.2 Skins
With this software you can also optimize animations, removing useless joints or useless animation keys, etc., then ,in your engine you have to optimize the model skeleton to be accelerated by the graphic card, GPU Skinning, to apply it, once you have imported the model into the engine, select it and then go to Tools Menu -> optimize for GPU skin. This is made automatically in the pro version of Unity engine too.
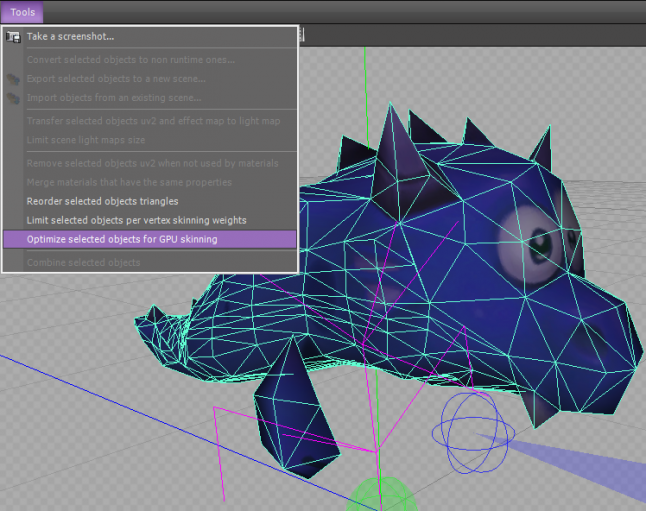
Model by Emmanuel.
1.2 Materials and textures
For normal textures, well, actually, we have a limit here too, 16MB approx per texture, plus another 5.5MB if mipmaps are enabled. Textures resolutions also have to be power of 2: 32x32, 64x64, 128x128...2048x2048 for optimization purposes, no bigger, thanks.
Compression is always a good idea, if you want to go full quality, 2048x2048 textures, ARGB 32-bit format, you can store about 30 in memory, ah, dont use Z-Shell for transparency, address it as repeat (better clamp if you can) ,and try to avoid filtering if it is possible, or at least don't use mipmaps if you are using a bilinear filter for small objects.
Opacity is also a bottleneck, try to ignore it too when it is possible.
Here you have a secret technique to make a "moving" effect for plants and trees, from the master class of Felix Caffier with the Shiva engine.
All the visible models of the level has materials, the way to optimize this is to have one material for all the level geometry, if you can, and do different uv maps ,then mix them by themes, for example, the dungeon, the sands, the beach,etc.
Think about lighting, when a lot of objects with the same material use dynamic lights you are increasing the usage of light computations...
A big number of the materials use textures, if you are using atlas for combined meshes, or different models in your theme, then, a coin for you : )
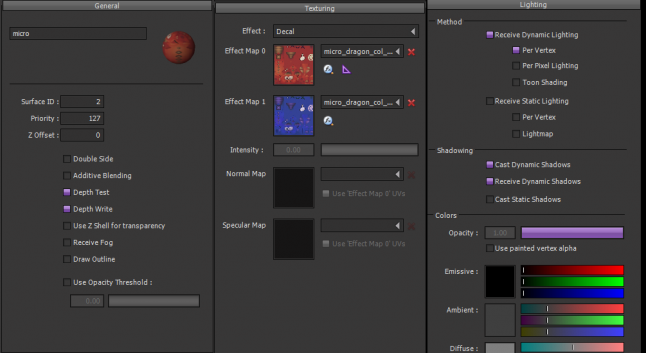
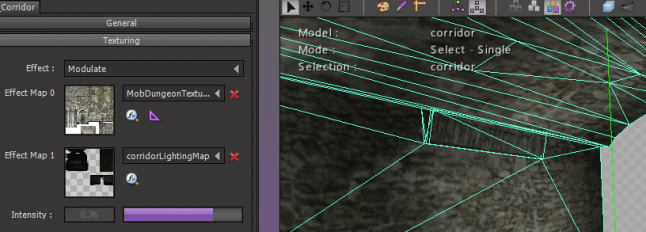
In this material example I'm using a second texture for the morphing of the model, it interpolates in the time, the effect intensity, so it fades from the effect map 0 to e.m.1 in less than a second, giving a nice effect and very optimized (see the game demo video to check). -Thanks Emmanuel-
Use just a single material and texture for all the combined meshes you are a winner in memory consumption, elegance and efficience, but be careful with the lights usage.
This example is a whole level made in the game editor, with the same material and all the meshes combined in runtime:

It has one dynamic light (applied to 3 types of objects only), precomputed static lights for geometry: 1 mesh combined with a result of 6.6k polys in total in screen.
1.2 Lighting and baking
I think it is better to use the dynamics lighting only for important objects, and for others, check the static lighting (lightmap) and calculate the lightmap of each model or all the objects in the whole scene.
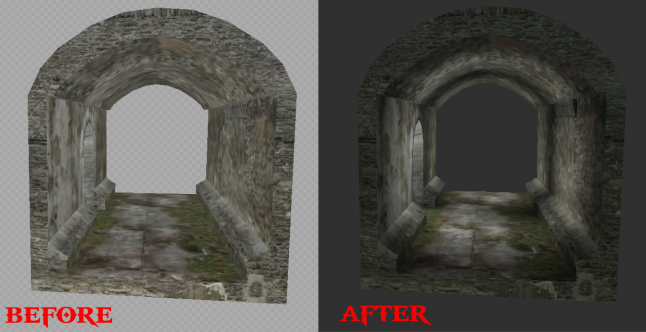
Here is the tutorial I have used.
Options of the sample: Method: lightmap ,direct lighting. Resolution: 4 lumes perworld unit, compression: low (16bpp), sub-sampling: 2, Bias:0.01, clip-distance:10. Activate Back face ray casting, cast shadows , blur result and quantize geometry (3 decimals). You can use ambient occlusion with a quality of 50 and distance 10, activating distance attenuation, and average normals (bias: 0.01, amount: 0.5).

Now you have the lightmap go ahead and save it using the shape attributes -> lightmap -> save as. This is an additional map, so, use something like 128x256 as resolution.
You can make your own baked lightmaps creating the second UV maps in modeling tools like 3d Studio Max, to do this, open the model in 3ds, select the mesh add an uv unwrap modifier, in the parameters use the channel 2 and reset uv, secondly, go to edit parameters : edit uv and use flattern mapping, it creates the new UV2 for lightmaps, to make the baking add the lights (points and focal) , press zero key in keyboard ,it will open the rendering to texture dialog window, here remember to use channel 2 and add a texture in the output panel of lightmap type, then render it, it will write the image

and you have to import it in our lovely engine as an effect map 1 in the material of the object :
or inside the shape lightmap property.
There are a lot of tricks to simulate cool light effects without so much preprocessing, like this glow without lighting ,you can find a lot of stuff like this, for example the projectors to simulate shadows (blob shadows in unity), and so on, you can also use screen space ambient and lighting too (screen space reflections), but if you use these as post-rendering effect ,use the offscreen rendering with 1/16 resolution.
STEP 2: Minimize and optimize draw calls number
2.1. Game Objects
Once we have combined all the geometry of a level ,colliders and not colliders, we have a solid one and only mesh for all the level geometry (if possible) that will collide with the gameplay elements like the player, enemies or just dynamics elements.
This is great because it will be using just one drawcall function to render all the level geometry for each type instead of one for each part of the geometry, so, we are reducing the objects count as much as we can and we will be fine with the drawcall number, but , that's the first huge advance technique you must be using right now, and more, we are going to talk about batching later.
Groups are useful to organize our scene and have quick access to objects from childs to parents, you can also remove a whole type of enemies or puzzles just removing the parent of all of them, and you can use groups to activate runtime combining, for example.
In other engines like Unity you can also have layers and do a lot of great stuff with that, this can be used to optimize things up, for example, deactivating a far (or out of the camera project view) group of objects by its layer, and so on.

In this example (no baking used yet) you can remove all the ghost with just one instruction,or make them follow another target, also with one line of code, we'll see this later in the AI scripts optimizations. I'm using fresnel (like Nintendo in almost every model :) )
To check collisions for a lot of objects, it is better to use simple computations than sensors, because each mob sensor is heavy in memory and requires one or various calls in each frame to check the collisions states, while your home-made function to check if a sphere is inside another is cheaper.
Here you are a video of this gameplay with no dynamic lights:
and here it is another example using dynamic lighting,
check the counters (FPS, DrawCalls)
Take a look to the stats HUD showing the FPS and draw call counters, the memory used is 100MB less than the showed because it is a debug platform (which consumes 100MB RAM).
2.2. HUD: User interface
Be minimalist. Not an advice. It is the best for your game, this is science.
If you have no 2d-batching, then, each 2d object is sucking a draw-call, that means, that each frame your game has to draw something that could be out of the screen or be batched.
The use of a texture atlas is mandatory when we talk about hud's, or sprites...here you have a little guide to do good atlas with a software that is used by Ubisoft. -thanks Julien-
You can make different resolution atlas for different devices screens, 1024x1024 or 2048x2048.
There is no much more to say about HUD optimization ,use it wisely.
2.3. Effects
* Particle emitters
Do you think it is the same to use a complex particle emitter (system) with hundreds of particles than a single spritepack?...well, it all depends ,but size matters :)
You can have a large amount of particles in an emitter, but the size must remain low (scale:1) and it is better if you don't use alpha (when you can).
When using a spritepack makes the game slow it is probably because of the texture size, try to pre-load it and keep it 1024x1024 if you can.
* Trails, and other simple effects are low cost, but keep the segments bellow 1024, steps 0.6, without textures and a short life time...
STEP 3: A better Game Loop
We are in the final step of the optimization loop-process of our game, here we have to detect scripts bottle necks, laggy functions, slow events, and so on, and solve them using a set of common known techniques in computer engineering.

Using the profiler is a key to success, this tool is going to be our new friend :)
3.1. Scripts
Try to reduce the instances of AI scripts. You can do this by using one single AI for a group of objects with similar behaviours, like enemies, barrels or boxes, power-ups, etc.
Once you have designed a common diagram for a specie of objects that needs to follow a behaviour, name it and assign that object an attribute to identify it from the script.
Here you have an example of a 3D Flocking algorithm ,used in my Ludum Dare 28 entry. You have an unique Enemy_AI that handles events for each enemy, you can add a SubEnemy_AI to each mob, but this one has no events, this way you are processing all the movements, collisions and states from one place and you have an optimal functioning in runtime for slow devices such as android consoles.
To make things easier, try to keep things simple, the less AI's used the better, but with limitations of course.
To fast - build use all your cpu's : "ndk-build -j 8" where the number 8 is number of threads ( thanks Zach again).
3.2. Levels data:
Batching: static, automatic
A whole level can be saved into a prefab in unity, a model in shiva, or it can be procedurally generated, you can save a lot of time using noises, random, and other types of generation sources in your algorithm. But ,what happens with the batching process?
First of all we have to take a look at what batching is. An automated process that makes our game faster because of the ability to save resources. Ok, I want that :) , and you can have it, but only if you follow the rules. There is another explication of this in the unity page dedicated to this topic. But if you want to know more, take a look to the static batching in Shiva.
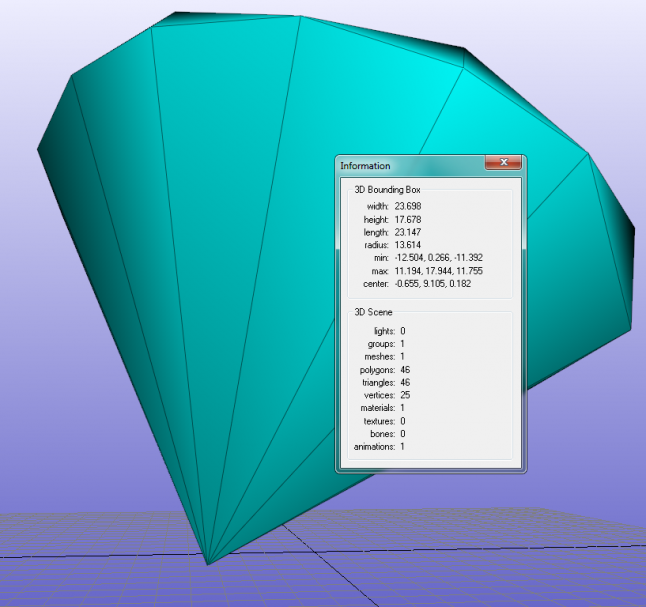
Now you know, that the gems in my game has less than 47polys and 32verts ;)
Here , a toadstool model before and after the poly-reduce tool operation:

If you are going to have a dozen of these mushrooms, you will need to make them to auto-batch, that implies, don't use lighting, AI's, or any other thing withing the mushroom model.
You can also batch sprites, with a tool like this Sprite batcher.
Here it is an example of a large matrix of animated tiles using only 2 draw calls.
Sounds and music
Sounds:
Maximize optimization with a low quality (22Hz even mono) for smartphones, a better one for consoles and tablets, use ogg compression and not too long sounds (2min max), ...
Music:
Be careful when you use buffers, try to follow a rule where the buffer is not empty and it doesnt consume so much resources to get full again to keep playing the music track. When changing from one to another song , use a volume-fade with a tweener command and you are a good game developer ;)
3.3. Events, animations and cinematics
Don't use so much events, functions are better also to control them.
Use GPU for animations, not just model-skin animations, the mesh API is powerfull, if you have models with less than 900polys, why don't you try to make some mesh modifications?.
In the gameplay videos of Kuzu you can see how objects are being "decomposed" in triangles, i'm using the mesh API to create a runtime clone of the object mesh and then with a circular formula of an explosion, make each face to move following a geometric pattern.
You can also, store animations for cinematics as a simple set of instructions in a Lua script, like a path, which the camera follows and states to trigger them, the chunk of bytes of those scripts are low compared to recorded video, that also need to be decoded and buffered...
Remember to clear memory for the whole level group,if you use complex AI's then send them messages to clean memory by itselves.
Well, that's enought for now...
Resume of terms and techniques:
Auto-batching, static batching (no lighting), combine geometry meshes, reduce draw calls, reduce game objects count, set size 1 for models and in textures for particle emitters and trails , static lights (baking), reduce events and ai instances with events/stats/onloop/onenterframe, use atlas for textures and huds, try to not use alpha in materials textures, use compression, power of 2 in resolution for textures, reduce hud components, optimize models skining for gpu, avoid sensors (good use in case you need them), object / shadow / fog activation by frustrum and distance to the camera, use masks / categories for lights, colliders and sensors, use rays instead of sensors.
Follow these rules/advices and you will have a full motion gameplay with a robust/solid FPS rate in devices such as an OUYA or GameStick console or other weak hardware device.
Try The Legend of Kuzu, thanks for reading.
Read more about:
Featured BlogsAbout the Author(s)
You May Also Like


.jpeg?width=700&auto=webp&quality=80&disable=upscale)


