

Daily news, dev blogs, and stories from Game Developer straight to your inbox
Sponsored By
On Making Good Combat Mechanics: Part 1
Combat mechanics are the soul of any action game. This article series will take a practical approach to combat mechanics, looking at our terminology and principles through images of tools that implement them, rather than detached theoretical concepts.
8 Min Read

This post is cross-posted from my blog at http://joesopko.weebly.com/blog
A GIF showcasing mechanics created with the tools explained in this article!

Combat mechanics are the soul of any action game. This article series will take a practical approach to combat mechanics, looking at our terminology and principles through images of tools that implement them, rather than detached theoretical concepts. Not only is this approach more clear, but putting workflow first is a good way to approach any problem. Quality products are reached through iteration, and iteration requires proper workflow.
If you are a player of action games, you intuitively know the importance of responsive controls and balance. For brevity's sake, we will use these intuitions as guidelines that good combat mechanics must:
1) recognize all player inputs and subsequently respond with outputs that change the
gameworld in at least one of the five categories enumerated below,
2) and be balanced against whatever the player fights against.
In order to accomplish these two goals when creating action games, I designed a robust system using Unity’s animation tools to graphically conceptualize and control my combat mechanic sets. Many possible changes can occur when players interact within a game world, so I break down the changes I want players to be able to make into five high-level categories:
1) visual effects,
2) sound effects,
3) attack hitboxes and player hurtboxes,
4A) input windows 4B) that transition into different states,
5) and physics behavior.
Here is a quick peek at one of the graphical user interfaces, showing an example animation of a sword attack while boosting. Generally speaking, it represents a complete frame-by-frame timeline for whichever animation I am currently working on and all of the different elements that the animation affects:
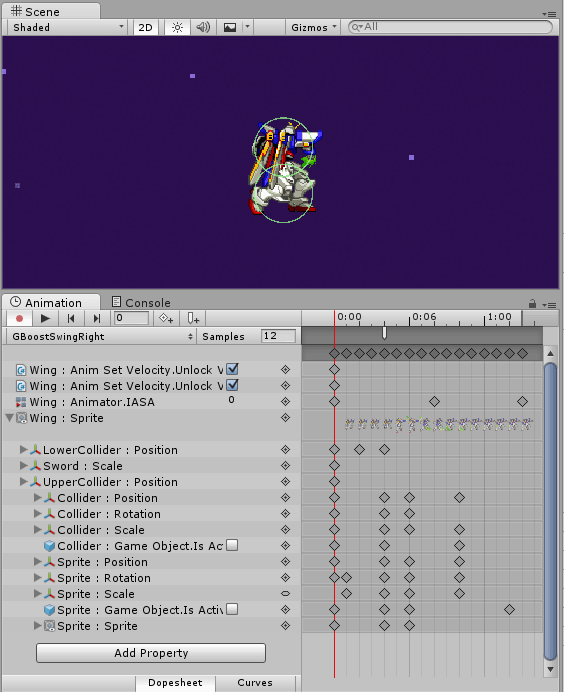
As you may notice there's a lot to process here, however, an important lesson I’ve learned in game development, particularly with smaller teams, is the value of creating a central location for interrelated elements. Imagine trying to coordinate the appearance of a particular sprite; the *woosh* sound of a sword as it is swung; properly lined up and sized hitboxes; and an input option to cancel out of the mechanic that is balanced in all situations; all when each editable element is in a different place! As I hope to show, having a central location to edit all these different characteristics greatly improves workflow efficiency when trying to finely balance all the different changes players inputs can have.
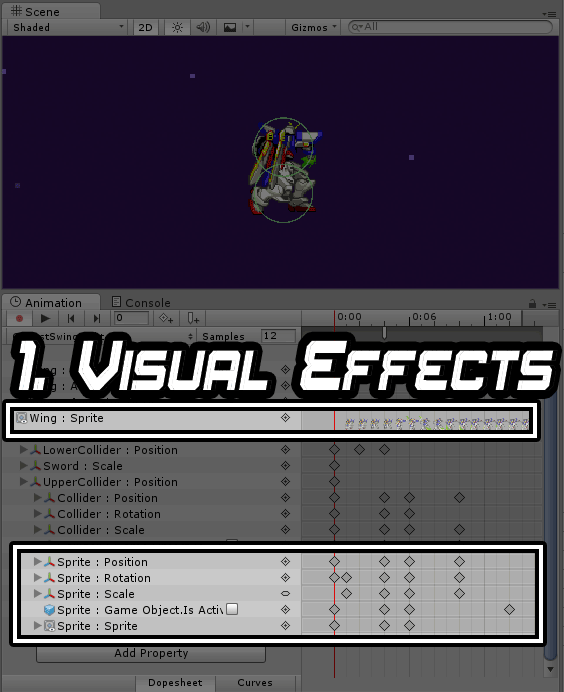
1) Visual Effects
Visual effects must properly communicate hitboxes and behavior. Unity can import a wide array of 2D or 3D assets and any object's position, scale, and rotation can be manipulated via Unity's native gizmos. Notice how despite the simplicity of the animation, many visual effects need to be carefully placed and controlled. Any changes will automatically be recorded on the selected frame as indicated by the vertical red line. Particle effects are also supported but are not used in this example animation. Working by myself, I tend to keep visuals barebones.
2) Sound Effects
Sound effects should also be used to reinforce behavior to the player, for example playing the woosh sound the same frame the hitbox comes out. The SFX is played on the frame indicated by the small tick highlighted below, and the desired sound effect can be selected via the highlighted menu in the bottom right. These are generated via dynamic code generation whenever an audio file is placed into a mechanic's associated folder within our Assets folder.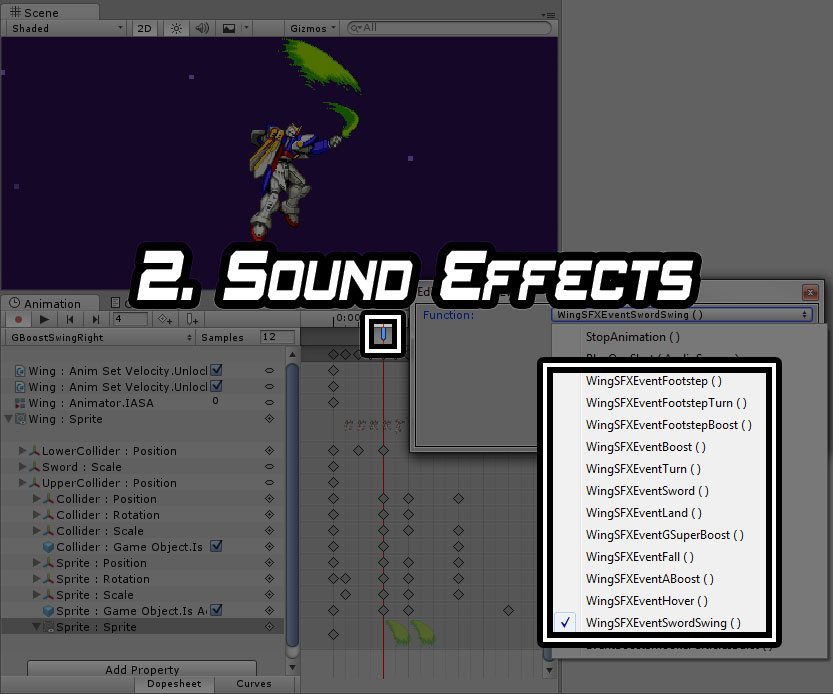
3) Attack Hitboxes and Player Hurtboxes
Visualized by the green outlined geometry, hitboxes and hurtboxes are colliders that are used in taking and inflicting damage. A tag is assigned within a dropbox menu (not shown here) to denote if it is a hitbox or hurtbox. Carefully controlling their position and size is crucial to balancing. Any Unity 2D/3D collider geometry can be placed or modified with gizmos similarly to visual effects. In addition 3D Models that have imported rigs can have colliders attached to its bones, so the designer does not need manually place each collider unless balancing is required.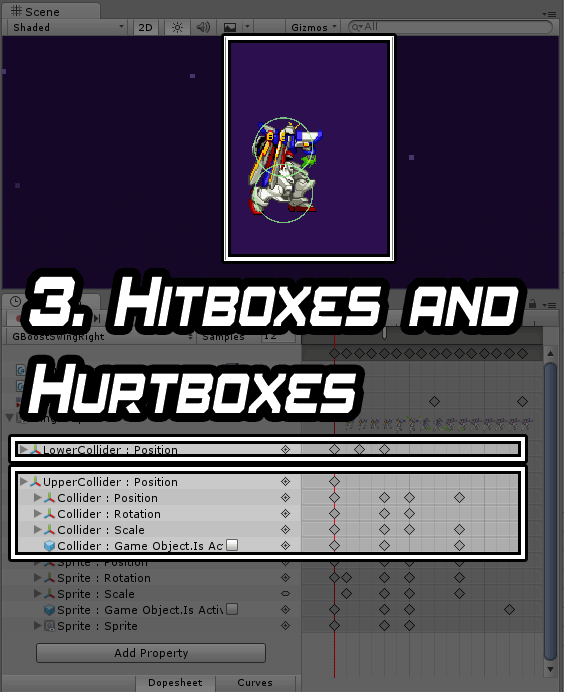
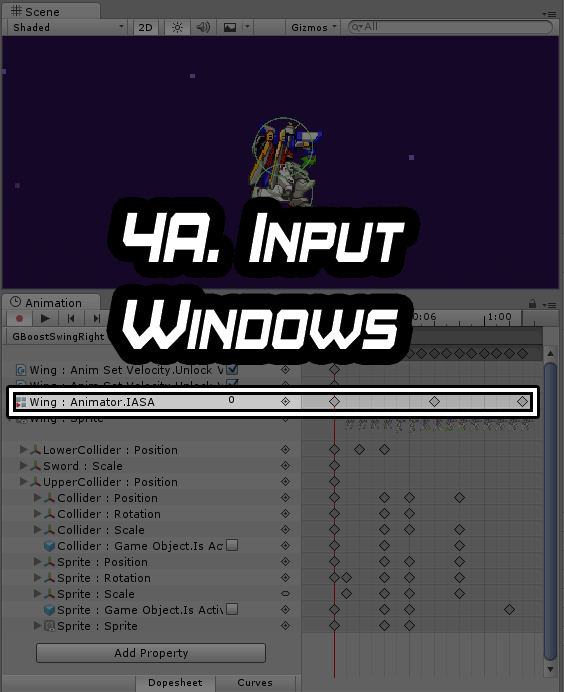
4A) Input Windows
Input windows define when a player's input is acknowledged, a concept that drastically influences a game's feel. I have divided input windows into 3 different types:
1) IASA (Interruptable as soon as), which immediately cancels into the next state upon input,
2) Press Buffer, which listens for a press input during the window and then transitions at the end
of the window,
3) and Hold Buffer, which is the same as a press buffer but additionally requires the player to be
holding the button at the end of the window.
IASA frames result in faster paced gameplay, generally enabling play that results in more actions per minute. Press buffers allow for planning ahead and performing combinations of movements without perfect timing. Hold buffers are similar to press buffers, but are more intentional as the input must not only be pressed, but held. This results in a distinct feel that matches charging moves, such as a spinning sword slash used for killing multiple enemies.
Whether an input window is active and recognizes input is denoted by a float. 0 represents no active window and 2 represents an active window.
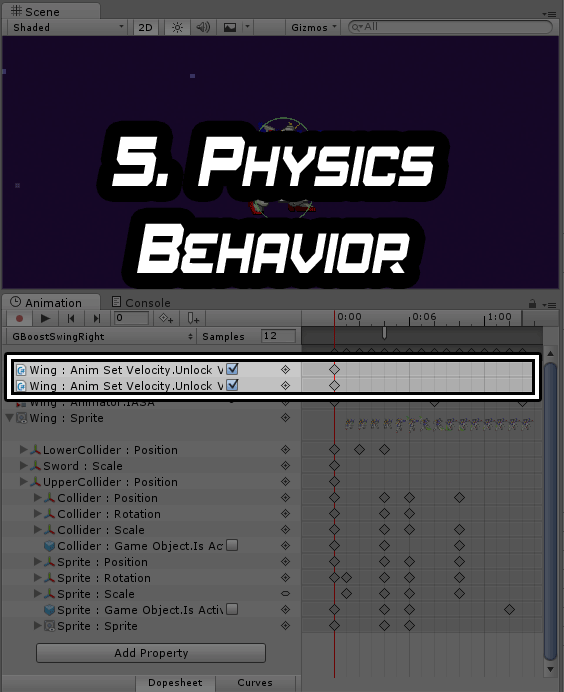
5) Physics Behavior
Physics behavior defines how a mechanic moves through space. I have found that depending on the desired behavior, there are two different ways to conceptualize and control physics behavior:
1) velocity curves
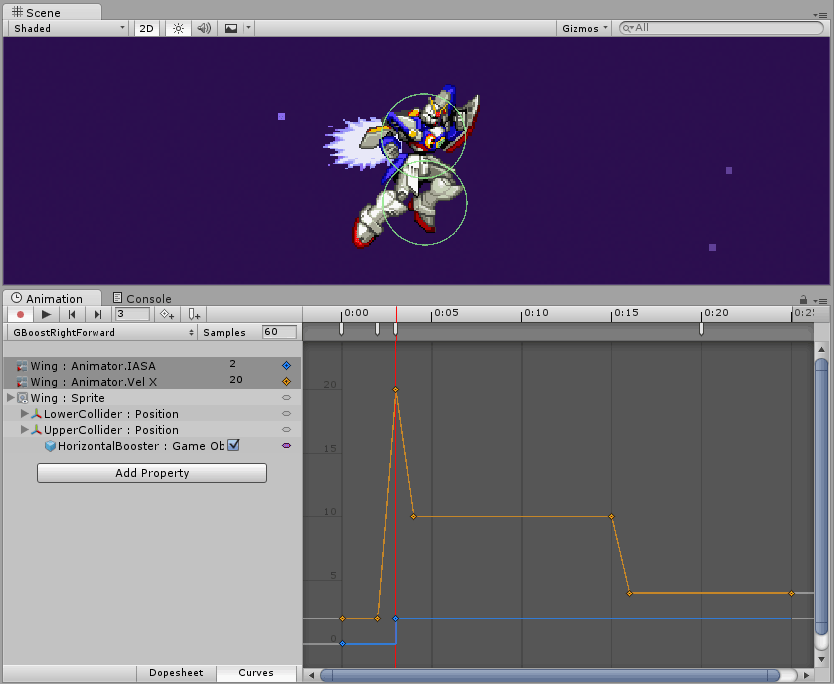
The Y-Axis represents your speed in units per second and the X-Axis represents time in the set sample rate. Here, it is 60 FPS, which is shown to the right of "Samples" in our image.
Velocity curves can be helpful for more complex movements and can also be edited and tested during play to fine-tune a movement.
2) booleans that enable physics control within scripts
In our example, I set the unlock boolean to true to enable physics control within a C# script.
I included the corresponding script for illustrative purposes below, but will not delve further into it until my next article. 
This is the corresponding script controlling physics behavior in our example. My next article will explain this more in depth.
As you can see a lot of data is accessible via the Timeline interface, and you may have previously noticed that number four regarding Input Windows was earlier split into two:
4A) input windows 4B) that transition into different states.
What state an input window transitions into right now is not held within the Timeline GUI but within the script. Until my core mechanic set is finalized, having input windows generic and in code allows me more flexibility. For example, I am able to experiment with different combinations of inputs that trigger a transition depending on the current state, or utilize timers and other variables to influence whether a transition occurs. If I were to have input windows be a single universal condition, I would not as easily be able to experiment.
As mentioned earlier in the article, having all of our data in one interface proves more usable as all our elements would be accessible in one place. At a glance seeing a Boost IASA or a Sword Press Buffer would immediately tell us what that input window is for, and when navigating 50+ unique animations, would prove to be valuable. However this usability comes at the cost of flexibility and scalability, and as such I plan on waiting to pack the transition data into the timeline.
I hope that this practical approach to combat mechanics proves useful to someone. Unity's Animation tools are highly criticized for their usability, but through several automation scripts utilizing C# reflection, dynamic code generation, and a proper perspective, I believe it is a highly usable and intuitive workflow. If anyone is interested in the scripts that make this possible, don't hesitate to contact me!
In my next article I will dive into scripts and the initial creation of a mechanic set which utilizes Unity's Mecanim GUI and Visual Studio.

Read more about:
BlogsAbout the Author(s)
You May Also Like


.jpeg?width=700&auto=webp&quality=80&disable=upscale)


