

Daily news, dev blogs, and stories from Game Developer straight to your inbox
Sponsored By
Making a SEGA Mega Drive / Genesis game in 2019
Nowadays people still create new games for long discontinued consoles: we call it "homebrew." In this article, I'll share my experience of making 3 games for the SEGA Mega Drive / Genesis home console, using modern tools and technology!
18 Min Read

Nowadays, people still create new games for long discontinued consoles. We call it "homebrew." Sometimes, it’s a way to achieve a childhood dream by making a game for the console you had as a kid. But it's also a fun challenge for any game designer or game developer: retro hardware comes with a lot of constraints that will challenge your creativity. In the 90's, those constraints were anything but painful for the professional developers. Today, as we have better tools, making games for those machines is way more accessible.
Last year, I wrote an article about making a Game Boy game. Today, I'll share my experience of making 3 games for the SEGA Mega Drive / Genesis home console. This is arguably the easiest machine to develop an homebrew game for, thanks to the powerful tools we have now. For example, I even managed to make a (very basic) game in 60 minutes, and it does run on the console!
The games
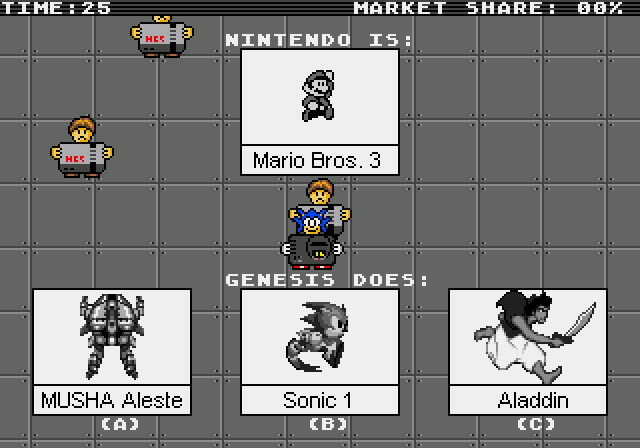
Last year, to celebrate the 30th birthday of the Genesis / Mega Drive, I created a game titled "30 Years of Nintendon't." It's an obvious tribute to the best games of the console and to the aggressive marketing that SEGA used at the time (e.g. "Genesis Does what Nintendon't.")
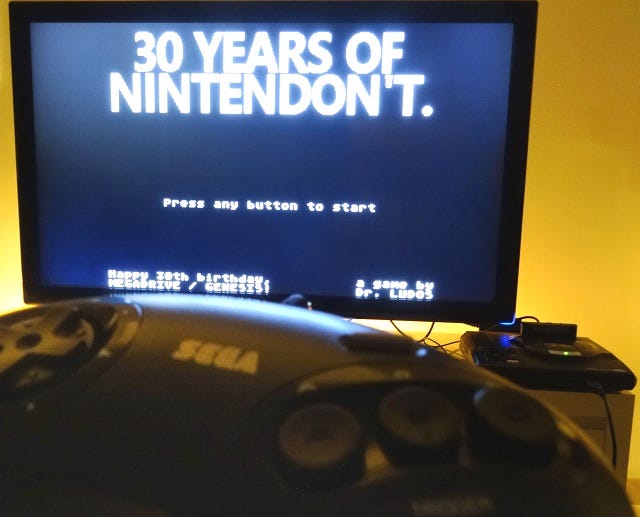
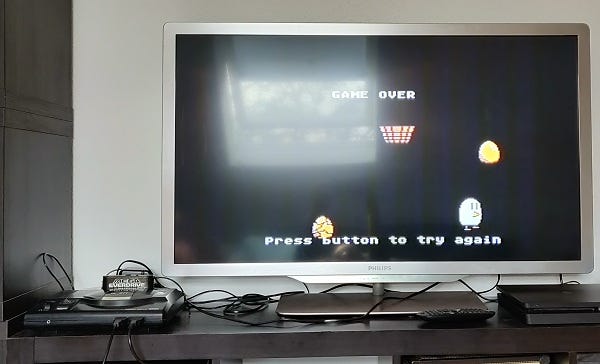
In this game, you play as a SEGA evangelist who must convince players to leave their NES and SNES because the Genesis has better games! The game was released freely online on the 30th birthday of the console, and can be played here: https://drludos.itch.io/30-years-of-nintendont
Since then, I've also created two (small) arcade games for the console:


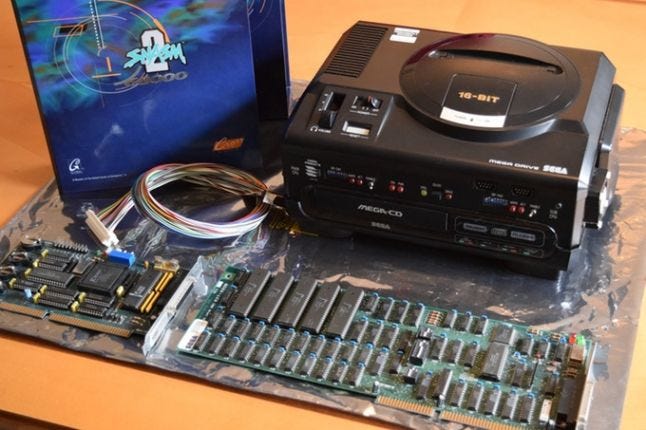
These 3 games are now available in a cartridge published by Cote Gamers:
http://cotegamers.com/shop/en/genesis-mega-drive/43-test.html
It comes with a beautiful plastic box like the actual vintages games, and a series of bonus postcards.

Can I use Unity, Unreal Engine or Godot?
Well, I’m sorry to say that, sadly, those engines can not export games to the SEGA Mega Drive / Genesis (yet?). But fear not, there is another tool that is as useful as those popular modern engines, while being tailored for Mega Drive / Genesis: SGDK. It's a framework allowing you to code for this machine in the C language. It’s way easier and faster to learn than the Assembly language that was mandatory in the 90’s. But it doesn’t stop here. SGDK also comes with several tools to facilitate the creation of graphics and sounds. You can make your visuals with your favorite 2D graphics editor (from Photoshop to GIMP and Asesprite) and they’ll be converted automatically as long as you respect the hardware limitations (more on that later). The same goes for sound: you can create your sound effects as .wav files, and for the music you can use several tracker tools. Last but not the least, SGDK features a powerful "Sprite Engine" that will simplify most of the technical tasks to display moving images on screen. But how "easy" is it in reality? In this article, I'll give you my personal feedback on this point.
Here comes Blast Processing
As any vintage programmer will tell you, writing a program in C instead of Assembly will have a cost on your game performance. And this is true. But the cost varies greatly from one retro console to another. It depends on the CPU they use, and also on the efficiency of modern compilers making code for such vintage processors. Luckily, the Mega Drive / Genesis use a Motorola 68000 processor, that is quite well suited to handle the particularities of the C language. This is especially true when compared to other CPUs like the 65816 of the SNES. While being powerful in its own right, SNES’s CPU has a hard time running programs written in C at a reasonable speed. So, when it comes to homebrew development in C language, "Blast Processing" is no longer a marketing myth but a reality!
How fast can your C code run?
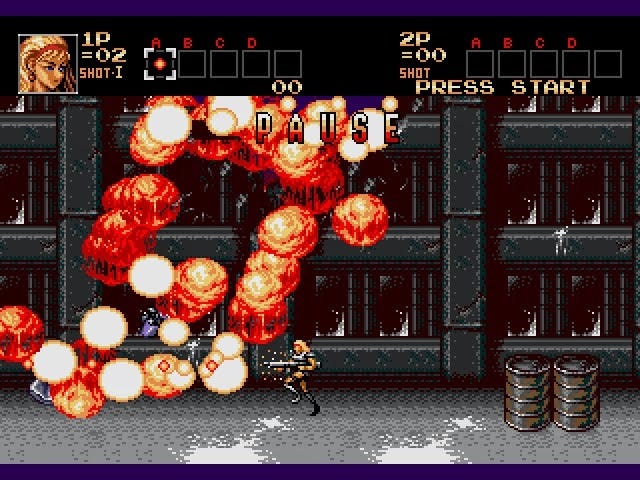
For a personal example, here is an animated GIF of my game MeteoRain, with 45 meteorites sprites moving flawlessly at 60fps:
And here is another example of an explosion made with 40 particles moving at 60fps in Break An Egg:
If we look at vintage games, a good example of the Mega Drive / Genesis CPU power is Contra Hard Corps. While the game was developed in Assembly and not in C (it was the 90’s), developers were able to use the huge processing power to move a lot of sprites on screen, creating memorable bosses with a lot of moving parts and huge explosions.
In comparison, Contra III on the SNES was limited by the power of the CPU, and instead of moving loads of sprites, Konami relied on unique graphical effects that only the SNES video chip can achieve, such as transparency.
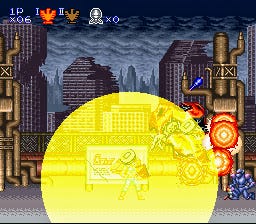
While both games are equally fun to play, they highlight the technical differences between the SNES and the Mega Drive / Genesis quite well. You can read more details about how Konami tailored each game for their respective support in the "Making of Contra III and Hard Corps" article from Retro Gamer #176
Graphical limitations
As processing power is not an issue, the main bottleneck of the Genesis / Mega Drive for homebrew developers are its graphical limitations. And more specifically, it’s the limited number of colors it can display. While the console can generate 512 unique colors in total, only 64 colors can be on screen at the same time. Ouch. For comparison, the SNES can display 256 colors at the same time out of a 32768 unique colors palette. So, graphics artists had to be very talented to make SEGA games look as good as their competitors. And on many occasion they did. A lot of vintage Mega Drive / Genesis games look beautiful despite these colors limitations, such as Comix Zone, the Story of Thor, Streets of Rage II, Ranger-X, Gunstar Heroes, Sonic 1-2-3, etc.
Comix Zone (1995)
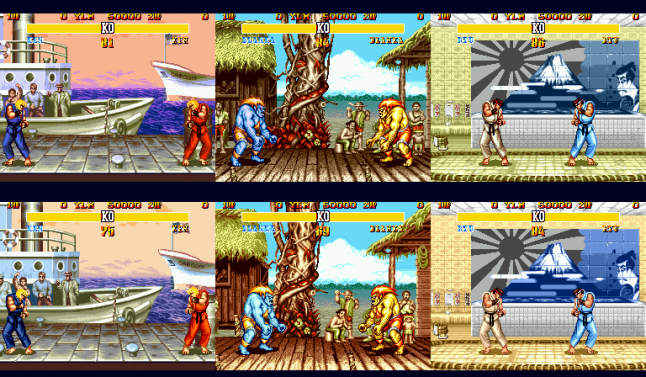
But on other occasions, Mega Drive / Genesis games would look quite bland compared to the SNES versions. One of the most famous example is Street Fighter II’, where the colors limitations of the console really show themselves:
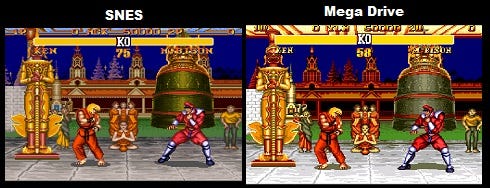
Making a good use of the limited palettes available (4 palettes of 16 colors for the Genesis vs. 16 palettes of 16 colors on the SNES) was a real challenge for the developers, who usually had a very limited time to complete their projects. Nowadays, some talented members of the SEGA community are able to fix some games to improve their color use. For example, Gabriel Pyron is doing wonders on games like Castlevania Blood Lines, Golden Axe, Outrun or the aforementionned Street Fighter II’:
(Top line is original colors palette, bottom line is modified colors palette by Gabriel Pyron)
With that in mind, you can use your favorite graphics program to make your images as long as you are very careful when picking colors! If you don’t match the actual 512 colors palette set in the hardware, it’s not an issue: SGDK will automatically convert your image to the Mega Drive / Genesis palette. But when it comes to the total numbers of colors used and displayed on screen, you are on your own!
Making things move
To display something on screen, you first have to copy the graphical data from the ROM to the video RAM. Indeed, the graphical processor doesn’t have a direct access to the ROM data, but it’s able to read data from the RAM. So, to make the background or the animations of your sprites change over time, you have to regularly copy new data from the ROM to the RAM. And the total amount of video RAM (VRAM) available is limited: 64KB. It’s not that much compared to game ROM sizes ranging from 512KB to 8MB.
Bottleneck #1: VRAM transfer
If you are making a very tiny game with few graphical elements, you can simply load all of them at startup once and for all. But most games need to have the graphical data in VRAM constantly updated to show a lot of different animations. And that usually means a lot of trouble!
Indeed, the amount of graphical data that you can send from the ROM to the VRAM each frame (i.e. 60 times per second) is limited. To be exact, it’s 7524 bytes per frame, so around 7KB. When you want to display huge animated sprites in addition to animated backgrounds, like in Street Fighter II’, you will regularly struggle with this limitation. And that’s only the first issue.
Bottleneck #2: Sprites limitations
With 8/16 bits consoles, another difficulty lies in the total number of sprites the hardware can display. Usually there are two limits: one for the total number of sprites on screen, and one for the total number of sprites on the same horizontal line. For 8-bits consoles like the NES and the Master System, these limits are harsh: no more than 8 sprites per horizontal line, and a total number of 64 sprites. Does it means that we can display 64 times Sonic or Mario on screen? No, here we are talking about "hardware sprites", that are smaller than what we would usually call a sprite. Here is an example from Super Mario Bros on NES, were several 8x8 pixels large hardware sprites must be used to display a single "Mario sprite."
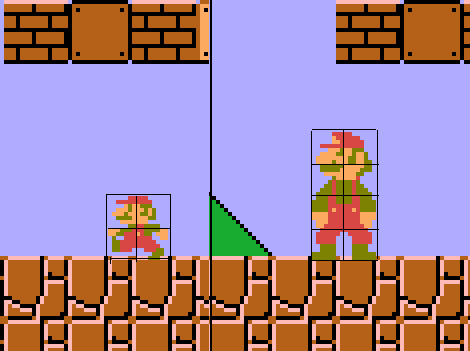
(source: https://nesdoug.com/2018/09/05/06-sprites/)
With the 16 bits consoles, sprites limits were hopefully relaxed a bit. For the Mega Drive / Genesis, you can display 80 hardware sprites in total. But a single hardware sprite can be as large as 32x32 pixels (compared to 8x8 pixels previously). Here are some "hardware sprite" cutting examples on the Mega Drive / Genesis. Did you notice that Sonic is displayed with 2 hardware sprites only, while 8 sprites were required for Mario on NES?
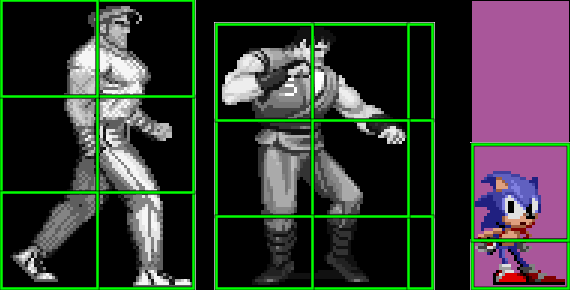 (source: https://www.patreon.com/posts/new-resource-and-26847248)
Bottleneck #3: Sprites priorities
As if that is not complex enough, the Mega Drive / Genesis has another specificity: the sprite chain. When two sprites overlap, the console need to know which one to display on top of the other. On the Master System and on most Nintendo consoles (NES, Game Boy, SNES), the sprites are defined in a big table, and their order in the table is used to set the display priority. No need to say that’s it’s a quite complex tool to use, as you have to constantly redefine this big table to modify sprite priorities.
On the Mega Drive / Genesis, SEGA used a more flexible and simple system. Like for the other consoles, all the sprites do have an index number in a big table, but it’s no longer used to set the sprite priority. Instead, each sprite holds a reference to the next sprite that will be displayed. In the end, the console create a chain of sprites, starting with sprite 0. Each sprite only knows the one that comes after itself. That way, you can more easily modify the sprite priorities, without having to reorder all your sprites in the big "sprite reference table." But to be honest, even if it’s easier to use, it’s still an annoyance when you are making a game where sprite priorities change often, for example in a beat’em up.
The "easy" way: SGDK sprite engine
Displaying moving sprites and scrolling backgrounds with those bottlenecks is quite a challenge. All developers from the 90’s struggled with it, and many homebrew developers still do. For example, Matt Philips released the brilliant Tanglewood game in 2018, that he created using 90’s tools only. He programed the game in Assembly language, and used an official hardware development kit designed about 30 years ago. It was a deliberate choice on his end to fully experience the vintage game development method.
But for people not as skilled nor as patient as Matt Philips, modern tools will hopefully lessen the annoyance of the technical hardware limitations. We already evoked that the C language is usually easier to use than Assembly. We can also mention that using an highly-accurate Mega Drive / Genesis emulator, such as Blast’em, in combination with an Everdrive Flash Cart to test on real hardware makes developing a game painless compared to using an old hardware In-Circuit-Emulator powered by a set of DOS-based tools. But once again, the main gift that modernity brings to the table is called SGDK.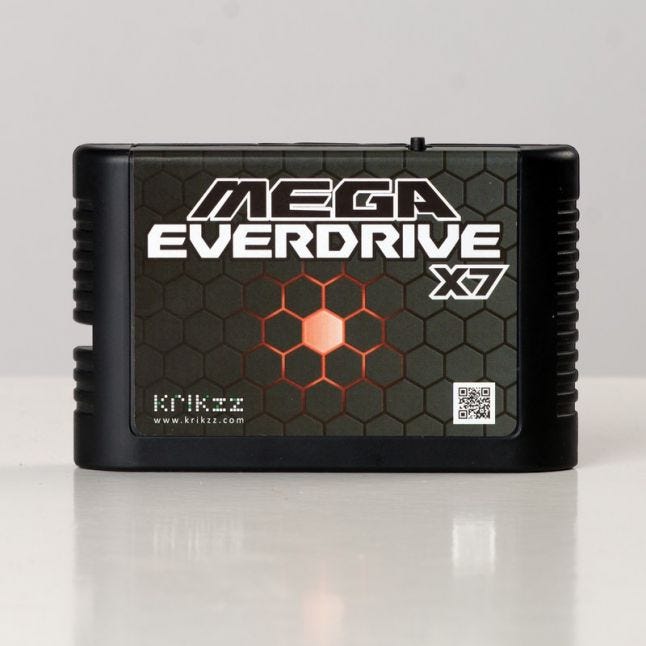
Put your game on a SD cart, insert it into a Mega Everdrive, and you can test it on real hardware!
Indeed, among all the other features, SGDK also comes with a powerful "Sprite Engine" that will make your life simpler. It’s a set of functions to handle sprites display like you would do in a modern framework. For starter, you no longer need to worry about the number of hardware sprites required for each animation frame: SGDK will automatically do it for you. Then, when it comes to sprites priorities, you don’t need to manually define the sprite chain, as SGDK will do it for you using a simple "sprite priority" value that you can assign to each sprite, like in any modern framework. Last but not the least, SGDK also handles all the VRAM transfers AUTOMATICALLY! Yes, you’ve read that right, with the Sprite Engine you don’t need to care about the VRAM at all! You can simply tell SGDK to display "animation X on sprite Y", and it’ll do all the technical and complex work for you. If you ever had to handle such things manually, this feels like magic, pure and simple!
SGDK’s Sprite Engine feature alone is what makes the Mega Drive / Genesis the easiest retro consoles to make games for, especially if you have some experience with game frameworks on modern platforms. SGDK is free and open source, but if you want to help its author Stéphane Dallongeville keep making retro magic, you can support him on Patreon: https://www.patreon.com/SGDK/
Audio
Audio on retro hardware is also a real challenge in itself, and each console is quite different in this area. For the Mega Drive / Genesis, you have a Z80 processor dedicated to this task, as it’s directly connected to the audio hardware. So, to make sound and music on this console you first need to write an "audio driver": a program for the Z80 processor. Back in the 90’s, each game studio developed its own audio driver, and customized it for each game. In the late commercial life of the console, some standardized drivers appeared, such as Sega of America’s GEMS, used in about an hundred of games from western developers.
Making good audio on 8/16 bits consoles is not only a matter of musical skills, but also a matter of programming skills! Some games with good music or sound effects were butchered by a bad audio driver. The most famous example is, once again, Street Fighter II’. The audio driver from this game suffers from bugs that distort all the voices samples in the game. Many years later, Stéphane Dallongeville (SGDK author, he’s a wizard, remember) reverse engineered this audio driver and fixed its bugs. As a result, you can now play Street Fighter II’ with crystal clear "Hadoken!". Here is a video where you can hear the difference:
Let’s go back to homebrew development, and our beloved SGDK. It comes with a various selection of audio drivers, depending on what you need to do in the game. For example, you have the PCM driver, that can play a single sound effect at once in very high quality (e.g. voice samples). But you also have the XGM driver, that can play a music track + 4 sound effects at the same time. The best feature is that you can switch the audio driver you use during your game, depending on your needs. For example, in 30 Years of Nintendon’t, the voices samples from the title screen and game over screen are played using the PCM driver for higher quality. But, during the game, as I needed to have several sound effects playing at the same time, I used the XGM driver.
Regarding the assets themselves, you can use modern tools to create them. For sound effects, as I mentioned previously, you can simply use .wav files that will be automatically converted in the right format. For music, the reference tool is Deflemask, a tracker that can create music for the audio hardware found in several 8/16 bits consoles. I don’t have much experience to share with you about music creation, as the songs I used for my games came from hugely talented chiptune artists: Minerscale (Break An Egg) and Warlord (MeteoRain). They both used Deflemask, and exported their creation to the VGM format that SGDK can convert for use with its own audio drivers.
Making a Mega Drive / Genesis game in 60 minutes? Challenge accepted!
Game Jams are an excellent way to exercise your game design and game development skills: How good a game can you create from scratch in a limited time? (usually 48h or 72h).
Time-wise, the most brutal jam ever is arguably the 0h Game Jam. As the name implies, it takes place during the Winter Time Shift (Day Light Saving Time) each year. You start making your game at 02:00 during the time-shifting night. After working hard for 60 minutes, you release your game online at the very moment your clock moves back from 03:00 to 02:00. Last year, I decided to join this jam. Having just completed "30 Years of Nintendon’t" I already had some experience in making a Mega Drive / Genesis game, and a lot of appreciation for SGDK simplicity. But could SGDK make it easy enough for me to make a 16 bits homebrew in 60 minutes only? Here’s the answer:
60 minutes of work
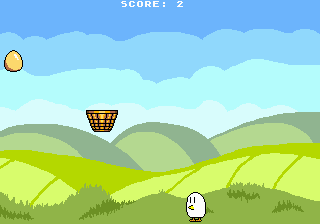
Let’s be honest, the result is far from mind-blowing. The game balancing is awful and there is a huge bug in the random generator that makes the game unbeatable after the 5th egg. Also there is no background image, no sound, etc. But it is a new Mega Drive / Genesis game, created from scratch in 60 minutes, that does run on the actual console. I don’t know for you, but for me it’s already some kind of achievement!
Moreover, as the core gameplay idea had some potential, I kept working on the game for many more hours. I ended up with a quite fun arcade game that you can play here. It’s also available on the 30 Years of Nintendon’t cartridge alongside a third game unique to this physical release, MeteoRain.
Many hours of additional work!
From homebrew to indie
Although homebrew is usually a niche for hobbyists (like me), some consoles are still a viable commercial platform for indie studios today. Two recent games are a perfect example of this. On one hand Tanglewood was fully developed in Assembly like in the 90’s, making the end result even more impressive. On the other hand, the equally awesome Xeno Crisis was developed with SGDK, taking full advantage of the comfort and ease that modern tools brings to the table.

Tanglewood (2018)

xeno Crisis (2019)
So, if you enjoy retro games, why not make your first Mega Drive / Genesis game today?
After all, SGDK in only a click away: https://github.com/Stephane-D/SGDK
Closing words
In conclusion, I hope you enjoyed this article about making 3 games for the SEGA Mega Drive / Genesis with today’s technology. If you want to play my games on your own console, or simply support my work, you can buy a beautiful boxed cartridge release of my games from my publisher Cote Gamers: http://cotegamers.com/shop/en/genesis-mega-drive/43-test.html
If you’re only interested in digital release (i.e. ROMs), you can find all my retro games here: http://drludos.itch.io/
If you enjoy my work and can afford it, you can support me financially on Patreon. My games usually end up being released as freeware online, while some of them are also sold on actual cartridges. By supporting me on Patreon, you'll also gain an unique access to the beta versions of my games, and even to the various prototypes I create (including canceled projects).
If you simply want to be notified of my latest games and articles releases, you can sign-up to my newsletter. I only use it to announce games and articles releases, so except about one email every 1-2 months at maximum.
Read more about:
BlogsAbout the Author(s)
You May Also Like


.jpeg?width=700&auto=webp&quality=80&disable=upscale)


