Daily news, dev blogs, and stories from Game Developer straight to your inbox
Sponsored By
Let's Make a CSS Coding Game
Whether you're curious about the inner workings of web coding games like Flexbox Froggy, or want an eye-catching addition to your web dev portfolio, I'm here to walk you through making simple CSS coding game I call nth-charge.
8 Min Read

Whether you're curious about the inner workings of web coding games like Flexbox Froggy, or want an eye-catching addition to your web dev portfolio, I'm here to walk you through making simple CSS coding game I call nth-charge. In this game, players use the CSS selector :nth-child() to recharge depleted phone batteries! (If you need a refresher on :nth-child(), check out the entry on MDN Web Docs.)
I'll cover some unique design decisions to consider when it comes to coding games, and gotchas to avoid based on own my experiences making HTML, CSS, and JavaScript games at Codepip. By the end, you'll have everything you need to put your own spin on a CSS coding game
Check out the demo of the finished game here.
The High Concept
Creating a coding game is a tightrope act of balancing education with entertainment. An immediate way to boost the fun factor is by setting the game in an engaging context with the aid of visual design and storytelling. And for that, you'll want to figure out a high concept.
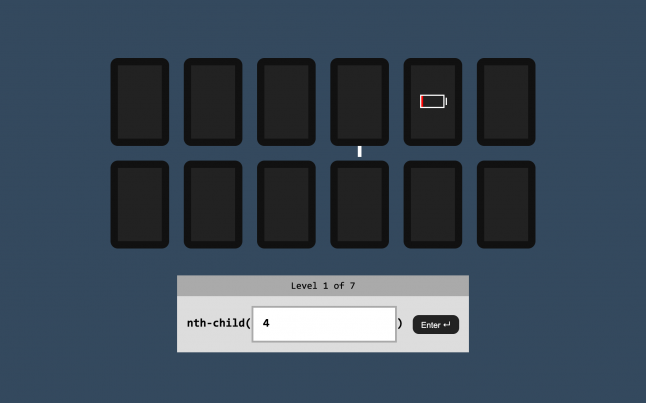
Our game's high concept is that players wield the power of CSS to recharge phones with the dreaded low charge indicator. The player will be presented with a row of 12 phones. On each level, specific phones will display a low-battery indicator. The player must select only these phones by entering the correct arguments for nth-child().
It's a simple, silly concept. Yet, it's a vast improvement over just boxes and text.
What makes for a good concept? Perhaps one that introduces a new CSS feature that many developers haven't been exposed to yet, or one that trips up many beginners. Or one that you want to familiarize yourself with more deeply. Bonus points if your concept is highly visual and interactive in nature.
The Gameplay Loop
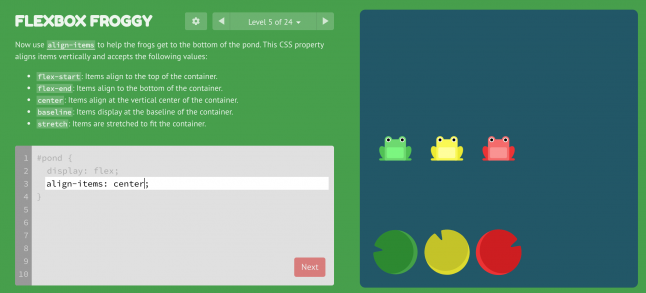
Though CSS coding games take many forms, we'll be making a game like Flexbox Froggy.
At its core, in this genre the player progresses through multiple levels where they're asked to position or style HTML elements in a certain way. By inputting the correct CSS code, they complete the level.
As the player advances to the next level, the loop starts all over again. Later levels add new concepts and increased difficulty, shaping the learning curve.
Let's implement this gameplay loop using JavaScript. We'll be coding three main functions: one that initializes the game when it's first started (init), one that loads a level (load), and one that checks the player's answer (check).
Implementing Levels
When it comes to making levels, one big decision is whether to go with a traditionally-designed versus procedurally-generated approach.
In the traditional approach, you "handcraft" each individual level, which can be as simple as storing each level's configuration in a JSON file.
In the procedurally-generated approach, you devise an algorithm that spits out an endless variety of levels. The tradeoff here is that the procedural approach is more difficult to implement and balance, but offers more gameplay content.
For our game, we'll take a traditional approach to keep things simple. We'll design seven levels that require the following solutions.
Level | Solution |
|---|---|
1 | 5 |
2 | n |
3 | even or 2n |
4 | 3n |
5 | odd or 2n+1 |
6 | n+6 |
7 | -n+3 |
Go ahead and create a levels.json file with the following content, which will be used by the main app:
{
  "levels": [
    ["5"],
    ["n"],
    ["even", "2n"],
    ["3n"],
    ["odd", "2n+1"],
    ["n+6"],
    ["-n+3"]
  ]
}
Initializing the Game
In our initialization function, we'll load the level data from a JSON file, grab the first level, and then tell the game to load the first level.
We'll also set event listeners to a text input field and button, which the player can press return or click respectively to submit their answer and get it checked.
function init() {
  fetch('./levels.json')
    .then(response => response.json())
    .then(data => {
      state.levels = data.levels;
      load();
    });

  document.querySelector('#input').addEventListener('keypress', (e) => {
    if (e.key === 'Enter') {
      check();
    }
  });

  document.querySelector('#button').addEventListener('click', (e) => {
    check();
  });
}
We also make reference to a state object that stores the level data and keep track of the current level.
const state = {
  levels: [],
  current: 0
};
The HTML document for the game, including the input field, submit button, and phone elements, looks something like this:
<!DOCTYPE html>
<html>
<head>
  <meta charset="UTF-8">
  <meta name="viewport" content="width=device-width, initial-scale=1.0">
  <title>nth-charge</title>
  <link rel="stylesheet" href="styles.css">
</head>
<body>
  <div id="container">
    <div id="phones">
      <div class="phone"></div>
      <div class="phone"></div>
      <div class="phone"></div>
      <div class="phone"></div>
      <div class="phone"></div>
      <div class="phone"></div>
      <div class="phone"></div>
      <div class="phone"></div>
      <div class="phone"></div>
      <div class="phone"></div>
      <div class="phone"></div>
      <div class="phone"></div>
    </div>
    <div id="editor">
      <span>nth-child(</span>
      <input id="input" type="text" autofocus>
      <span>)</span>
      <button id="button">Enter ↵</button>
    </div>
  </div>
  <script src="script.js"></script>
  </script>
</body>
</html>
Loading a Level
The initialization function above loads the first level by calling load. Let's write that function next:
function load() {
  document.querySelector('#input').value = '';
  document.querySelectorAll('.phone').forEach(phone => phone.classList.remove('low');

  const solutions = state.levels[state.current];
  document.querySelectorAll('.phone:nth-child(' + solutions[0] + ')').forEach(phone => phone.classList.add('low'));
},
We reset the previous level by clearing the input field and removing any classes that have been added to the phone elements.
Next, we grab the solutions for the current level, for example 5 for the first level. We combine this with :nth-child() (for example, .phone:nth-child(5)) to select our target phone(s). We add a low class to these phones, which we'll use to style a low-battery indicator. This gives the player the necessary information to play the level.
Checking the Answer
Finally, when the player submits their answer, we have to check whether it's correct or not. First, we grab the player's answer from the input field, stripping out any spaces. Next, we check if the array of solutions contains the answer. If so, the answer is considered correct.
function check() {
  const value = document.querySelector('#input').value.replace(/\\s/g, '');
  const solutions = state.levels[state.current];

  if (solutions.includes(value)) {
    // Correct
    if (state.current < state.levels.length - 1) {
      state.current++;
      game.load();
    }
  } else {
    // Incorrect
  }
}
There's one more check if another level exists. If so, the game advances to the next level.
One thing to watch out for when it comes to checking answers in a coding game is that one level can have many potential solutions. An answer can be formatted in different ways, like with differences in whitespace. Multiple solutions can also be correct, as in the case of even versus 2n. Even answers you might not have accounted for may be perfectly valid, such as 2n+0 or 2n-0.
With a limited number of solutions, it may be possible to list all possible permutations to check against, or come up with a regex formula that matches them all.
A more robust and comprehensive approach, however, when dealing with CSS is to apply the solution styles to one set of elements, and the player's answer to a set of identical "shadow" elements. Then you can use methods like Window.getComputedStyle() or Element.getBoundingClientRect() to obtain the raw computed values of the elements' styles for both the solution and answer, comparing them for correctness.
This is an approach I've often taken. For instance, in the case of Flexbox Froggy, where there's endless ways to combine the different flexbox properties, I compare the computed values for the frogs with those of the lily pads.
Putting It All Together
Combining the HTML, JavaScript, and JSON snippets above, you have the skeleton of a fully-functional coding game. It's stripped down for the sake of understandability, but with a dash of CSS to give the interface some style, it's ready for release.
Here's a demo of a slightly dressed-up version of this game, and the source code on GitHub for you to download and tinker with. In this demo, I've added more feedback elements, which are so critical for the player's learning and enjoyment. For example, the game displays the current level, gives visual feedback based on the player's inputs, and rewards the user with a win screen at the end.
This demo ultimately evolved into a full-fledged game called Nth Cart:
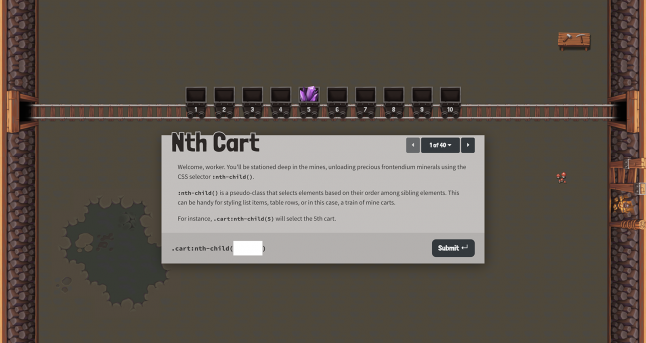
Try adding your own embellishments. Possibilities include adding instructional text to each level, a menu to navigate levels, a score-keeping mechanism, sound effects, and saving state between play-throughs.
Or you can take it even further, remixing what we've created together today for a whole new game concept, perhaps touching on an entirely different aspect of CSS. Take inspiration from other games, whether they're coding games (CSS Diner for another example) or your favorite video games that have a unique aesthetic or interesting mechanic.
It doesn't necessarily take many lines of code or a ton of dependencies to get there, as you can see. Creating your own CSS coding game is within your reach. So try creating a coding game for yourself, and putting it out in the world for others.
Read more about:
BlogsAbout the Author(s)
You May Also Like


.jpeg?width=700&auto=webp&quality=80&disable=upscale)


