


Trending
Opinion: How will Project 2025 impact game developers?
The Heritage Foundation's manifesto for the possible next administration could do great harm to many, including large portions of the game development community.
In each Games Demystified column, developer Jeremy Alessi unpacks the technique behind a game's signature gameplay -- complete with a demo -- and this time, he's be covering the Tony Hawk-esque rail grinding of Dissidia: Final Fantasy.

[In each Games Demystified column, developer Jeremy Alessi unpacks the technique behind a game's signature gameplay -- complete with a demo. Previously, he's covered gravity as applied in Super Mario Galaxy, Einstein-Rosen bridges in Portal, and the tiny-big world of Rolando. This time he's be covering the light-rail grinding of Dissidia: Final Fantasy.]
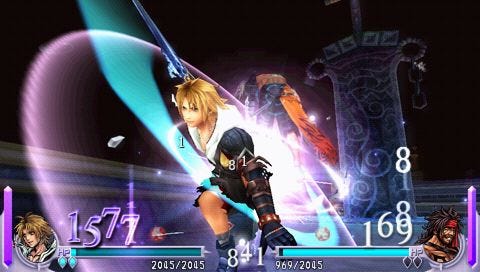
Dissidia: Final Fantasy is a far cry from typical Final Fantasy games because it is action-based. Taking the battles into real-time is one thing, but including an extreme sports-like element such as rail grinding really distinguished this version of Final Fantasy from previous efforts -- or any other fighting game for that matter.
The result is a digitally delicious dessert that blends Final Fantasy, Street Fighter, and Tony Hawk's Pro Skater into one decadent diversion.
There are so many unique gameplay elements present in this title that it was actually a bit difficult to decide what gameplay concept to cover.
In the end the light rails and their physics based mechanics grabbed my attention and are what separated this title from other RPG/Fighting games.
The concept of grinding over low friction rails is an old one. In fact, people have used rail transport since the sixth century B.C. The Diolkos Wagonway transported boats across the Corinth isthmus in Greece.
This early track system operated for 1300 years, stretched for 3.7 miles, and allowed slaves to push trucks along grooves of limestone, which formed the basis of the railway.
The trucks of this particular railway carried boats across the Corinth isthmus. This last fact highlights the basic premise of a rail system -- to reduce friction and allow for either quick or massive transport.

Obviously, the rails in Dissidia Final Fantasy are used for speed. Whether you need to escape a grueling attack or you just need to race across the map to collect an EX Core item, the rails are there to allow fast, accurate transport.
The question, as always, of course, is how can we simulate this precise method of transport within the world of a video game?
The answer is something called a spline path. There are numerous ways to create a spline path. In this edition of Games Demystified we'll break out of the purely algorithmic nature of the series and look at this mechanic from both the art and programming perspectives.
Following a spline path is a fairly trivial task algorithmically. The base concept consists of a series of nodes or points in 3D space. These points are then linked together sequentially so that an object may traverse them from point A to point B.
Of course, a character or object must be able to follow the path even if the total structure of the linkage isn't linear, like the curvy light rails in Dissidia.
There are numerous methods for spline path traversal. Dissidia Final Fantasy appears to use a very direct linear method. Although the rails in Dissidia are curved, the character is rigidly fixed to the path.
The motion of the character along the light rails is smooth because there are many nodes within the spline path.
There are other methods of spline path traversal but they are better suited to imprecise path traversal like one might see in a racing or free flight situation. Grinding on rails is about as linear as it gets and yet there are still several methods to accomplish this task.
For our example, we're going to create a spline path with 3DS Max, apply a renderable spline modifier, attach some bones, and export the result into Unity 3D where the algorithms will take over and allow our player character to grind on the rail.
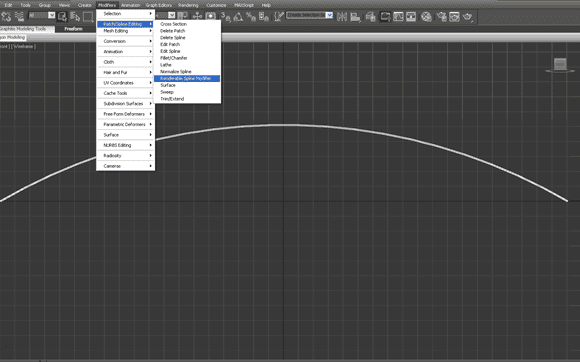
The first step in 3DS Max is to select Create Shapes > Arc. Drag the shape until it appears like the screen shot below.

(click image for full size)
After creating the Arc the next step is to apply the Renderable Spline Modifier to it. You do this by selecting Modifiers > Patch/Spline Editing > Renderable Spline Modifier. It looks a little something like the screen below.
(click image for full size)
Once the Renderable Spline Modifier has been applied it's time to adjust its settings so it's visibly noticeable. Using the Modify Panel on the right side of the 3DS Max UI set the parameters of the Renderable Spline to match the snapshot below.
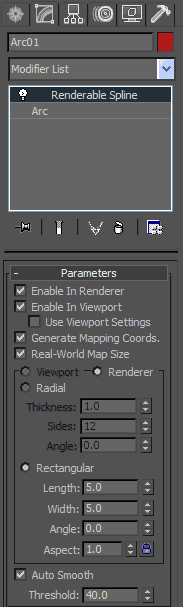
These settings create a square shaped rail out of the spline and also apply the texture mapping coordinates necessary to properly texture the spline. We won't be using Max's texturing tools beyond this. Instead we'll apply a texture and shader inside Unity.
The next step to creating some sick Dissidia rails to grind on is adding the nodes, which allow for spline traversal. In Max we'll be adding a chain of bones to our scene. From the main menu select Animation > Bone Tools to bring up the Bone Tools dialog.

(click image for full size)
Next, click on the Create Bones toggle button.

(click image for full size)
With the Create Bones toggle button selected begin creating the chain of bones by clicking on the far left top (using the front view) vertex of the arc and simply drag and click on every vertex intersection along the arc. Once you've left clicked on the last vertex on the other side, right click to end the chain. You should have 22 bones when the chain is completed.

(click image for full size)
Once the arc and bones are in place you can export the rail in .FBX format to be loaded into Unity. Once the rail object has been imported into Unity, we can apply a reasonably cool texture/shader combination to it so it more closely resembles the rails of Dissidia.
The real rails have a fantastic ethereal style to them as they animate and glow. In addition, rails appear to taper off and become invisible in some segments. It all adds up to a very spiritual extreme sports experience.
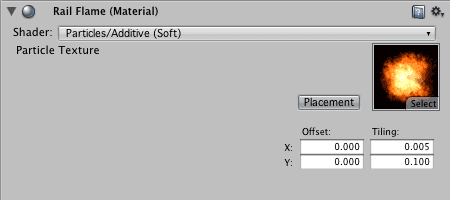
In order to crudely emulate Dissidia's rails we'll create a material comprised of a flame texture with alpha channel and the Soft Additive Particle shader built in to Unity. In order to appropriately break the rail up with alpha blending, open the placement settings on the material and set the tiling to 0.005 for X and 0.1 for Y.
The results are reasonably cool looking.

With the rail created and imported into Unity, the rest of the scene can be added which includes a number of things such as a character, the skybox, and ground.
Since the rail and its mechanics are the focus here though we're going to switch gears and put our algorithmic hats on.
This example contains just 2 scripts. One script allows for camera control and the other controls the character showcasing our basic rail-grinding algorithm.
Here's what that script looks like:
var currentNode : Transform;
var thisDirection : boolean;
private var thisController : CharacterController;
private var moveDirection : Vector3;
private var nextNode : Transform;
function Update()
{
if ( Input.GetButtonDown( "Jump" ) )
switchDirection();
if ( Vector3.Distance( transform.position, nextNode.position ) < Vector3.Distance( transform.position, currentNode.position ) )
{
currentNode = nextNode;
if ( thisDirection )
{
if ( nextNode.childCount > 0 )
nextNode = currentNode.GetChild( 0 );
else
{
nextNode = currentNode.parent;
thisDirection = false;
}
}
else
{
if ( nextNode.parent.childCount == 1 )
nextNode = currentNode.parent;
else
{
nextNode = currentNode.GetChild( 0 );
thisDirection = true;
}
}
}
transform.LookAt( nextNode );
moveDirection = nextNode.position - transform.position;
thisController.Move( moveDirection * 10 * Time.deltaTime );
}
function Start()
{
thisController = gameObject.GetComponent( CharacterController );
nextNode = currentNode.GetChild( 0 );
}
function switchDirection()
{
if ( thisDirection )
thisDirection = false;
else
thisDirection = true;
}
The opening lines of this script set up the editor exposed variables currentNode and thisDirection. The currentNode variable represents the transform of the current node or bone our character is standing upon.
Depending on the direction the character is facing we set thisDirection to true to traverse the spline path from parent to child node or false to travel from child to parent node. With these variables exposed you could place the character at any point on the rail and set its initial spline traversal position and direction correctly. It should be noted that you could just as easily append some code to the script to dynamically set these parameters.
The next few lines set up the private variables for this script. The thisController variable represents the Character Controller component of the character. This is what we use to actually move and orient the character.
The moveDirection variable is a Vector3 and represents the actual motion of the character through 3D space. Finally, the nextNode variable is the next transform transform thisController aims for.
The Update() callback of this script contains all juicy bits. The first part of Update() allows us to press the spacebar to switch directions on the rail. Afterward we have a conditional which resets our currentNode and nextNodes if the transform of our characterController scene object is closer to the next node in the chain of bones than to its current target.
Depending on thisDirection the chracter either travels from parent to child node or vice versa. The way the bones were chained together allows us to simply traverse only relying on Unity's parenting system instead of by an indexing or naming routine.
As was stated above, if thisDirection is true then the character travels from parent node to child node. There is a conditional within the thisDirection true/false conditional which checks the childCount of the nextNode.
If the childCount is greater than 0 it means that there's another node in the chain, otherwise it means we've reached the end of the rail. In our example here we simply turn the character around and begin traversing the rail in the opposite direction when it reaches the end.
When thisDirection is false the character travels from child to parent along the chain of nodes. The conditional within checks to make sure that the parent has only one child. If the parent node has more than one child then we've reached the top node on the chain because its parent is the Arc root, which contains two children, the Arc mesh and the chain of nodes/bones.
The final portion of Update() contains code which orients and moves the characterController. First, transform.LookAt( nextNode ) rotates the chracterController. Next up, we calculate the moveDirection as a Vector3 difference between characterController's position and nextNode's position. Finally, we actually move the characterController scene object at a rate of moveDirection * 10 * Time.deltaTime.
The only other functions within this script are the Start() callback and the switchDirection() function. The Start() callback initializes thisController and nextNode. The switchDirection() function is merely a flag toggle function for the direction our character traverses the rail.
To wrap up, I think it's safe to say that Dissidia Final Fantasy is a real feat of game design, art direction, and programming prowess. The combat remains fluid throughout even with the addition of mechanics like rail grinding, which at first glance appear tangent to the core gameplay.
As it turns out this was a fantastic addition, which opened the game up to all new methods of combat. Until next time, happy level-grinding!
You can download the Unity Project Package for this article by clicking here.
You can check out a Unity Web Demo for this article by clicking here.
Read more about:
FeaturesYou May Also Like


