

Daily news, dev blogs, and stories from Game Developer straight to your inbox
Sponsored By
Featured Blog | This community-written post highlights the best of what the game industry has to offer. Read more like it on the Game Developer Blogs or learn how to Submit Your Own Blog Post
An Introduction to Unity, Navigation, and NavMeshAgents
This blog is intended to be a beginner to tutorial to anyone starting out developing in Unity3D. It explains the basic layout of Unity and goes in to detail on how the Navigation properties and the NavmeshAgent component works.
10 Min Read

This tutorial is intended for those who are new to the unity3D game engine. My goal is to provide a basic understanding of the NavMesh inspector, and basic navigation properties. I will aslo take a short time to explain the basic aspects of Unity3D's interface, such as what GameObjects are and how to add/modify primitive GameObjects in Unity's scene inspector.
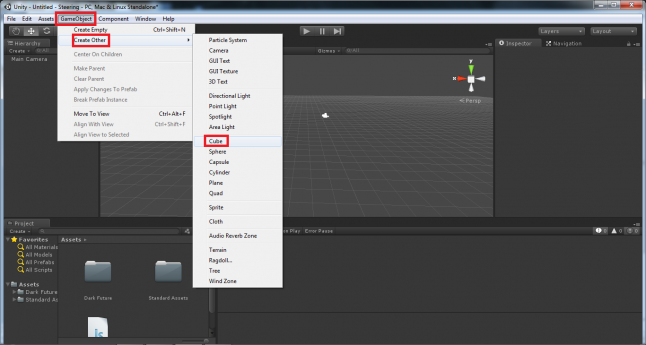
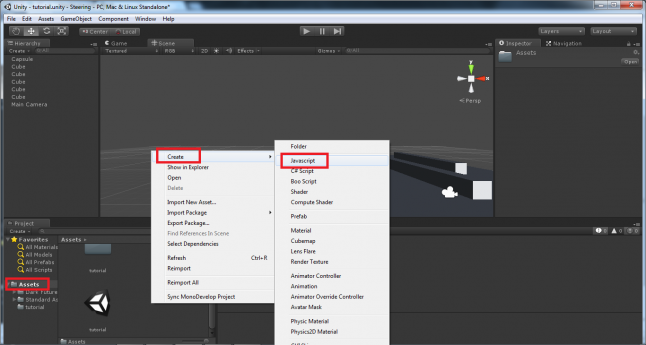
To start with we will take a look at Unity3D's GameObject window, which is located towards the top and slighlty to the left of the screen. A GameObject is essentially anything that exists within a scene in Unity. By default, all GameObjects have a transform component, this component provides basic information as to where the GameObject is located in 3D space. Lets open up the GameObject menu and go down to the “create other” tab. When we extend this tab we see a number of different things we can create in our scene, for now we will just focus on the primitive shapes cube, sphere, capsule, cylinder, plane and quad. Let's just keep it simple, left click on and add a cube to our scene.

Now that we've added a cube to our scene we will take a look at a few other things. First, open up the “Scene” tab located beneath the tool bar at the top of the window and to the right of the “Game” tab. Click on the cube to highlight it, this will allow us to move the cube around in 3D space. When you have a lot of GameObjects in a scene it can be easy to lose track of which GameObject you currently have highlighted. If you look to the left you will see the GameObject “hierarchy” panel displaying all of the GameObjects you currently have in your scene, our cube should be highlighted in the panel because we just selected it, if not, go ahead and double click on the name and this will not only highlight the object but it will also snap our scene viewer to the objects current location, and reveal the objects properties in the inspector panel on the right.
.png/?width=700&auto=webp&quality=80&disable=upscale)
Let's go ahead and modify the cube to make it more like a floor. To modify the basic geometry of an object we will look at the inspector on the right and take a look at our cube's “transform” component. The transform component has three basic properties we can adjust, position, rotation and scale, we want to re-size the cube to look more like a floor, to do that we want to adjust the scale of the object. Let's extend the 'x' coordinate to span 25 units, and the 'z' coordinate to 25 units as well. These measurements are much more reasonable for a floor surface, but our surface is still a little tall, so let's decrease the 'y' value of the scale of our cubes transform to .5. That way we have a much thinner surface than before, this adjustment doesn't really do anything to affect game play, it's purely esthetic. In other words... I think it looks better.

Now that we have a floor in our scene, let's take a look at the navigation properties window. The navigation properties window is located to the right of the inspector panel, you'll have to click on it to open it, as it is tabbed behind the inspector panel by default. The navigation properties panel has three different sub panels to it labeled “Object”, “Bake”, and “Layers”, the object sub panel contains information about the object such as whether or not it is navigation static. A navigation static object is an object that won't move throughout the scene like a floor! So let's go ahead and check the box next to navigation static to confirm that our floor isn't going anywhere. As you will see, we now have access to some new options since we made our floor navigation static, one of those options being to adjust the objects navigation layer. An objects navigation layer essentially determines if a NavMeshAgent is capable of walking on it or not, click on the tab to extend it and you will see the different choices we have for our object such as default, not walkable, and jump. These choices are pretty self explanatory, the default selection means that the object can be walked on, so we won't have to change anything. Go ahead an add some different GameObjects to our scene and follow the process explained above, except this time make the objects not walkable, these will be our levels walls. Now let's go ahead and save our scene, call it whatever you'd like, and then click on the Bake button at the bottom of the navigation panel.
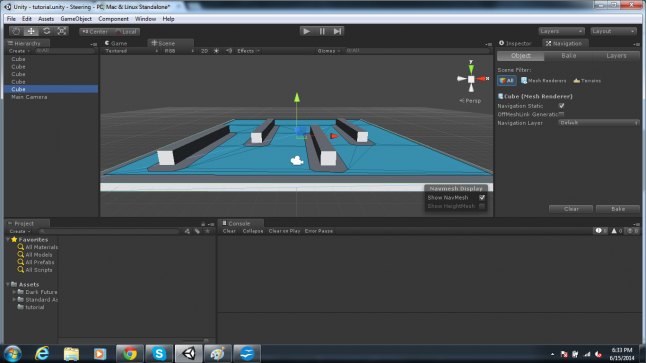
The floor turned blue! You may be wondering what the heck that means, I suppose I'll tell you. That blue layer over the surface of our floor is the walkable NavMesh in our scene. Anything that is covered by that blue layer can be traversed by a NavMesh agent. This brings me to my next topic, “What the heck is a NavMeshAgent?!” A NavMeshAgent is a component that can be attached to any GameObject we have in our scene that we want to move around, an enemy AI is a good example of a GameObject that would probably have a NavMeshComponent.
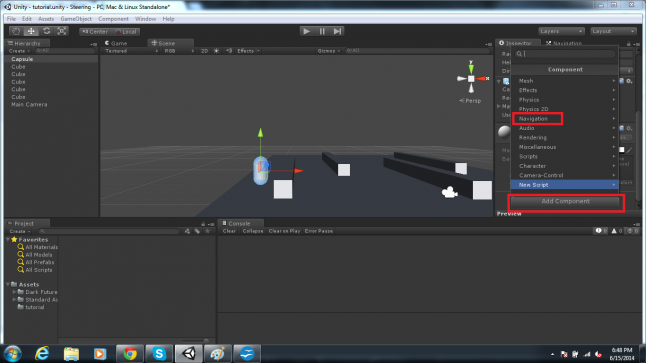
So, enough talk, let's make one. Go ahead and add a new GameObject to the scene, a capsule is a pretty good representation of an enemy for now, so let's go with that. Highlight the capsule and open the inspector tab, scroll all the way to the bottom of it and you will see an “Add Component” button, click on that and the components window will open up, this displays the different types of components you can attach to your GameObjects, five rows down you see the "Navigation" filter, go ahead and click that, this will reveal the different navigation related components you can add to your objects. The first component you should see is a Nav Mesh Agent, double click that and it will add the Nav Mesh Agent component to our capsule GameObject. 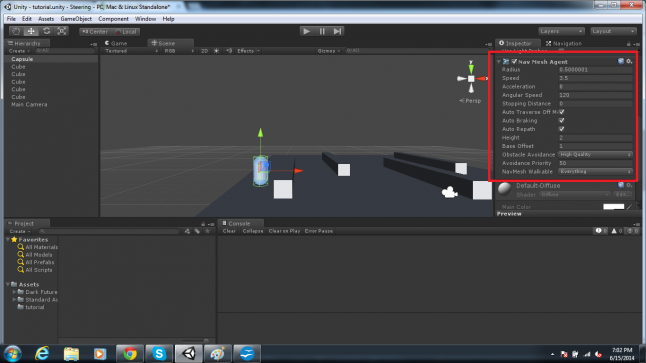
The NavMeshAgent component has a ton of new properties to play with, all of these properties can be edited either in the component panel or you can access them in a script.
Next, take a look at the bottom left corner of the screen, there you will find the panel labeled “Project” this is where all of the folders in our project are contained. Click on the assets folder, this will open up the folder and reveal what it contains in the box on the right. Right click anywhere in the box and open the create tab, then select JavaScript. This creates a new behavior script in JavaScript within our assets folder, let's name it “EnemyMovement.”
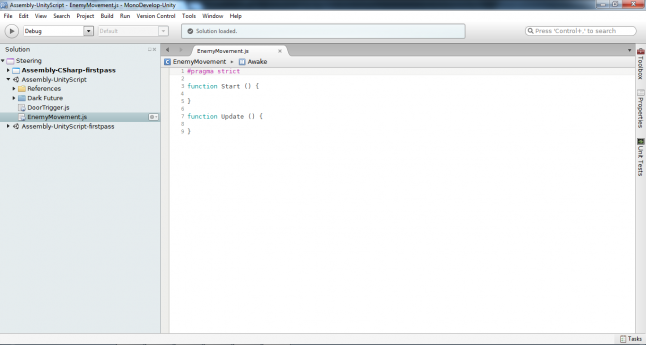
Double click on our script and this will open up MonoDevelop, which is Unity's default script editor. If you take a look at the script you will see two functions already laid out for us, the Start and the Update. These functions are built in to unity to perform tasks at specific times throughout our game. The Start function runs once at the beginning of our game and the Update runs at a consistent rate throughout our game usually anywhere between 30-60 times per second, whenever the frame is updated.
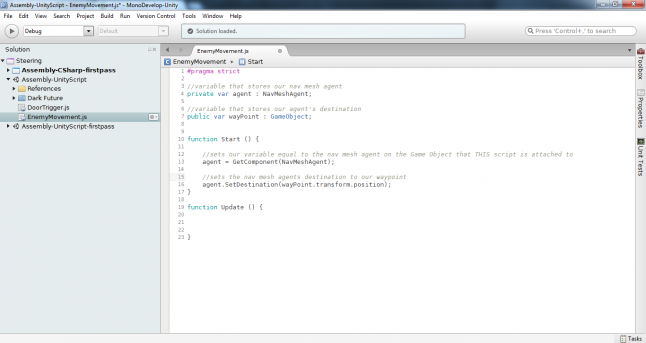
Let's make some fairly simple additions to our script and get our capsule moving! First we need to make a variable that stores our NavMeshAgent, we will call it “agent” and keep it private because we won't need to access it from another script, or from the properties panel. Next we need to create a variable that stores a GameObject that will be our agent's destination. We make this variable public because we give it a value in the properties window, let's call it “wayPoint.” Next thing we want to do is set the agent variable we created to be the NavMeshAgent component on the GameObject that this script is attached to. To get a component attached to the GameObject that our script is attached to we use the “GetComponent()” function, the parameter we include is NavMeshAgent, because that is the component we are retrieving, if there is no NavMeshAgent attached to the object, you will get an error. Now that our agent variable is set to the right NavMeshAgent we can set this NavMeshAgent's destination. To do that we call “agent.SetDestination()” this function sets the destination of the NavMeshAgent it is called from, in our case we call it from our “agent” variable, the parameter that is required by the “agent.SetDestination()” function is a Vector3, which is the same type as a GameObject's position in 3D space, so let's pass in our wayPoint's transform.position to set that as our destination. to learn more about NavMeshAgents and Unity scripting in general you should check out Unity's script reference.
.png/?width=700&auto=webp&quality=80&disable=upscale)
Go ahead and save the script we just made. Exit out and go back into the editor. From the "Assets" folder in the project panel hold left click over our script and drag it to attach it to our capsule in the hierarchy panel. Now we need to create an empty GameObject that will be our NavMeshAgent's way point, open the GameObject tab and select “create empty,” this will create a completely empty GameObject with nothing more than a transform. Position this object wherever you would like on the floor we made. I renamed my object “way point” you can do this by right clicking on an object in the hierarchy panel. Next, select our capsule again and go over to the inspector panel, scroll all the way to the bottom and you should find the script we just made there in the panel. If you notice, there is a slot called “Way Point,” this is the variable we created in our script, it takes a GameObject, left click hold over the game object that is our way point in the hierarchy panel and drag it to the empty slot. This sets the empty GameObject we created to be the way point that our NavMeshAgent will go to.
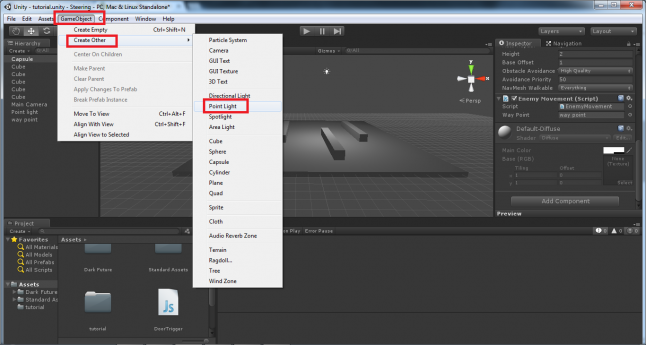
The last thing we need to do is create a point light so that we can see what happens in our scene. To do this, open the GameObject menu again and select create other. This time, navigate down to where you see "point light," select that and it will be added to our scene. Select the point light in the hierarchy panel and then look over to the right in the inspector panel and familiarize yourself with some of the point light's properties, adjust it's intensity so that it is a little brighter. Now, once everything is satisfactory, click the play button in the top middle just above the scene panel. If evereything is done properly your scene should play out and you should see our capsule go from wherever you placed it to begin with to wherever you placed our way point. If anything went wrong be sure to check over your script to make sure it is identical to mine and re-read the previous instructions to make sure you did not miss anything. If you are still having trouble, feel free to comment your questions below. God bless!
Read more about:
Featured BlogsAbout the Author(s)
You May Also Like


.jpeg?width=700&auto=webp&quality=80&disable=upscale)


