

Daily news, dev blogs, and stories from Game Developer straight to your inbox
Sponsored By
8 Tips & Techniques for Designing Levels
Throughout my years in game development growing as both an artist and designer, I've learned quite a bit. I would love to share a set of tips and techniques pertaining to level design that are simple, yet highly effective.
10 Min Read

Something that has always mesmerized me as both a player and designer is the pure excellence in level design that comes from amazing titles such as Dark Souls or Ori and the Blind Forest. These are two very different games, however they both deliver a great sense of satisfaction in similar ways. As you traverse their intricate world-spaces, you’ll discover the numerous amounts of secrets and shortcuts that are both clever and surprisingly abundant. Hello everyone, my name is Josh, and I am a growing artist, designer, and above all, game developer. I would like to share with everyone 8 tips and techniques I have learned throughout the years about designing levels. Now, I cannot promise this blog post will lead you to the glory of the previously mentioned titles – however, everyone must start somewhere.
These tips and techniques will act as a basis for constructing the various environments or worlds in your game(s). Experienced developers will likely recognize some of these, as they are widely used in the industry – They have been proven to paint a clear path and establish a strong foundation for your level design. To those of you who are still young and fresh to the gaming industry, there is a lot to learn – there will always be a lot to learn. I hope that you ultimately learn something of value here, and remember that this isn’t a post on how to make good level design, but rather the techniques that can lead you to good level design. Without further ado, let’s begin!
Blocking
Blocking, or sometimes referred to as a block-out, is breaking down something into its basic and critical components. This is a technique that is widely used in animation, design, and art. In terms of level design, blocking can be used to represent your level in basic geometric shapes. The shapes or geometry you use can represent various things such as collision, obstacles, or key objects within your level. The purpose of this technique is to help both the designers and artists gauge the strength or scope of their level.

Since block-outs are very simple, it allows for easy modification. This means that you can do frequent testing of your level block-out to see if it “feels right” to players. You want your players to feel comfortable with the level they are experiencing, so nailing that feeling is crucial early on. If you are up to it, you can start with a basic block-out and work in some more complexity. Make sure you are communicating with your artists though! The shapes you are blocking out should be consistent with the game assets the artists are making. Game engines such as Unity or Unreal offer primitives like cubes that can be used for blocking, and 3D modelling software such as Maya or Blender can also be utilized.
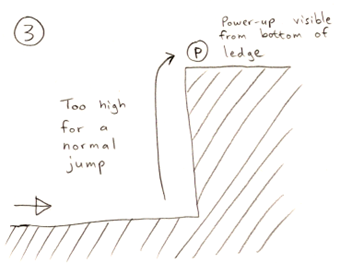
Use Reference Objects

References are an integral part of creating logical and consistent design. The use of geometric objects allows the designer to understand the scale of their characters and mechanics relative to their level. Are you making a platformer and don’t know how high up you should be placing your platforms? Use a box to represent your character’s jump height, and now align that box to the ground and – boom! You now know exactly where to be placing your platforms. Of course, this is just one of many examples I could give. Without references, we are often left to guess-work, or our interpretations from the brain. Memory isn’t always the best compromise, it’s good to have a clear understanding on how the structure of your level is going to work during gameplay. Because of this, one of the best recommendations I can give is to use static character models while designing to correctly accommodate scale. You do not want your assets ending up too big or too small.
Sketch Your Level
Alright, now it’s time to grab your pen and paper – or perhaps your stylus and tablet. Sketches are a great way to give you a rough idea of how a concept works, and the same applies to level design. This is a good technique to go in tandem with the block-out phase. The general idea is to breakdown your level into smaller components. These components can act as situations. By this I mean you can detail things like any actions your player takes, or the things he will encounter in any given area. Work iteratively and remember to test a lot, it’s a great idea to test what you’ve came up with to see if it feels appropriate. And if it doesn’t? That’s fine. Sketches are rough, and you’ll find yourself modifying your sketches a lot until you’ve arrived at something more satisfactory. This is a great phase to test out ideas and see how they play out in-game.
Decide on A Visual Theme

Ori and the Blind Forest gameplay shot
I know I have already mentioned Ori and the Blind Forest, but I just have to bring it up again for its outstanding visual theming. Aside from it’s gorgeous art-style, Ori is really good at integrating the mechanics of their game seamlessly into their environments. The visual theme for your level defines several things, such as mood and circumstance. Early on you should have a general idea on what you want your visual theme to be for your level. It’s also strongly recommended that you design your level around a centralized theme. Lack of consistency, or a strong visual theme can lead to a messy looking level. Because of this, I recommend establishing a colour palette for your level. Use colours that work well with each other (complimentary colours). If you aren’t sure about your colour choices, open up a painting program like Photoshop and start blending your colours together – avoid colours that are harsh are jarring when juxtaposed against the others.
Create A List
It’s always great to be organized, and what better way to organize yourself with a list. You can write down exactly what you want your players to see, experience, or interact with. It’s your list, so don’t be afraid to break it down into more specific components. Now if you ever forget anything, or have any brilliant ideas – you’ll have a list to back you up. If you want to take a digital approach, use sites like Trello (https://trello.com/) if you are working with a team, or even alone. Lists are important because it helps you and others understand the scope of your game.
Try to think ahead when creating and adding to your list. Look at your block-out, or sketches, and imagine what would occupy the level space. Visualize the components you want in your level and how they would interact with each other. Establishing a strong set-piece in your level can be done by clever use of perspective, sense of scale, and more. Many games know the player will be viewing their levels from a specific angle, so they design around this.

:format(webp)/cdn0.vox-cdn.com/uploads/chorus_image/image/49201587/screenshot_3.0.0.jpg?width=300&auto=webp&quality=80&disable=upscale)
(Left) Super Mario 64 - Tiny Huge Island, (Right) Final Fantasy 15 - Demo
Create A Detailed Guideline
If you are looking to approach a more finalized version of your level design, it’s a good idea to create a detailed guideline. This acts as the blueprints for what your level is and how it should be played. Consider this your sketch, but much more detailed and polished. Detailed guidelines are typically drawings, or even 3D mockups in modelling software like Maya or Blender. The guideline should focus on the fine details of your level. If you are making a platformer you can detail things like: player jump movement patterns, moving platform locations, trigger interactions, enemy pathing, and much more. When working in a team, it’s important that everyone is on the same page – A detailed guideline will assure everyone understands the interactions of your level.
Creating & Testing Your Level

Super Mario Maker - Users can create their own crazy levels
With the engine of your choice, whether it be Unity or Unreal, you’ll come to the point where you need to start crafting the level you have been aspiring to create. Depending on how you’ve been designing, whether it be pen-and-paper sketches, 3D block-outs, or more, be cautious when transitioning from your intended designs into the game space. During the transition, it’s crucial that you preserve all of the details and ideas you have been planning since the beginning. A poor transition can drastically affect the gameplay in a negative way. Now, that doesn’t mean you can’t make adjustments during this phase. Slight adjustments and tweaking can be very beneficial, but you should typically avoid major changes. It is also CRUCIAL that you do not overhaul gameplay mechanics at this point because that could completely negate the design of your level. For example, imagine designing a platformer with double jump in-mind, but later in development you decided to introduce triple jumping. This could trivialize the difficulty of your game and lead to a poor player experience.
Fill Up Your Level
It goes without saying that there is always room for improvement, for nothing is ever truly perfect. My final tip is that, if you have the time, try to add some polish to your level. Do certain parts of the level feel barren? Consult the list you (hopefully) made earlier and try adding in some lower-priority assets. Animations, subtle or not, are also great ways to make an environment feel more realistic and immersive. Grass swaying in the wind, chains rustling, cloth blowing, and more - these are the things that players may not directly notice, but will subconsciously appreciate. The extra degrees of polish are what sometimes pushes a good game to a great game.
The Legend of Zelda: Breath of the Wild
Conclusion:
Fresh-bud designers, or perhaps experienced veterans, I hope you took something out of this blog-post. These tips and techniques, in my opinion, are an effective way to approach level design from the ground up. Brilliant level design is no simple task, and it sometimes goes completely unnoticed in the games that have it. However, it’s still there. Sometimes you may not realize it, but it’s the level design that shapes the most memorable moments in your favourite games.
As game developers, we have the power to create magnificent stories, breath-taking vistas, immersive worlds, and more. The only limitation we have is our knowledge and imagination. Seeing our visions come to life before us, and sharing it with the rest of the world, is a wonderful experience. A new generation of game developers are rising. We all know there are so many amazing games out there, and there are only more coming. So, let’s keep that trend rolling, let’s grow as developers, and share what we love with the world.
Thanks for checking out my blog post.
Read more about:
BlogsAbout the Author(s)
You May Also Like


.jpeg?width=700&auto=webp&quality=80&disable=upscale)


