Daily news, dev blogs, and stories from Game Developer straight to your inbox
Sponsored By
Featured Blog | This community-written post highlights the best of what the game industry has to offer. Read more like it on the Game Developer Blogs.
Useful game engine tips for indies.
Middleware are great tools, but you might also end-up with an amazing engine if you do it yourself. Admittedly, native and homemade technology are not for everyone, but for me, it was the perfect choice.
14 Min Read

During my career, I wrote few 3D engines for AAA games. I know how much work is required to create software engine from the ground up. Most independent game developers are using middleware and this is an excellent choice that I would recommend to anyone starting in the game business. However, after spending a decade as a 3D engine architect, it was easy to create my own 2D engine for Ovogame (my solo indie studio). Since 2006, this engine has evolved into a great tool. It allowed me to easily create a nice catalogue of games on iOS, Android and few other platforms. I want to share some of its secrets with you.
Ultra cross-platform friendly.
I started working exclusively on PC. But progressively, my engine has evolved into a very cross-platform friendly tool. Despite supporting few platforms (Windows, iOS, OSX, BB10, Android, OUYA...), the code didn’t become unmanageable. Actually, it was the opposite as I kept simplifying a lot of features. I’ve reached a stage where I can develop my games almost exclusively on my computer and use other platforms to quickly build their target. This engine is saving me a lot of time and allow me to support all these platforms almost with no extra cost. I’m managing every low level aspect of the engine: graphics, textures, fonts, audio, files… The main engine is completely platform ignorant. It’s a toolbox that manage all the game aspect in simple and fully compatible C++ code. In some ways, the game engine is a platform on its own. There is just a tiny bridge linking the engine to a minimal set of platform specific code.
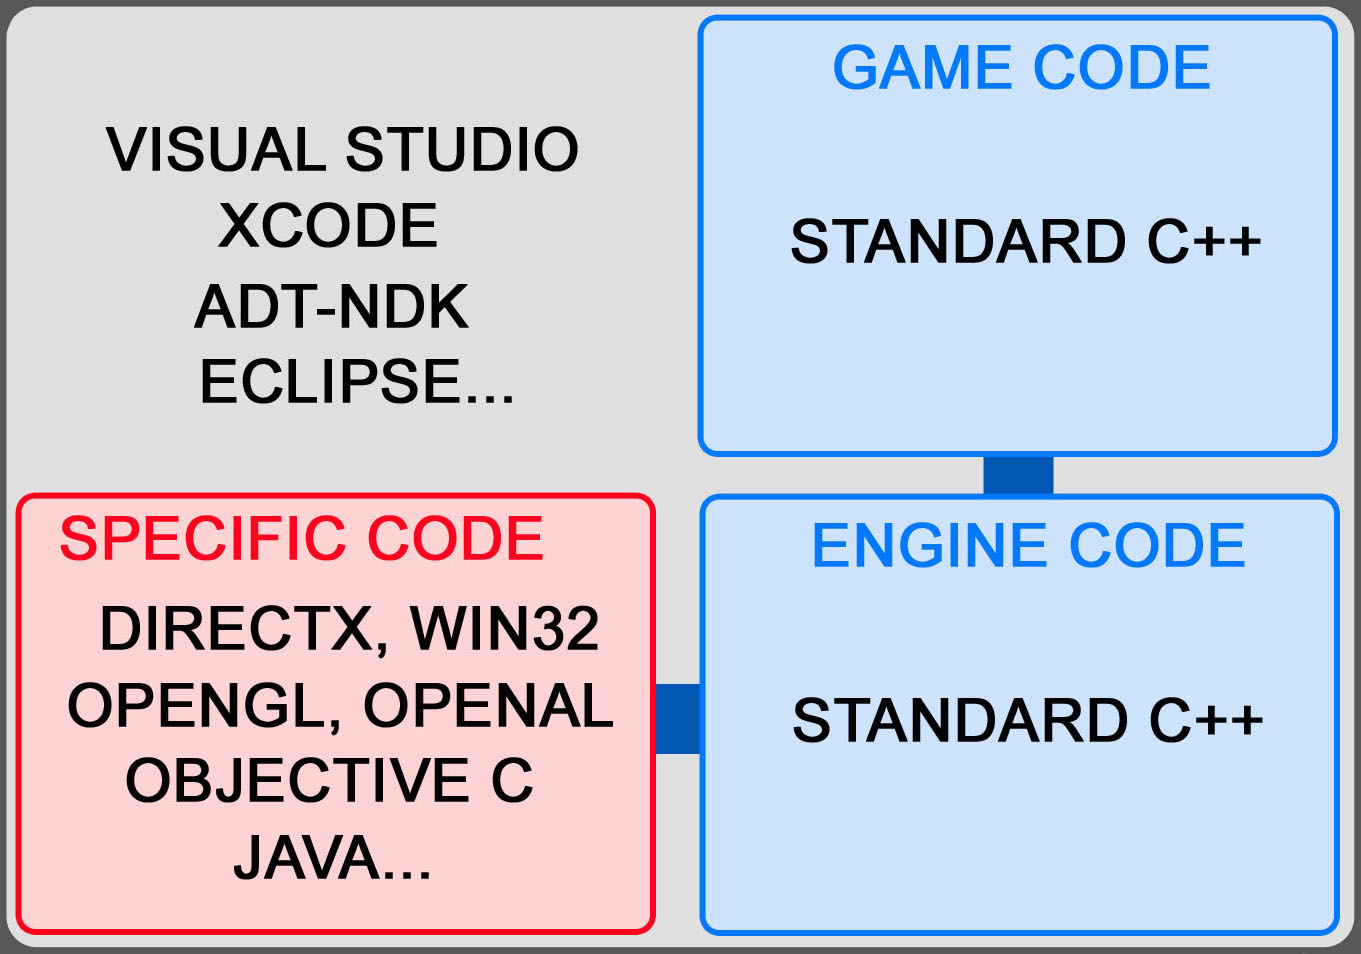
To support a new platform, I need to create these few specific files. Once it’s done, my entire portfolio can be rebuilt very quickly because all the remaining source code and game resources are 100% compatible with all platforms.
To illustrate the cross-platform nature of the engine, I’ve made a video showing how simple it is to create an Android build from a windows version. Android is probably the most difficult platform to support for native developers as it is Java based. Native support was added on the late and the tools weren’t very friendly at the beginning. Despite all these difficulties, you’ll see that it takes absolutely no time with my engine to get a Windows project running on an Android device from scratch.
Like the video is showing, the only work I need to do is to create a new Android project. The entire source code and resources from the app doesn’t need any modification. Obviously, it’s the same thing with all my other supported platforms (computer or mobile). As far as I’m concerned, this is a killer feature.
Screen resolution.
Managing all the screen resolutions is a problem that every developer has to handle. There are a multitude of different resolutions and aspect ratios found on modern devices. It’s even worse, if like me, you want your games to run on both computers and mobile devices. For a 2D game, it’s a real problem if you don’t want to stretch your graphics. I started considering this issue when I was handling iPad (ratio 4x3) and iPhone (ratio 3x2) builds. Instead of only handling these two ratios, I wanted to find a way to support any possible one thrown at me. Also, I wanted my game code to stay clean and simple. The solution I’m using is a very good compromise between both objectives.
While developing my games, I’m using a virtual resolution of 960x640 (ratio 3x2) or 640x960 in portrait mode. So, I can only worry about this unique metric while coding (left image).
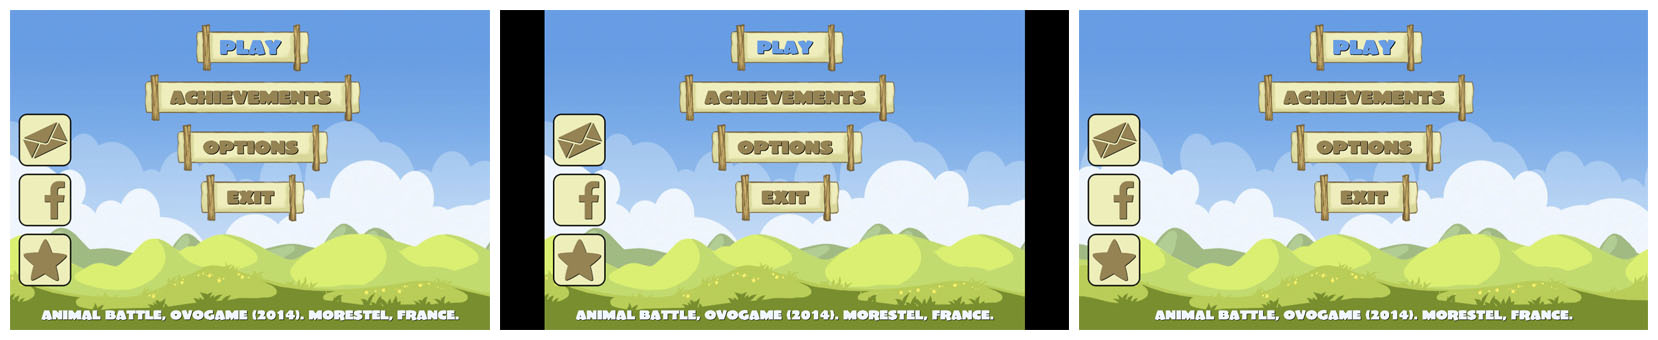
The engine is auto-scaling these coordinates for the best fit on the actual physical screen. Obviously, if the screen ratio is not 3x2, I’ll get either vertical or horizontal area not covered by my virtual screen (like the image in the center with the vertical black bars: ratio of 16x9). The visible area is bigger than my virtual screen. The engine knows what the actual visible metric is. In this example, with a ratio of 16x9, the screen metric isn’t (0, 0) to (960, 640) but it’s (-88, 0) to (1048, 640).
If I want to draw something close to the left border of the screen (like my 3 square buttons), I can’t assume that the top left pixel is at (0, 0). Instead, the engine is telling me the proper values (-88, 0). This way, I can display my square buttons always at the same distance from the left border of the screen (image on the right).
If you are using static backgrounds like I do, they need to be bigger than the 960x640 virtual screen. They are all drawn with a resolution of 1280x768. Thus, I can always display something interesting instead of black bars (image on the right vs image in the center). This is all managed by the engine, I made a small class to handle the backgrounds once and for all.

Thanks to those two little tricks, with almost no extra work, my games look like they were design for any screen resolutions.
Because I’m working on my computer, it’s very easy to test how the game is running at any screen resolution. In windowed mode, my engine can be forced to start at any resolution by simply editing a text file (my system file). So, if I’m forcing the game to run at 1136x640, I’ll know how it looks on an iPhone 5. Again, this is saving me a lot of time as everything can be tested (with no re-compiling) and fixed immediately on the computer build.
Data driven.
I really like to spend as much time as possible on the computer’s build. There’s no need to package the resources, no device uploading, no slow simulators… I can recompile and launch the game in seconds. I can easily add new resources and edit them directly. The whole process is way faster than any tool chains available for mobile devices. To spend as much time as possible on the computer’s version, I need an easy way to simulate other platform’s behaviour.
It’s important to design your code as data driven as possible (instead of code driven). Personally, I’m trying to make everything important running dynamically (avoiding using too many pre-processor tag). For example, there is a variable in the engine specifying if we are on a touch screen device or a computer. This variable can be overwritten (in the system file, no need to recompile). Thus, the game can run on my computer the same way it’s running on a touch device. It’s useful because some of the code or functions might be different (no fullscreen toggle in the options, touch gesture might be different than the mouse gesture, buttons have bigger clickable area…).
I’m using this data driven philosophy to switch on and off almost everything: ads, demo or full version, personal promotion (some distributors don’t allow it), rate me link, screen resolution, social networks… This way, almost everything can be tested and develop on the main computer’s build. A cool consequence of this, is that I’ve got almost no builds. It’s just one single build that can react differently depending on its data. It’s extremely nice because I don’t have to worry too much about merging builds and applying bug fixes on all those builds. I have just one source code compatible with all platforms and just need to edit some parameters to get a specific build.
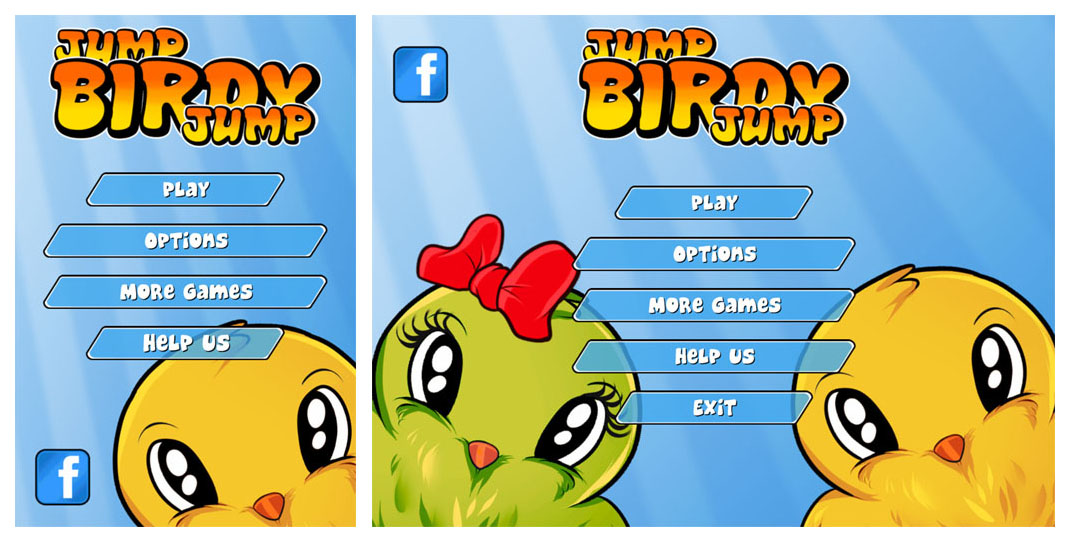
I really think that this way of coding is extremely helpful and does save me a lot of time. I want to mention Jump Birdy Jump (my best mobile game, check it out). It was first created in portrait mode (for mobile phones and tablets). Later, I wanted to create a computer build (PC & Mac) and obviously, it had to work in landscape mode. Because most of the code was using a data driven approach, I was able to use the same build for both version. I had to create new landscape backgrounds obviously and tweaked few levels (I duplicated them all for simplification) but almost everything else worked. Instead of using a virtual resolution of 640x960, I used 1280x960. Thus, at least vertically, my metrics was the same and all my sprites and game elements where at the right position. I was able to update my project to support both portrait and landscape mode in no time.
Also, I’m using a data driven approach to manage the different Android stores. In the previous video, I did show you how I can create a project from scratch with my setup script. For managing the different Android stores, I don’t need to create a new project. I just need to edit the script and change the target store. The script will re-create the project settings: changing the manifest, putting the correct permissions, copying special libs, changing the store name in my system file, deleting previous build… The game source code and resources will not change. So, with just one project, I can build all the different targets for all the different Android stores just by changing one word in my script. In the game, the store name is used dynamically to get the proper links (rate me, more games…) and behaviour. This is so helpful when I have to do an update.
The data driven approach is very helpful, you should try to adopt it wherever you can. It might look like extra work initially but it’s absolute not the case. Once you’ll be used to it (and see its benefits) you won’t go back. For example, if you are using ENUMs in your code to describe your data, you are doing something wrong. As you’ll see in the next two sections (Audio & Localization), I do access my resources using strings. There are countless good reasons for this.
Audio.
When I was exclusively developing for PC, I was happy using middleware libraries for my audio needs. But when I started supporting more platforms, it wasn’t such an obvious solution. Either the libs weren’t on all platforms or they were just too expensive for my indie budget. So, I created my own audio engine and it was all worth it.
For simplicity, I’m only supporting one audio file format: Ogg Vorbis. Like everything else, the audio engine is extremely data driven. At start-up, the audio engine is loading a simple text file describing every sound usable in the game.
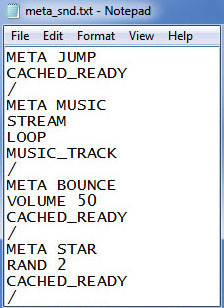
Each sound has a name (not necessarily the same as its corresponding ogg file). This name will be used in my code to play that sound: CAudio::PlaySnd(“JUMP”). Most of the time, this will be the only code I have to write to managed all my audio. Effectively, each sound can be fully parametrized in the text file. For example, the tag CACHED_READY means that the sound need to stay in the cache and must be loaded before the game has started. For bigger sounds like the MUSIC one, you can see in the text file that it will be streamed and it must be looping. I can also change the default volume of a sound in that file. So, when I’m tweaking my sounds, I don’t need to recompile my code or even change the actual ogg file.
The RAND tag is also very useful (check the STAR sound with RAND 2). Basically, it means that this sound is actually two different ogg files (star_1.ogg and star_2.ogg). This is very useful if you don’t want to play always the same sounds for very common things (catching stars, footsteps, shooting…). The engine will randomly pick one of the sounds when I call CAudio::PlaySnd(“STAR”).
I’ve got few more tags that are helping me speeding up the whole process and as you can see, it’s very simple to add any new tags in the future.
Obviously, I can overwrite everything by code, but in practice, I don’t need to do that. Sometimes, I still need to do rare things by code and the engine is providing me with some useful feature:
I can check how far we are inside a sample. I’m using this feature to do lips syncing (check Anka for a great example of this).
I can force a sound to fade out or fade in.
When I play a sound, I can attach a tag to it. I can tell the engine to kill all the sounds with a specific tag. This can be very useful in some cases when an object is vanishing from the screen but its sounds are still playing.
All these audio features are helpful while coding a game.
Localization.
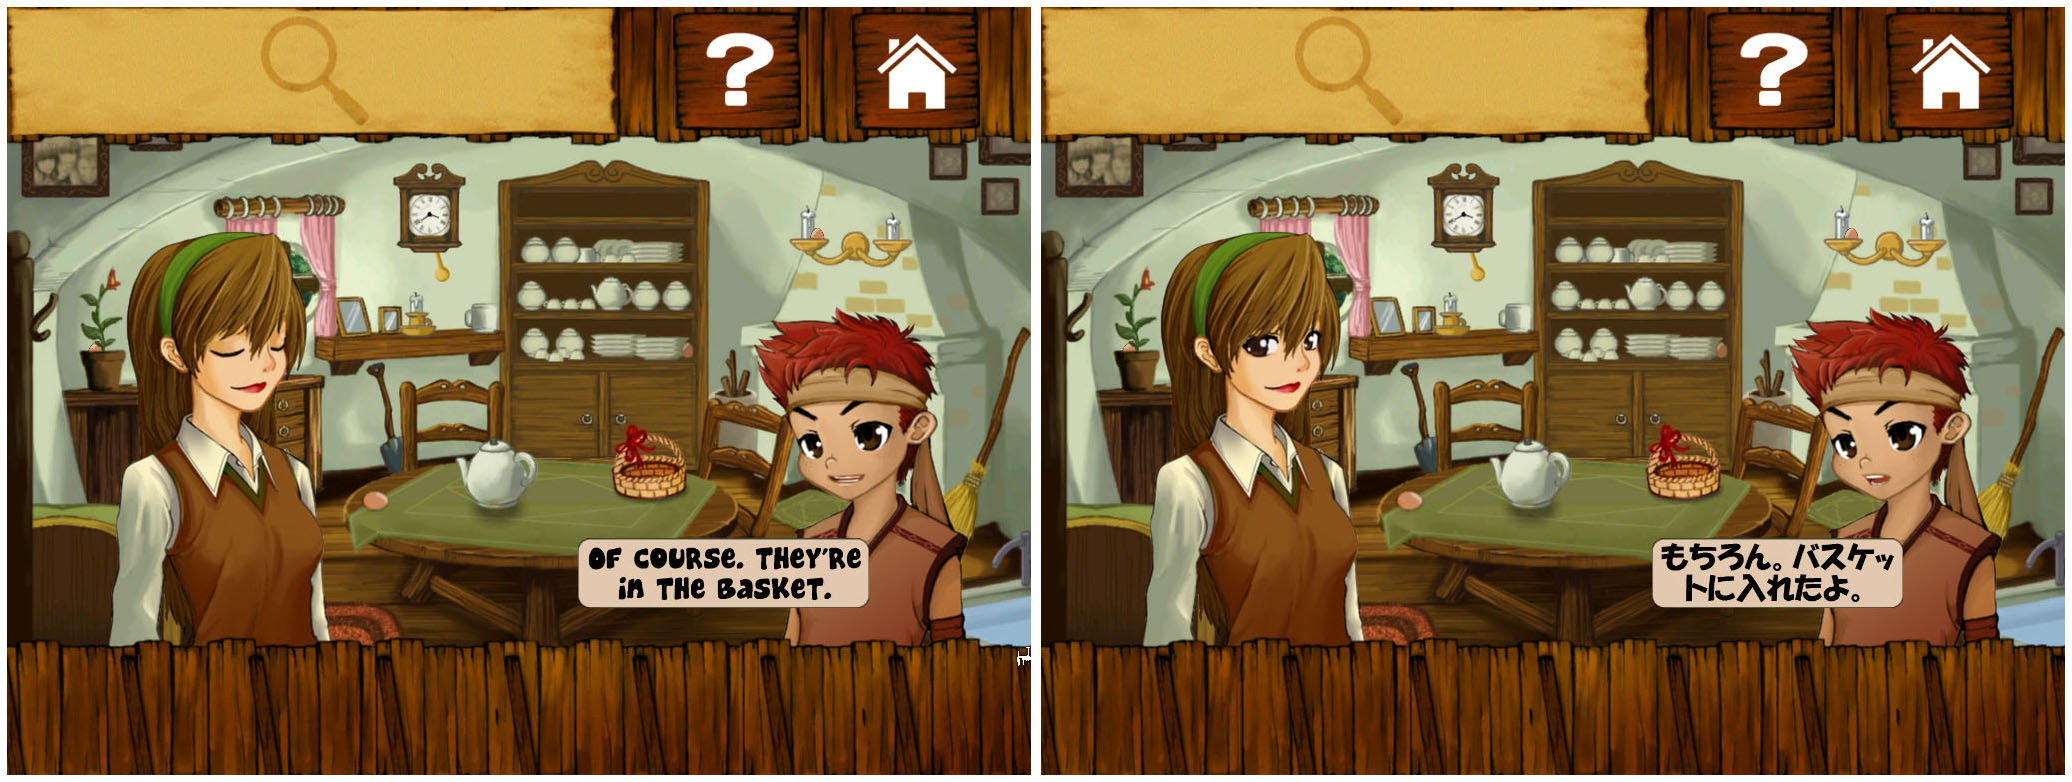
I’m always developing my games in English first. But, very early in development, I’ll add the French version (I’m French). I try to localize my games in as many languages as possible. It helps get better visibility. As you can guess by now, I’m using a data driven approach to handle all languages in my games. I’ve wrote a specific article about this subject, so I won’t talk too much about it here. Please, check the link.
I’ll just add that I’m using my own font system. I can export any TTF font into my own file format. It’s very simple to remove unused characters. I’m using this feature for the gigantic Chinese’s fonts. Also, with a minimum amount of work, I can add missing characters. It’s very useful when you have found your perfect font but it hasn’t got some accentuated letters used in most European languages.
Editor.
This is a bit out of topic but I think it’s an important part of my process developing games with my engine. Some of my games are levels based (Jump Birdy Jump, Fatal Escape, Tropical Mania…). I love creating editors directly inside my games. As most of my editors are small in scope, I don’t mind developing them in the same build as the game (instead of coding a second app). A simple tag in the system file will tell the game to start-up the editor instead of the normal front end. I can code a new gameplay element and immediately integrate it inside the editor without dealing with two projects. This is definitely saving me some coding time. Also, I’m sure that what I see in the editor will be identical to what’s in the game.
Check this VIDEO of Jump Birdy Jump’s editor. It’s a bit rough on the edges as I was the only one using it. But, I was able to create a lot of different levels and only concentrate on their design.
In fatal Escape (coming soon), I’ve even left the editor in the game, so player will be able to create their own levels.

I had to polish it a bit more than usual because the players will see it. Also, it had to work on touch screen devices (the computer version is more friendly thanks to the mouse and keyboard). It’s a little bit of extra work, but that’s a cool feature in the game.
With my adventure game Anka, the editor is much bigger, but so is the game. Without it, I couldn’t had created the game on my own. I was able to design the whole story interactions, events, transitions, dialogues, placing objects and behaviours, drawing collision areas and even creating the animations without leaving the editor.
In most cases, developing a proper editor or good tools for your games is always a good idea. You might spend a bit of time working on these editors, but at the end, the return is massive and you’ll be saving time. Levels creation become much easier and you can concentrate on designing and tweaking them.
Conclusion.
I started creating my engine before the current middleware tools were available, so I didn’t had much choice. I’m glad I did carry own improving this technology other the years. I had many friends whom kept changing tools to create their new games. Every time they wanted to support a new platform, their old games had to be fully ported (sometimes, it wasn’t even possible). With my engine, when I’m adding a new platform, my entire portfolio is following at no cost. It’s a great way to get extra incomes from old games. Also, for my new games, it’s invaluable to develop once but distribute on many platforms.
Creating your own technology isn’t for everyone but even if you are using a middleware solution, I’m sure you can still use a lot of good advice from this article.
Read more about:
Featured BlogsAbout the Author(s)
You May Also Like