


Daily news, dev blogs, and stories from Game Developer straight to your inbox
Sponsored By
Featured Blog | This community-written post highlights the best of what the game industry has to offer. Read more like it on the Game Developer Blogs or learn how to Submit Your Own Blog Post
UE4 State-Based Level Music System Basics
In this Lesson Series we’ll create a basic adaptive music system foundation and implement it in Unreal Editor 4’s Level Blueprint. This simple system is designed to have five overlapping music tracks with changing volumes based on four Level Stages.
46 Min Read

Description:
In this Lesson Series we’ll create a basic adaptive music system and implement it in Unreal Editor 4’s Level blueprint. This simple system is designed to have five overlapping music tracks that change their volumes based on four Level Stages which will be controlled with the keys 1-4.
At the heart of this Lesson Series are Ambient Sounds and Level Blueprints. We’ll also explore the basics of designing and fully implementing a system like this as well take a look at next steps if you are interested in taking these concepts further. Sound files are supplied for convenience.
Overview:
Lesson 1: Setup and Ambient Basics
Lesson 2: Modifying an Ambient Sound’s Volume in a Level Blueprint
Lesson 3: Level Stages
Next Steps
Prerequisites:
Music files: http://devjana.net/support/exampleMusic.zip
Unreal Editor 4.9.2 or later
It will help to already have some familiarity with Blueprints, though this is not necessary.
Key topics:
Sound Design
Level Blueprints
Lesson 1: Setup and Sound Basics
Let’s first get our simple level ready. By the end of this Lesson you’ll have a simple project setup with our basic music tracks imported and playing when the level starts. We’ll be importing WAV files and using them looping Ambient Sounds. If these concepts are familiar you can likely skip to Lesson 2.
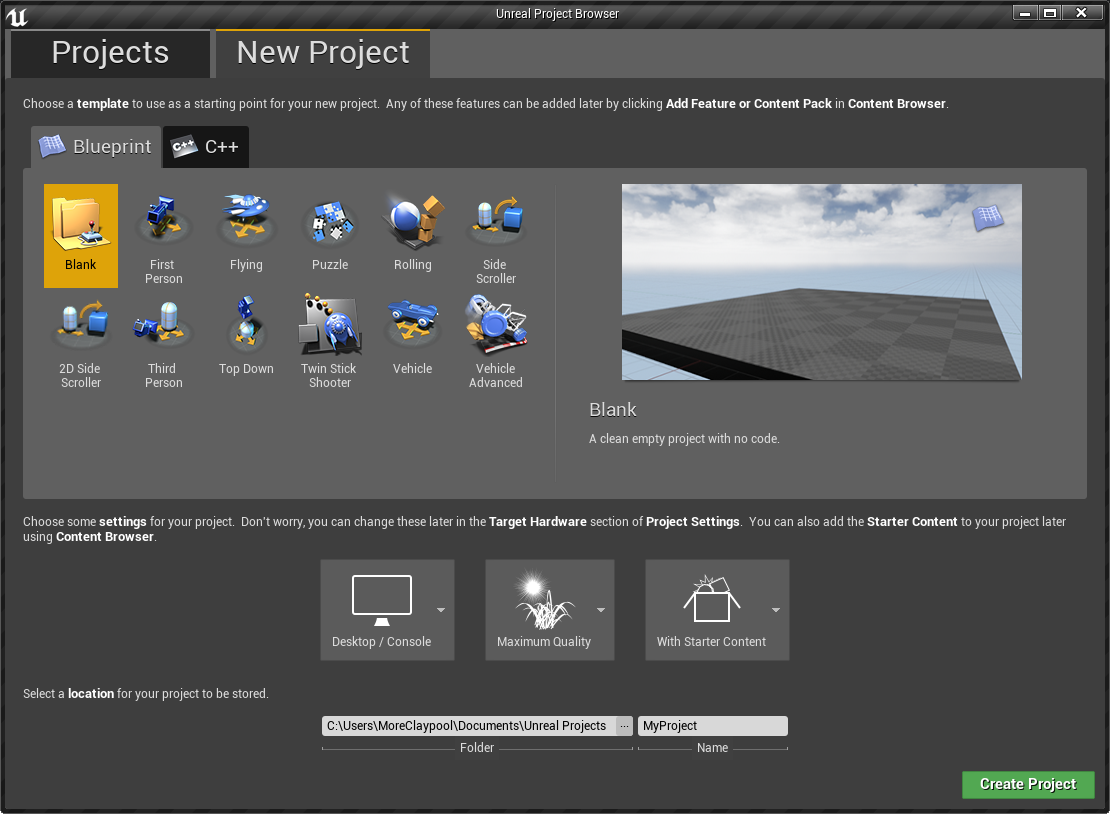
1.1 Create the project
We’ll start with a default “Blank” project “With Starter Content”:
fig 1.1 - creating a new project with starter content
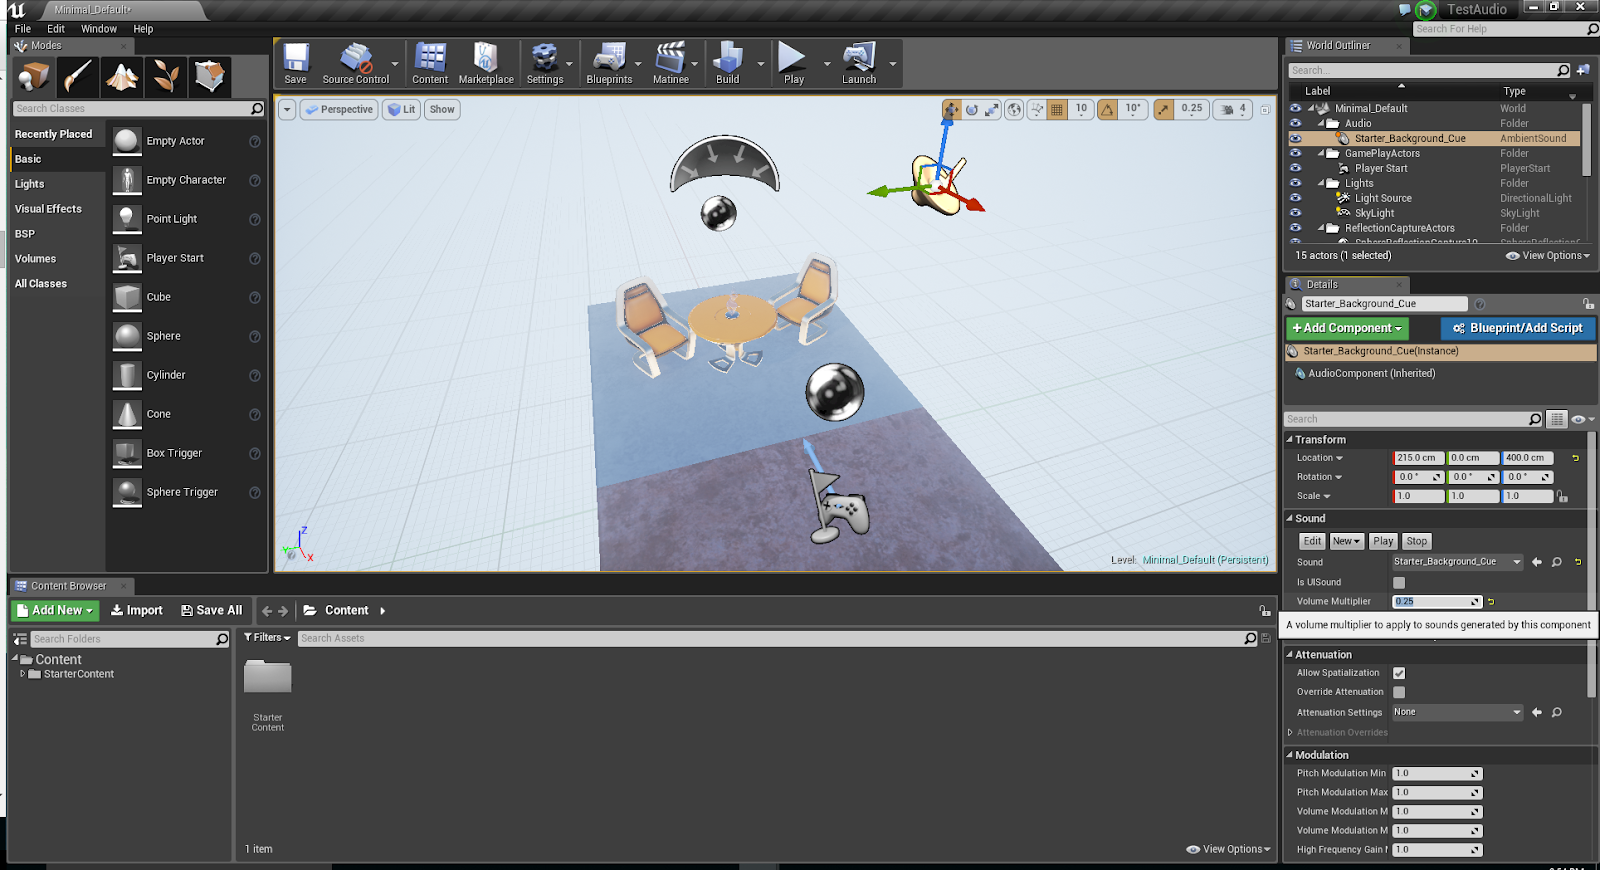
In the default level you’ll have a few objects in 3D space. Navigate around a bit and you’ll find a “speaker” object. This is the level’s Ambient Sound for background noise. Hit the Play button to hear the sound. Back in the editor, click-select the speaker and you will see its properties.
fig 1.2 - default starter content level’s Ambient Sound
With the Ambient Sound object selected, change its Volume Multiplier value to adjust the volume for the Ambient Sound. Take a few moments to Play the level with different volume settings. Since we’re going to focus on music later let’s turn down the default ambient sound to 0.25 or so.
We’ll be using looping Ambient Sounds like this to create our music system, but we’ll be changing their volume levels in real time as the level is being played. For that we’ll need some music files that are ready for this type of use.
1.2 Download the music files
Download and unzip this file: http://devjana.net/support/exampleMusic.zip
Within, you’ll find a handful of WAV files. These are the music files that we’ll use for this example.
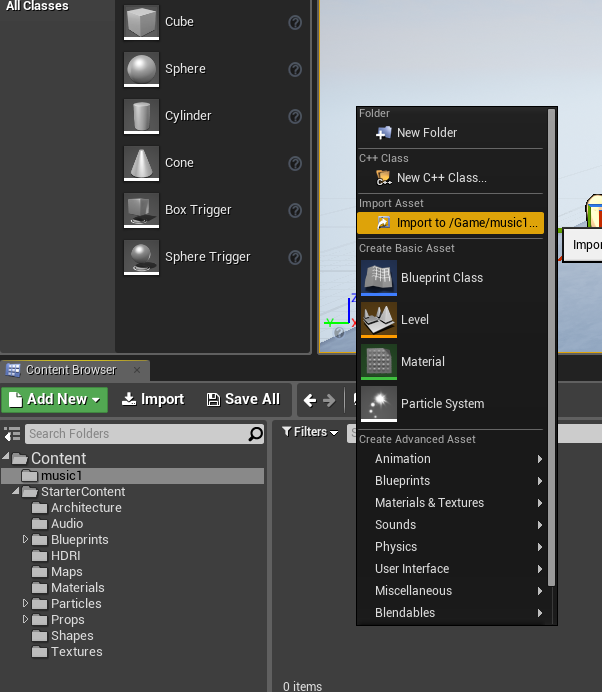
1.3 Import Music files
Back in UE4, navigate to the “Content” folder and create a new folder named “music1”. Navigate to the ne “music1” folder, right click, and choose, “Import to /Game/music1…” from the popup menu.
fig 1.3 - importing audio files
Select the WAV files from location where you unzipped the examples and import them.
1.4 set imported music files to loop
With all of the newly imported files selected, right click them and select “edit”
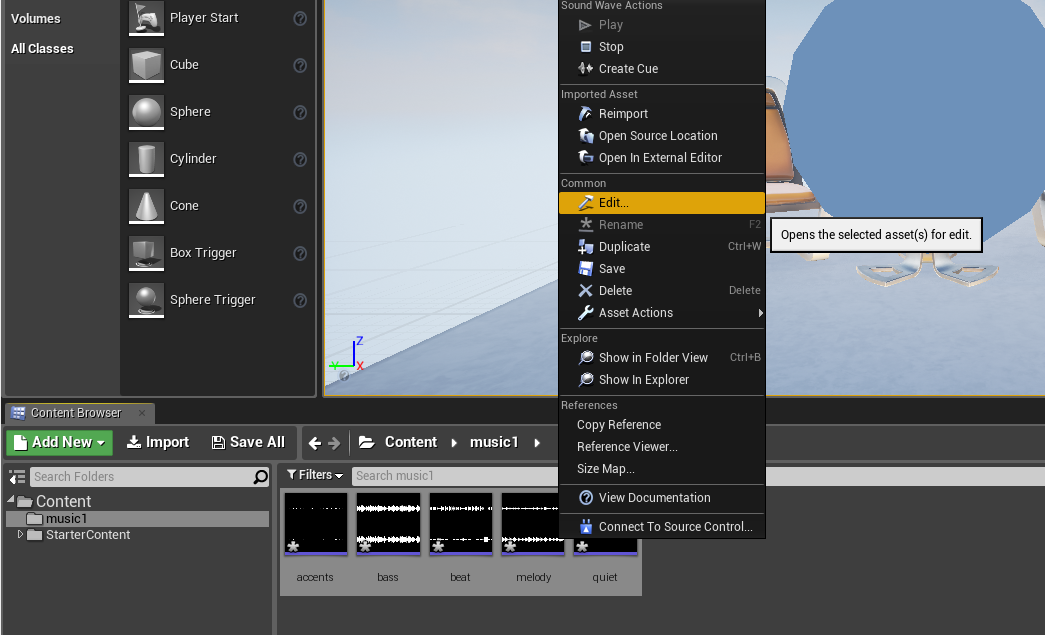
The resulting window should indicate that it is for 5 Sound Waves. We’ll want to make sure these are looping by enabling the “Looping” checkbox.
fig 1.4b - setting all selected sound files to loop
1.5 Place the wave files as Ambient Sounds in the level
One at a time, select each sound file, right-click in the world and place an ambient sound. Repeat for all sounds.
fig 1.5a - placing an Ambient Sound in the level from a selected file
fig 1.5b - all imported sound files placed as Ambient Sounds
You should now have all the music files in the scene. Hit Play and you’ll hear the music with all tracks playing at full volume. By the end of this Lesson Series you’ll be changing their volumes in the Level Blueprint through keystrokes to simulate Level Stages.
Lesson 1 Conclusion:
You should now be familiar with importing sounds and adding them to your levels as Ambient Sound loops. A very simple starting project is now ready in which we’ll build a simple adaptive music system.
Lesson 2: Modifying a Sound’s Volume Within a Level Blueprint
Now that we’ve got the basics of a level together with some looping music we’ll want to be able to manipulate the volumes of these music files while the level is in action. We’ll do this using a Level Blueprint. By the end of this Lesson you’ll have used a Level Blueprint to change the volume of a sound in real time while the level is running.
2.1 Open Level Blueprints
Click “Blueprints and select “Open Level Blueprint”.
fig 2.1a - opening the Level Blueprint window
This will open the Level Blueprint window:
fig 2.1b - the empty Level Blueprint window
2.2 Expose a sound in Level Blueprint and change its volume
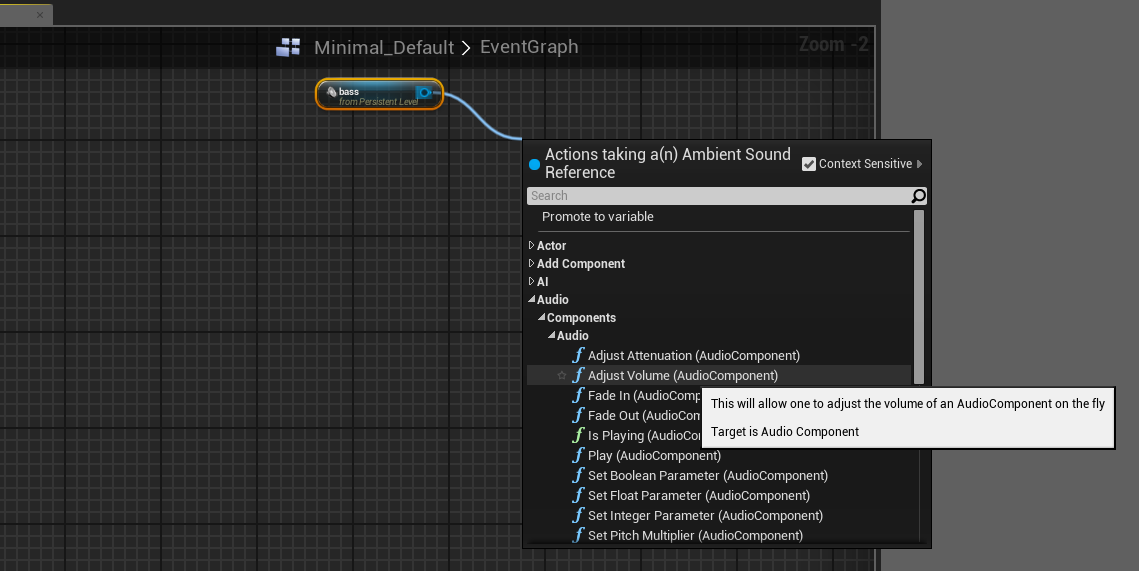
First, we’ll work with the “bass” sound. We’ll need to create a reference to the bass Ambient Sound in our Level Blueprint. To do this, select the bass Ambient Sound object in the level and then right-click in the empty Level Blueprint.
fig 2.2 - creating a reference to the selected Ambient Sound
In the resulting popup, choose “create a reference to bass”. This will add reference to the bass Ambient Sound which we’ll use to manipulate the sound’s volume.
2.3 Add an Adjust Volume Component
Now that we’ve got a reference to the Ambient Sound, we’ll want to adjust the sound’s volume. One way to do this is to click-drag the blue handle on the right of the new reference and drag a line out to the empty Blueprint. In the resulting popup, select Audio-Component-Audio-Adjust Volume.
fig 2.2 - opening the Level Blueprint window
This will expose the ability to adjust the sound’s volume in the Level Blueprint.
Note: Blueprints can get complicated and tough to follow quickly so it is always best to keep them tidy visually. You’ll see that I prefer to stack the Ambient Sound and it’s relatives vertically to group them. We’ll look at this more later.
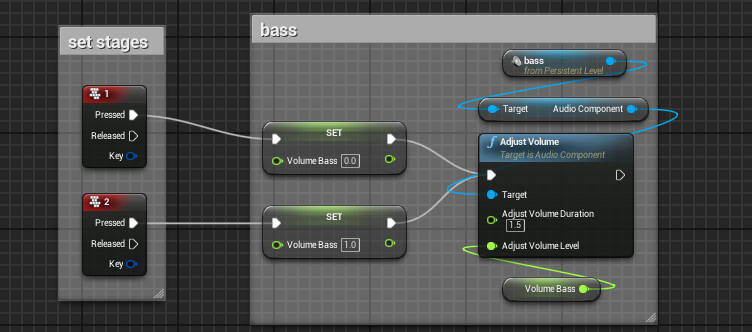
2.4 Adjust Volume via Keystroke using a Variable
The system as planned has 4 Level Stages so we’ll need multiple possible values for volume. To do this, we’ll create a variable that will set the sound’s volume. We’ll then change the value of this variable depending on the current Level Stage.
fig 2.4a - promoting Adjust Volume Level to a variable
First, we need to create the variable. Right-click on “Adjust Volume Level” in the Adjust Volume Component and select “Promote to Variable” in the popup. This will create a new variable that is connected to the volume of our bass.
Note that the new variable is already connected to Adjust Volume Level for bass.
fig 2.4b - renaming the new variable “volume_bass”
It is important to name variables meaningfully as things get confusing quickly if they are not. This one is the volume for bass so let’s name it “volume_bass”.
Next we’ll need a Keystroke to Set the value of this variable. We’ll create a Set for this new variable. One of the easiest ways to do this is to right-click in an empty space in the Blueprint and start typing “Set Volume” in the filter. You’ll see “Set Volume Bass” shown in Variables-Default. This is available because of the name our new variable was just given.
fig 2.4c - creating a Set for a variable
Now that we’ve got a Set for the variable, we want a keystroke to trigger the set variable, which will then trigger the Adjust Volume. Right-click in the Level Blueprint. Select Input-Keyboard Events-1. This creates an Event that fires when you press the “1” key”. We’ll want this to trigger the Set for our variable and then move on to the Adjust Volume.
fig 2.4d - creating a Keyboard Input Event for
To connect this key Event to the Set for our variable, click and drag from the “Pressed” arrow of the key event to the top left arrow of our Set to create the link. Next, create a link from Set to Adjust Volume. Your blueprint should look as shown below:
fig 2.4e - connect the Keyboard Event to Set to Adjust Volume
Run the Level. You’ll see when you press the “1” key it will change the variable value for “volume_bass” and use the Adjust Volume Component.
Try changing the “Volume Bass” value in the Set for different volumes. Also, experiment with the “Adjust Volume Duration” in Adjust Volume. This is the amount of time in seconds the transition will take. I find about 1.5 seconds to work well with this example, but feel free to adjust to your personal tastes.
2.5 Multiple Stages of a volume parameter via keystrokes
We want multiple levels of volume for our sounds, so we’ll need multiple Sets for the volume variable and multiple key inputs. Rt-click in an empty area of the Blueprint and create a new Input-Keyboard Event, but this time for “2”. Also, create a new “Set Volume Bass”. Connect the Pressed for 2 to the new Set. Connect the new Set to the Adjust Volume as we did before.
fig 2.5 - adding a second Level Stage with a new Keyboard Event and Set
Make sure each Set has a different value for it’s “Volume Bass” and run the Level. You’ll see that the 1 and 2 keys now change the volume of the bass sound. Feel free to experiment with the volumes and Adjust Volume Duration.
2.6 Keeping it Clean
As mentioned earlier, Blueprints can get complex and scattered in a hurry. We’ll be adding quite a bit after this step and it is always best to take just a few moments to keep things organized. One of the best tools for this is to use Comment boxes. These can be created from the right click menu where they can be found at the bottom. It is often simpler to just hit the “c” key when in Blueprints. Create a few Comment boxes and organize the current Blueprint. Note that once the Comment box is made, draggin the Comment box will also move all of the nodes within it.
fig 2.6 - using Comments to keep your Blueprint clean
Lesson 2 Conclusion:
At this point you should be able to manipulate the volume of an Ambient Sound in real time. Building upon this we’ll be able to craft a simple adaptive music system that will use keystrokes to move between states 1 through 4.
Lesson 3: Level Stages
The heart of our simple music system is to represent in the music 2 major things: which team is winning and how far along the level is. We’ll start by changing using a single team’s score to move through Level Stages.
3.1 Determining the Level Stages
For each Level Stage we’ll have predetermined volumes for our tracks:
Level Completion | Level Stage | Beat | Extras | Bass | Melody | Quiet |
|---|---|---|---|---|---|---|
less than 30% | 1 | 0 | 0 | 0 | 0 | 1 |
30-60% | 2 | 0.3 | 0.25 | 0.1 | 0.8 | |
61-90% | 3 | 1.0 | 1.0 | 0.5 | 0.5 |
fig 3.1 - basic design of our music system
We’ll be referring to this table as the defacto design document later as we assemble the level music system.
3.2 Changing the volume of the bass Ambient Sound based on Level Stage
We’ve now got 2 “stages” simulated with Keypresses. Let’s expand this to 4. Add using the steps we’ve just completed add Input Events for the “3” and “4” keys as well as 2 more Sets for the “volume-bass” variable.
Set different “Volume Bass” values for the sets and connect as needed. Your Blueprint should look like the following:
fig 3.2 - four level stages triggered by Keyboard Events
Your Volume Bass values may be different than what is pictured. Feel free to experiment and try working with Adjust Volume Duration as well. Play the level and try the 1-4 keys.
3.3 Adding second sound: beat
Now that we’ve got four Level States for bass, let’s add another sound to be controlled by these states. Tracing the steps you’ve used to add bass to the Level Blueprint let’s now add beat:
Select the beat Ambient Audio object in the level
Rt-click in the Level Blueprint and add a reference to beat
Drag out an Adjust Volume Audio Component
Promote the new Adjust Volume Level to a Variable
Name the variable “volume_beat”
Rt-click in some empty space in the Blueprint and create a “Set Volume Beat”
Connect the Set to the Adjust Volume
Repeat steps 6 and 7 to have 3 stages
Adjust the “Volume Beat” values to those shown for beat in the table above (fig. 3.1)
0.0
0.3
1.0
Create a Comment named “Beat” to keep things organized
Your Level Blueprint should now look like the following:
fig 3.3 - adding a reference and setup for beat
At this point, you’ll notice that if Blueprint you cannot connect an Input Event to more than one Set. For this, we’ll need a Sequence.
3.4 Using Sequences to control multiple sounds
Sequences allow a single input to trigger multiple outcomes. Think of it as an “if this then that” with multiple “thens”. In fact, you’ll be able to control how many “thens” - a subject we’ll explore later.
Add a Sequence by Rt-clicking in empty space in your Blueprint. Start typing “sequence” in the filter and select Flow Control-Sequence.
fig 3.4a - using the filter to find and add a Sequence to the Blueprint
We’ll want one Sequence for each Stage. You can continue to create them by right clicking or you can select the newly created one and use Ctrl+W which creates a duplicate.
Once you have four Sequences, connect the “1” key event to the first Sequence, then connect the “Then 0” to the first Set for bass’s volume. Repeat for “2” through “4”. Your Blueprint should look the same as below:
fig 3.4b - sequences ready to handle multiple sounds
Play the level now and you’ll observe the same behavior as before. We’ll now want to set up connections for beat.
If we look at the table from Fig. 3.1 we’ll see that beat has a volume of 0.0 in Stage 1 so we’ll connect Then 1 of Stage 1 to the first Set of beat. In stage 2 beat’s volume is to be 0.3 so we’ll connect Stage 2’s Then 1 to the second Set for beat. In stages 3 and 4 beat’s volume is to be 1.0. As such we’ll connect the Then 1 of both Then 1’s to the last Set for beat.
Your Level Blueprint should now look as shown below:
fig 3.4c - sequences linked to both sounds
When playing the level now you’ll be able to control the volumes of both beat and bass with the number keys 1 through 4.
3.5 Adding Thens to Sequences
Currently our Sequences only have 2 “Thens”, but we’ve got five sounds in the music for our little system. We’ll need to add an output for each of the remaining sounds.
In each Sequence, click “Add pin+” until there are 5 outputs (Then 0 through Then 4).
fig 3.5 - sequences with 5 Thens
Next, we’ll set up the remaining sounds and connect. We’ll then have a working simple sound system.
3.6 The final Blueprint
Referencing the table in Figure 3.1, let’s continue to set up the remaining sounds for our system. This will mirror the steps taken in 3.3. Below are listed the sounds with their Sets and to what their sets connect
Extras:
Set 0.0 connects to
Stage 1 Then 2
Stage 2 Then 2
Stage 3 Then 2
Set 1.0 connects to
Stage 4 Then 2
Melody:
Set 0.0 connects to
Stage 1 Then 3
Set 0.1 connects to
Stage 2 Then 3
Set 0.5 connects to
Stage 3 Then 3
Set 1.0 connects to
Stage 4 Then 3
Quiet:
Set 1.0 connects to
Stage 1 Then 4
Set 0.8 connects to
Stage 2 Then 4
Set 0.5 connects to
Stage 3 Then 4
Set 0.3 connects to
Stage 4 Then 4
Your Level Blueprint should look like the following:
fig 3.6 - sequences ready to handle multiple sounds
Feel free to play with the Adjust Volume Durations for the sounds as well. Playing the level now should allow you to use the 1-4 keys to control the levels of each layer of the music. You’ve now successfully created a simple adaptive, stage-based, level music system.
3.7 Keeping it Clean again
Things are getting pretty scattered in there. If you aren’t familiar with Collapsing in Blueprint this is a good opportunity to explore it. Click-drag a comment and the nodes within it. Then Rt-click and choose Organization-Collapse Nodes. A combination of Comments and Collapsing can help keep things manageable in the Blueprint window.
fig 3.7a - drag selecting multiple nodes for collapse
fig 3.7b - collapsed Blueprint
Lesson 3 Conclusion:
The foundation has now been laid for your adaptive level music system. We’ve got a team score driving the volume of a track and also determining the Level Stage which drives the beat beneath the basic volume.
Next Steps:
Experimenting with Pitch
Similar to Adjust Volume, there’s an Adjust Pitch Audio Component that can be useful with which to experiment. Your best results will be to try values of 1.0, 0.5, and 2.0, but be prepared for some really outlandish results.
Connecting to game events
You’ll want to connect the stages to in-game events. The simplest way to do this would be to have checkpoints that increment the level stage as the user passes through them or pickups that each represent a level stage. In a multiplayer setting you can use team scores to determine Level Stages. Consider how different volumes could represent different teams winning.
Working with a musician/sound designer
When working with a musician/sound designer you’ll want to ask for the “loop stems” in order to get the types of files as we used here so you can mix them in real time in the game.
I hope this has been helpful. Feel free to contact me if you have any feedback or questions: @devjana
Read more about:
Featured BlogsAbout the Author(s)
You May Also Like


.jpeg?width=700&auto=webp&quality=80&disable=upscale)


