Featured Blog | This community-written post highlights the best of what the game industry has to offer. Read more like it on the Game Developer Blogs or learn how to Submit Your Own Blog Post
HDR Audio in Wwise: Best Practices (so far)
Learn some best practices learned (so far) in using the new HDR audio feature in Wwise 2013.1. Originally published here: http://bit.ly/11OdWRS

Audiokinetic has released Wwise 2013.1 with many new features, among them PS4 support, ITU BS 1770 compliant loudness meters and HDR audio. We worked with Audiokinetic to develop the HDR feature set over the past year and now that it's out, I'd like to share some of my best practices that I've come up with (so far) in using it:
1). Keep it mellow – The first thing to be aware of is that the Wwise implementation of HDR audio is a relative volume scheme. We initially played with using SPL, similar to DICE's Frostbite Engine, but abandoned that because a). we learned that even DICE didn't use real-world SPL values, which sort of negates the whole reasoning behind using real-world values to set volume and b). because not everyone would use HDR and introducing a second volume slider (Volume and SPL) in Wwise just confused and overcomplicated things. So anything you want to be affected by the HDR effect (which may generally include all game sounds except UI, mission critical VO and the like) will live in its own bus with a special HDR effect on it. But this bus should be kept at a reasonable level. Generally around -12 to -18 dB. This will give you headroom in the final mix, and give your loudest sounds the ability to play without clipping. Furthermore when you have lots of very loud sounds plays, a more conservative bus level will allow things to sound cleaner. For individual sound structures, you can start with 0dB as your baseline, bring down sounds that should be quieter in the mix and bump up the louder ones above 0dB so they'll push the HDR window up when they play.
2). The voice monitor is your best friend – The new voice monitor (shortcut: Ctrl + Shift + H) is a fantastic asset for tuning individual sound levels within the HDR space. Being able to visualize the input and output of all sounds, as well as see what affects the HDR window and how is immeasurably important when it comes to tuning individual sounds within the HDR space or preventing pumping of quiet sounds when a loud sound plays. The voice monitor is a fantastic tool whether or not you're using HDR, but the ability to see the window behavior really makes it very intuitive as to how the effect works.
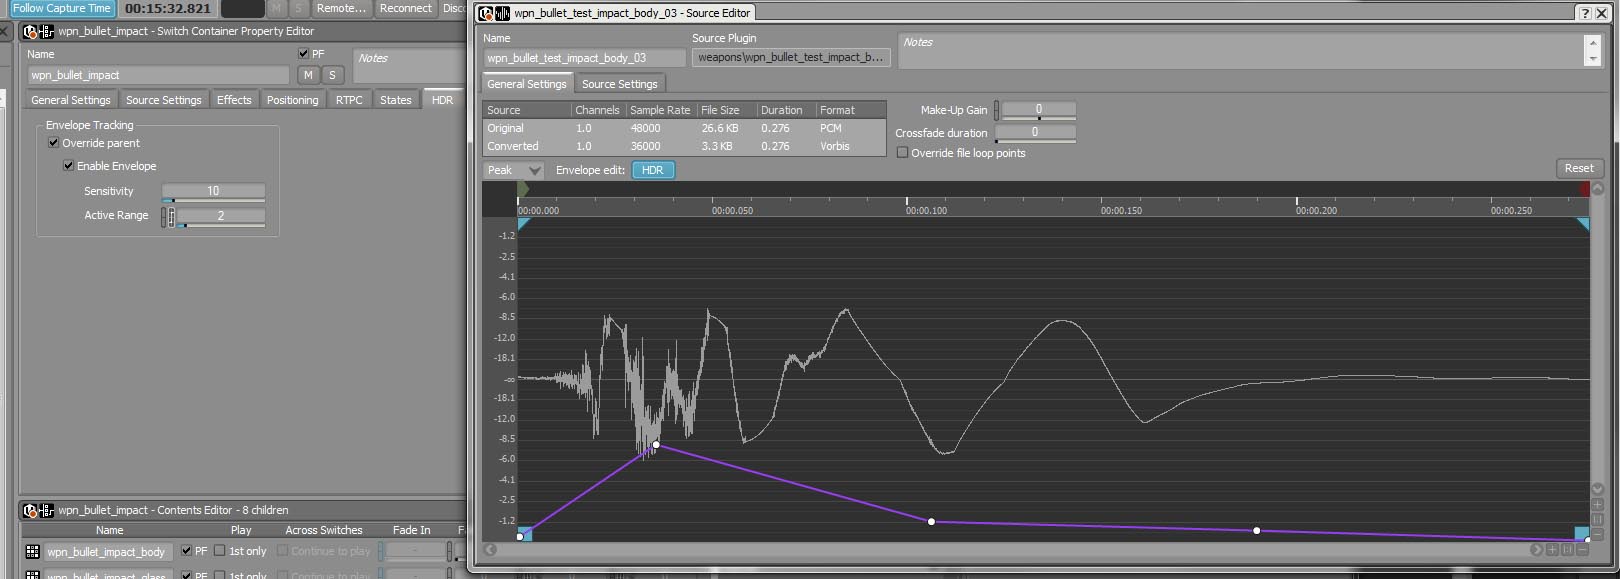
3). It's okay to cheat – Don't be afraid of a little judicious use of make-up gain to make an important sound punch through without affecting the HDR mix. Make up gain is applied post-HDR effect, so it won't affect the window movement, but will boost a sound's level. More importantly, play with the sensitivity slider in the HDR tab to dial in the best curve for your sounds. The HDR window can follow the volume of a sound, but often you only want the initial transient to affect the window and the tail to decay naturally while letting quieter sounds come through. For even more granular control, you can edit the envelope of individual waveforms in the source editor window. As an additional control, you can also reduce the tail threshold for louder sounds. Most of my louder sounds are set to 3 or 6, which means after the first 3 or6 dB of loudness, the sound is removed from the calculation of the HDR window.

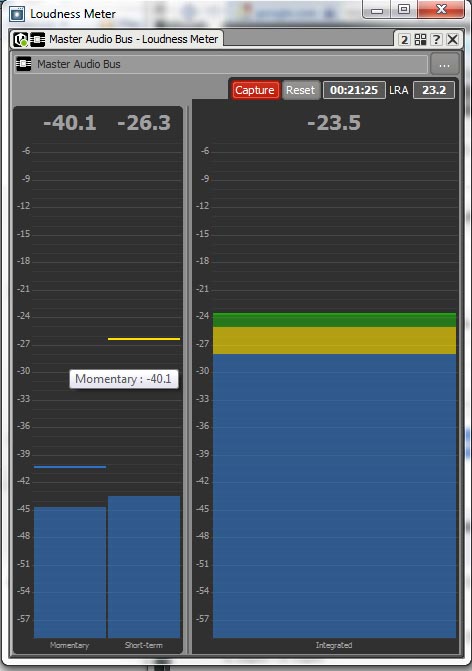
4). The EBU/ITU-R BS.1770 standard is gold – Keep you game averaging around -23 LUFS/LKFS (based on a minimum of 30 minutes of gameplay). Everytime you play your game, connect Wwise and keep an eye on the Integrated meter in the Loudness Meter. What matters here is the AVERAGE loudness, the longer you capture, the more accurate your measurement. As a rule of thumb, I always keep the loudness meter up and running in my project.

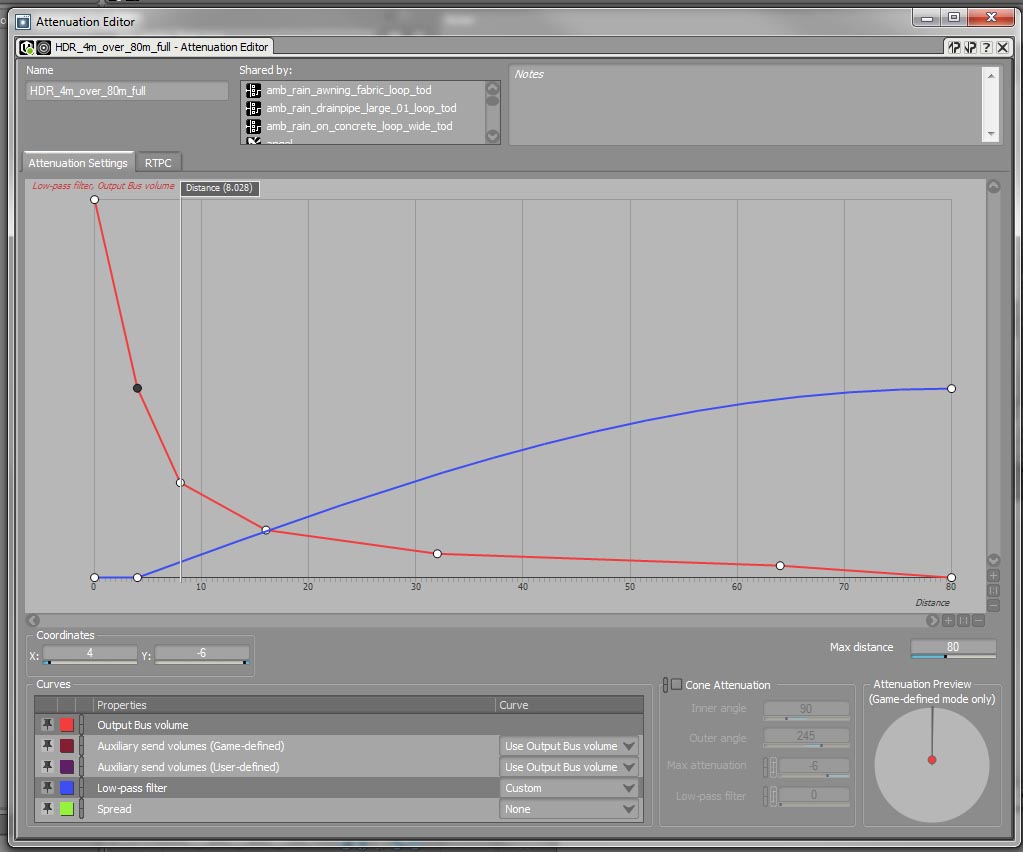
5). Inverse square attenuation make sounds behave naturally – one of the initial “issues” I had once we got HDR working in our game was that using our old attenuation curves (generally an exponential curve over a set distance based on the general loudness of the sound ranging from 15m – 250m) just didn't work as we needed them to. We wanted attenuation curves to sound natural in a real-world environment, so I created a set of inverse-square curves. The inverse square law states that the volume of a sound is halved by a multiple of every x meters. For example the most common curve we use falls off fifty percent every 4 meters over the span of 80 meters. So at 0m it's 0 dB, at 4m it's -6dB, at 8m it's -12dB, at 16m it's -18dB, at 32m it's -24dB, etc. This has the added benefit of limiting the number of attenuation curves needed which is a performance savings. Of course, inverse square curves are not a blanket solution, there will always be times when you want/need something custom, so we still maintain some custom curves.

6). Only generate envelopes on the important sounds in the game – This is a simple optimization tip. It takes CPU to constantly analyze the envelope of every sound. I only generate envelopes for the louder sounds in my game (making sure they're not generated on ambience and incidental effects). It won't affect the mix, but provides some performance savings.
I'm happy to share the settings I have on my HDR effect, but I feel this will vary based on project, so I'm not sure how useful that would really be for people. Another feature we've added is a speaker_type switch controlled by an rtpc which affects the HDR threshold based on the speaker type the user is playing through. The end result is automatic dynamics switching based on speaker type where the better your speaker system, the greater the dynamic range in the mix (similar to what games like Uncharted offer in their audio options menu). In short, there's a ton of ways to use this great feature, and I'm sure there's going to be plenty of other tips and tricks people figure out as they start to play around. Enjoy!
Read more about:
Featured BlogsAbout the Author(s)
You May Also Like


.jpeg?width=700&auto=webp&quality=80&disable=upscale)


