Game Audio Theory: Ducking
'Ducking', or lowering the audioscape volume, can create greater engagement for listeners, and Day 1's Quarles explains how it's done in this in-depth game audio feature.

['Ducking', or lowering the audioscape volume, can create greater engagement for listeners, and Day 1's Quarles explains how it's done in this fascinating game audio feature.]
When watching a big action scene in an adrenaline-fueled summer blockbuster, a viewer is bombarded with lights, quick camera cuts, explosion sounds, a pulse-rattling score, and a hero that often mutters a snarky one-liner before sending the primary antagonist into the depths from whence he/she/it came.
As someone in the audio field watches the scene, they automatically peel the sequence apart layer by layer. You have the musical score, the hundreds of sound effects playing at once, the dialogue track, and on top of all that, you have a gigantic mix that must be handled elegantly and intelligently so the viewer understands what is happening onscreen and does not go deaf in the process.
There are multiple techniques in a post-production environment that are often used in tandem when pushing towards the final mix. Methods such as side-chain compression and notch EQ play very important roles in film and television, but they are a linear/time-locked medium.
Since the video game medium is interactive in nature, you cannot always predict where a player will go and thus, how a sound will be played (and heard) in the game world. Couple these issues with real-time effects being utilized (reverb, distance-based echo, low-pass, etc.) and it can be very difficult to lock down exactly where the audio spectrum is at any given time.
One important technique that audio professionals oftentimes employ to great effect is one that is called "ducking." Ducking, at base level, is essentially the practice of discreetly lowering the volume of all elements of the audioscape with the exception of the dialogue track. This allows more headroom in the final mix, which will provide important information to the listener that may otherwise be missed due to the complexity of what is going on within the soundtrack at that particular moment.
Pacing
To understand the validity of a process such as ducking, certain elements must be taken into account beforehand. First and foremost on this list is game pace. Game pacing is a basic game design practice. It is essentially the approach of creating a gameplay experience that has multiple peaks and valleys in the action so the player does not become fatigued and disinterested in the product.
Audio plays a key role in effective game pacing. The reason is simple; the vast majority of elements in a game have an aural representation, and if the gameplay action and visual portion of a product is relentless for too long, the audio spectrum will lose dynamics and quickly become a wall of noise. When this happens, the player will more than likely turn down or mute the audio -- thereby destroying the atmosphere and the pacing that the developers were trying to achieve.
Fortunately, there are a number of ways in which a development team can avoid this problem. In an ideal scenario, the audio team would be involved with all level layout meetings and planning discussions to help with audio pacing through the game.
Much like a great piece of music, a game has a "rhythm." It has establishing motifs and themes, it has gradual builds and rising action, it has massive climaxes, it has denouements, and it has resolves. If it's a constant climax, the player will get exhausted and probably pretty frustrated after awhile.
In addition, as a project gets closer and closer to final lock-down, the more important it becomes that the audio department is aware of any changes that occur at the design level. For example, if a new battle encounter is added to a section of the game where there wasn't one before, the "rhythm" of the level has now changed.
The audio department needs to be able to go through the levels and do a final mix of the entire game from top to bottom after design has completed any major reworks to make sure that the aural integrity remains intact throughout the shipping process.
Priorities
Besides having the audio team in the know from a game design standpoint, there are some basic system elements that need to be addressed. At the very top of the list would be "priorities." There are certain sounds that are more important than others. A voiceover line that tells the player what they should be doing is far more insightful than a looping cricket call, for example.
This is where a priority system comes into play. The human ear cannot distinguish hundreds of independent channels of audio at any given time. It simply becomes a wall of sound, so there needs to be a limit put in place.
Generally a set number of allowed simultaneous channels that can be played at any given time will be set at the beginning of the project by the programming staff. From there, different "sets" of sounds will be given a different priority, which means that the higher priority sounds will trump anything else that is playing through the mixer at that time.
After the high priority sounds have finished playing, the lower priority sounds will pick up where they left off. If the priority system is set up properly and the sound sets themselves are organized in an intelligent manner, the player will never know that certain sounds have stopped playing and started again.
Bus
The next subject that I'll go over is the idea of bus hierarchy. Busses have multiple names: Sound Groups, Channel Groups, Volume Groups, SoundClasses, Event Categories, etc, etc, etc. For the purposes of this article, I will refer to all of these as "busses." Busses and sub-busses are essentially groups and sub-groups of certain types of sounds.
We lump things together for two major reasons. One of them is purely for organizational purposes. The other and more practical reason is to be able to affect similar types of sounds all in one fell swoop.
So, if all of the player's footsteps on all different types of substances (concrete, marble, grass, mud, snow, gravel, broken glass, etc.) have to be lowered in volume and pitch, we wouldn't change the values on each individual sound, we'd do it on the bus level, which would affect all of those sounds. This simplifies the process significantly and lessens margin of error when trouble-shooting audio settings and/or volume tweaks.
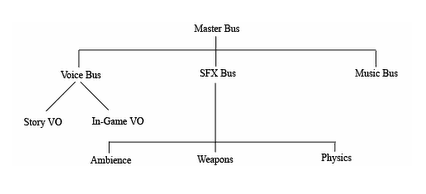
Now we obviously need to make sure that the bus hierarchy is split up and grouped in a sensible way. We don't want things to get messy, because it will circumvent what we're trying to do; which is keeping things nice and tidy and ready for ducking! Here is a very basic but common bus hierarchy breakdown:

So, at the top of the chain you have the Master Bus. Think of this as your volume control on your TV. If you adjust this, you adjust everything in the mix. Then you just follow the chain down from sub-bus to sub-bus. You would want to categorize similar types of sounds within the sub-busses. For example, you might want to put all physics-based sounds in a sub-bus under SFX (sound effects) and then all bullet impacts on a separate sub-bus under "Weapons," which is also under SFX.
Practice
Now in terms of ducking (specifically ducking when voiceover is occurring), you'd want to put all sounds that you do not want ducked in the same bus. As a practical example, we'll look at Lucasarts' Fracture.
Fracture was designed using the DESPAIR engine, a first generation technology engineered by Day 1 Studios. The audio engine is an amalgamation of Firelight Technologies' FMOD and Day 1's internal tool suite.
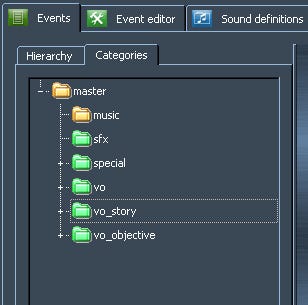
From an authoring standpoint, all of the voiceover files were brought into FMOD's Designer tool, placed in the VO_Story bus, and then had all priorities and parameters set from there.

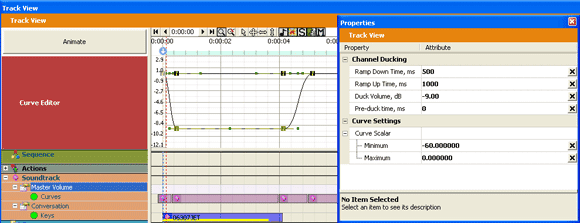
After the audio pack files are built and ready to go we then open up Day 1 Studios cinematic tool, Outtake, and place the desired file in the soundtrack property:

(click image for full size)
As you can see, when this file triggers, a host of options are available to the user to essentially determine how the ducking will behave. In the case of this particular file, the ducker will ramp down all audio except the voice-over to the established target volume of -9 dB over the course of 500 milliseconds (or half a second). It will stay at that volume until the file ends and then it will ramp the rest of the audio mix back up to default volume over the course of 1000 milliseconds (or one full second).
By default, the ducker will engage at the beginning of each file, but there is an option to offset the start of the file to the ducker, so you could begin the audio ducking before the file begins to allow more of a preparation for the listener to really hear the intended sound.
Conclusion
It should be stated that ducking is a tool and technique that should be used wisely and in conjunction with other methods of mixing. If it's used too frequently or aggressively, it will become distracting for the listener. Sometimes people feel like this is an unnecessary feature in an audio engine, but given the unpredictable nature of player behavior I feel it's valuable to have every tool at the content creator's fingertips.
If used properly, it's a very powerful method of guiding what the player should be listening for and at its very root, helps tell the story of the game that you and your team have created.
---
Title photo by Mattay, used under Creative Commons license.
Read more about:
FeaturesAbout the Author(s)
You May Also Like


.jpeg?width=700&auto=webp&quality=80&disable=upscale)


