


Trending
Opinion: How will Project 2025 impact game developers?
The Heritage Foundation's manifesto for the possible next administration could do great harm to many, including large portions of the game development community.
Week 4 was spent on delving into lighting.

Week 4 was spent on delving into lighting and because of that it was the first time I was really delving into the glsl code for this project. Previously I have done some coding in hlsl for Unity projects as well as some visual coding in Unreal and Unity’s shader graph, so the waters were not totally unfamiliar.
Multiplication lighting:
The simplest form of lighting is by multiplying the color obtained from reading your texture by a separate color. In the fragment shader you just need to set the frag color to the following:
FragColor = texture(“uniform for texture”, texCoord) * lightColor;
The following pictures show the before and after of this method for lighting. The background color is not actually influenced by the lighting, I just changed it for effect.


Diffuse lighting:
The next type of lighting was diffuse lighting. It would be added on top of the multiplication lighting we already had. The way diffuse lighting works is by taking the normal at a specific pixel as well as the direction of a light and taking the dot product. The light position can be passed in as a uniform as was mentioned during the Week 3 blog post about textures.
Once you get a value from taking the dot product of the normal and light direction you can multiply it after the light color.
FragColor = texture(“uniform for texture”, texCoord) * lightColor * diffuse;
The following images show the effect of diffuse lighting. Before the addition of diffuse lighting there was an extremely flat feel to the lighting. The whole magnet had the same intensity, with the addition of diffuse lighting there are parts covered in shadow and others that are more lit up.
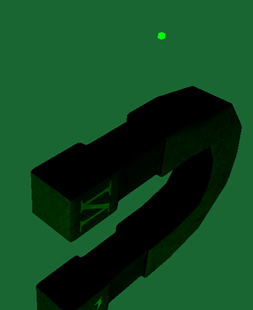

In order to lighten up the darker parts of the magnet we need to add in ambient light. For this I just added a value of 0.2.
FragColor = texture(“uniform for texture”, texCoord) * lightColor * (diffuse + ambient);
Implementing specular lighting:
The lighting method that we have been implementing is called “Phong Shading” (Phong shading - Wikipedia).
The last step in creating Phong Shading is to calculate the specular light. The calculation involves getting the view direction of the camera as well as the reflection direction of the lightsource. You then take those two and apply the dot product on them. Afterwards, put that value to a power so that the larger the angle between the view and reflection directions the weaker the specular light becomes. You then multiply the maximum specular light value, in this case 0.5. Then in the area where we added together the diffuse and ambient, add in the specular lighting.

The following gif shows the full implementation of Phong Shading.

Overall it was pretty interesting to start coding more deeply in glsl and it really influenced where I wanted to go with the project. I was inspired to make Cell Shading and Gooch Shading work in my small engine, which is what I would be working on for the next two weeks.
Read more about:
BlogsYou May Also Like


