


Daily news, dev blogs, and stories from Game Developer straight to your inbox
Sponsored By
Featured Blog | This community-written post highlights the best of what the game industry has to offer. Read more like it on the Game Developer Blogs or learn how to Submit Your Own Blog Post
Rapid Level Creation On A Budget With Google Warehouse And Unity Pro - No Artist Required
How I used SketchUp, stock assets from Google Warehouse, and Unity Pro to make most of Energy Hook, with little to no artist skills of my own.
16 Min Read

For some reason, I’ve had a lot of trouble finding an artist who would be willing to work with me on my indie game Energy Hook. I can’t imagine why - who wouldn’t jump at the chance to work really hard on someone else’s game for no pay? Although some brave artists like Paul Whitehead, a fellow Treyarch ex-pat, volunteered to do a little part-time work here and there, for the most part I was on my own.
So I wondered, could somebody with almost no art skills to speak of make a game that people might be willing to back on Kickstarter? I figured, probably not, if the game looked like this:
Still, left mostly to my own devices, I managed to get the game looking like this: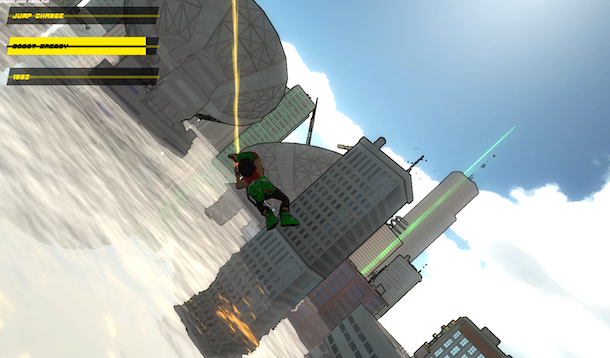
Which I thought wasn’t bad for a non-artist, and backers on Kickstarter seem to agree.
So how’d I do it?
Google warehouse.
Since the game takes place in a city, and there are a ton of city assets in Google Warehouse, it was a match made in heaven. But I’ve also found jetpacks, boots, gauntlets, antennae, water tanks - Google Warehouse seems to be a place you can go for free assets of all sorts, and maybe I'm not the only one who can find the assets one needs there.
Warning: Here Be Dragons
The problem is that almost everyone says, “Don’t Do That.” And their reasons are good ones:
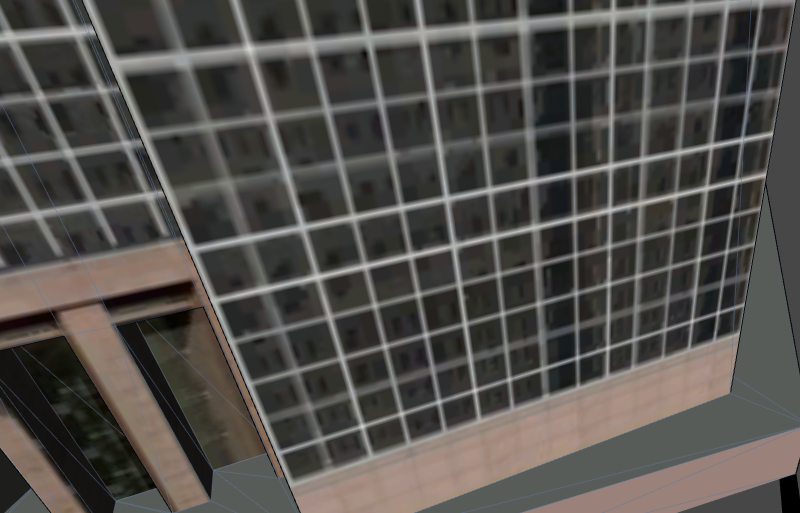
SketchUp models are not optimized for games. They are broken down into lots of smaller submeshes, each requiring its own Draw call, and it doesn’t take many of these inefficient models to turn your game into a slideshow. This fairly simple model looks incredibly complex to Unity, and I’m showing just a fraction of its sub-objects here:
Compare that to a building that Paul modeled in Maya which has much higher geometric density, makes one Draw call, and looks perfect:
Most of the models in Google Warehouse are textured haphazardly, often by having satellite photos arbitrarily stretched over them. Others look okay from a distance, but in-game, once you get up close, you see artifacts and the blurriness from the low texel density.
Here's a particularly bad texturing job, even from far away:
But even decently textured buildings look unprofessional up close:Finally, there can be copyright issues. A lot of the stuff in Google Warehouse is ambiguously copyrighted - the likeness of a building is usually owned by the owners of the building, and there are various rules about what constitutes fair use of such likenesses. Back in my Spider-Man days, when we were modeling a hyper-real Manhattan, we had multiple staff members devoted to just contacting the owners of Manhattan buildings and seeing if we could use that building’s likeness in the game. There’s also some clear outright copyright violation in Google Warehouse, such as when someone decides to model an X-Wing fighter and put it up for the rest of the world to use.
But those problems can be mitigated, and the advantage of being able to rapidly create a game even without an artist on hand is too good to pass up. So this is a viable method of level construction for a variety of uses:
if you’re a hobbyist game developer
if you’re looking for placeholder assets to prototype with
if you’re looking for assets that will never be too close to the in-game camera (buildings in the distance; or a racing game where the off-track assets are whipping by at 100 mph)
if your game has a highly stylized non-photorealistic look
Doing this is unfortunately not appropriate for mobile development - even with Unity Pro, the performance of these assets are simply not good enough for mobile.
Mitigating The Issues
Performance
First off, the big question is how do we mitigate the performance problems? And, unfortunately, part of the answer is to use Unity Pro, which costs $1500 a seat. There goes our shoestring budget. We have to use Unity Pro because Unity Pro has a “static batching” feature that takes SketchUp’s pile of tiny, inefficient meshes and batches them together into larger, more efficient meshes that use fewer draw calls. The improvement in framerate I witnessed when I migrated from Unity Free to Unity Pro was staggering. 
You can tell the static batching is working if the ‘batched’ statistic next to the Draw Calls shows a nice big number. (And your framerate doesn’t suck.)
On the bright side, you can try Unity Pro for free for a month, and use that time to decide if static batching + SketchUp assets is right for you.
There are a few other techniques you can use to improve performance still further:
You can simplify the assets and delete extraneous parts of them from within SketchUp.
You can use a free tool called PlayUp to export your assets from SketchUp. PlayUp is much better about combining submeshes than the default Unity exporter is.
You can use tools like MeshBaker to combine your meshes and textures into single models that take fewer draw calls.
Copyright
My approach to copyright has been twofold:
I usually change the assets in some way, stretching or squashing them, cutting a piece off or mashing two buildings together.
Hope and pray that I don’t piss anybody off. My mantra has been “It’s easier to get forgiveness than permission.” Because this is a downloadable PC title I’m working on, if it turns out that one of these assets inadvertently does violate someone’s copyright, I can simply remove it, replace it with something roughly the same shape, and update. If this was a boxed or console title, this would be a mistake; I’d have to make sure to get permission first.
Texturing
Texturing is the hardest problem to deal with. Paul teaches a class on texturing at DigiPen and tells his students, “There are no shortcuts.” Here there are three options:
Spend almost as much time re-texturing these models as I would have if I modeled the asset myself. I exaggerate a bit, and still sometimes choose to do this, because I find that when I take other people’s assets and improve them they look a lot better than when I try to create something myself from scratch.
Have a highly stylized look that lets me get away with manky textures. One of the reasons I like cartoony shading.
Accept that the textures won’t look that good up close.
PlayUp vs. SketchUp’s Built-In Exporter
There are two ways to export a model from SketchUp into Unity, both with drawbacks. There’s a public domain tool called PlayUp designed to let you bring models from SketchUp into any engine. The advantage of PlayUp is that it creates more efficient models that use fewer draw calls, and if you’re using Unity Free is definitely the way you should go.
The disadvantage of PlayUp, I’ve found, is that it often fails to get the texture UV’s correct. So, since I’m using Unity Pro and therefore don’t need the efficient meshes, I’ve been using SketchUp’s built in exporter.
I’m describing using SketchUp’s built-in exporter below, but there’s something to be said for using both! Use the built-in exporter for your static meshes that will be batched; and use PlayUp for dynamic meshes (assuming it keeps their UV’s intact.)
My Workflow
After some experimentation and some dead-ends, here is the process I eventually settled on for populating New Atlantis with stuff. This assumes familiarity with SketchUp and Unity - if you’re new to either of those products, there are plenty of tutorials to get you up-and-running - I’d recommend spending at least a couple days with each before tackling this.
The SketchUp Side
So, maybe I decide I want to have a wind-farm in my level. So I’ll need a bunch of wind turbines.
I create a new model in SketchUp. The default settings, which are in meters, are fine. I’ve deleted the sample figure that’s there and re-saved that file as my default template.
I go to File -> 3D Warehouse -> Get Models... and search for the model I want. I sometimes use the Advanced Search to look for models that aren’t too complex, and I sometimes grab overly complex objects and delete some of their complexity later.
(Often when I’m searching for something, I’ll find something else that looks cool and appropriate for my level, and I’ll grab it and run with it. It’s easy to get distracted but all good in the end.)It’s hard to tell just from looking at the models in the warehouse how complex they are. I may want to download a few and take a closer look.
I place the model so the origin is where I want the model’s pivot to be in Unity. For the wind turbine, it’s at the center of base of one of the turbines.
I delete everything I don’t want. This usually requires right-clicking on the model and using Explode; it sometimes also requires right-clicking on the component I want to delete and choosing Unlock; and then I can delete stuff by selecting it (or group-selecting it) and hitting the delete key.
I have the model I want to put in-game now. I save it as a .SKP file in a SourceAssets folder, and am ready to export the .DAE file into my Unity project’s Assets folder.
Here’s where we need to think about the directory structure of our models and our materials. We can make models share the materials that get exported from SketchUp, or we can put them in their own separate folders. On the one hand, reusing materials is a good thing: it means less memory usage and more stuff that Unity can batch together. (Changing materials almost always means a new draw call.) On the other hand, often our models will accidentally share the same material name (like “building_face”) and then Unity will automatically use the pre-existing material and our new model will look wrong. I have two folders in my Assets directory - one for models that can share materials and one for models that won’t. When in doubt, I export models to their own subfolders in the nonsharing folder, to make sure their material names don’t collide. When I create the model myself, using stock or my own custom SketchUp materials, I share. This windmill uses stock SketchUp materials, so I export to the shared folder, with Export -> 3D Model.
The Unity Side
Now I switch to Unity. If I’ve done everything right, it will automatically load the new asset into the project folder, but I want to tweak some settings before bringing that wind turbine into our level.
Meshes - Scale Factor: different modelers model in different scales, but I’ve found that usually 1 SketchUp unit ~= 2 cm. I like 1 unit == 1 m in Unity (and that’s often the scale stock unity assets are built on), so I usually use a Scale Factor of 0.02. This isn’t the only way to do it, of course - it might be smarter to rescale everything in SketchUp, so you can have a consistent Scale Factor on the Unity side.
Meshes - Generate Colliders: this will make my model physical, so my character can collide with it (or raycast an energy line to it). I’ve been turning it on for almost everything and haven’t noticed performance problems.
Meshes - Generate Lightmap UV’s: I personally prefer baked lightmaps with ambient occlusion to dynamic lighting and an SSAO shader, although it’s less dynamic at runtime.
Meshes - Mesh Compression. I usually leave Mesh Compression off, because sometimes I see weird behavior with it, but have rarely noticed problems with Optimize Mesh on.
Materials - Material Search: Local Materials Folder. This will help me make sure none of my materials accidentally collide; if I intend to share some default materials, then I widen the search.
I can now put the new asset in the level. It’s worthwhile to parent it to an empty GameObject and make that a prefab - if you make a prefab directly out of the model, it doesn’t seem to automatically update when you re-export the .SKP file.
I adjust the materials and shaders. For Energy Hook, so far, I’ve been using the stock Unity toon shaders for ramp-lighting on stuff that I don’t want to be shiny, and the stock reflective shader for windows and shiny things. (For outlining, I use Edge Detect Effect Normals from the Unity Pro post-processing shaders.) You’d want to do your own things for your own look, of course.
Check the object’s Static checkbox, and make all its children static as well. This is necessary both for the static batching and the lightmaps.
If the object is made up of overlapping transparent parts, I’ll use the Transparent/Cutout shader so the transparent bits are z-buffered correctly.
I may want to bake lightmaps for that object right then, which takes a few minutes. Or I may wait until the evening and bake the whole scene, which can take hours. Some key settings I use with the light-mapper are: Shadow Samples 1000; Ambient Occlusion 1; Resolution 5 texels / world unit.
Now I can use that prefab all over the level - I can also, usually, scale it (within reason - texel density is still an issue here) and even flip it across its axes, to create a variety of instances from a single batchable model.
Editing The Textures
The way I’ve mostly been cleaning up my SketchUp model’s textures is to either get rid of them entirely, have them map into a giant palette texture that Paul provided, or increase their resolution and then apply certain artist effect filters to them in Photoshop or Gimp. A cut-out or oilify texture fits our world’s cartoony look much better than a muddy photograph. It’s tempting - and easier - to do this on the Unity side, in the assets folder, but then if I decide to make changes to the .SKP model, when it re-exports the textures it can write over my work.
Another drawback to SketchUp is that it stores the texture information in the .SKP file instead of in separate, easy-to-get-at image files. To edit SketchUp textures, I have to go to Preferences->Applications to set which image processing app I wanted to use, and then in the Paint browser, click the drop-down to find ‘Colors In Model’ - only from Colors in Model can I then right-click on a material, select ‘Edit...’ and make my improvements.
Another thing I do in places is replace the model’s materials completely - sometimes going with flat-shaded materials, other times using stock materials from the asset store, and once in a blue moon drawing my own texture.
This is another way to give different instances of a model their own look, but it’s important to remember here that new materials mean new Draw calls - if I gave every instance of a model its own materials, the static batcher would no longer have anything to batch.
Is “Stock” A Bad Word?
So, that’s what I’ve been doing, and now you can do it too. Feel free to get in touch, ask me questions, tell me better ways to do things, and show me what you come up with!
One thing I didn’t mention: working this way is fun as hell. I love the feeling of raw creativity, of being able to get an idea and make it happen that day. I feel like Phineas saying to Ferb, “I know what we’re going to do today,” and doing it. Such a change from game development ten years ago, when we had to walk uphill both ways in the snow.
On the other hand...
Ever seen the Metallica documentary, Some Kind Of Monster? They used the word ‘stock’ like it was the ultimate artistic sin. “How does this riff sound?” “Stock.”
More than half of Energy Hook’s assets, at the moment, are stock. It would be easier for me to tell you which objects aren’t stock assets than which are. Even our protagonist and her animations are stock assets. Some other game developers with good eyes have called out some of my assets: “Hey, that’s the default Unity skybox!” I changed it up a bit, but yes.
And I’m not currently not sure how much I’ll be able to replace with lovingly artist-created assets and how much will remain in the final product - it depends on how much money the Kickstarter raises.
Basically, making a game like this with no budget to speak of means I have to embrace “Stock,” at least for now. It’s taken me a bit of getting used to, coming from a AAA background where everything was original. But other than that skybox, so far people seem to be quite happy with the final product. And hey, I can enjoy a movie even if it has the same actor as another movie, or if it has the Wilhelm scream. Not to mention I liked Metallica’s early stuff a lot better, back when they didn’t mind stealing a riff from, say, Diamondhead or Budgie.
Hey, almost everything is remix / mash-up / kit-bashed. I think the really important thing is that your conglomerate creation is still original, still yours - it’s more than the sum of its parts. And if you think so too, back my Kickstarter or vote up Energy Hook on Greenlight!
Read more about:
Featured BlogsAbout the Author(s)
You May Also Like


.jpeg?width=700&auto=webp&quality=80&disable=upscale)


