Modeling the BCK, Part I
Part I Describing the 3D modeling of some of the game components of the up coming BCK adventure series.

I done this a while back but thought I would post it just the same. If you are into 3D modeling you may find this entry useful, or better yet know of a better way of doing something and letting us know J I am using an old antiquated version of 3D Studio Max (3.1 or something). I will explain in another blog why I haven’t upgraded.
No surprise the BCK is a human, so we need a model of a human that we own the rights to. This means we build him from scratch. So when I model something I usually try to model the smallest most detailed parts first. That will set the scale for the rest of the model. It is frustrating to build big model objects first then when it comes time for the smaller stuff you end up dealing infractions of an integer on coordinates. You then have to rescale the world coordinates to get away from that. So I start with the small parts of the model first.
The smallest most intricate part of the BCK will be his hands so that is what I am modeling here. I needed a good likeness and didn’t want to hand draw it. So I scanned my hand with a scanner. I then put a box object in the workspace and texture the box with the image from the scanner. Using the image as a reference, I zoomed in and made a profile with the line tool. So here is the result:
<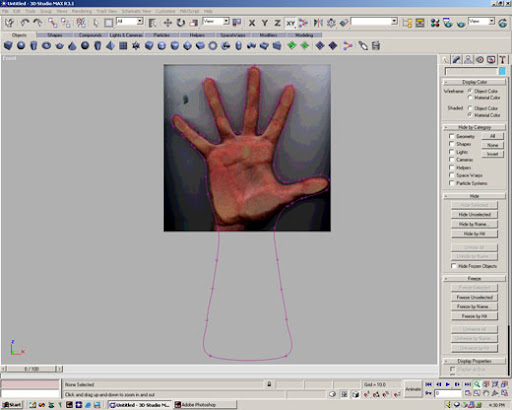
Scanned Hand
Next I delete the box object that has the image of myhand on it. It can’t help me further. I add a surface modifier to the spline (which won’t look like anything for awhile). Then make a reference copy ofthe hand spline with the surface modifier and move it next to the left. So I have two hands now. On the original, I have to drop back down the modifier stack to work on the spline again. What this does is allows me to make changes to the spline and see the changes happen in real time to the reference copy of the hand. This technique will save you a ton of time. I then use the line tool again,and the 3D snap to make the rest of the hand model and adjust it endlessly it seems till it looks right. When doing splines that you surface, try to stay away from three line intersections and keep to four. Three line intersections will produce anomalies and jack up your model. You can hardly ever get a three line intersection to smooth out due tothe tessellation of the model (taking a model with few polygons and dividing it into more polygons for smoothing and detail). So after countless hours of dorking with lines and the bezier handles of each vertex we get a surface model that looks like a hand. Yea!
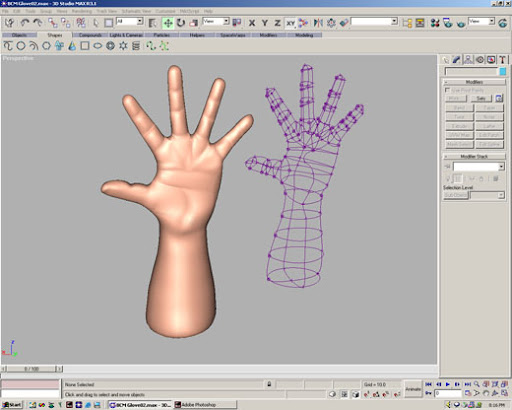
Splined Hand
Next I used the kinematic bone system and some box objects to make up the bone system for the hand. I set the movement and rotational limits ofthe bones, and then used the skin modifier to cover the bones with the surface I just created. I then had to play with the bone’s vertices envelopes to specify the range of vertices that will follow each bone around. This is more of a pain in the ass than you might expect. Sometimes bones can make the skin fold in on itself. When that happens, the normal vectors of the polygons get flipped and the surface is rendered inside out. Yikes. So here is the hand with its bone structure.
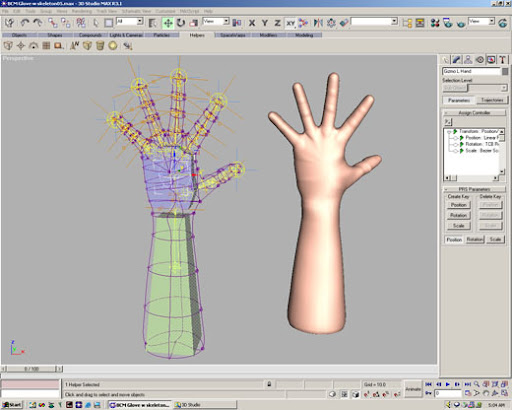
Hand Bone System
Now you think your work is done, hah! I then make a mirror copy of the whole thing with the bones and kinematics for the opposite hand. But guess what? My version of 3DS is too dumb to preserve the vertex envelopes for the bones. Sigh! So I have to adjust all the skin envelopes on the second hand to match the first. However, the result is two hands for the Bottle Cap Kid that are 100% articulated! So cool.
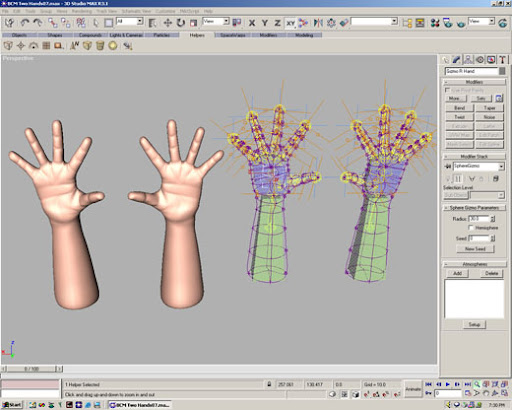
Two Hands are better than one
You can read more and follow me and Neuron Games, Inc. here:![]()
![]()
![]()
![]()
![]()
About the Author(s)
You May Also Like




.jpeg?width=700&auto=webp&quality=80&disable=upscale)
