


Trending
Opinion: How will Project 2025 impact game developers?
The Heritage Foundation's manifesto for the possible next administration could do great harm to many, including large portions of the game development community.
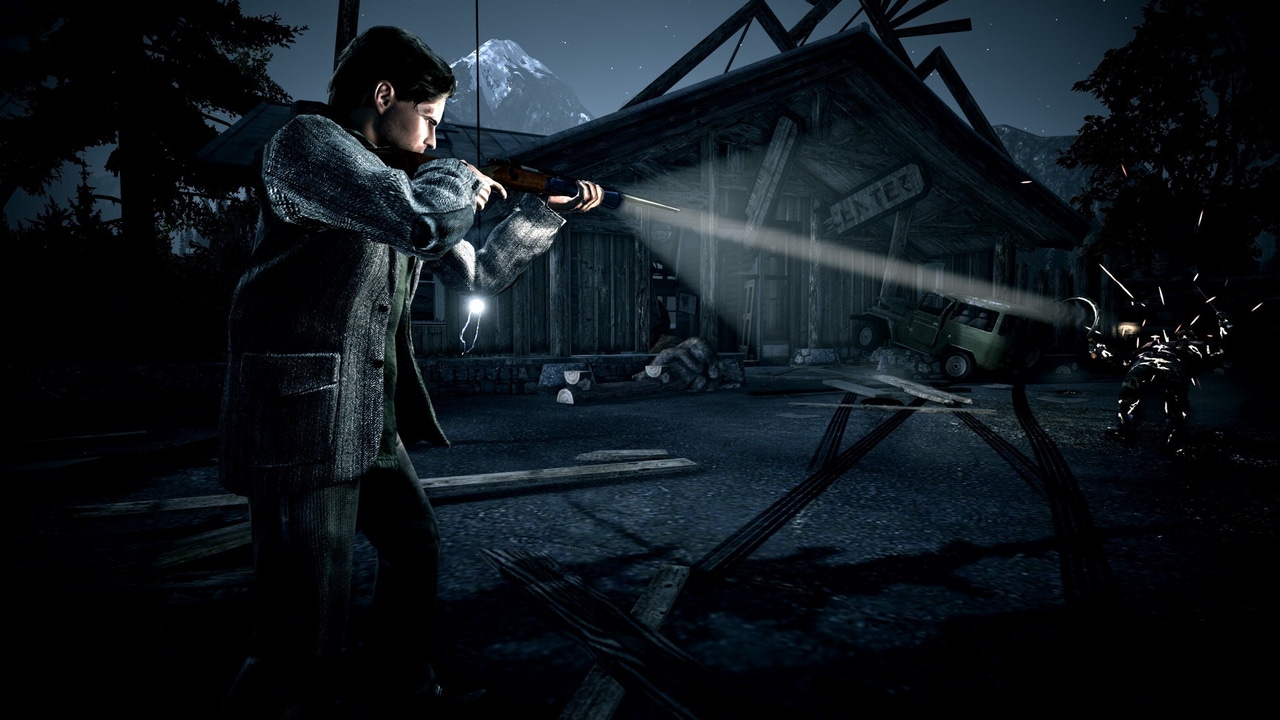
Remedy animation programmer Henrik Enqvist takes a look at how the team created a believable tweed cloth simulation on the title character's jacket in Microsoft's horror-thriller Alan Wake.
[Remedy animation programmer Henrik Enqvist takes a look at how the team created a believable tweed cloth simulation on the title character's jacket in the Microsoft-published Xbox 360 exclusive horror-thriller Alan Wake.]
The main character in our action thriller is Alan Wake, a writer who gets trapped in a nightmarish scenario where he is forced to fight dark forces while trying to solve the mystery of his missing wife. He is not a well-trained action hero, but rather an everyday guy.
To establish his character our art director wanted him to wear an old tweed jacket with arm patches. As the game takes place in a real-world setting, the tools for giving characters personality are limited, compared to a fantasy game or a space shooter. Therefore the clothes that our characters wear become far more important.
Alan Wake's jacket had to be as believable as possible to maintain the illusion of a thriller atmosphere to the player. The jacket needs to move in the wind and add a nice secondary motion to the character as he rushes through the forest. As a programmer, you immediately start to think about a cloth simulation.
A lot of games before us had already shipped with cloth simulation, but often those methods gave the impression of either silk or rubber -- something that we didn't want. Just recently, some very good third party solutions for cloth simulation have shipped, but at the point when we needed to have a stable solution such tools didn't exist, or didn't serve our needs.
This article will take a look at the challenges we encountered and present the solutions for rolling our own cloth simulation. Even if you are familiar with the methods described here, the way we put things together should make for some interesting reading.
The jacket was modeled together with the rest of the character as a regular skinned mesh. The bones driving the jacket mesh are a separate layer on top of the normal skeleton. The sleeves of the jacket use the normal upper and lower arm setup. Both upper and lower arms are split into one main bone and one twist bone. The upper jacket is driven by look-at constraints and a Verlet simulation drives the lower jacket.

Figure 1. The jacket rig on top of the regular game skeleton.
The jacket bones are parented top-down so that when the upper bones move the lower bones will follow. We were tempted to parent the lower bones straight to the thorax, but that would have caused us to lose motion -- especially the vertical motion in the jacket when the character raises his shoulders.
In the upper jacket, we mimic the motion of real shoulder pads by driving the shoulder bones with look-at constraints towards spots on the upper arms. This way the shoulder pad will follow the upper arm and when the arm is raised the shoulder pad will lift the rest of the bones -- just as a real jacket.
The following bones in the chain are a layer between the upper jacket and the simulated lower jacket. These bones are driven by look-at constraints straight down so that they compensate for the rotation that the shoulders cause. We also added position constraints between the left and the right bone to compensate for the stretching that occurs when the shoulder pads move.
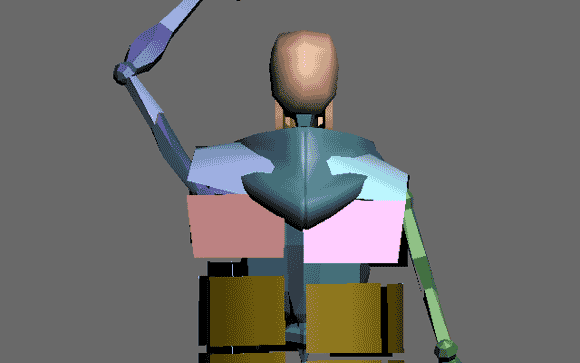
Figure 2. The bones move when character raises his arm.
It might have been a good enough solution to implement the constraints in the animation exporter and bake the results into the animation data, but we still opted for driving the bones in real-time inside the game engine.
This way we could save a few bytes in the animation data and we were also able to easily share animations between characters regardless whether they were wearing jackets or not. Also the shoulder movement generated by in-game IK (e.g. when aiming) became correctly applied when solving the constraints in real-time.
After the upper jacket is solved we take a look at simulating the lower part of the jacket. Most cloth simulations in games have a one-to-one mapping between the vertices in a cloth simulation and the vertices in the rendered mesh.
In our case we wanted to preserve the fidelity of the jacket mesh and not have it held back by any coder-dictated constraints. For example, the silhouette of the pockets and the front part of the jacket would have been lost if we would have settled for a having the same mesh for simulation as for rendering.
Normal maps could have been utilized to give shape to the jacket but we felt that this wasn't enough. Instead we wanted our artists to freely shape the jacket anyway they wanted and then allow them to use the normal maps to add wrinkles or other detail instead of making up for lost geometry.
Our solution to this was to have a low-resolution cloth mesh used for simulating the jacket and then map that to the bones in the skeleton that was used for driving the skinned mesh.
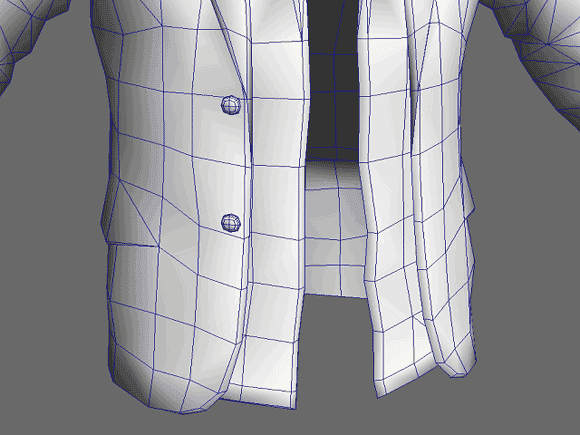
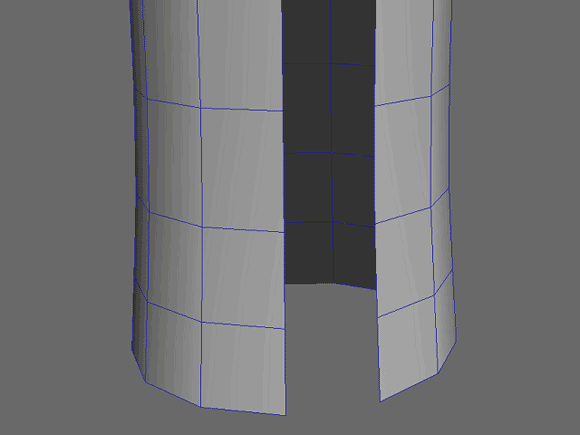
Figure 3. The silhouette of our jacket vs. one that shares vertices with simulation.
First we will take a look at the Verlet physics and then later on see how we map the simulation back to the bones. Verlet physics is currently the standard for solving cloth simulations in games. If you are not familiar with Verlet I recommend you to first read either of these Gamasutra features: Devil in the Blue Faceted Dress: Real Time Cloth Animation or Advanced Character Physics.
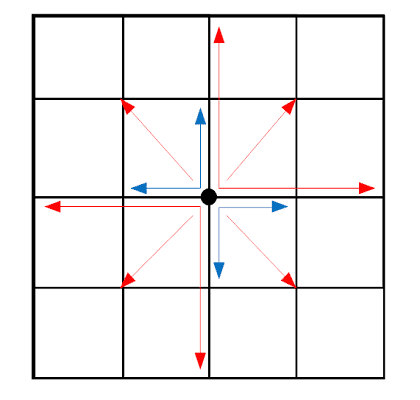
Figure 4. A 4x4 grid of vertices and the constraints for one of the vertices.
For the rest of us I'll just give a short recap of how it works. Figure 4 shows a cloth mesh and the spring constraints for one of the vertices. As shown in the figure, each vertex in the mesh is connected to all neighboring vertices as well as their neighbors.
Constraints to immediate neighbors are called stretch constraints and shown in blue. The longer constraints, shown in red, are called shear/bend constraints.
It is important to keep these constraints in two groups because we will later solve them with different parameters. Note that in our jacket the top row of the cloth will be skinned to the character and not driven by the simulation.
Having a grid-like mesh is not a requirement by the algorithm itself, however, for cloth simulation this topology is the easiest to work with. The heart of the cloth simulation consists of two parts. The first part is the Verlet integration where we for each vertex calculate the velocity and apply it to the position.
Vector3 vVelocity = vertex.vCurrentPosition - vertex.vPreviousPosition;
vertex.vPreviousPosition = vertex.vCurrentPosition;
vertex.vCurrentPosition += vVelocity * ( 1.0f - fDampingFactor ) + vAcceleration * fDeltaTime * fDeltaTime;
In our project vAcceleration was given by the sum of gravity and wind. Damping is used for both tweaking the looks of the jacket as well as making the simulation stable. A high damping factor gives the jacket a feel of having a very light fabric which slowly and softly settles while a small damping factor will make the jacket heavier and keep it swinging/vibrating longer after a motion.
The second part of the algorithm involves solving the spring constraints (known as relaxation). For each constraint we move the vertices towards or away from each other so that they satisfy their original lengths. Here is the code snippet in human-readable form.
Vector3 vDelta = constraint.m_vertex1.m_vCurPos - constraint.m_vertex0.m_vCurPos;
float fLength = vDelta.length();
vDelta.normalize();
Vector3 vOffset = vDelta * ( fLength - constraint.m_fRestLength );
constraint.m_vertex0.m_vCurrentPosition += vOffset / 2.0f;
constraint.m_vertex1.m_vCurrentPosition -= vOffset / 2.0f;
The stretch constraints will keep the cloth together while the shear/bend constraints will help keeping the shape of the cloth. As you can see solving this system perfectly will result in a cloth that moves rigidly. That is why we will be adding a coefficient to the shear/bend constraints before solving the new positions.
vOffset *= fStiffness;
constraint.m_vertex0.m_vCurrentPosition += vOffset / 2.0f;
constraint.m_vertex1.m_vCurrentPosition -= vOffset / 2.0f;
A stiffness factor of 1.0 will lead to a rigid cloth, while 0.0 will give you cloth that bends without any restrictions.
You might already have noticed that the Verlet integration assumes that the previous time step is the same as the current one, otherwise the calculated velocity will not be correct. It is possible to get away with a variable time step when using Verlet integration but the constraint solving will not be as forgiving to changes in time step.
Because the solver works by iterating over the constraints you will see that the constraints will never be solved perfectly. In a game this inaccuracy will be visible as stretching and the shorter your time step is the less stretching you will see.
In the end this will be a trade off on how much CPU time you are willing to spend on the cloth. If the time step is not constant the stretching of the cloth will vary and we will introduce some unwanted oscillation into our system. More important is that the time step will affect the stiffness factor and other parameters of the cloth, a shorter time step will by nature give you a more rigid cloth even if you are using the same stiffness factor.
In practice this means that you will have to settle for a fixed time step before starting to tweak the looks using your cloth parameters. I know that there are games out there that have a variable step time for physics but my personal experience tells me that your life will be a lot easier if the time step for physics as well as the game logic is fixed.
Before diving into the details of the cloth simulation we take a quick look at how the hood was simulated. We used one extra bone for skinning the vertices of the hood mesh. We create a pendulum from the center of the bone to a position behind the hood. The end of the pendulum is a single particle driven by Verlet physics. The bone is then targeted with a look-at constraint towards the pendulum.
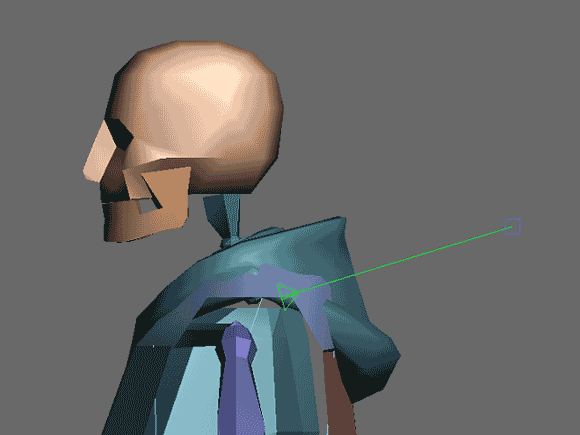
Figure 5. Hood and pendulum.
The hood gives us a hint about what we need to do next for our lower jacket. We are going to utilize the positions of the vertices in the simulated mesh to calculate the transforms for the bones.
The first thing we do is to match up the bones so that each bone pivot matches a vertex in the simulated mesh. This way it will be trivial to set the translation part of the matrix.
Next we will need to calculate the 3x3 rotation matrix. Each row (or column depending on your matrix setup) in the matrix is given by the x-, y- and z-axis of the bone.
We define the x-axis of the bone to be the direction from the base vertex to the next one below it. The y-axis is then given by the vector from the vertex on the left to the vertex on the right.
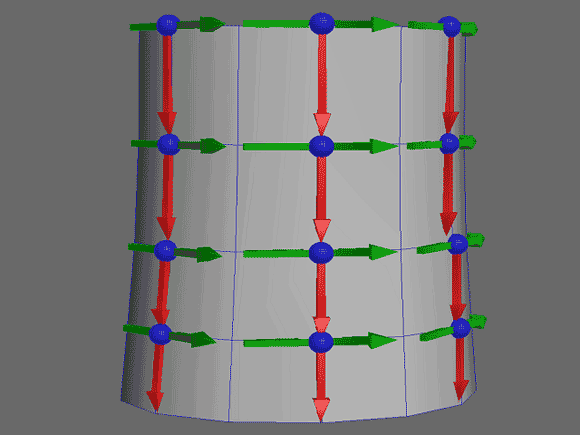
Figure 6. Bones attached to the cloth mesh.
In figure 6 the x-axis is shown in red and the y-axis is shown in green. The z-axis is then computed as the cross product between these. At the end we also ortho-normalize the matrix to get rid of the skewing in the transform.
As you can see, in vertical direction we use each row (except the last) of the cloth mesh for the bone setup, but in horizontal direction we only use every second column. In addition to the artistic benefits described earlier, this is a fairly fast method. This way, traditional skinning techniques can be used on the GPU side to render the mesh while the alternative would have been to update a large dynamic vertex buffer.
The cloth mesh can have a fairly low resolution, which will make it easier for the CPU. The only overhead in our solution is the conversion from the low-resolution simulation to the high-resolution mesh, but with our setup the overhead will be negligible compared to the rest of the simulation.
For solving the clipping of the cloth against the legs and the body we use ellipsoid vs. particle collision detection. Figure 7 shows the ellipsoids needed to solve the jacket clipping against the character.
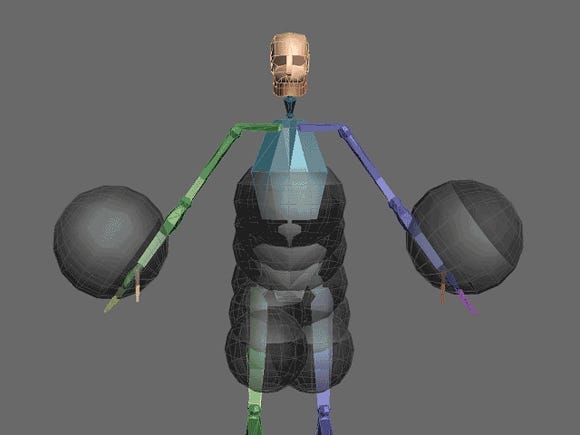
Figure 7. Ellipsoid setup for Wake.
Ellipsoids are very fast for collision detection against particles. Collisions can be solved by transforming the space the ellipsoid and the particle live, so that the ellipsoid becomes a sphere. Then we can apply a fast sphere vs. particle collision test.
In practice this is accomplished by creating an inverse transform using the ellipsoids length, width and height values and applying it to the particle's position. The only problem with this is that the collision normal we get after transforming back to our original coordinate system is skewed.
We decided that we could live with a little bit of inaccuracy when solving the direction of the collision. In cases where a heavily stretched ellipsoid would have caused too bad response, we split it into two more uniform ones.
Another problem to solve is the stability of the jacket. A cloth in rapid motion might cause knots or end up at the wrong side of the collision volumes and clip through the body. We solve this by defining a safety distance for each vertex in the simulated cloth.
For each vertex the original rest position is skinned to the closest bone and we use that as the reference point. If the simulation exceeds the threshold we simply move the vertex closer to the reference point. In our setup we allowed the vertices at the bottom to move more than the vertices closer to the shoulders.
The max distance we could allow our vertices to move was around 40cm before rare cases of knots and clipping started to occur. We also tried other techniques such as collision planes but the max distance method was by far the best method. It was fast, simple to set up, and allowed for most motion before causing visual errors in the cloth.
So far we have come a nice way towards achieving our goals. Our artist has modeled the jacket so that it pleases him; no animator is needed to animate the jacket, as everything is simulated in-game, and the CPU is happy because we can use the processing power for other game-related things as well. There is one thing bothering us though -- it looks like rubber.
First, we want to get rid of the stretching. As said earlier, the stretching phenomenon is caused by the errors introduced by the iterative nature of the algorithm. This is a popular topic for research and you will find various methods for solving this.
Unfortunately, all available solutions would have required us to allocate a whole lot more of our precious CPU to the cloth. Instead, we solved stretching by adding one last step to the cloth simulation where we introduced something we called "hard constraints".
We defined hard constraints to be all stretch constraints that are vertical. We sorted these constraints top-down so that constraints near the shoulders would be solved before constraints down at the legs.
Because we iterate the constraints in correct order we know that the upper vertex in the pair is already solved and doesn't cause any stretching, thus, we only needed to move the lower one towards the upper vertex. This way we can be assured that after a single iteration the length from top to down is exactly the same as the length in the rest position.
Vector3 vDelta = constraint.m_vertexTop.m_vCurPos - constraint.m_vertexDown.m_vCurPos;
float fLength = vDelta.length();
vDelta.normalize();
Vector3 vOffset = vDelta * ( fLength - constraint.m_fRestLength );
constraint.m_vertexDown.m_vCurrentPosition += vOffset;
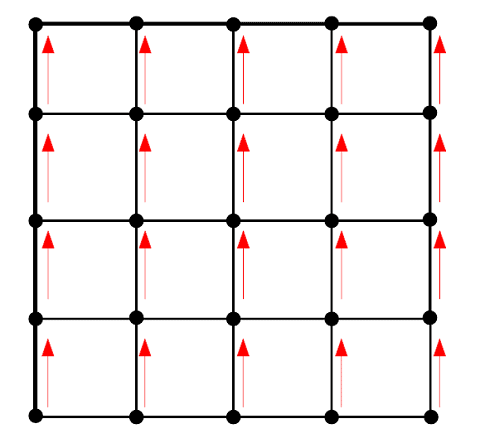
Figure 8. Hard constraints.
As you can see we don't take into account the horizontal stretching of the jacket. It is not possible to add hard constraints in horizontal direction because that would cause a vertex to be solved twice, which would mean that we lose the results of the vertical fix up stage and no longer preserve the rest length.
Anyway, we noticed that for a jacket, horizontal stretching actually goes unnoticed by the human eye, while vertical stretching makes the jacket look really bad. This solution was good enough.
The second thing we wanted was to make the edges of the jacket move a bit more than the rest of the jacket. For example, when you run with an open jacket you will notice that the air resistance will have a greater effect on the edges of the jacket than the center part. This is because your body will act as a wind blocker for the rest of the jacket.
The edges can easily be found by counting how many constraints are attached to them, any vertex with less than four stretch constraints is an edge. Thus, we flag these vertices and simulate them with different parameters like this.
Lower damping factor.
Global wind has a greater effect.
World space motion will have a greater effect (more on world space motion below).
The allowed maximum safety distance is higher.
This way the internal frequency of the edges will be different to the rest of the jacket. Instead of the whole jacket reacting as a big pendulum to impulses the edges will add a nice secondary motion to the movement.
Figure 9. Edge vertices.
Next thing we noticed was that when the character moves around, the world-space motion has a fairly large impact on the simulation while small local body turns or movement in shoulders go unnoticed.
In a traditional cloth simulation the positions of the vertices are simulated in world-space. One could argue that this is the correct way of simulating cloth, but it just didn't feel right. So instead we simulated the jacket in the characters local-space and added a small world motion separately. We saw that 100% of the local skeleton animation movement together with 10 to 30 percent of world-space movement gave us the results we were looking for.
A last thing we wanted was to exaggerate the contrast between a jacket in low-motion and a jacket in high-motion. When Alan was walking we wanted the jacket to be fairly calm and then have more vivid jacket motion for the occasions where he dodged or jumped.
We thought that when the jacket is in contact with the body it should move less because of the friction between the jacket and the shirt and then when the jacket lifts it should have greater motion as it can move freely. We faked this by using a higher damping value for each vertex that was touching an ellipsoid. This way, vertices that are in contact with the body will feel a bit sticky, giving us just enough contrast between a jacket in a casual situation compared to one in fast motion.
The first incarnation of the cloth simulation was fairly simple to achieve by searching for the word "cloth" in game development literature and applying the algorithms found. The second phase of getting the look and feel of the jacket to a state where it was good enough for our quality bar involved browsing through academic papers, a lot of trial and error, and even a few lines of scrapped code.
Naturally there is room for improvement. One example is using that a low-resolution simulation in addition to mapping to a high-resolution mesh makes it hard to solve all clipping perfectly. Other small features that didn't make it in time were wrinkle maps where the jacket folds, or allowing a tornado to wildly throw the jacket around.
In the end the effort was well worth it, as our cloth clearly differentiates from cloth simulations in other games. It looks a lot more like tweed than silk or rubber. Our setup also proved to be very flexible when it came to simulating other fabrics, for example the down jacket of Barry Wheeler and the veil for an old lady were simulated with the same system. The looks of the different fabrics were easily accomplished by tweaking the parameters.

Figure 10. A tweed jacket.
This article was first published April 29, 2010. It has been updated in 2024 for formatting.
You May Also Like


