Featured Blog | This community-written post highlights the best of what the game industry has to offer. Read more like it on the Game Developer Blogs.
The Full Throttle Remastered FMV Pipeline: Part 1
This blog post is a multi-part overview of the FMV Pipeline for Full Throttle Remastered. Starting from the 20-year old LucasArts archives, we'll go through a series that investigates how we were able to achieve our remastered FMVs.


Full Throttle is a point-and-click adventure game that was published by LucasArts way back in the 20th century, April of 1995. In addition to the standard point-and-click visual gameplay style of the time (character sprites moving around in front of a still backdrop) the game also featured full motion video (FMV) for both non-interactive cutscenes and interactive gameplay modes. This FMV technology further advanced the storytelling aspect of the genre because it allowed the creators to use computer rendered frame sequences while maintaining low CPU overhead. Additionally, compressed FMVs could be contained in a smaller storage footprint and fit on the target medium: CD-ROM; ~650 megabytes.
The classic version of Full Throttle used a video technology developed by Vince Lee at LucasArts called INSANE. INSANE stood for INteractive Streaming ANimation Engine and was first developed and used for Star Wars: Rebel Assault. Its use was continued and improved among future titles as well:
Star Wars: Rebel Assault (November 1993)
Full Throttle (April 1995)
Star Wars: Rebel Assault II (November 1995)
The Dig (November 1995)
Outlaws (March 1997)
This video playback system allowed the creators to compress an otherwise large chunk of data into a smaller format that would fit among the other game data files on a CD-ROM. Disk I/O speeds and increased computer processing power were at a point in modern technology where the compressed FMV was able to be streamed off of a CD-ROM, decompressed into a frame of video and be displayed on screen. Full Throttle FMVs were encoded at 320x200, 10 frames per second. Additionally, audio tracks embedded within the video were processed and mixed in realtime before being sent to the audio device.
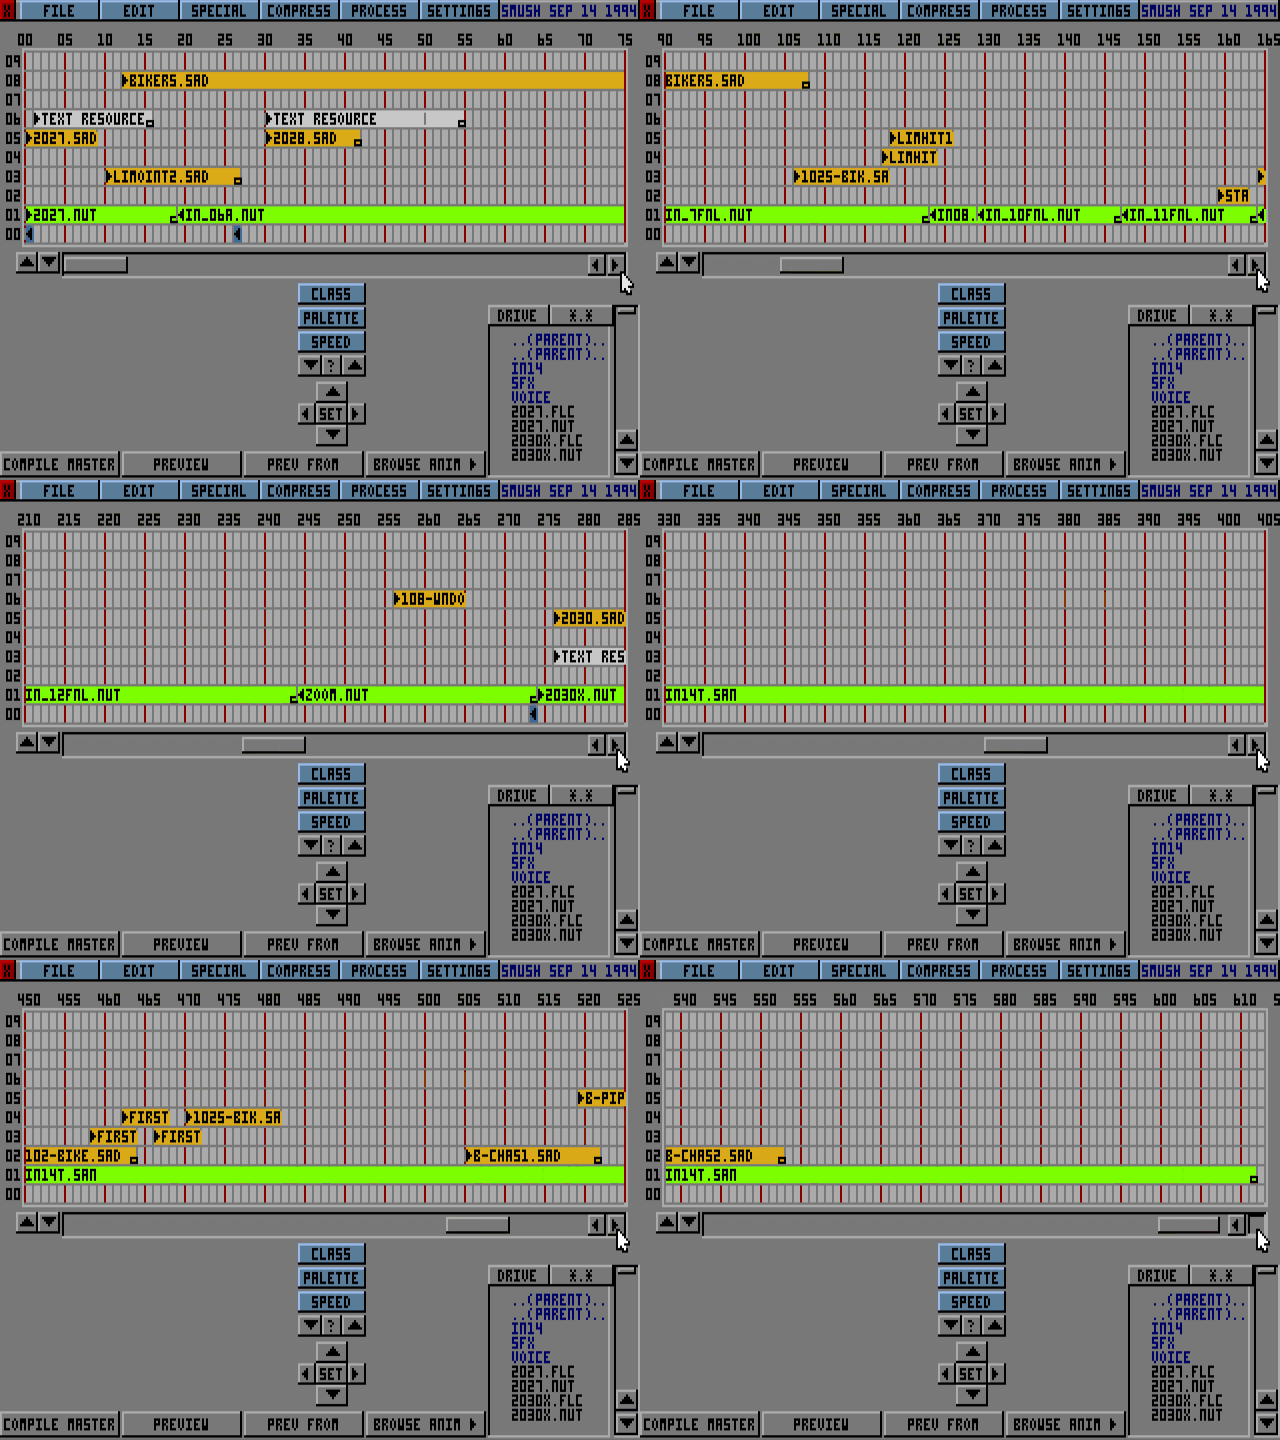
A tool called SMUSHFT.EXE (SMUSH for Full Throttle) was used to encode and compress the video into a .SAN file (Smush ANimation). Unlike your standard video playback system with one video track and one audio track, a .SAN file could contain one or more video tracks and multiple audio tracks to be dynamically played to the user based on the game state. The image below shows SMUSHFT.EXE with an original project file. You'll notice as we scroll through the timeline, the green bars represent video frames over time while the dark yellow represent audio files. There are also grey bars which represent a text line that has corresponding subtitle information.
A key part of our philosophy when remastering the classic LucasArts adventures is to maintain the original integrity of the game while enhancing the older content. We want the game to play and feel just as it did back in the 90’s, but with a new paint job, a much fuller sound and support for newer and better input methods. The approach taken to accomplish this is to start by porting the original game to the target hardware. Then while the game is running for the user, query the game state each frame and retrieve enough data about the game state so we can then provide the user with a more modern presentation. So, as far as the game is concerned, it’s still ticking along like it had been back in 1995.
What this means is that we adopt all of the technology that the game was using, including the INSANE engine. In order to remaster all of this video content, we need to start from the original video files that the game had shipped with back in 1995 and use those as a blueprint to create the remastered counterpart. The end result is a 1-to-1 frame match of the original, with higher fidelity visuals and drastically improved sound.
Extraction
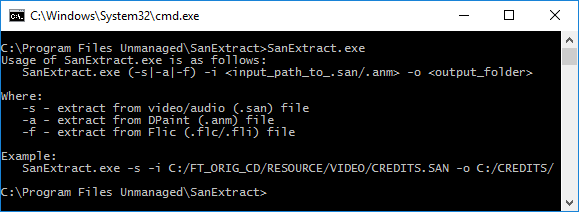
The first task was to take the original video files (The .SAN files) and extract all audio and video information into a format we can generate a blueprint from. We already had the code that was used to decode these files so we wrote a C# tool that interfaced with the original decoder through a compiled native DLL. This tool, called SanExtract, parses the .SAN file and splits out the audio and video contents into a useful directory structure we could work with.
If you have purchased the original game and can get to the files on the CD, you can check out the extracted videos yourself! Here's a link to our SanExtract tool: SanExtract.zip
MD5 [ac951d858cd8d252222d31fee61b1ce4]
SHA-1 [2915295a260306292f979788fe047a208e5f4e3b]
Just run the SanExtract.exe via command-line using the original files (most likely located under [CD_DRIVE]:/RESOURCE/VIDEO/ & [CD_DRIVE]:/RESOURCE/DATA/) as input.
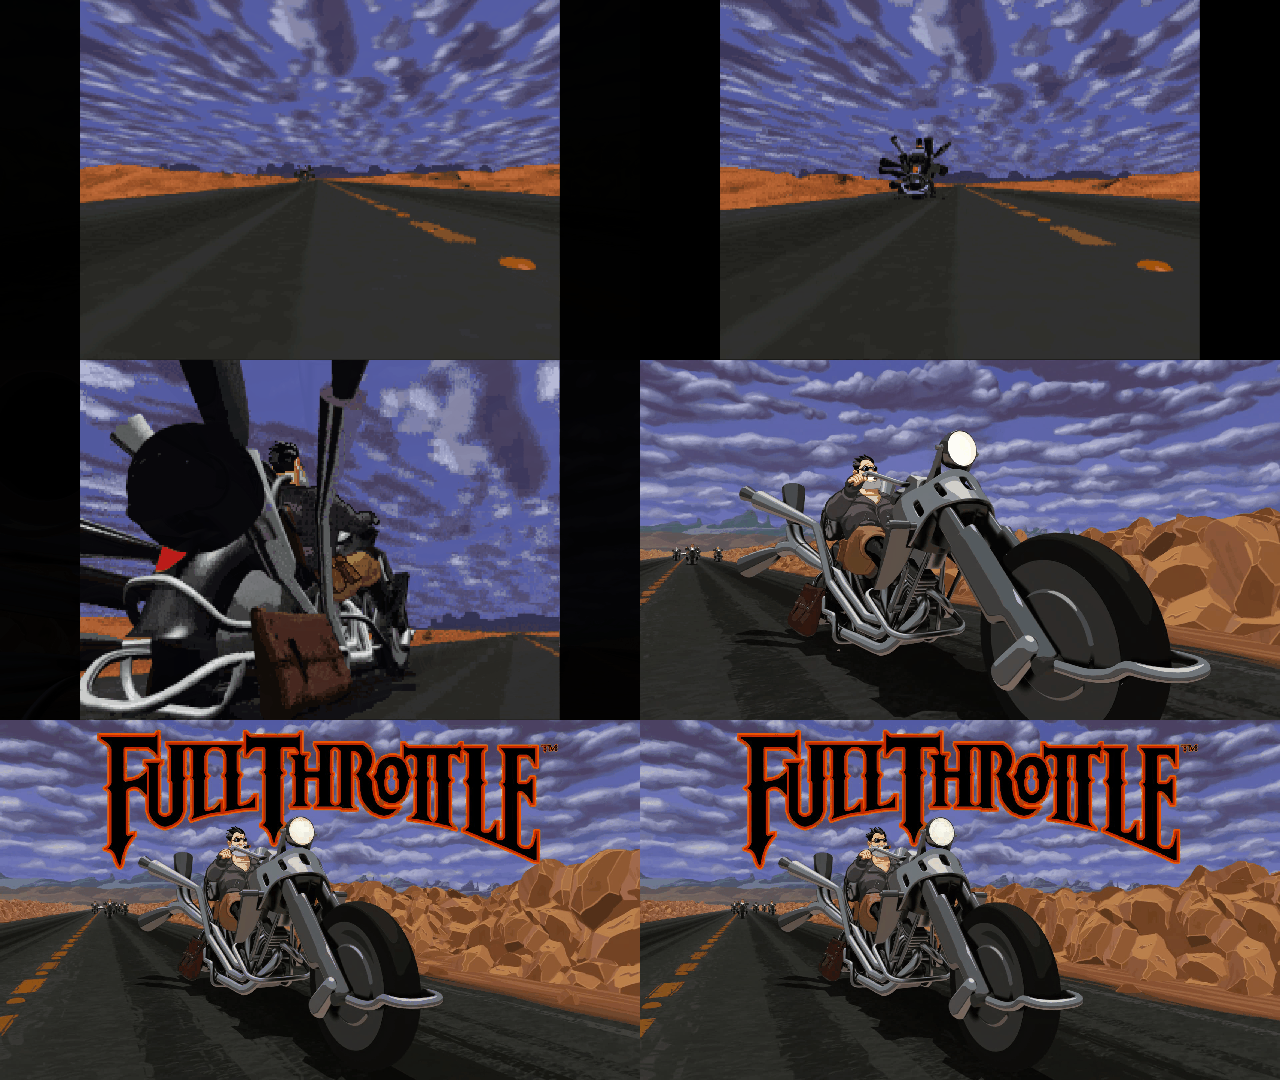
The artifacts of SanExtract are one or more streams of linear video frames as well as all of the audio files that were used during playback. And I do say “one or more streams of linear video frames” and “all of the audio files” correctly. The engine was dynamic enough to allow elements (both audio and video) to be enabled or disabled at runtime. I'll talk more on that further down the road. Extraction was only the beginning of this process. We needed to know how the original frames were created so we could re-create a similar workflow for the remastered project. For example, some frames or sequences contain a composite of multiple sources of art. Consider the original sequence below.

It may not look like much, but there are both hand-painted and hard-surface 3D rendered elements in the frame. Ben’s bike, the limo, and the shadow of Ben's bike cast upon the limo are from a 3D rendered sequence. The gold-colored smashed hood ornament is a separate hand-painted animation sequence. The end result is a composition of the 3D render, the hand-painted animation and a static background image of the clouds.
Below you'll see each of the constituent parts that were used to generate the final sequence. The left sequence is just the hand-painted hood ornament. The right sequence is a mask used when compositing the 3D renders (bike and limo) with the cloud background. And the center sequence is the 3D render + cloud background. Eventually, the hand-painted and 3D render elements get composited together to form the final image sequence above.

To maintain a quality aesthetic like the original, we can't just take every single frame of video (~16,000 frames) and hand-paint over it. We need to properly capture the hard surfaces of the bikes and vehicles just like in the original, including the shadows cast within the scene. At the end of the day, we need to find the original 3D models and hand-painted animation sequences and remaster those individual parts so they can be composited together.
So, I mentioned that we needed to find the original 3D files and hand-painted animations. We had initially thought, "Oh hey, there's probably some sort of metadata we can extract that maps the original constituent parts to a video". In reality, files get renamed and information is lost to time. The metadata only goes back so far and even when looking through the archives, we find many files of the same name but with different dates and different contents. We have no idea which files were actually used to generate the final composited frame, and we needed to come up with a solution to solve this problem.
The Archives
Our archive consisted of ~67GB of data and useful data pertaining to the original FMVs were scattered all over the place. Looking at the layout of the backup data, it appeared that towards the end of the project, the data files from everyone’s computer was copied to a backup location and placed in an Indiana Jones style warehouse somewhere. We were left with a bunch of disks that contained copies of everyone’s hard drive. Looking further, there wasn’t really one disk that contained all the data we needed; The useful data was spread across all archives. Furthermore, there were many cases of duplicate file names that contained different data contents, modify dates, etc. Moving forward, we needed a way to index all of the duplicate files and do a CRC comparison to determine all of the unique files to investigate from the archives.
We chose to identify certain file extensions that were used within the FMV process and create a manifest for the following file types: .ANM, .CEL, .FLC, .FLI, .GIF, .MAX, .NUT, .OBJ, .PRO. We wrote a python script to go through all known archives and generated an XML map of every file name with the file extensions we were looking for, keeping track of duplicates. The result was a flattened directory of useful files that we could easily search through. Here’s an example of a node within a manifest xml file:
<file>
    <name>b_cm1</name>
    <most_recent>C:\Backup\Lleslle backup\THROT-C\RESTSTOP\STUFF\B_CM1.ANM</most_recent>
    <unique_files count="2">
        <file_item>
            <path>C:\Backup\Lleslle backup\THROT-C\RESTSTOP\STUFF\B_CM1.ANM</path>
            <modify_date>1994/07/30</modify_date>
            <size_bytes>115829</size_bytes>
            <crc_value>2D31393738373530333931</crc_value>
        </file_item>
        <file_item>
            <path>C:\Backup\PC2\FUL528_Davi_DV2\BEN\RESTOP\FLICS\B_CM1.ANM</path>
            <modify_date>1994/07/13</modify_date>
            <size_bytes>115829</size_bytes>
            <crc_value>32303432363131303937</crc_value>
        </file_item>
    </unique_files>
    <all_files count="4">
        <file_item>
            <path>C:\Backup\Lleslle backup\THROT-C\RESTSTOP\STUFF\B_CM1.ANM</path>
            <modify_date>1994/07/30</modify_date>
            <size_bytes>115829</size_bytes>
            <crc_value>2D31393738373530333931</crc_value>
        </file_item>
        <file_item>
            <path>C:\Backup\Lleslle backup\THROT-C\RESTSTOP\STUFF\B_CM1.ANM</path>
            <modify_date>1994/07/30</modify_date>
            <size_bytes>115829</size_bytes>
            <crc_value>2D31393738373530333931</crc_value>
        </file_item>
        <file_item>
            <path>C:\Backup\cleslie's-backup\THROT-C\RESTSTOP\STUFF\B_CM1.ANM</path>
            <modify_date>1994/07/30</modify_date>
            <size_bytes>115829</size_bytes>
            <crc_value>2D31393738373530333931</crc_value>
        </file_item>
        <file_item>
            <path>C:\Backup\PC2\FUL528_Davi_DV2\BEN\RESTOP\FLICS\B_CM1.ANM</path>
            <modify_date>1994/07/13</modify_date>
            <size_bytes>115829</size_bytes>
            <crc_value>32303432363131303937</crc_value>
        </file_item>
    </all_files>
</file>
The XML snippet above shows that two unique files with the name b_cm1 were found in the archives. These manifest files allowed us to narrow down the search space when trying to find the frame dependencies.
Sorting Dependencies
With all of these dependencies in the archives, there was no really good way to determine which dependencies were actually used in the final FMV. We could have made assumptions and use some sort of fuzzy logic but in the end we decided to build a custom tool that a person could interface with and sort through the necessary assets visually. This tool, called SanWrangler, allowed us to load an original sequence of frames and then look through all of the archive data for the intermediate, constituent parts that were used to create that frame.
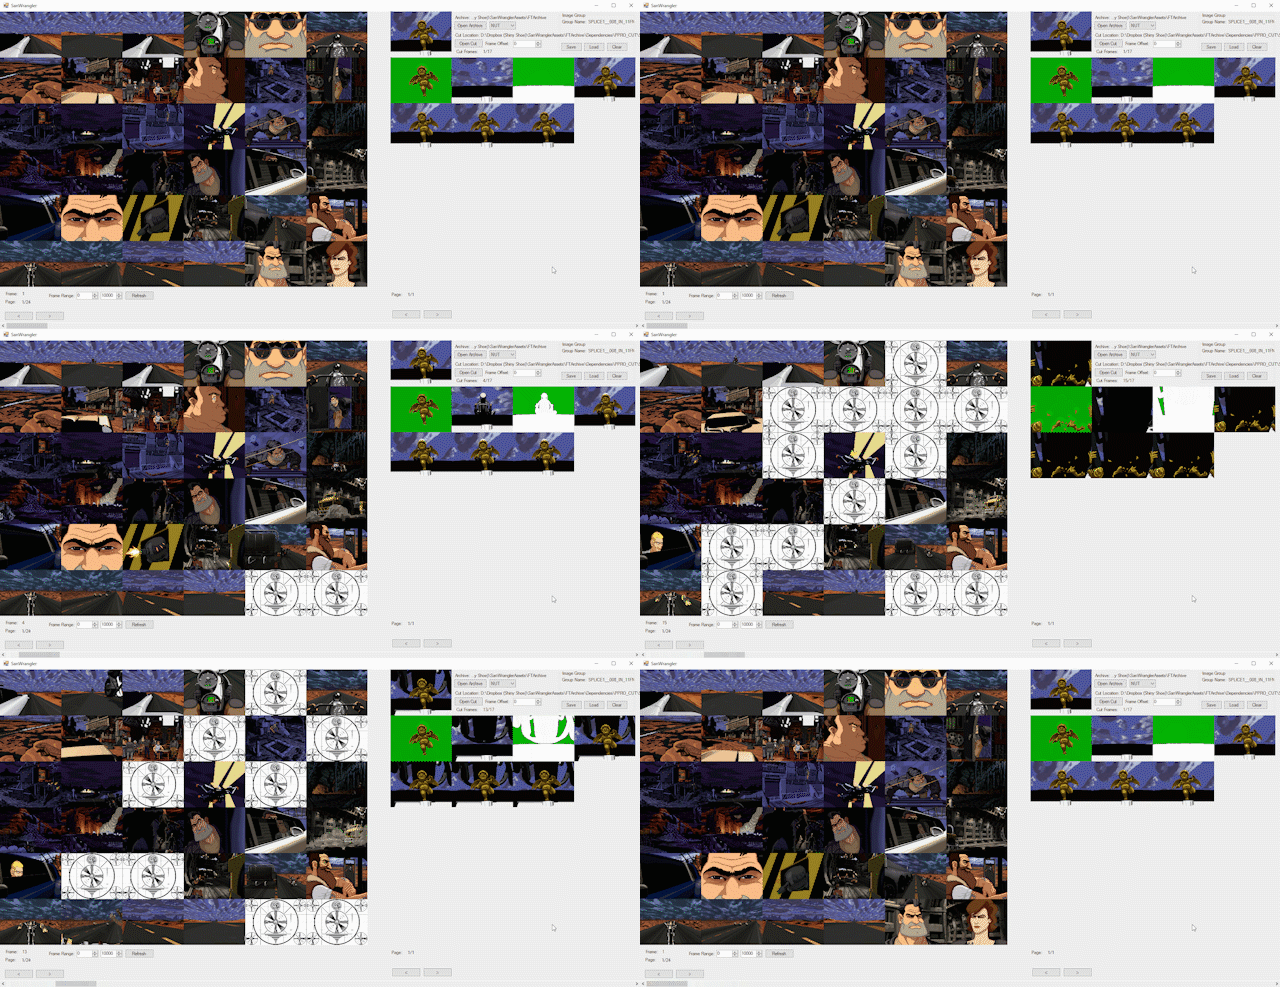
Looking at the SanWrangler example below, you'll see on the left is a pagenated bank of 36 individual streams of image sequences that the user can look at. This pool of sequences represents all of the frames found among the archives, excluding binary duplicates. To the right of the archive pool at the very top is the original sequence provided by the initial .SAN extraction process mentioned above. Lastly, the user is able to Shift+Click on the left archive pool streams to move them over to the right pool. This right pool of selected frame sequences represent all streams that contain the parts used to generate the final sequence of frames.
Of all of the files we were able to sort through, SanWrangler allows the user to search through the following files in the archive pool:
.ANM - Animation files created by a LucasArts proprietary tool. These files contained hand-drawn animation cells and were later composited together with other files if needed.
.FLC/.FLI - Autodesk Animator & Autodesk Animator Pro files
.NUT - Contained a series of uncompressed linear frames consumed by SMUSHFT.EXE and later encoded into a compressed format within a .SAN file
.MAX - The original 3D mesh file authored in 3D Studio 2.0. We were able to run a batch process to render images sequences used in SanWrangler so we would know what the binary .MAX files contained. These frames were crucial in determining which .MAX file was used in a specific FMV sequence.
Now we've reached a point where the actual remastering of legacy files starts. SanWrangler would save off a list of selected frame dependencies into another distilled format. From here the remastering pipeline split up into three routes: Remastering the hand-painted frames, remastering the 3D models & remastering the audio.
Stay tuned for Part 2 of the Full Throttle Remastered FMV Pipeline! In the next part I'll discuss the methods of automation and conversion that were used to put everything back together again. Feel free to bring any question to the comments below. This is an initial quick overview with which I can go deeper if needed.
Read more about:
Featured BlogsAbout the Author(s)
You May Also Like

