Five Tips for VR/AR Device-independent Unity Projects
How does a Unity developer “create once, build many” while dealing with the rich, varied, constantly changing plethora of VR or AR toolkits and services? At Parkerhill, we came up with a set of best practices that work for us.

It’s wonderful to see the variety of new virtual reality (VR) and augmented reality (AR) technologies, devices, toolkits, and platforms that are continuously emerging. But, for developers, such variation becomes a nightmarish tangle of software, features and business priorities.
This article was originally published on the ParkerhillVR blog.
How does a Unity developer “create once, build many” while dealing with this rich, varied, constantly changing plethora of features and services? The ability in Unity to choose a target platform is often not granular enough. Unity’s moving to address some of these issues with emerging support for XR player settings and API classes. But inevitably, developers need to use higher level toolkits that cater to the actual devices they are targeting in a Unity project. The diagram below illustrates the challenge developer face juggling multiple SDKs, and high-level toolkits that include player rigs, prefabs, very useful script components, shaders and example scenes.
At Parkerhill, we have developed many VR and AR projects and demos, and experienced the pain of trying build for a spectrum of different devices using different SDKs. As a result, we came up with a set of best practices that work for us. Even better, we have implemented a collection of Unity in-editor utilities that facilitate these design patterns, and released them on the Unity Asset Store as the Parkerhill BridgeXR package.
Tip #1. Use additive scenes for player rigs
Unity projects are naturally divided into scenes which implement levels of a game. Unity also allows you to additively load a scene to the current main scene. Additive scenes are a great tool for modularly organizing scenes as separate object hierarchies.
We commonly use additive scenes to load device-specific player rigs containing camera components, input devices and physical event handling. To keep the main scene device-independent, for example, we may have one additive scene with the SteamVR player rig and another containing the Daydream player rig. And then write a scene manager script that adds the corresponding player rig scene when the app starts, based on the actual target device.
Tip #2. Use conditional objects for SDK-specific prefabs
Device SDKs include prefab objects that you use in your scene to implement various features. Examples include teleportation pods, video players, environmental mapping tools, avatars and so on. Another example, based on the target device, you might lso want low-poly versus high-poly versions of your models, since performance and quality requirements vary widely between devices and platforms. Your project can choose to use the appropriate version of a prefab based on the target device, instantiated at runtime.
Tip #3. Apply conditional components to implement SDK-specific behaviors
One of the most distinguishing features of device SDKs are the component scripts you can add to your game object, to implement specific behaviors. A common example of this are interactables, with grabbing and highlighting behaviors. Unfortunately there is no easy way built into Unity for conditionally adding components to objects.
One solution is to save separate versions of your interactable objects as prefabs, and then use the conditional object technique described above to add the correct one to your scene. This results in your maintaining completely separate versions of the same object (one for each device SDK) which introduces a maintenance problem should you want to change the original object.
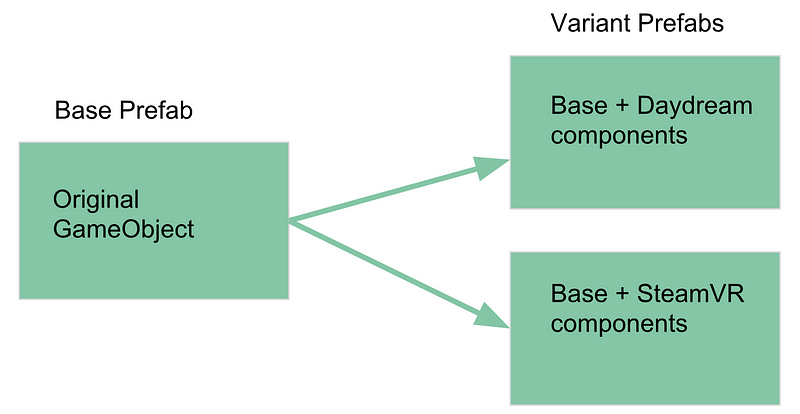
Unity 2018 introduces new a Variant prefab feature that can help, which allow you to define prefab assets derived from other prefab assets. You could have an original game object as the base prefab, and then make Variants with added interactable components, one variant prefab for each SDK. You’d still end up having separate variant prefabs for each target device, but at least if the base object were modified, the changes will be reflected in each variant.
At Parkerhill we implemented a better solution, called Refabs. In a sense, Refabs are the inverse of Variant Prefabs. A “refab” is a reusable collection of components (saved as a prefab) that can be applied to any game object. They let you separate behavior from objects, as a set of one or more components that are used as a template on game objects.
Refabs work like this: Add components to an empty game object and save it as a prefab. This set of components can be added to any game object using the Refab Loader component. Then the object in your scene, instead of the SDK-specific components, would just have a Refab Loader that points to which refab to use. The same reusable set of components can be added to other game objects too. (For specific examples, see the video “Refabs for Unity demo” https://youtu.be/bkJR1xBLtf0 ).
Tip #4. Map device-specific input events to application semantic events
In addition to player rigs, prefabs and object components, you should also decouple your application from device-dependent input events. For canvas-based UI input, such as buttons, try to use Unity’s standard Event System.
For more general object interactions, like grabbing, using, and throwing, your device-specific SDK may directly manage the user’s hands or input controller, raycasts, and haptic feedback.
To decouple your app from the SDK, don’t use toolkit-specific events in your application. You should map toolkit-specific events to application semantic events. Semantic events are events that have meaning in context of your application. For example, instead of responding to “the left hand trigger button was pressed,” your application may only need to know, “this object has been grabbed.”
Tip #5. Exclude SDK folders to avoid compiler and build conflicts
When you go to build a project that has imported multiple SDKs for a specific platform you may encounter editor or build errors due to conflicts between plugins libraries. You need to remove the unused offending folder. A workaround is to rename the folder with a trailing tilde (“FolderName~”) so it will be ignored by Unity.
The Parkerhill BridgeXR Toolkit
Using these five strategies can go a long way in help make your app device-independent by decoupling it from any one specific SDK. It involves some work, but it can be done manually. Fortunately, Parkerhill has a tool that helps you manage it all nicely!
The Parkerhill BridgeXR plugin for Unity includes a set of in-editor utilities that support each of the five best practices listed above, as follows:
Scene Bridge—makes it easy to selectively load an additive scene to a current scene, based on a current active device identifier (Bridge ID). Useful for player rigs and other device-specific object hierarchies to be included in a scene.
Prefab Bridge—selectively instantiate a Game Object prefab at a spawn point in your scene based on the current active bridge ID. It is used when you have similar but different prefabs for different devices, such as teleport points, video players, and level of detail objects.
Component Bridge—when you have different sets of components defining a complex behavior for each target device, use a Component Bridge to selectively add one or more Unity components to a Game Object based on the current active Bridge ID. Based on the Parkerhill Refab utilities, Component Bridges are a powerful tool for implementing common behaviors with SDK-specific components.
Input Event Mapping—decouple your core application from device-specific SDK input events by mapping them into application-specific semantic events, using BridgeXR’s event sender and receiver components.
Folder Exclusions—in-editor tool that lets you exclude specific folders from builds when targeting one device or another.
Taken separately, each of these utilities are useful in their own right. Combined, they provide a the means to build build a device-independent layer within your Unity projects. BridgeXR helps you manage multiple SDKs in a single project, without version control branches or other unsatisfactory tasks.
Whether implemented yourself, or with the aid of Unity utilities like Parkerhill BridgeXR (available on the Unity Asset Store), using these tips, you can continue to use the high level toolkits you already know and trust, leveraging the best of breed software from the leading VR and AR vendors, and avoid much of the VR and AR toolkit SDK fragmentation that can disrupt your development.
This article is an abbreviated version of the detailed white paper, Best Practices for Multi-Device VR/AR Development, available FREE at Parkerhill.com
About Parkerhill
Parkerhill Reality Labs is an immersive media development company with a history of high quality games and non-gaming applications, educational publications, and agile management practices. Credits include the cross-platform multi-device game, Power Solitaire VR, and the books Unity Virtual Reality Projects and Augmented Reality For Developers (Using Unity).
Read more about:
BlogsAbout the Author(s)
You May Also Like


