


Trending
Opinion: How will Project 2025 impact game developers?
The Heritage Foundation's manifesto for the possible next administration could do great harm to many, including large portions of the game development community.
In this article by Radical Entertainment senior rendering coder Keith O'Conor, he describes the nuts and bolts of the game's particle system -- detailing exactly how it produces great looking effects that perform well in the open-world adventure game.
October 23, 2012

Author: by Keith O'Conor
In this article from the April 2012 issue of Game Developer magazine, Radical Entertainment senior rendering coder Keith O'Conor describes the nuts and bolts of the game's particle system -- detailing exactly how it produces great looking effects that perform well in the open-world adventure game.
One hallmark of the Prototype universe is over-the-top open-world mayhem. We rely heavily on large amounts of particle effects to create chaos, filling the environment with fire, blood, explosions, and weapon impact effects.
Sgt. James Heller (the main character) can go just about anywhere in the environment. He can run up the side of a building, glide across rooftops, or even fly across the city in a hijacked helicopter. Because of this we need an effects system that scales to support the hundreds of complex effects and thousands of particles that could be visible at any one time.
Here's how we built upon the effects system developed at Radical for Scarface and Hulk: Ultimate Destruction by improving and adding features that would allow us to push the effects to the level we needed for Prototype and Prototype 2.
Our particle systems are composed entirely of a component-based feature set. A feature describes a single aspect of how each particle behaves -- like changing position according to gravity or some other force, spinning around a pivot point, animating UVs, changing size over time, and so on.
The effects artist can choose any set of features to make a particular particle system, and each chosen feature exposes a set of associated attributes (such as velocity, weight or color) that she can tweak and animate. This is all done in Maya with the standard set of animation tools, using the same simulation code as the runtime compiled into a Maya plug-in to make sure Maya and the game both behave consistently.
Once the artist is satisfied with the look and behavior of a particle system in Maya, it is exported as an effect that can be loaded in the game. This effect is then scripted for gameplay using our in-game editor, "The Gym," a complex state machine editor that allows designers to control every aspect of the game (see our GDC 2006 presentation for more details.)
When scripting an effect to play in a particular situation, the effects artist has access to an additional set of controls: biases and overrides. For each attribute that was added as part of a feature, the effects artist can choose to bias (multiply) the animated value, or to override it completely. This allows a single loaded effect to be used in a variety of situations. For example, the artist can take a standard smoke effect and make small, light, fast-moving smoke or large, dense, black hanging smoke, just by biasing and overriding attributes such as emission rate, color, and velocity (see Figure 1 for an example).
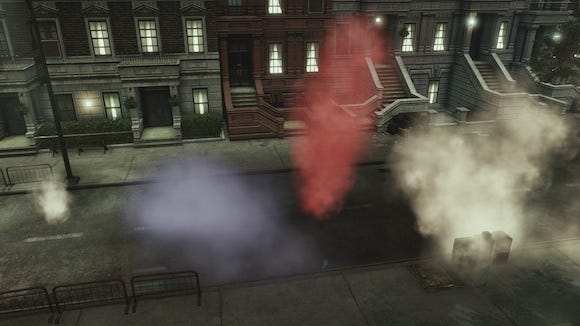
The original effect (left) and three variations scripted with different biases and overrides
Artists can use The Gym to tailor each instance of that effect to match its use in-game instead of authoring and loading many similar versions of the same effect or using an identical generic effect in multiple situations. This reduces memory usage and improves the artist's workflow, allowing them to tune the effects live with in-game lighting and animations. The biases and overrides are also a major part of our continuous level-of-detail system, which we'll describe later in this article.
Each particle system's attributes are stored as separate tightly packed arrays, such as the positions of every particle, then the lifetimes, then the velocities, and so on. This data-oriented design ensures that the data is accessed in a cache-efficient manner when it comes to updating the simulation state every frame, which has a huge impact on CPU performance when doing particle simulation.
This way, we take up only a small percentage of the CPU's time to simulate thousands of particles with complex behaviors. It also makes implementing an asynchronous SPU on PS3 relatively straightforward, as updating each feature means only the necessary attribute arrays for that feature need to be DMA-ed up, without any extraneous data.
Having the particles' positions separated has other performance benefits as well, such as allowing for fast, cache-efficient camera-relative sorting for correct alpha blended rendering. It also enables other features, such as particles that emit other particles by using the position output attribute array of the simulation update as an input to another system's particle generation process.
Having many short-lived particle effects going off all the time (during intense combat situations, for example) can start to fragment your available memory. Fragmentation happens when many small pieces of memory are allocated and freed in essentially random order, leading to a "Swiss cheese" effect that limits the amount of contiguous free memory.
In other words, the total amount of free memory in the heap might be enough for an effect, but that memory could be scattered around the heap in chunks that are too small to be actually usable. (For an introduction to fragmentation and memory allocators, check out Steven Tovey's great #AltDevBlogADay article.) Even though we use a separate heap for particle allocations to localize fragmentation, it is still a problem. Fortunately, we have a few tricks to limit fragmentation -- and handle it when it becomes an issue.
Whenever possible, we use static segmented memory pools (allocated at start-up) to avoid both fragmentation and the cost of dynamic allocations. The segments are sized to match the structures most commonly used during particle system allocations. Only once these pools are full is it necessary to perform dynamic allocations, which can happen during particularly heavy combat moments or other situations where many particle effects are being played at once.
Our effects system makes multiple memory allocations when a single particle system is being created. If any of these fail (because of fragmentation, or because the heap is just full), it means the effect cannot be created. Instead of half-creating the effect and trying to free any allocations already made (possibly fragmenting the heap further), we perform a single large allocation out of the effects heap.
If this succeeds, we go ahead and use that memory for all the allocations. If it fails, we don't even attempt to initialize the effect, and it simply doesn't get played. This is obviously undesirable from the player's point of view, since an exploding car looks really strange when no explosion effect is played, so this is a last resort. Instead, we try to ensure that the heap never gets full or excessively fragmented in the first place.
Toward this end, one thing we do is partition the effect into "stores," based loosely on the class of effect. We have stores for explosions, ambient effects, bullet squibs, and a number of other effect types. By segregating effects like this, we can limit the number of effects of a particular type that are in existence at any one time.
This way, our effects heap doesn't fill up with hundreds of blood-spatter effects, for example, thus denying memory to any other type of effect. The stores are structured as queues; when a store is full and a new effect is played, the oldest effect in that store gets evicted and moved to the "graveyard" store (where old effects go to die). Their emission rate is set to zero so no new particles can be emitted, and they are given a certain amount of time (typically only a few seconds) to fade out and die, whereupon they are deleted.
Having effects partitioned into stores also allows us to perform other optimizations based on the type of effect. For example, we can assume that any effect placed in the "squib" store is a small, short-lived effect like sparks or a puff of smoke. Therefore, when one of these effects is played at a position that isn't in the camera frustum, or is further away than a certain distance, we simply don't play the effect at all, and nobody even notices.
Another example is fading away particles from effects in the "explosion" store when they get too close to the camera, as they will likely block the view of the action, and also be very costly to render. When the player is surrounded by legions of enemy soldiers, tanks, and helicopters all trying to get a piece of him, these optimizations can lead to significant savings.
We also cut our memory usage by instancing effects. In our open-world setting, the same effect is often played in multiple places -- steam from manhole covers and smoke from burning buildings, for example. In these cases, we only allocate and simulate one individual "parent" effect, and we then place a "clone" of this parent wherever that effect is played. Since only the parent needs to generate and simulate particles, and each clone only needs a small amount of bookkeeping data, we can populate the world with a large number of clones with a negligible impact on memory and CPU usage. To combat visual repetition, each clone can be rotated or tinted to make it look slightly different.
Each particle system (cloned or not) needs memory to store its vertex buffers in addition to the memory required for simulation. As the number of particles in a system can change every frame due to new particles being generated or old ones dying, the amount of memory required for its vertex buffer varies similarly.
While we could simply allocate enough space to store the maximum possible number of vertices when the system is created, that would be wasteful if only a few particles are emitted for the majority of the effect's duration. Alternately, we could instead just perform per-frame allocation in the effects heap, but creating and destroying these buffers every frame adds churn, increases the possibility of memory fragmentation, and demands more processing overhead for doing many dynamic allocations.
We instead use a dynamic vertex buffer heap, out of which we allocate all vertex buffers that are only needed for a single frame. Because the particle vertices are built on the fly every frame and don't need to be persistent (besides being double-buffered for the GPU), we can use a simple linear allocator.
This is an allocator that is cleared every frame, and every allocation is simply placed at the beginning of free memory. This has a number of advantages; fragmentation is completely eliminated, performing an allocation is reduced to simple atomic pointer arithmetic, and memory never needs to be freed -- the "free memory" pointer is just reset to point at the beginning of the heap at each frame.
In addition, this heap doesn't have to be limited to the particle systems' buffers. It is used by any code that builds vertex buffers every frame, including skins, motion trails, light reflection cards, and so forth.
With this large central heap, we only ever pay for the memory of objects that are actually being rendered, as any dynamic objects that fail the visibility test don't need any memory for that frame. If we allocate memory for each object from when it's created until it's destroyed (even if you rarely actually see the object), we use far more memory than we do by consolidating vertex buffer allocations like this.
It's easy for effects to get out of control in Prototype 2's game world. Explosions, smoke, blood sprays, fires, and squibs all go off regularly, often all the same time. When this happens, the large amount of pixels being blended into the frame buffer slows the frame rate to a crawl. So we had to dedicate a significant amount of our effects tech to identifying and addressing performance issues.
We decided to place this burden on the effects artists. This is partly because they are the ones who create the effects and therefore know all the art and gameplay requirements. But we also do this to deliberately make them responsible for effects-related frame rate issues. Otherwise, we found that they would often make something that looks good but performs poorly, hoping it could be optimized by the rendering team before we had to ship.
This sucks up far too much valuable time at the end of the project, and usually, isn't even feasible. This shouldn't really be surprising -- at this stage it should be standard practice in the industry that artists understand and work within performance constraints. But, when deadlines loom and everyone is under pressure, it's quite tempting to just get it done and fix it later.
We found that the easier it is for artists to quantify performance and recognize when they're doing something wrong, the more likely they are to do it right the first time. We learned this the hard way toward the end of Prototype when nearly every one of the lowest frame rate situations was due to the GPU time spent on effects. Once we gave artists easily accessible performance information, they were more than happy to take an active role in performance tuning.
This feedback started as a simple percentage that showed how much particle rendering cost overall compared to the per-frame budget. It has since been expanded to give the artists details on each individual effect (see Figure 2). They can see a list of all effects currently being played and how much each one costs in terms of memory usage and GPU load.
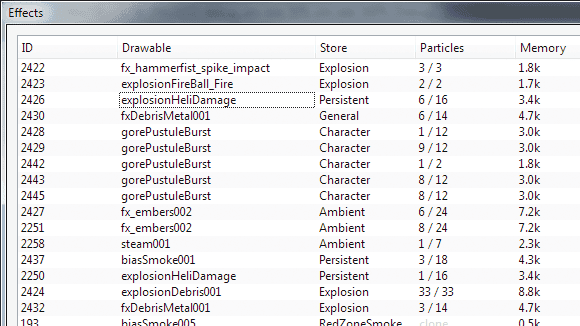
For the GPU load, like the overall budget percentage, we use simple occlusion query counters to identify how many pixels each effect writes to the screen. This can be a great indicator of overdraw due to too many particles or poor texture usage (resulting in a large number of completely transparent pixels that cost time but don't contribute anything to the final image).
The artists can immediately see which effects cost the most and where to concentrate their optimization work. Other visualization modes are also useful for investigating performance issues, such as rendering a representation of the amount of overdraw or displaying the wireframe of a particular effect's particles.
As is the case in rendering tech in general, the more direct feedback we can give artists about what they're working on, the better they are able to do their job and the better the game looks overall -- everybody wins!
Our effect scripting system was also built to allow us to change an effect's level of detail based on the current rendering load, which became our main method of optimizing effects. Given that some effects can be visible from one end of the city to another, we needed to be able to concentrate our budget on the effects near the camera and change LODs based on the current rendering load.
The LOD system is mainly based on the attribute biases and overrides described above. The effect artist can create an LOD that changes the bias and overrides values of an effect at a certain distance. These values are then interpolated between all LODs based on the effect's distance from the camera. For example, the artist might choose to lower the emission rate and increase the particle size of an effect when it's far away -- this would reduce the amount of overdraw while still maintaining a similar look, but with less of the detail that would only be noticed up close.
The interpolation results in a continuous LOD transition that doesn't suffer from any popping or other similar problems -- although they still have the option of switching to a completely different effect at a certain distance (with a cross-fade) or disabling the effect altogether. While reducing GPU cost is the main goal, these LODs usually end up saving both memory and CPU time, too.
The other metric we use when choosing LOD is the rendering cost of the previous frame's particles. This uses the same occlusion query results as the statistics given to artists and is fed back into the LOD system.
If the previous frame was relatively expensive, we don't want to make the current frame worse by spawning even more expensive effects, so we instead play cheaper LODs in an attempt to recover faster. The artist has full control over what LOD to choose and at what level of performance it should be used.
When the frame rate drops significantly due to particles, it is often not because of one expensive effect but due to many moderately expensive effects all going off at the same time. Any optimizations done in this regard must take into account what other effects are playing. For this we have "effect timers". Using an effect timer, we can check whether a particular effect has already been played recently, and choose to play different effects based on this.
A prime example is a big expensive explosion; we might only want one big explosion to go off at a time, and for any other simultaneous explosions to be smaller, less expensive ones. This often happens when a missile is shot into the middle of traffic and three or four cars explode at the same time -- one car will play a good looking effect, while the other cars play smaller, cheaper ones. The visual impact is similar, but at a much lower rendering cost.
Although our effect scripting system is meant mostly for optimization of rendering, it has useful applications for gameplay too. For example, when the player fires a tank shell into the distance, we want a suitably impressive and impactful explosion, but if the same explosion were to play right in front of the camera when the player is hit by an AI's tank shell, the result would likely blind the player for a few seconds and completely block their view of the action.
This can be very frustrating in the middle of combat, so in these situations we can use different LODs to reduce the number of particles, lower the opacity, and make the effect shorter and smaller. Not only does this make Prototype 2 play better, it also uses a cheaper effect that has a lower impact on frame rate.
Even with our LOD and scripting system doing its best, the mayhem of Prototype 2 means it is still possible for particle effects to become too expensive. When this happens, we take the more extreme measure of switching to bucketed multi-resolution rendering (as presented by Bungie's Chris Tchou at GDC 2011).
The decision to switch to a lower resolution render target (in our case half resolution -- 25% the number of pixels) is also based on the previous frame's particle rendering cost. When it is low, all particles render to the full resolution buffer. This avoids having to do a relatively expensive upsample of a lower resolution buffer, which in simple scenes can be more expensive than just rendering particles at full resolution.
Once performance slows to a certain level and the upsample becomes the better option, we switch certain effects to render to the lower resolution buffer while the rest of the effects stay at full resolution. In this case, the artists need to choose which effects need to stay at full resolution, usually small ones with high-frequency textures that suffer the most from the drop in resolution, such as sparks, blood, and fire. All other effects drop to rendering at the lower resolution.
When even that results in too much GPU time, as a last resort we switch to every effect rendering into the lower resolution buffer, regardless of artist preference. For the upsample, we chose a nearest-depth filter (as used in Batman: Arkham Asylum [pdf link]), which we found to be cheaper and better quality than a bilateral filter.
We wanted to keep the actual shader used by the majority of our particles as inexpensive as possible, so it's relatively simple. We call it the add-alpha shader, as it allows particles to render either additively (for effects like sparks or fire) or alpha-blended (for smoke) using the same shader. Whether the shader is additive or alpha-blended is determined by the alpha channel of the particle's vertex color. To do this we pre-multiply the texture's color and alpha channels and use a particular blend function -- see Listing 1, which follows this text, for the relevant shader code.
This is not a new technique, but it's one that is nonetheless central to our particle rendering; particles from every effect that uses this shader (and a shared texture atlas) can be merged together, sorted, and drawn in the same draw call. This eliminates the popping that would happen; otherwise -- if two overlapping effects were drawn as separate draw calls, there would be a visible pop when the camera moves, and the order in which they are drawn changes. The vertex alpha can also be animated over time, so a particle can start its life as additive but finish as alpha-blended, which is very effective for explosions that start with a white-hot bang and end with thick smoke that fades away.
You'll also notice in the code listing that there are two texture fetches. This is for simple subframe interpolation of our texture animations, which allows us to use fewer frames and still produce a smoothly animating image.
In Prototype 2, the world is split up into three zones: green, yellow, and red. Each zone has a distinct style and color palette, as well as a few different times of day. Without lighting and shadowing, particles look wrong in many situations -- too flat, too light or dark, and sometimes just the wrong color (see Figure 3 for example). We realized they needed lighting but didn't want to add the expensive pixel shader code in order to do per-pixel shadowing and image-based lighting, as this would have vastly reduced the number of particles that we could render.
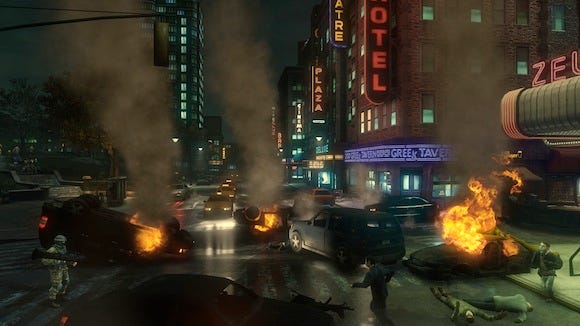
Figure 3A (top) has improved colors over Figure 3B (bottom).
Our solution was to do lighting per-vertex, but as a pre-pass into an intermediate "particle lighting" buffer. For each particle vertex, we render the lighting contribution to a pixel in the lighting buffer. This way we can use the pixel shader to do lookups into the shadow buffer and image-based lighting textures, using the same lighting code as the rest of the game and avoiding the performance pitfalls of vertex texture lookups on some platforms.
This lighting buffer is then read in the particle's vertex shader and combined with the vertex color, resulting in no extra instructions in the pixel shader. The only concern here was the performance of the vertex shader texture lookup on some platforms, particularly the PS3 and some earlier DX9 GPUs.
In these cases we actually rebind the particle lighting buffer as a vertex buffer and just read from it as we would any other vertex stream. This is trivial on the PS3 as we have full control over how memory is viewed and accessed, and for the DX9 GPUs that support it, we use the ATI R2VB extension (as detailed in this link [pdf]).
Particles are a significant part of bringing the world of Prototype 2 to life. Various performance management systems work together to deliver effects without exceeding available resources. Lighting and shadowing add a huge amount of visual quality, and by doing it per-vertex, we are able to light every particle in the world at considerably less cost than we otherwise could have. And finally, one of the most important aspects of effects tech development is giving the artists the tools they need to do their job-and to help us do ours. After all, they're the ones that make us all look good!
The author would like to acknowledge Kevin Loose and Harold Westlund who authored many parts of the original Radical particle effects systems.
// Add-alpha pixel shader. To be used in conjunction
// with the blend factors {One, InverseSourceAlpha}
float4 addalphaPS(
float4 vertexColour : COLOR0,
float2 uvFrame0 : TEXCOORD0,
float2 uvFrame1 : TEXCOORD1,
float subFrameStep : TEXCOORD2 ) : COLOR
{
// Fetch both texture frames and interpolate
float4 frame0 = tex2D( FXAtlasSampler, uvFrame0 );
float4 frame1 = tex2D( FXAtlasSampler, uvFrame1 );
float4 tex = lerp(frame0, frame1, subFrameStep);
// Pre-multiply the texture alpha. For alpha-blended particles,
// this achieves the same effect as a SourceAlpha blend factor
float3 preMultipliedColour = tex.rgb * tex.a;
float3 colourOut = vertexColour.rgb * preMultipliedColour;
// The vertex alpha controls whether the particle is alpha
// blended or additive; 0 = additive, 1 = alpha blended,
// or an intermediate value for a mix of both
float alphaOut = vertexColour.a * tex.a;
return float4( colourOut, alphaOut );
}
Read more about:
FeaturesYou May Also Like


