Share Your Experience: YouTube Integration In Games
Would you like to integrate YouTube video upload into your games? In a detailed technical feature with sample code, Team Bondi programmer Claus Höfele delves into the practical steps for your users to get gameplay footage automagically uploaded online.
November 22, 2008

Author: by Claus Höfele
[Would you like to integrate YouTube video upload into your games? In a detailed technical feature with sample code, Team Bondi programmer Claus Höfele delves into the practical steps for your users to get gameplay footage automagically uploaded online.]
Increasingly, YouTube integration is seen as a valuable feature addition to games. Spore Creature Creator, for example, offers to place a video of your creature on YouTube.
At the same time, a special YouTube channel aggregates the videos created by the community and offers additional informative material about Spore. This is a great way to encourage user created content and create a community for a game.
Other current games with YouTube support include PixelJunk Eden and Mainichi Issho -- both allow you to upload recorded video footage of your game performance. And, not only commercial games benefit. By hosting the videos, YouTube puts this feature in reach of indie game developers who might otherwise not be able to afford the server resources.
As a game developer, recorded gameplay offers you a variety of possibilities to engage the player:
Video as an achievement: the player can replay successes or win a video for a special accomplishment, such as a high score.
Video as a community building feature: the player can share funny and interesting mementos of gameplay or display self-created content.
Video as a learning device: the player can see how others play, watch in the enemy camera who killed him/her, or share game tips with others.
This article shows you how to add a video recording feature to your game and share the recording on YouTube. It includes a demo application and source code that can be downloaded here.
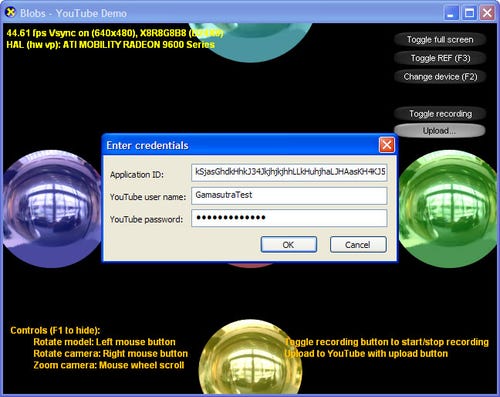
The demo that comes with this article consists of a C++ implementation that extends the Blobs sample application from the DirectX SDK. Whereas the demo runs only on Windows, the library to encode and upload videos to YouTube is cross-platform and it should be easy to integrate the techniques demonstrated in this article into your own game. Figure 1 shows a screenshot of the demo.
Recording Gameplay
In most cases, you'll want to have the recording running all the time during gameplay to ensure that the player doesn't miss any noteworthy events. You can offer the player the option of selecting scenes from the history of recordings (say, the last 10 minutes) or automatically store a video when important events occurred (such as a goal in a soccer game).
Alternatively, you can ask the player to start recording explicitly if the game lends itself to it. Spore Creature Creator, for example, asks you to start the recording by pressing a button in Test Drive mode to create a video.
A straightforward option to record gameplay footage is to capture the contents of the framebuffer in regular intervals during gameplay and encode these screenshots into a video. While simple to do, transferring the framebuffer contents from the graphics card to system memory for each screenshot isn't a free operation.
Also, you have to encode the screenshots in real-time, which takes a big chunk out of a game's frame time and requires regular hard disk accesses to store the video frames. Console game developers should look to see whether their system provides hardware-specific APIs that speed up this process. PixelJunk Eden on the PS3 is an example where recording the framebuffer has been used to good effect.
While the previously mentioned technical challenges can be acceptable for some games, more problematic is the fact that framebuffer captures restrict the editing options that you can apply to the recordings. Say you are developing a car racing game and would like to allow the player to choose a different camera view in the video (first person, cockpit view, third person) than that used while playing the game.
Halo 3, for example, implements a feature called Saved Films that allows you to record gameplay and change the playback speed, camera angle, and display options when watching the recording. (Halo 3 doesn't allow you to turn the recording into a video and upload it to YouTube, however.) If you want this level of control, you need to record the game state and render the video frames in a second step.
The recorded game state must comprise everything you need to recreate a rendered frame at a later time. This will include the state of your player's avatar, AI controlled characters, and much more data, depending on the particular type of game.
The integration of such a recording system can be complex, but you can simplify your task a little if you forgo pixel-perfect recreations of the gameplay. It's not important that every particle is at the same place as before, but the effect should be at the same position.
You might already have a similar system in place for your saved games, which also requires you to store the current game state and recreate it at a later time. Same as saved games, you will have to worry about recorded game state being compatible with different versions of your game.
Because recording of game state can result in a large amount of data, an alternative approach is to record the input that caused the game state. If you capture all button presses, joystick movements, and the system clock, you can use this input to recreate a frame.
This requires a deterministic game engine: one that produces the same outcome for each run. A deterministic game engine is no easy feat, but such a system will produce a minimal amount of data in each frame. Interestingly, you can use a deterministic game engine to help fix bugs by recording the input while playtesting and replaying the input to reproduce the bug (see this link and this link).
A combination of game state and input captures might work too: capture the game state in regular, but large, intervals (say every 300-600 frames) and record the input in-between those game state updates.
Because game state and inputs are very specific to your engine, this article's demo goes the easy route: read back the framebuffer contents in regular intervals, scale it to a suitable size, and send the image to the video encoder. The demo uses IDirect3DDevice9::StretchRect() from the DirectX SDK, but OpenGL aficionados can use glReadPixels() instead.
Choosing a Video Format
YouTube accepts videos in a variety of formats. Once uploaded, the videos are converted into a format understood by YouTube's video player, which is based on Macromedia's Flash technology.
One of the video codecs that YouTube accepts for upload is Theora, maintained by the Xiph Foundation. Theora comes with a compact, open-source reference implementation and has a license that allows you to use the codec in non-commercial and commercial games free of charge.
Theora encoded videos are embedded into the Ogg video container format and thus have an “.ogv” filename extension. Ogg can also contain audio (usually encoded with the Vorbis codec from the same organization), although the demo ignores audio for simplicity.
320x240 pixels is the minimum resolution you'll want to use. For higher quality videos, YouTube recommends 480x360 pixels or more. YouTube selects the quality of a displayed video by taking the viewer's bandwidth, the source material of the video, and the quality settings into account. (A YouTube viewer can change the default quality for videos in the account settings or click on the “watch in high quality” link underneath a video.)
If you have a lot of text or other high contrast data in your videos, a higher resolution will considerably improve the video's quality.
Another consideration is file size. One minute of video in Theora format (768 kbit/s) results in roughly 4.5 MB of data. YouTube itself limits uploaded videos to a length of 10 minutes and a file size of 1 GB.
I have had good experiences with Ogg and Theora in my programs, but if you want to explore other options, have a look at ffmpeg (supports a variety of formats; GPL/LPGL), Xvid (MPEG-4; GPL), or DivX (MPEG-4; commercial, but community codec free as in beer).
Encoding Screenshots with Theora
At this point, the system implemented for the demo has arrived at the structure depicted in Figure 2.
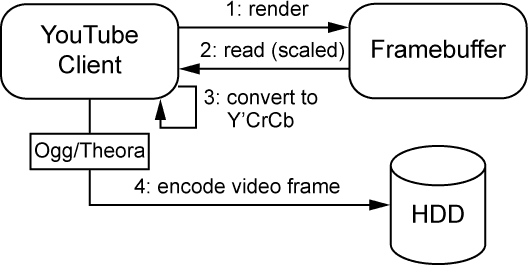
After the game has rendered the current frame, a scaled copy of the framebuffer content is read back, converted, and encoded into a video frame. The conversion step needs a bit more explaining.
Theora expects the video frames in Y'CbCr format. Y'CbCr – often used interchangeably with the term YUV – is a color space that separates an image into one luma component (roughly equivalent to the light intensity) and two chroma channels (the color information). The prime on the Y means that the luma channel contains gamma corrected values.
Y'CbCr encoded images contain less redundancy and thus produce smaller files than RGB. In addition, the human vision is more perceptible to light intensity than color. For this reason, the two chroma channels can be stored in a lower resolution than the luma channel.
The demo application contains a routine that converts the framebuffer's RGB values to the required Y'CbCr based on values I found at this link. At the same time, the image is subsampled to a 4:2:0 format, which reduces the two chroma channels to a quarter of the original size.
To encode the screenshots into a video, the demo application defines the following interface to the Theora and Ogg libraries:
class TheoraResourceWriter
{
public:
TheoraResourceWriter(size_t width, size_t height, unsigned int fps,
unsigned int bitrate = 768000, unsigned int quality = 0);
~TheoraResourceWriter();
bool open(const std::string& fileName);
bool write(const Image& image);
void close();
}
Where Image is a wrapper for a piece of memory that contains the framebuffer contents in Y'CrCb format, which is passed to TheoraResourceWriter::write() for every frame.
YouTube's Data API
Now that the video exists on your hard disk, you can upload it to YouTube.
To start developing a YouTube application, you'll first need a client ID and a developer key that identify your software, which you can request from Google; this is in addition to a YouTube account. Whereas client ID and developer key are usually built into your application, user name and password are asked for when the user logs in to your application.
Google offers client libraries to access YouTube's servers for several programming environments. Unfortunately, a C/C++ API is not available, which puts the many games developed in this language at a disadvantage. On the up side, YouTube uses an HTTP based protocol that is straightforward to implement yourself.
Applications that want to communicate with YouTube's servers can use one of several HTTP request methods, of which GET and POST are the most common ones. HTTP GET asks the server to read a resource, for example the description of a video feed that you subscribed to. HTTP POST, on the other hand, is used to create resources, such as when uploading a new video.
A resource in this context is anything addressable by a URL, for example http://gdata.youtube.com/feeds/api/standardfeeds/top_rated to get access to the most highly rated YouTube videos.
After accessing a resource in this way, YouTube's server answers with an HTTP response code, signaling the result of the operation, and a content document with additional information (usually in XML format) -- more info here.
This style of request/response mechanism is referred to as REST (representational state transfer).
Implementing a YouTube Request
The principle of a RESTful service is captured in the following class function template:
template<class RequestOperator, class ResponseOperator>
YouTubeServiceState YouTubeService::service(
RequestOperator requestOperator, const typename RequestOperator::Input& input,
ResponseOperator responseOperator, typename ResponseOperator::Output& output)
{
const bool developerKeyValid = !m_DeveloperKey.empty();
const bool authenticationValid =
!RequestOperator::requiresAuthentication || !m_AuthenticationToken.empty();
ASSERT_M(authenticationValid, "Authentication required for this service.");
ASSERT_M(developerKeyValid, "Developer key required.");
YouTubeServiceState result = YouTubeServiceStates::Ok;
if (authenticationValid && developerKeyValid)
{
m_WriteBuffer.clear();
result = requestOperator(m_CurlHandle, input, m_ClientId, m_DeveloperKey,
m_AuthenticationToken);
if (result == YouTubeServiceStates::Ok)
{
result = responseOperator(m_WriteBuffer, output);
}
}
return result;
}
This is C++'s way of saying: “First check that the application has a developer key. If the request requires authentication, also check that the application is authenticated. Then, perform the HTTP request implemented in the request operator and have the answer parsed by the implementation of the response operator.”
The method is templated with request and response operators because I wanted to separate the algorithm to perform a service from the details of a specific request. This allows me to add more requests as I need them by implementing additional operators with the required interface signature (functors as they are called in C++):
struct Request
{
typedef ... Input; ///< Input type.
enum { requiresAuthentication = false };
/** Performs a request.*/
YouTubeServiceState operator()(
CURL* curlHandle, const Input& input,
const std::string& clientId, const std::string& developerKey,
const std::string& authenticationToken);
};
struct Response
{
typedef ... Output; ///< Output type.
/** Parses a response. */
YouTubeServiceState operator()(
const std::string& response, Output& output);
};
Whereas the request functor is responsible to call a service based on the given input data, the response functor parses the result into an output object. In my demo, I'm using libcurl for sending HTTP requests and TinyXML for parsing the response.
The request functor can also require authentication if requiresAuthentication is set to true in the functor's declaration. Not all requests need to be authenticated, but when sending videos on behalf of a YouTube user, you'll first need to send one request with the user's name and password to get an authentication token.
In another request, you include this token to actually perform the upload. This sequence is illustrated in Figure 3.
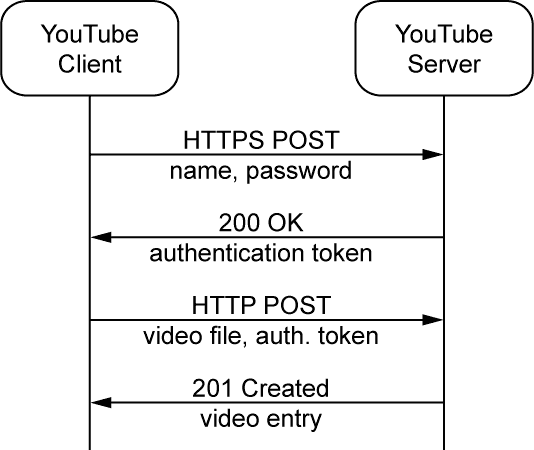
The authentication request has to be sent via HTTPS so that eavesdroppers can't spy on the YouTube password. For this reason, I have configured libcurl to use OpenSSL, which takes care of verifying YouTube's server and encrypting the authentication request.
Uploading Videos
The demo application already provides request and response operators for authentication, search, and video upload. To simplify the API's usage, I added inline methods that fill in known details of a request, such as which function objects to use, and call YouTubeService::service() internally. A video upload can be achieved with only a few lines of code:
YouTubeService youTubeService("YouTubeDeveloperKey");
YouTubeAuthenticationData authenticationData;
authenticationData.userName = "user";
authenticationData.password = "password";
youTubeService.authenticate(authenticationData);
ASSERT(youTubeService.isAuthenticated());
YouTubeUploadData uploadData;
uploadData.fileName = "screen.ogv";
uploadData.mimeType = "video/ogg";
uploadData.title = "Title";
uploadData.description = "Test upload";
uploadData.category = "Tech";
uploadData.isPrivate = false;
uploadData.developerTag = "TagName";
uploadData.keywords = "1Dot, 2Dots, 3Dots, more";
YouTubeVideoEntry videoEntry;
YouTubeServiceState upload =
youTubeService.upload(uploadData, videoEntry);
ASSERT(upload == YouTubeServiceStates::Ok);
When uploading the video file, you have a number of options that describe the contents, such as title, description, and category. Useful is the developer tag, which is an invisible marker that's only accessible to your application.
This tag can be used in search requests to filter videos uploaded by your application. With the private flag, you can decide whether the video is accessible to everyone or only the user.
Once uploaded, it usually takes 5-10 minutes for YouTube to process the video and enable it for viewing on YouTube's web site. You can check the status of a video under My Account / My Videos / Uploaded Videos for the account that was used to upload the file. You can watch some sample videos on the test account I created for this article.
Summary
As you have seen, adding YouTube upload to your game is straightforward, but requires some planning.
To start with, you need to decide how you are going to record the game footage. From the discussed options, a framebuffer capture is the easiest to add to an existing game, but recording game state or player input gives you more flexibility to apply changes to the recording. If you want to change the camera angle later on, for example, game state recordings allow you to do that.
I chose the Theora video format to turn the recording into a video because the encoder comes with an easy to use reference implementation and doesn't require license fees. Other video formats accepted by YouTube include DivX and most formats of the MPEG suite.
Finally, an application can upload videos with YouTube's RESTful interface; a protocol based on HTTP. The demo application for this article comes with an implementation for authentication, search, and video upload requests that you can use for your own game.
Note: Demo updated 5 January 2009. Note from the author: "Update v1.1: Fixed a bug where I mixed up the color channels when reading from the DirectX render target. DXUT sets the render target to D3DFMT_X8R8G8B8 by default where the color channels are ordered BGRX in memory. For this reason, I added ImageFormat::B8G8R8A8 as a new image format and a new code path to ImageUtils::convertToYCbCr420p() to handle this format."
[EDITOR'S NOTE: This article was independently published by Gamasutra's editors, since it was deemed of value to the community. Its publishing has been made possible by Intel, as a platform and vendor-agnostic part of Intel's Visual Computing microsite.]
Read more about:
FeaturesYou May Also Like


