Daily news, dev blogs, and stories from Game Developer straight to your inbox
Sponsored By
Featured Blog | This community-written post highlights the best of what the game industry has to offer. Read more like it on the Game Developer Blogs.
The hobbyist coder #2: A way to approach coding by flowcharts
Let's go for a second episode of the "hobbyist coder", where I want to share one of my approach of coding by visual flowchart representations.
8 Min Read

Hi everyone and thanks for all the comments on my first “hobbyist coder” post, it encouraged me to write this second one: expose a way to approach coding for non-coders.
As for my first post, maybe this way is a “classic” one in a coder formation but I remember, when I wanted to start coding, I found a lot of very useful tutorials on the internet about specific codes, syntax, algorithms but I never found a more global article about the way to “think” the code and how to transform any mechanic in code lines… So I’ll try to give one answer here, based on my own experience.
NB: This “method”, based on a graphic visualization of logic, will probably be more natural for Game Designers and Level Designers, the first ones using flowcharts frequently and the second ones using visual scripting (like Unreal Kismet) often too…
Let’s draw it
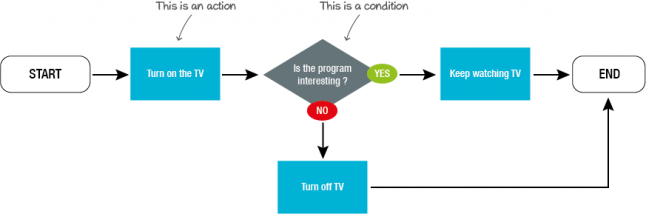
As I said above, the method I used when I tried to learn how to code was to start with a “flowchart”… At this point, some people may ask “But what is a flowchart”? You can read the Wikipedia definition (http://en.wikipedia.org/wiki/Flowchart) otherwise you can just now it’s a graphic representation of a process, with “action” blocks and “condition” blocks linked:
When I decided to approach coding “seriously”, I had already a professional Game Design experience and used a lot of “flowcharts” to define game mechanics, IA behaviors, UI flows, etc. and some of them were really complex.
So, a day I felt particularly intimidated of coding a complex behavior, I just watched a design flowchart at work and thought: “hey, actually it’s almost code! Maybe it’s a better way to think about coding than just in my head… ”. And yes, it was a better way.
But stop talking about me and let’s take a concrete case:
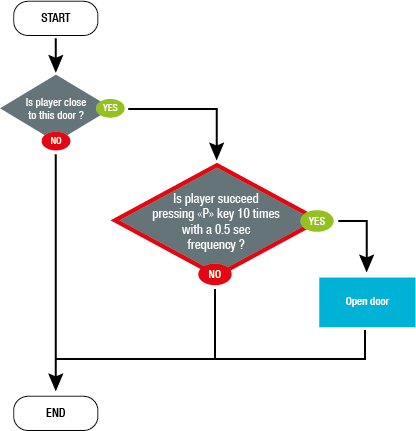
Let's considerate a simple «game” where the player has to press a key as fast enough a defined number of times to fill a “gauge”. If he waits too much between two inputs, the gauge is reset. The player wins when he fills entirely the gauge.
It’s a very simple behavior (a classic one used in lot of games actually, for example in God of War series to open doors) for the demonstration to be easier, but the process can be applied to much more complex ones.
So, a basic design flowchart for this behavior would be:
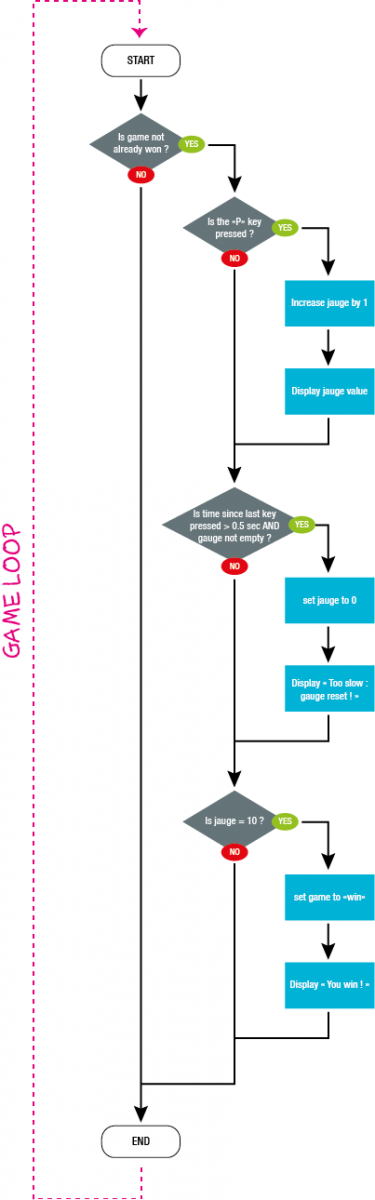
If you’re familiar with coding, you probably already saw I organized my flowchart the same way as code lines (vertically and with indentations). As most of time (I’m tempted to say “always”, but I’ve not enough experience to say that…) game programming is based on an “update loop”, which performs some actions each frame of the game, I mentioned it on the flowchart.
Variables
I won’t make a complete point about variables in programming (again, Wikipedia is your friend if you want more precisions: http://en.wikipedia.org/wiki/Variable_(computer_science)), so let’s say the basic: it’s just a storage of a value in memory which can, well, vary.
In flowcharts, you don’t really have to highlight the different “variables” involved in your process. However, in programming, you have to “declare” your variables before use them.
So, you can “scan” you flowchart and find all the places you’ll have to use a “stocked value”.
In our case:
A boolean (a true/false variable) for the game status (won or not)
An int (integer number) for the gauge
An int for the gauge max value (the value to reach to be filled)
A float (decimal number) for the time limit to valid a new key press (as the time will be expressed in seconds, we need a decimal to be more precise)
A float to store the time when we last pressed the key
Besides, this last time variable not really “mentioned” in the flowchart highlights a lack of precision. If we want to clarify this part, we have to add an action in the flowchart to stock the value :

Some variables need to be “initialized” before start your process, which it means give them a start value. If you don’t, they will have their default value (false for a Boolean, 0 for a int or float, etc…). In our case, these initial values are:
Gauge max value to 10
Time limit to 0.5 seconds
All the others variables keep their default value
Translation
Now, it’s the great final, the time to write your code!
I know it seems to be the hardest part for a lot of people but I don’t think so: you’ve already done the hardest designing the flowchart. This part is close to a “translation” for me!
Of course, for a translation, you need a “dictionary” depending of the language you want to use. For this example, I chose the C# language, which is quite accessible, in the Unity 3D environment.
To be honest, you’ll probably have to read some tutorials and documentation before being comfortable with a language and have the basics: you can’t translate a new language you never even heard just opening a dictionary ! But my purpose here is not to teach you any code syntax, as a lot of people can do it better than I.
Little aside about Unity C#
For C# coding in Unity, the main “dictionaries” I use are:
- the unity script reference : http://docs.unity3d.com/Documentation/ScriptReference/
- the C# reference : http://msdn.microsoft.com/en-us/library/vstudio/618ayhy6.aspx
The first one is useful to find functions (basically, action you can do automatically in code with parameters) proper to Unity (move a game objects, cast rays, etc…).
The second one references all the keywords of the c# languages (how to write a “condition”, which signs to make operations, etc.)
A more accessible website to have a first overview about C# syntax, without getting lost, is this one: http://www.dotnetperls.com/
OK, let’s see how the translation goes with our example (click the image to see a larger one) :
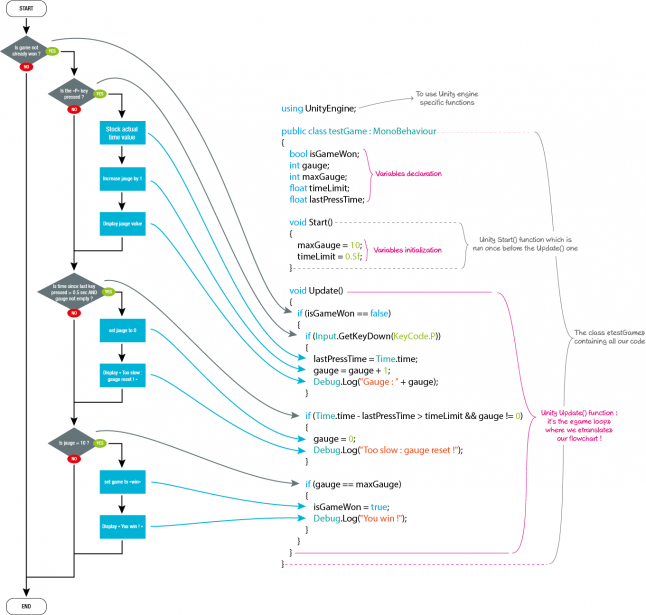
And here we are!
Isn’t this way really time-consuming?
Yes it really is… But:
Step by step, you won’t have to use this method and will be able to construct the logic in your head
If you’re a hobbyist coder like me, you keep saving a lot of time on very complex situations drawing them, seeing why it won’t work before write all your code.
When you’re more comfortable with programming logic, you can “compact” some flowcharts you consider obvious in a single “node”:
(and if this node is used more than one time, it’s probably a good candidate for a function!)
An alternative to draw flowcharts is to use your own “pseudo code”, which can be faster. For our example :
If game not won
If “P” key pressed
lastPressTime = actual time
jauge + 1
display jauge value message
If time since lastPressTime > 0.5 sec. AND jauge different from 0
jauge = 0
display “too slow” message
If jauge = 10
set game to won
display win message
Conclusion
That’s the end of this little article and I hope you found it interesting.
I’m aware that is not a turnkey solution to making code without knowing anything about it. My goal was here to try to demystify some common non-coders thoughts like “I can’t write all these strange lines!”, “I don’t know anything about mathematics and nuclear physics so I can’t code!” or “But I’m not a computer engineer!”
It doesn’t means you don’t need some mathematics and code syntax basics, or that an engineer diploma won’t make you understand faster, but it’s not the most important thing. Logic is definitely the most important, and “flowcharts” seems to me a good way to make it more accessible!
Update 07/11/13 :
Visual scripting ?
A coworker was surprised I didn't talk about visual scripting and I think he was right. So, let's fix this point.
Visual scripting, for those who don't know, is a system to script connecting logic blocks graphically... Yes, like a flowchart ! Actually, it allows to almost bypass the "translation" part as the "graphic script" you made is directly interpreted by ths software without really writing a code line. So, it's a very good way to start programming, as you just focus on "logic".
A small and non-exhaustive list of visual scripting tools :
- Kismet, in the Unreal engine, maybe the most famous one (http://www.unrealengine.com/en/features/kismet/)
- uScript for Uniy, very close to Kismet (http://www.detoxstudios.com/products/uscript/)
- Playmaker for Unity, with a little bit different philoshophy based on Finite State Machines (http://www.detoxstudios.com/products/uscript/)
- Stencyl, a 2D game engine allowing to "write" code by blocks (http://www.stencyl.com/)
Read more about:
Featured BlogsAbout the Author(s)
You May Also Like
Latest News


Trending


Featured Blogs