


Trending
Opinion: How will Project 2025 impact game developers?
The Heritage Foundation's manifesto for the possible next administration could do great harm to many, including large portions of the game development community.
In this article taken from Game Developer magazine, game designer Simon Strange introduces a method for increasing or decreasing player tension in games without altering their fundamental design elements -- a way to tweak a game in order to profoundly change its function.

[In this article taken from Game Developer magazine, subtitled "A Process for Identifying Low-Risk Design Opportunities", game designer Simon Strange introduces a method for increasing or decreasing player tension in games without altering their fundamental design elements -- a way to tweak a game in order to profoundly change its function.]
All systems are fundamentally in one of three states: growth, decay, or equilibrium.
For a video game, which can be viewed as a system of systems, growth and decay both happen during development. As systems are added, removed, and adjusted, the game more and more resembles its final shape. By the time you ship, your game is (hopefully!) at equilibrium.
Of course, designers cannot simply tweak and tune game systems on a whim. The target equilibrium point (the final state of the game's systems) needs to be identified fairly early on, so that individual systems (and their supporting assets) can be locked down during development. This is a very practical way to reduce risk and manage a project.
Unfortunately, this tends to create an antagonistic relationship between a designer's ability to effect change and the amount of development time left. This reduces the designer's ability to work on game systems during the latter half of the project, which can be very frustrating.
Over the last few years, I've developed a system for identifying and defining low-risk design changes. My goal is to allow design changes during the majority of a project instead of being forced to lock down design elements early on.
By identifying low-risk options in a systematic way, using charts and visual aids (which I discuss in parts 2 and 3), I have been able to describe to producers and publishers in advance exactly why certain changes pose little to no risk to the project's long-term stability. This has afforded me almost twice as much time for fine-tuning our game's core systems, which has resulted in better, and more balanced, more polished products.
The key concept is "equilibrium tension." A system in equilibrium feels the effect of many sub-systems, but each "pull" is balanced by an inverse "pull" of equal magnitude. In the simplest cases, this means two sub-systems opposing one another's effects, but in most cases a combination of sub-systems must be considered. This is exactly analogous to the force diagrams you might have drawn in physics classes.
Imagine a brick resting on a table. The gravitational force on the brick is exactly opposed by the table, so the brick remains in motionless equilibrium. (See Figure 1.) Now imagine your left hand on the left side of the brick. If you press on the brick, the brick will slide to the right. (See Figure 2.) If you use both hands, one on either side, and apply an equal amount of force, you can re-establish equilibrium. (See Figure 3.) The point is that the brick can remain in equilibrium with any magnitude or combination of forces, so long as each force is counteracted by other forces.
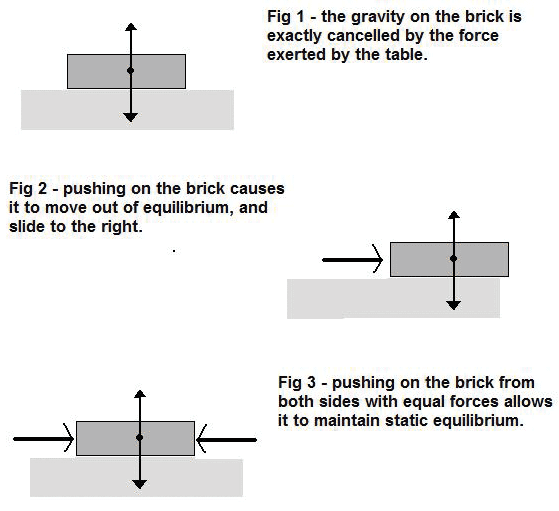
This does not mean that all equilibrium states are the same! The "squeezed" brick can absolutely feel the tension from your two hands. In the same way, you can make significantly different experiences within a video game by changing the "tension" on that game's equilibrium state.
Imagine our brick as a playable character in a simple 2D platform game. A player could move the brick left or right, jumping over small obstacles to progress through the world. If the player puts the controller down to take a break, nothing would happen to disturb the brick, just as you might have removed your hands from the physical brick and left it lying on the table.
Now let's add a sub-system, and start throwing fireballs from the right side of the screen every three seconds. The fireballs are a new force which, if unbalanced, would "push" the brick out of equilibrium. To balance this force, the player must simply "push" back by jumping over the fireballs as they appear. So long as the player jumps properly, the game remains in the same equilibrium as before. The difference is that the player is now actively working to balance the game's equilibrium. The more we demand of the player, the more tension we place on our equilibrium state.
Let's look at a few examples of how tension might be increased or decreased in some well-known games, without passing judgment in regard to whether this increase or decrease would be a good thing.
Portal
The central system in Portal can be boiled down to "Where do I place the blue portal?" and "Where do I place the orange portal?"
Not every surface in Portal is smooth enough for the player to open a portal through. Since the possible solutions to each room increase or decrease with the number of possible portal locations, reducing the number of smooth walls makes the solution more readily apparent to the player. So fewer smooth walls equals lower tension.
As Portal exists now, there is no penalty for creating more portals than necessary.
But if we were to track the number of shots used in each room -- by limiting the gun's ammo, or simply telling the player that we expected them to be more prudent (16 shots / 8 expected) -- players would become aware of each shot as a resource to be managed. Managing more resources means higher tension.
Mega Man
Mega Man games have always included difficult jump sequences. In most cases, missing a jump means you have to start the sequence over again.
But in a few spots, missing a jump means instant death. Jumps always provide opportunities to progress through the level but jumps over spikes or pits also offer an opportunity to fail the level entirely.
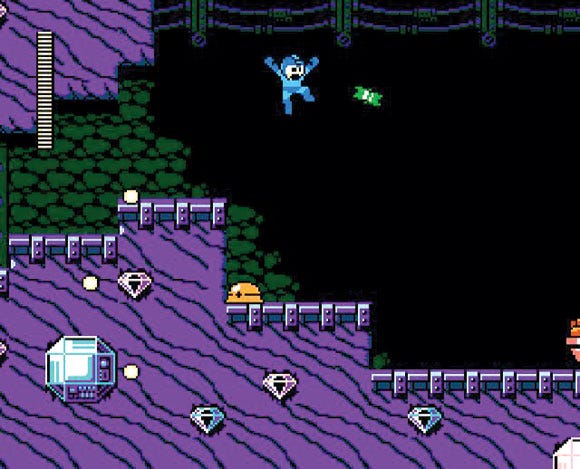
Spikes and pits have absolutely no consequence on a successful jump, as they are simply an extra harsh penalty for failure. Reducing these cases allows players to master the tricky jumps without fear of penalty. This changes the aggregate angle of the jump "tension" and reduces the player's fear of failure. Less fear equals lower tension.
Mega Man games have always been moderately difficult due to tricky jump timing, instant deaths, and limited attack options. But there have never been strict time limits within individual stages. Simply adding a countdown clock would give players yet another way to fail, increasing the tension of every action in the game. Time limits mean higher tension.
Aliens vs. Predator
Rebellion's 1999 PC game Aliens vs. Predator had some wonderfully austere levels, in which only a handful of enemies would appear. The clever twist -- nearly unprecedented for a FPS at the time -- was that enemies were randomly distributed, and their locations were reset whenever you loaded or re-loaded the level. This meant that while you could learn the geography of the level, you never knew when or from where the enemies would be coming. This was a dramatic departure from the norm, and was a big part of AvP's reputation as a very scary game. Unpredictability equals higher tension.
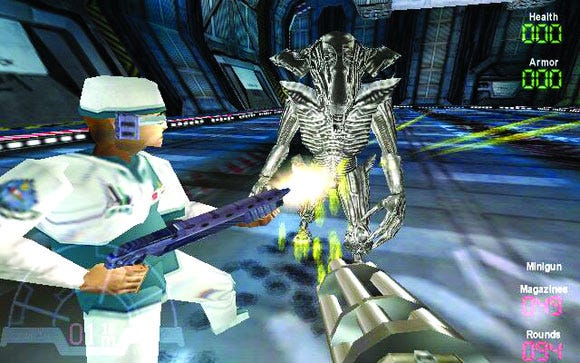
Another innovation in AvP was the asymmetrical balance between the three characters. Predators and Marines each had a suite of powerful weapons, but they were all strictly limited by ammunition. This forced the characters to constantly guess which sort of threat they would be facing at any moment, and to switch weapons accordingly.
The Alien, on the other hand, had no equipment, ammunition, or other limiting factors at all. Aliens were always working at 100 percent effectiveness. This cognitive simplicity was a big source of the appeal for playing as the Alien. Fewer gameplay choices means lower tension while playing as an alien.
Rock Band
Rock Band's core gameplay has never really changed. That's actually an important principle of the franchise, because they want to sell additional tracks to customers, and breaking backward-compatibility would be a big deal. But the Rock Band games have managed to change in other significant ways, all of which are excellent examples of maintaining system equilibrium at different levels of tension:
Failure. Rock Band forced players to fail if they missed too many notes. Rock Band 2 allowed quick games to be played in a special "no fail" mode, but separated those sessions from "real" RB2 sessions. LEGO Rock Band weakened the impact of failure by allowing failing players to save themselves. Rock Band 3 introduced a menu option which simply turns off failure at no penalty.
Group composition. RB1 forced bands to keep essentially the same members in every session. RB2 allowed players to lead multiple bands, but locked your selected band once you moved past the main menu. RB3 allows a group to seamlessly change bands at any time, and to add or remove players mid-song.
Achievement/Trophy criteria. In order to get all achievements, RB1 required players to master each instrument, expected all players to play at expert level, and required playing with multiple local players. RB2 required players to master each instrument, and even asked players to play for seven hours without pausing or disconnecting controllers. RB3 rewards you for playing in practice mode, gives rewards at every difficulty level, and tracks individual progress in every song (so you can fail or excel independently of your group).
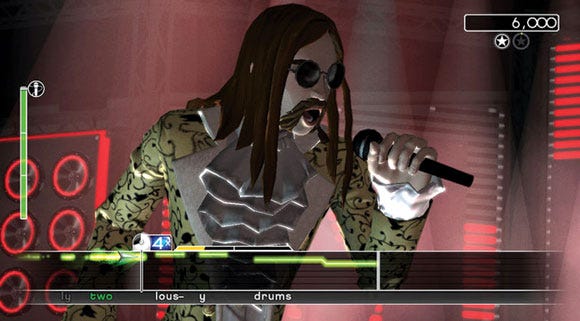
Rock Band has clearly been moving toward lower and lower tension states. Some people consider that an improvement, while others are less happy with the change. But Harmonix has done an excellent job of adjusting its games without breaking their core equilibrium, and has done so by managing player tension levels.
The point of all these game-specific examples is not that these design elements necessarily make the games any better or worse. The point is that all of these proposals do nothing to break the equilibrium of the game's established systems. The game might be more challenging, more frustrating, or less compelling, but it would mechanically be the same game. I'm not trying to evangelize creating games with more or less tension -- that question needs to be addressed by each game's individual design team. I'm simply posing that by thinking in terms of tension and system equilibrium, we can identify design opportunities which do not threaten the stability of the project but still impact the player's experience in significant ways.
I've made a point that some system-level changes in your game can be made with minimal risk, and I've identified a few examples of such changes. But how, exactly, does one go about separating equilibrium-preserving changes from equilibrium-destroying changes? Without a formal process to repeat these results, it's meaningless to simply point out examples. To that end, I'll share my step-by-step process of drawing a Tension Diagram.
Identify as many sub-systems as possible.
Identify as many player actions as possible.
Link sub-systems together.
Link player actions to the sub-systems.
Identify missing sub-systems and player actions.
Repeat steps 3 - 6.
For this exercise, I'm going to create a Tension Diagram for Doom II. Doom II is pretty primitive by today's standards, but the limited systems will assist in our completion of the diagram. If you're already familiar with Doom II, you may want to perform steps 1 and 2 on your own without looking at my list. You're welcome to use online resources and so forth.
Doom II's sub-systems. FPS fundamentals: levels, time counter, visibility, health counter, ammo counters, armor counter, projectiles, item collection, enemy spawning, victory condition(s), difficulty settings, load game, save game, and deathmatch.
Enemies. Soldier, Sergeant, Nazi, Heavy Weapon Dude, Imp, Demon, Specter, Revenant, Mancubus, Arch-vile, Cacodemon, Pain Elemental, Lost Soul, Hell Knight, Baron, Cyberdemon, Arachnotron, and Spiderdemon. Each enemy has the following sub-systems: movement, health, attack, aggro. Because the game supports deathmatch, we add "enemy player" to this list, though enemy players have more sub-systems that NPC enemies.
Weapons. Fist, Berserk Fist, Chainsaw, Pistol, Shotgun, Chaingun, Rocket Launcher, Plasma Gun, and BFG9000.
Environment. Doors, locked doors, moving columns, crushers, acid floors, and exploding barrels.
Collectibles. Health shard, stimpack, medkit, armor shard, armor vest, ammo, soul sphere, megaarmor, megasphere, invulnerability, night goggles, backpack, berserk, invisibility, map, radiation suit, and keycards.
Doom II's player actions. Four-way movement, turn, strafe, run, open door, shoot, and change weapon.
Linking sub-systems. Health (see Figure 4). For no particular reason, I've started with Player Health at the core of my diagram. I listed all the sub-systems which interact with Player Health, and then arranged them flow chart-style around that mechanic. There are four sub-systems which decrease health, and seven which increase health. Of course, most of those systems have more subtle effects, which we also need to represent. In this starting diagram, moving to the right means increasing health while moving to the left means decreasing it.
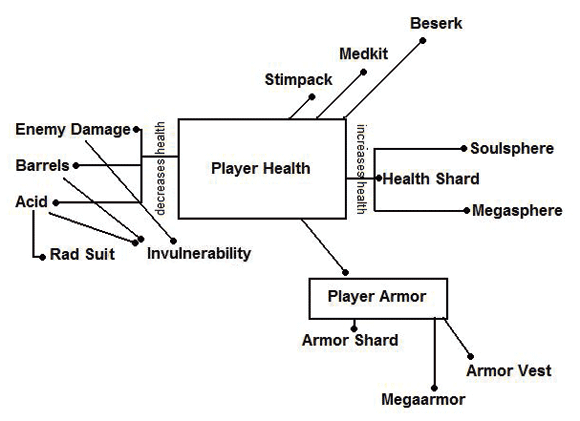
Figure 4 shows the linking sub-systems for Health in Doom II.
Three items (health shard, soul sphere, and megasphere) directly increase health, so they lay to the immediate right. Stimpacks, medkits, and berserk only increase health up to 100 percent, so in some cases, they don't increase health as well as the first three items mentioned. To indicate this, those items are represented as mostly pulling against Player Health, but also partially pulling against the reduced maximum health for those items.
Armor does not increase or decrease Player Health, but it does mitigate damage, which I have represented by allowing it to "pull" on the four damage sources. Invulnerability (and to a lesser extent, Rad Suit) play a similar role.
Linking sub-systems: Visibility (see Figure 5). When I use the term "Visibility," I literally mean what can be seen. There are three sub-systems which manipulate visibility: light, obstacles (such as walls), and aggro. Light affects whether the player can actually see something in front of them, and it is affected only by Goggles. Doors and walls block line of sight as well as prevent enemy aggro. Similarly, unspawned enemies cannot be seen.
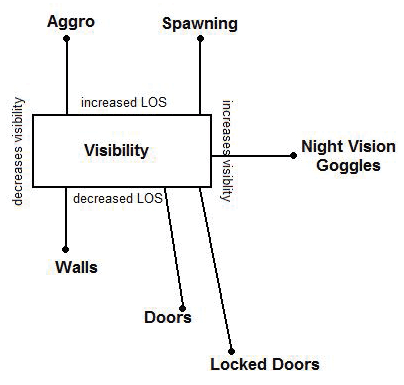
Figure 5 shows the linking sub-systems for Visibility.
So around Visibility, we have two orthogonal groupings of systems. Though they do not interact, they are linked by a common metric.
Adding Player Actions
All of the player's movement options allow us to circumvent obstacles such as walls and doors. Moving eventually leads us to victory as we navigate each level. Moving also allows us to avoid enemy projectiles (see Figure 6).
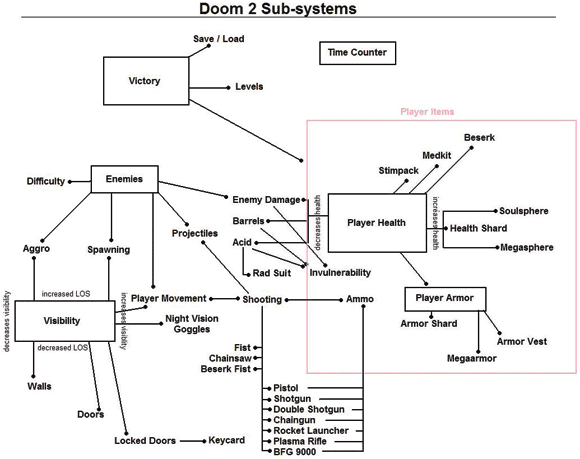
Figure 6 shows Doom II's linking sub-systems with the addition of player actions (click for full size).
Shooting can (hopefully!) reduce the enemies around us, at the expense of ammunition. I could complicate the diagram by taking into account how efficiently each weapon combats each type of enemy, but that's not strictly necessary, and would require overlapping lines or a 3D model. Since enemies in Doom II did not have any sort of resistance system, all weapons work reasonably well against most enemies.
Are We Missing Anything?
This diagram does not include any systems from the story, theme, menus, or taunts, and it ignores player expectations which might have been built-up from an overexposure to the original Doom. Those all have an important place, but they generally do not impact the central system mechanics that we are considering here. In fact, you can look at Raven Software's excellent Heretic to see how a nearly identical system design can spawn a game with an entirely different feel.
I've explained my ideas concerning system equilibrium, tension, and how to diagram the relationships between them. We've looked at a few specific examples of how adjusting one sub-system necessitates an inverse adjustment in another sub-system in order to maintain equilibrium. So how does this analysis allow a designer to anticipate and minimize risk, especially the sort of risk that tends to follow design changes made late in development?
To dig into that, we need to consider how tension on each sub-system affects a player's experience. Let's take a look at the completed diagram of Doom II's sub-systems, and make some observations:
Player Health is the sub-system under a great amount of tension.
Enemy and Player Health are linked through a wide variety of sub-systems.
Victory is relatively low-tension, compared to the rest of the sub-systems.
Visibility is relatively low-tension, and the Night Vision Goggles are probably the most obvious outlier on the diagram.
This means that changing the way health is gained or lost would undermine nearly every system in the game, and changing the behavior or treatment of enemies would be nearly as bad. Adjusting either one of these systems is exactly the sort of gigantic change that producers try to avoid by forcing designers to lock down systems as early as possible.
The tension around victory is interesting; it seems to say that defeating enemies (and thus defending your health) is a more driving goal than actually completing the level. In fact, playing Doom II without a story or level progression (that is to say, deathmatch) was arguably the best part of the game. The tension diagram helps the designer to understand that the story and linear progress are less significant to the product than the moment-to-moment systems of attack and defense.
The visibility system -- as evidenced by the tension diagram -- was a fairly forgettable element in the overall experience of Doom 2. As a designer during production, I might try to get the system cut entirely, or find a way to work it into a more central part of the experience. Consider how Looking Glass approached this in its original Thief games.
Scientific researchers talk about isolating variables in order to test them without interference from other effects. Creating a tension diagram for your game's systems will help you to identify those systems which are isolated, and are generally safe bets for redesign at any point in the project. That said, if you do have a larger systemic problem such as "the game is too hard," "the AI is cheating," or "I don't know what I should be doing to improve my skills," then a tension diagram can be an invaluable tool for determining what sub-systems might be at play, and help you to make those higher-risk design changes in as mindful a way as possible.
Of course identifying safe changes is only half the battle -- designers also need to communicate the scope of their adjustments effectively to programmers, artists, producers, and clients. The visual nature of Tension Diagrams helps here as well, since diagrams are easy to digest and easy to talk about. Engineers appreciate the compartmentalization of sub-systems, and producers love enumerating the number of pieces under revision ahead of time. Best of all, a diagram like this fits on a single page -- so people will actually read it!
Science is a collaborative process. Data must be carefully recorded, and experiments must be reproduced by independent teams. One person or one experiment can go awry, but over time, the collaborative nature of science accounts for all errors.
Art, on the other hand, is an intensely personal process. Art is driven by emotion and expression, and the value of art is determined for each individual on a case-by-case basis. Trends can appear over time, but art is fundamentally unconstrained by convention, process, or interpretation.
Game design is fascinating because it is equal parts art and science. It's dependent upon creative solutions to very difficult technical problems. Every good game contains both wholly derivative elements cribbed from other games, and unmistakably unique systems which have never been seen before.
At many times, the artistic impulses of game design exist in direct conflict to the scientific principles of what is already known. Because of this, many designers are marginalized, become rampaging tyrants, or find themselves isolated at critical moments.
My process for discussing sub-systems in terms of tension diagrams is deeply scientific because it begs for reproduction and refinement. But it does not, at the end of the day, offer any solutions to the design problems we all face. Rather, it focuses our artistic efforts on well-constrained elements in an effort to provide freedom to our artistic expression while simultaneously providing guidance through structure.
Will this process help you? I sincerely hope that it will. Game designers are very much in need of some common processes by which we can compare and contrast our efforts. Have you experimented with some similar process? Have you tried to create sub-system diagrams in the prototyping stage? I would love to expand upon this discussion with all who have read this.
Read more about:
FeaturesYou May Also Like


