Daily news, dev blogs, and stories from Game Developer straight to your inbox
Sponsored By
Deep Dive: Optimizing a fully spray-painted world in Bombing!! 2: A Graffiti Paradise
"Painting everywhere is a technically expensive thing to do, and it can be very difficult to achieve if you’re not entirely focused on it as a goal of your project."
13 Min Read
Game Developer Deep Dives are an ongoing series with the goal of shedding light on specific design, art, or technical features within a video game in order to show how seemingly simple, fundamental design decisions aren't really that simple at all.
Earlier installments cover topics such as lessons learned from ten years of development with Ingress engineering director Michael Romero, how legendary Dwarf Fortress programmer Tarn Adams updated the game for its official Steam release, and how architect and solo developer Jack Strait made an entire horror game in PowerPoint.
In this edition, indie developer Devon Wiersma takes us through the upgraded visuals of Bombing!! 2, and the optimization process they went through to get it running smoothly while still allowing the player to paint on every surface in the game.
Hello! I’m Devon Wiersma and I’m a solo indie game developer. I’ve been self-funding and self-publishing my own games as a hobby for roughly five years now, starting with tabletop RPGs and gradually working my way into larger digital projects. Currently, I’m making a game called Bombing!! 2: A Graffiti Paradise.
Bombing!! 2: A Graffiti Paradise is a creative graffiti sandbox game where 100 percent of the game world is paintable. It’s also a sequel to my previous, pared-down version of a game of the same vein called Bombing!!: A Graffiti Sandbox.
As far as I’m aware, the Bombing!! franchise is one of the few games on the market striving to make a game where you can really just paint anywhere. There are other games out there such as Kingspray Graffiti VR, SuchArt: Genius Artist Simulator, or Roblox Spray Paint which attempt to do similar, but these types of experiences frequently limit your painting to certain surfaces in the world. My goal with Bombing!! 2 has always been to make the possibility space for painting in the game world be as wide open as it can possibly be.
As I’ve worked on the Bombing!! series, I’ve slowly uncovered the reasons why other games don’t allow you to paint everywhere: as it turns out, painting everywhere is a technically expensive thing to do, and it can be very difficult to achieve if you’re not entirely focused on it as a goal of your project. In this deep dive, I’m going to outline some methods I’m using to help optimize my worlds in Bombing!! 2 to empower this paint-anywhere experience, some limitations I encountered, as well as highlight some of the struggles I’ve faced designing a game that allows players to paint all over.
Background On Bombing!!
I started building Bombing!!: A Graffiti Sandbox (or Bombing!! 1 as I call it now) as a side project informed by my own experiences making graffiti, and it shipped in 2020 as my first premium digital game I made solo, so naturally much of my experience building Bombing!! 2 was informed by my experience building the Bombing!! 1.
While Bombing!! 1 is similar in gameplay to Bombing!! 2, it was much smaller in scope, with maps only the size of a room or so and paint resolution so low that many people have likened it to creating pixel art. In Bombing!! 2, I wanted to follow this up by taking the idea and making it bigger and better in both world size and tool scope, which is where my focus on optimization came in.
For the technical side of things, Unity is the game engine the Bombing!! series is built in, alongside a plugin called “Paint in 3D” made by Carlos Wilkes (who is an amazing asset developer; I’d highly recommend checking out his work). The Bombing!! Series on the whole is highly dependent on that plugin, so you’ll see it referenced a few times throughout this piece.
Textures, Textures, Textures
Writing a texture change can be an expensive operation to run if it’s done frequently, and this compounds; the larger the resolution of the texture, the more expensive the operation gets. Every time you paint in Bombing!!, a texture receiving the paint event is getting re-written.
In Bombing!! 1, I intentionally kept texture resolutions low (~128x128px) as a stylistic and PSX-looking choice. Some users likened it to creating pixel art because the resolutions were so chunky looking, whereas some users wanted them to be higher resolution, as the limited size made it difficult to create more complex art. Ultimately, the low resolution detracted from the possibility space that freeform painting afforded the player, and I wanted to improve this in the sequel.
In Bombing!! 2 I also wanted to see how far I could really push these texture resolutions to strike a balance between texture size and performance. The challenge is that if an asset’s texture is too low then it makes the paint look too pixelated, while too high can make the paint feel too ‘sharp’ and can make rewriting textures while painting insanely expensive. Moreover, when every asset in a map uses its own texture with its own complexity, finding values which strike parity between them is key as one object’s surface might look too pixel-y while another might look too sharp if they’re not balanced correctly. It’s all about finding a balance between what looks nice and what the hardware can afford.
Getting this balance requires lots of trial and error and usually involves me testing out a bunch of different iterations on each asset I’m bringing into the game. Eventually the values which felt best to me were somewhere around 512x512 for simpler assets and 4096x4096 for larger assets. However, anything higher than 2048x2048 usually sees diminishing returns and often results in slowdown when painting on older hardware, so it rarely becomes worth it at these larger values.
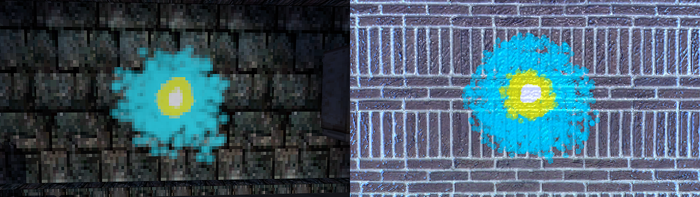
On the left, a texture from Bombing!! 1. On the right, from Bombing!! 2.
UV Unwrapping
The way Paint In 3D works is that when an asset receives a paint event, it writes to the texture at the point on an asset that it receives the event on. For example, if you paint on the pole of a Stop sign, the texture at that point on the pole will be painted. This means that an asset can’t have overlapping UV spaces or else the paint will be applied to multiple places on an asset that texture is being shared on (since the event applies to the UV space of the point of contact).
This naturally leads to a big slowdown in my asset pipeline: I source my assets from online sources like the Unity Store and Sketchfab, which frequently means I have to unwrap and rebake each asset I’m going to use in the game if it doesn’t match my specifications (which is ~90% of the time). Additionally, this means that textures in my game that are more complex are going to take up more texture space on the whole, as each piece of the texture’s UV needs to be unpacked properly to avoid strange visual glitches when painting.

I supplemented some of this work with a Blender plugin called SimpleBake which allowed me to set parameters and quickly rebake assets that aren’t UVed to my needs. It still slows down my workflow when incorporating new assets into the game, having to rebake everything, but it at least allows me to streamline the process so I’m not left doing tons of 3D work by hand.
Map Size Workflows
Bombing!! 1’s map size was tiny.
Like, really tiny.

You could see to the opposite side of most maps, and many contained no more than a handful of assets to paint on. This was something I was determined to push to the limit in Bombing!! 2, but carried a hefty share of problems along with it.
First off, when an asset is painted in Paint in 3D, it creates a new material instance for said asset, since it becomes a unique material with its own textures. This means I can’t use some built-in Unity features like Material Instancing to get away with displaying lots of materials on screen. Additionally, the more a player paints in the world, the more material instances the game needs to render individually, which ultimately means that the more objects the player paints, the more demanding it becomes to render a game scene on the whole.
When I realized that players could potentially tank their own framerate by painting too much, this was a huge stopping point for me in production as I worked out the best method to get around this limitation.
Initially, I experimented with combining map geo together into large ‘chunks’, hoping this would alleviate the number of material instances that needed to be rendered. While it did, I eventually came to the conclusion that such an approach simply wasn’t feasible for production, as the larger and more complex geometry not only resulted in lots of 3D optimization work but would also dramatically increase the required texture resolution of assets in the world and, by association, end up just being more technically demanding for me in a different way. I wanted to try and retain the ‘kit’ based approach that I used in Bombing!! 1.
This problem felt daunting, like it was going to nip my whole idea of large-scale maps for Bombing!! 2 right in the bud. However, I soon remembered a key feature I hadn’t tried using yet: Occlusion Culling.
Instead of large, complex geo, I decided to completely change my approach and try the opposite route: a workflow that consisted of lots of small, simple geo. I had dismissed it before completely due to my material instancing concerns—after all, why would I want more objects if having too many instances was the problem?—but with occlusion culling, I could limit the number of these instances that were visible, thus counteracting the problem completely.
On the left, occlusion off in Bombing!! 2, on the right, occlusion on in Bombing!! 2.
I completely forgot about occlusion culling as I rarely am in a position where I build games with scenes large or complex enough to require its use, but in this instance, it felt absolutely mandatory to prevent a user’s GPU from blowing itself up trying to render a scene.
And it worked! With proper occlusion culling settings and careful map design, I landed on a workflow of building larger maps out of a collection of individual smaller planes. So long as I limited the number of areas a player could see the entire map from, the number of materials that needed to be drawn at a time shrunk significantly, and thus allowed me to build large maps even when hundreds of material instances existed in the level.

Thanks Occlusion Culling!
Painting With Particles
Paint in 3D allows the user to paint surfaces using particle collisions, replicating behaviors like painting with aerosol spray paint or spilling paint on things. However, having many particle collisions happening on surfaces at the same time isn’t cheap and when some textures can be 4096x4096 in size there’s easily the potential for slowdown during the painting process if not handled correctly.
While particle collisions might not be exceedingly important to get right in most games, my game is catered largely towards graffiti artists who really care about the feel of spray paint. A lot of time has gone into making sure particles spray as authentically as a player might expect, as it actually has a direct effect on their level of control in the world, so it’s really important for me to get right—especially in a game where particles create paint on anything.
Unity has some limiters to prevent too many particle collisions from happening at once, but it’s a fine line if that comes at the cost of the paint not being applied to the surface as a player would expect. Too few collisions and the aerosol won’t feel responsive enough and will fail to fill in gaps players might expect it to, but too many easily results in massive slowdowns.
I got a lot of feedback after releasing the demo for Bombing!! 2 on the particle collisions—some players complained they suffered slowdown while painting due to weak hardware, while others noted there was no slowdown, but the aerosol painting wasn’t good enough. After a lot of back and forth optimizing them, I realized there wouldn’t be a clean one-size fits all solution, especially as I realized that users will have vastly different quality expectations while playing on different hardware, and on the whole, this disparity between user expectations and hardware requirements was proving to be a big step to overcome.
Instead, I opted for a different solution: Just put the balance in the hands of the player!

Rather than trying to optimize my game for a player’s unknown hardware capabilities, I introduced a gameplay setting that allows them to change how dense their aerosol spray is. This way, players can make an informed choice and test the waters with how capable their machine is, rather than force me to build for every player on a different machine.
It comes with a warning that it might affect performance and should only be done on stronger systems, but this empowered users who felt that something wasn’t quite right to experiment with the optimization themself to find a happy middle ground for their own needs.
Players still note some slowdown here and there, but on my end, it’s at least much easier to tell them to simply lower this setting than it is to try and reoptimize particle collisions for their hardware!
Save Systems
The save system in Bombing!! 1 was bad. Really bad. It was the biggest thing that needed fixing.
Paint in 3D, by default, uses Unity’s built-in PlayerPref system to save textures—I imagine because saves are such a contextual thing to each game that it’s hard to create a one-size-fits-all solution to them. Bombing!! 1 used the built-in option, which worked for my limited capabilities as a developer but resulted in me writing textures as image files for painted materials to the user’s registry.
Again, I know, it was bad. It was enough to turn some users away from playing Bombing!! 1 at all, which is totally understandable.
If a player is playing a creative painting game, there’s a baseline expectation to be able to return to a piece and work on it again after a long time. After all, that’s half the fun! Especially with larger maps and higher resolution textures planned, saving to PlayerPrefs wouldn’t work in Bombing!! 2—I wouldn’t let myself do that again.
Instead, I wrote my own system! I store a unique ID on each GameObject in the scene that can be painted and then I save a texture file to the file storage using this unique ID. While it makes for a large save size (fully painted maps can easily be upwards of 500 MB) it also allows users to copy/paste these textures to back them up or reload different versions of maps when returning to them later. Steam’s Cloud Storage is no longer an option due to size limitations, but hey, at least I’m not blowing up people’s registries this time.
Conclusion
As you can tell, I’ve had plenty of growing pains and learning points throughout production, but I’m happy with just how many unique tips and tricks I’ve learned about painting optimization through building the Bombing!! games.
Ultimately, what I love about Bombing!! is empowering people to create cool things and replicate that experience of painting graffiti from the comfort of your own home. I hope some of these considerations are helpful to transfer onto your own games, as I’d certainly love to see ‘paint anywhere’ as a style of gameplay grow to become a genre unto itself in the future.
While you’re here, Bombing!! 2: A Graffiti Paradise releases on June 27th, 2023—you can wishlist it today on Steam and play the free demo to get a taste of what it's got in store!
About the Author(s)
You May Also Like


.jpeg?width=700&auto=webp&quality=80&disable=upscale)


