

Daily news, dev blogs, and stories from Game Developer straight to your inbox
Sponsored By
Featured Blog | This community-written post highlights the best of what the game industry has to offer. Read more like it on the Game Developer Blogs.
Building a Home: How to Construct a Card Game
With a card game set featuring anywhere from 80 to 200+ cards, documentation and organization is incredibly important. In this article I explain what a card file is and provide an outline of the card game development process.
10 Min Read

Every game is (or should be) backed up by solid documentation and a production plan, and card games are no different. Below I'll outline a basic development process for creating a card game or card game expansion and explain what a card file is and how it should be filled out. Keep in mind that this article assumes that your basic mechanics are already in place - things like your resource, card draw, and combat systems.
What's a Card File?
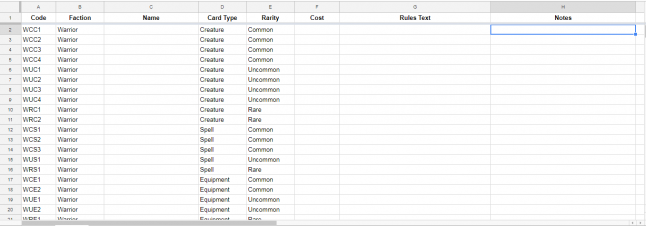
Let's get this one out of the way first. The term card file is pretty literal - it's a file that contains all of your card designs. Some groups may have proprietary software that they use, but the rest of us can make do with a spreadsheet. The tool you use is up to you and your team, but it must be:
- Easy to organize and edit
- Accessible to everyone involved in design
Personally, I just use Google Sheets. Now, before we begin, you should set up a basic sketch of your card file. Does your game have factions, like Magic's mana or Hearthstone's classes? If so, how many? And how many cards will your game have? These are question you'll have to figure out on your own, but once you do, you should evenly divide your factions. So if you have 5 factions and 100 cards, each faction should get at most 20 cards. Then, you can further break things down by card type. If you know that roughly 50% of faction A will be creatures, then 10 of its 20 cards should be creatures. Finally, you can break things down by rarity if your game has a rarity system.
 Stage 1: The Foundation
The first step in the process is all about setting up the main elements of your game or expansion, which is done mostly in the form of asking and answering questions about its identity.
1A: What's the Theme?
It's important to have a theme, because the theme is the binding agent that keeps all of the creative forces together. When on a team, it also serves to unite everyone around one central idea. A theme can be an aesthetic, like Mesoamerican mythology or Wild West. It can also be mechanical, like a set that focuses on certain creature or card types. Ideally your set should have both a mechanical and an aesthetic theme, but you can start with one and let it inform the other. You can also go back and make some adjustments to that initial card file sketch if need be.
1B: What's the Story?
If your card game has a narrative backing, now is the time to figure out what kind of narrative you'll be conveying with this batch of cards. Depending on your process, this may come directly before or directly after deciding what the theme is. You don't need to write out the whole script - just the major beats will do.
1C: What are the Mechanics?
Now that we've got a starting point with the theme and story, it's time to start exploring some mechanics. This isn't the time to settle down and make definitive decisions, but rather a time to experiment and explore. Come up with a bunch of ideas and do some paper prototypes. Talk with your team about how viable it will be to implement the mechanics and then start to do so so testing can begin
Notes on Playtesting
Speaking of testing, there's some stuff you need to keep in mind when you start to do it. For one, you don't want to focus on balance right now, which is fortunate because things will probably be a bit of a mess in that department. Rather, you want to answer a simple question: was it fun? Take note of what is and isn't fun, keeping in mind all the while that just about anything at this point can be changed. You should also see if the mechanics make sense, work the way and are played the way they're meant to, and if your theme is being appropriately expressed.
You should also try to get people of varying skill levels involved in the test. As I mentioned earlier this week, experienced players are better at parsing your game's information and might not detect the complexity-related problems that an inexperienced player would struggle with. It's also incredibly important that the design team themselves be involved in the playtesting.
During your tests, you should make sure that every card is played. It can be helpful to keep charts for this, with one column listing the card names and the other providing blank spaces for you to check off once you play the card. You should test until every card gets a check. You should also go out of your way play those unplayed cards even if they don't seem very good - the goal here isn't to win anyways.
After testing, it's time to iterate. You want to make big changes first as it's much easier to gauge their impact. You can think of it like a swinging pendulum, where big swings eventually give way to smaller adjustments that home in on the goal in the center.
As a final note on playtesting, you should be testing at least once every other week.
Stage 1 Purpose
- Unite the team around a concept
- Set goals
- Narrow down your options to a few good ones
- Boost confidence by having a plan
- Start playtesting
Stage 1 Card File Status
By the end of stage 1, I recommend filling out your commons first if you have a rarity system. Why? Because commons are the hardest cards to design. They have to be weaker and less complex than the rest of the cards, which makes them more restrictive. You may find that as a result of those restrictions, some of your mechanics don't work well or at all at common. If you don't have a rarity system, then just try to create a healthy amount of every card type. You can start playtesting immediately after the card file is filled in to this point.
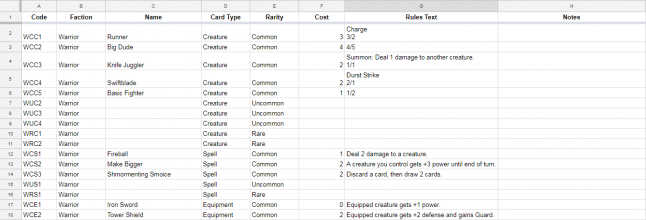 You'll note that not much thought was put into the card names. You can and should probably do a bit better than I did here, but names aren't incredibly important right now and will be changed later - we'll get to that part in a bit.
Stage 2: The Piping
So by this point you've designed your commons and maybe a few uncommons and you've done enough playtesting to have an idea of what is and isn't working out. You've tossed out all unneeded things and are left with just a few puzzle pieces. Now it's time to see how they fit together. This is also where you start hooking in other components, like the art and writing teams.
While Stage 1 had a clearly defined and linear process, stage 2 is just a repeating cycle of testing and iteration. This is where you'll be doing must of your playtesting and refining. You'll probably want to ramp up your testing to once per week.
Stage 2 Purpose
- Refine previously discovered mechanics
- Fill in gaps
- Reveal and review problem points
- Begin to integrate art and writing
Stage 2 Card File Status
At the end of stage 2 you should have a full card file. Not a finished one - just a full one. You can still replace entire cards here and there, but by the end of the stage those large changes should give way to small adjustments.
Stage 3: The Drywall
This is when you start to wrap things up on the design end and seal everything up into a single package. This is also where you go from focusing on design problems to focusing on balancing problems. Personally, I strongly prefer having separate design and balancing teams. They're different skill sets, so having two teams allows you to staff those teams in a more appropriate way. It also can produce less biased results, as the designers by this point may have gone balance-blind by playing with the same cards for so long. If you do have separate teams, halfway through this stage is when the design team hands off the file to the balance team.
Final Design
Let's assume that you follow my advice and have separate design and balancing teams. If that's the case, then this stage has two steps. For the first half, your focus is on wrapping up the design work. To do this you'll want to bring in some people from the balancing team to review your work and point out some initial problem areas that you can resolve while you still have the card file. Aside from that, you're just polishing and refining everything. This is the point where it's okay to get a little lost in the weeds.
This is also the point where your communications with the art and writing teams should become much more specific. You're not just talking about big-picture things like story sketches and setting. This is also the point where your art commission effort is running at full force and your writing team is assigning cards semi-final names and flavor text.
Balancing
This is where you hand off the card file and let the balance team take things over. If you've got another set lined up, you can start to shift designers over to it while leaving a few on the current set to interface with the balance team. By the end of this process, you should have a complete card file.
Oh, and don't forget to celebrate! Seriously, don't. From a managerial perspective, it's important to let everyone know that their hard work is appreciated. Celebrating also serves as a good progress marker and palette cleanser that really drives home the fact that you've finished your work on the project and can jump into the next one.
Stage 3 Purpose
- Make final changes
- Add final art and writing
- Fine-tune balancing
- Finish the game
Stage 3 Card File Status
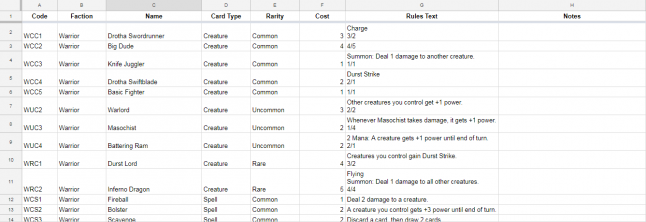
You start this stage with the complete card file from Stage 2, and you end it with a very similar but more polished card file. The file has been through the wash and it came out sparkly clean and ready to ship.
Note that it can be helpful to leave a few unused cards in the file at the end of Stage 2. Though the focus is on balancing, the balance team may uncover some big problems here that necessitate the complete removal of some cards. Having some honorable mentions waiting in the wings can make this process a lot less painful.
Stage 4: The Decor
This stage may be optional depending on how much time and money you have. I mentioned at the end of Final Design in Stage 3 that that's when you start to add in final art and writing. Cards will still change during the balancing process. Every once and a while you might even add completely new cards. The art team has to be agile here and respond to those changes, but it can still result in unused art and wasted money. To avoid this, you might wait until the end of the balancing process to dive into the art and writing. If you do, it takes the form of this optional Stage 4. Design isn't really even involved at this point and they've probably moved on to the next project. But if you've got enough resources and have a solid pipeline worked out, this stage should be unnecessary.
Stage 4 Purpose
- Add final art and writing
A Goodly Home
I hope this article has you given some ideas for how to structure your card game design process, but I also hope that it's shown you what kind of scope you have to deal with when designing a card game. Designing hundreds of cards and making them all live in harmony requires a lot of work and a lot of patience, but the reward is well worth it. Good luck, and have fun!
Read more about:
Featured BlogsAbout the Author(s)
You May Also Like


