


Trending
Opinion: How will Project 2025 impact game developers?
The Heritage Foundation's manifesto for the possible next administration could do great harm to many, including large portions of the game development community.
In this detailed design article, Blue Castle (Dead Rising 2) level design director Bridge examines how you design memorable, tactical combat areas for first/third-person shooter games.

[In this detailed design article, Blue Castle (Dead Rising 2) level design director Josh Bridge examines how you design memorable, tactical combat areas for first/third-person shooter games.]
The following is an attempt to identify, name and describe the key ingredients to necessary for typical cover-based video game shooter. Usually in a shooter, the core gameplay revolves around living long enough to kill what is threatening you or impeding your progress.
The challenge is to present this small amount of gameplay in new and exciting ways so that the player is compelled to sit through and play all the way to the end... and hopefully want to play the sequel.
It should also be noted that the following is focused solely on the areas of combat within a level, and should not to be misinterpreted as the sole ingredient needed for an entire level's design.
The Combat Zone is a reference to the area of gameplay within a level designated for battle. This is a broad term and doesn't necessarily imply explicit, physical boundaries... though in some cases it can. In either case, the LD creates areas of expected battle with various gameplay support; enemies, cover objects, destructibles, impassable points, flanking positions, etc. The layout and placement carries the expectation that the player will have to battle through the area -- in essence, the presentation of the core gameplay.
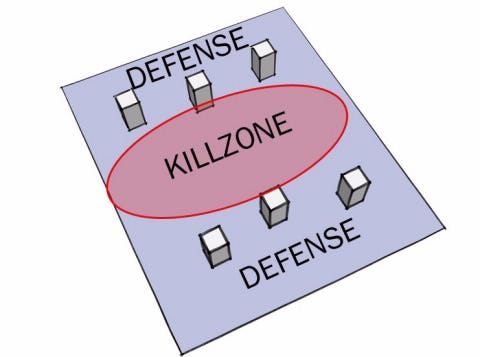
The Kill Zone
Defined as the area in which the player and/or AI is without cover and can be fired directly upon, and potentially killed. This area can be visible (landmines on the ground) or virtual (tracer fire). The effectiveness of the design here determines the difficulty of the firefight. Without an effective Kill Zone, the player doesn't need cover, and eliminates one of the key ingredients intended for gameplay.
Defensive Cover
The required companion to a Kill Zone. There should be areas in which the player and/or AI is protected from direct fire. Without this, the experience boils down to shoot or be shot. Cover has a huge impact on play styles and difficulty, which I will go into a bit further on.
Play Your Way
Players should be able to play the way THEY want to. Why? It allows for a more creative experience, something that players will likely want to come back to again. Limiting the player to one path and play style over and over again gets tiresome; variety is key to keeping the player engaged.
Everyone has a preferred play style in shooters:
Run and Gun - guns blazing, shooting everything on sight as they usually stick to the most obvious play path.
Ninja - climbing up and jumping across everything or sneaking around through small passages that are discovered; they usually avoid the most obvious play path.
Camper - loves to hang back in safe spot and snipe from as far away as possible before moving in.
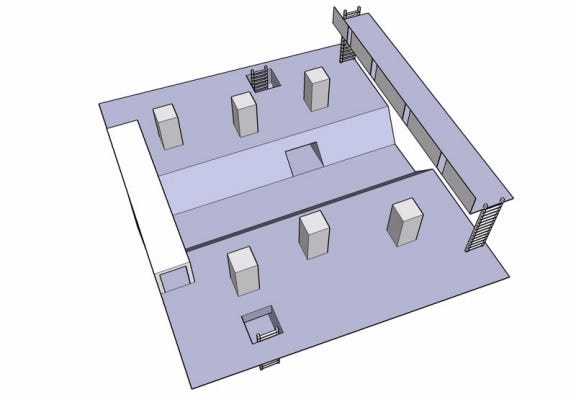
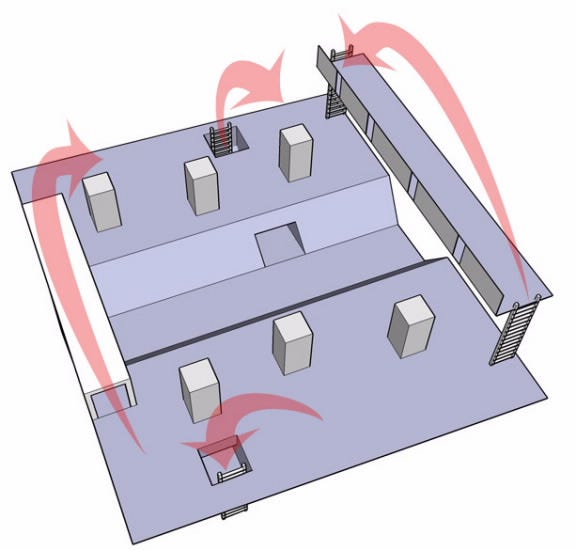
In the above level mock-up are examples of multiple play paths that accommodate these styles:
The Run and Gunner will likely shoot their way across the trench, taking cover only when necessary.
The Ninja will likely climb up and jump across all the cover objects, making their way across the playfield.
The Camper will likely look for a safe spot atop the catwalk to snipe the enemies from afar.
Focusing on accommodating each one of these play styles in each Combat Zone isn't easy and based on experience really should be planned from the beginning. However, this element is critical to getting out of the linear/scripted old school way of designing levels.
When you think you are about done with your napkin sketch, ask yourself:
Is there way to circle the enemy undetected?
Can the player climb under and over enemies?
Can the player have a variety of cover options?
Does the player have to crouch?
Can the player navigate the space by jumping from object to object?
Is It Obvious?
Giving the player multiple choices and paths within a Combat Zone lends to openness and freedom. But, all is for not if the player can't see it. Avoid trying to hide alternate routes and options; everything should be obvious!
Sell the player on the paths by:
Face the player: Show the player their options as soon as possible. Guiding the player with a more restrictive path at the entrance to a combat zone increases the odds that they will be facing the right direction.
Note: the paths don't necessarily need to be restricted with immovable static mesh. Players can be guided with hazards of moveable objects to encourage the direction they should move. Some players will ignore this and push forward, but the majority will follow and avoid trying to push through.
Metrics: be consistent with path widths and angles. Narrow and steep approaches look uninviting and are not obvious.
Lighting/FX: 'god rays' or glowing fireflies that highlight a tunnel or ladder.
Pawns: spawn some non-lethal pawns to attract the player's attention.
No More Tubes!
Most common, and easiest to produce are flat layouts with odd pieces of cover. These are possibly okay as an early training level, but boring and "been there" through the course of the entire game. The challenge is to create layouts that offer a variety of angles and directions for the player to shoot from and take advantage of the fact that the world is 3D.
Cover is a key component of a shooter for obvious reasons. But, before you dismiss it as something that just 'happens' when the level is decorated, be sure that you understand what types and how placement directly affects the player's experience.
Fiction and Story - Unorthodox Cover
F@#$#!!@G CRATES!?!?!?
Repeating crates are a great indication that the team has run out of ideas. They work if the fiction supports it (a crate warehouse!), but should be avoided. Great cover ideally doesn't stand out and yell:
"Hey, look at me! I am the token cover object for the battle that is about to start as soon as you hit that invisible trigger!"
By using the same looking, sized, and shaped cover objects throughout a level the player starts to see the game and not the world. The player can see the Combat Zone coming. This is especially nasty when the cover objects don't really match the fiction of the area... like crates in the jungle.
Everything has to make sense. When designing a Combat Zone, it is critical to use the fiction of the area to inspire what objects will be placed on the play floor, and how they can be used as cover. This needs to be a part of your napkin sketch plan, as it is symbiotic to the environment your level is within.
Flank!
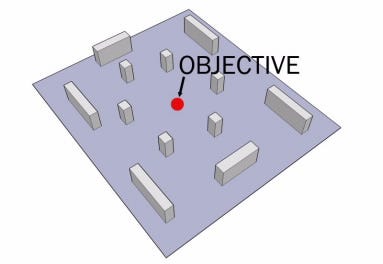
Players want to feel like a big badass that can outsmart the "stupid game". Giving the player the ability to outsmart AI by flanking the Kill Zone and Defensive Cover is key. Plan for ways that the player can get the perk of feeling like a hero that outsmarted the enemy.
The image above indicates a few ways a player could approach flanking the enemy within the example layout.
Relation to Difficulty
Cover is critical to controlling the difficulty of a Combat Zone. Taking into account the level Intensity and Difficulty Beats, your Combat Zone should reflect this.
Control cover difficulty by taking the following into account:
Amount: More cover means more protection from enemy fire and more opportunities to sneak around and pop an enemy. Less results in a larger and more deadly Kill Zone that ups the challenge.
Spacing: Player speed is key to spacing, so ensure that you are well versed in our metrics. Cover that is spaced further than the player can sprint makes for a risky run through the Kill Zone. Cover that allows the player to connect jumps facilitates a layered Ninja path.
Size and Height: Big and wide offers ample cover while a narrow tree exposes the player to multiple lines of fire. Forcing the player to crouch behind a stump is tough than just running and standing behind a wall.
Density: A cluster of small trees breaks sight lines, but not shots fired.
Temporary: Destructible cover leads to no cover and exposes the player to the Kill Zone.
Leverage the above intelligently following your Intensity and Difficulty Beats, so that your Combat Zones challenge the player in a variety of deliberate ways.
Layering refers to having multiple layers of game play surfaces stacked on top of each other. Layered Combat Zones are critical to supporting the above mentioned play styles. Layers need to be planned in your Napkin Sketch as the environment needs to justify it. Catwalks in the jungle, anyone?
The image below is an example of layered Combat Zone.

Verticality refers to a Combat Zone that is built vertically vs. horizontally. The challenge is focused on moving through the space vertically with lots of emphasis on climbing/jumping, which makes for a challenge that is focused on traversing a space. Couple that with combat, and it dramatically increases the difficulty.
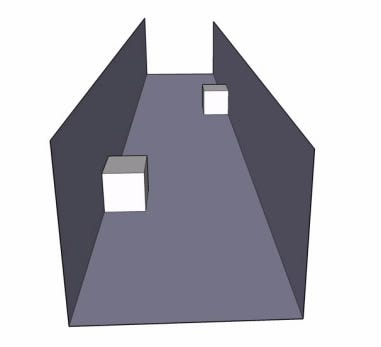
There are two main types of Combat Zone layouts; those that feature explicit bottlenecks, referred to as Choke Points, in which the player has to cross and overcome a deadly Kill Zone which I refer to as "defined". Note the image below; it features a few paths that all choke at the same point.

The second layout type is referred to as "freeform", where the choke point isn't explicit. The resulting experience is more "loose" as the Kill Zone could come together at various areas within the Combat Zone depending the player's approach.
Switching it up
Is it possible to design a Combat Zone that starts off as freeform, and then becomes defined -- and vice versa? The switch could be an exciting component and make for a memorable battle.
Why is there a crate in the middle of the jungle?
Everything in the area needs to be justified and fit the fiction of the world. Research and gather reference to ground your design layouts. Take into account:
Where in the overall world map is this area?
Is it old or new?
Why are these objects here?
Is there a waterway (stream/river/dried up river bed)
Was the area cleared or is it naturally dense?
Have the trees been cut down?
How do people get in and out of the area?
To re-enforce the suspension of disbelief, the layout should be believable. There are a few ways to help support this:
Functionality: As opposed to randomly placing objects and structures to serve the need for an effective Combat Zone, keep in mind that the layout has to technically be functional and ultimately believable. For example, if it is some sort of storage warehouse, then how do items get loaded and unloaded? Can everything fit through the doorways?
History: How long has this area existed? If it is old, does the layout reflect this (broken/disarray)? Thinking through the history of the layout helps to feed ideas about structures and their state. If it is an old area, could you just walk in through the front door? Is it overgrown? Is it broken? Maybe another way in through a collapsed part of a perimeter wall would fit better with the age of the layout.
Mini-story: Nothing breaks the illusion more than enemies that are mindlessly patrolling obvious loops or standing and idling (read: waiting to be killed). What is their role? What should they be doing when you enter the area? If they just arrived are they setting up camp and unloading? If they have been there for a while, what do they do to kill time?
The idea is to create a believable environment that simply isn't a random assembly of objects strictly serving the purpose of creating an effective Combat Zone.
Kill Zone on the move
As the player gets used to the concept of a Kill Zone, the game play still runs the risk of becoming stale if each Combat Zone feels as predictable and static as the last. This is especially true if the player is simply 'pop and shooting' from the sort of Defensive Zone throughout the course of the fight.
Designing Kill Zones that change angles and positions forces the player to find a new Defensive Zone. This helps to create the impression of a dynamic world along believably intelligent AI.
Ways that this can be achieved:
Stage alternate positions in which reinforcements enter the Combat Zone so that players are not mowing down enemies one after another from the same angle.
Note that this should be an event that this presented to the player.
Destructible element changes the playfield; great if it is a gameplay object that the player is aware of.
AI 'fallback' and 'charge'; the Kill Zone moving forward and back within the Combat Zone depending if the player is whittling their numbers down (AI fallback), or if there has been a standoff for sometime (AI charge)
Risk and reward
There is nothing wrong with letting the player feel empowered, even if it is for a short period of time. The hunted becoming the hunter for a short period of time armed to the teeth; not unlike Pac-Man eating a power pellet.
Within the layout, consider the placement of objects/items that would give the player a huge advantage in the battle. For example; an RPG with a few shots prominently displayed in the middle of the Kill Zone; the player can then choose to stay put and play it safe, or try risking his life sprint out and dive for the RPG.
Last but most importantly of all is planning for ways to stage the Combat Zone in a way that they stand out from each other. The level designer is faced with the challenge of presenting the same gameplay that, end-to-end, maybe lasts less than 30 seconds -- over the course of a 10+ hour experience.
Even with the understanding of what is needed to support a fun and engaging combat experience, pushing further on adding variety to the core combat experience is needed to extend the experience.
Adding a Twist - Unique Staging
Consider the elements that make up the core mechanics and challenge the player on one or more. The player can:
See
Move
Shoot
Take cover
Hear
Get Hurt
By either giving the player a positive perk for one or a negative perk can help to create a memorable experience.
With that in mind a negative perk could be an area that is filled with thick smoke that limits the player's ability to see. Or having a stampede of massive dinosaurs creates areas that cause damage and slow the player's movement.
Positive perks also give the player a memorable twist to the combat experience. A moment where the player comes across a huge pile of explosives as they are suddenly attacked by a hoard of dinosaurs give the player the chance to blow up and gib till the heart's content.
It all starts with the Napkin Sketch; plan for these key elements early on.
Ask yourself: "What will players remember about this battle that is different than others?"
Read more about:
FeaturesYou May Also Like


